


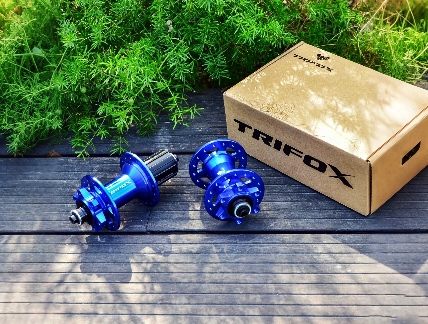
When it comes to mountain bike performance, the hub is one of the most critical yet often overlooked components. While riders frequently focus on upgrading frames or suspension, the humble hub plays a vital role in how your bike accelerates, maintains speed, and handles technical terrain. If you're experiencing any of these five issues, it might be time to consider the Trifox M827 Mountain Bike Hub for your next upgrade.1. Poor Engagement and Power LossModern mountain bike hubs feature high engagement points for instant power transfer. If you're experiencing noticeable delay between pedaling and drive response, or feeling like your power isn't translating immediately to forward motion, your hub's internal mechanism may be worn out. The Trifox M827 hub with its precise 54-tooth engagement system ensures immediate power transfer, making it ideal for technical climbs and sudden acceleration.2. Unusual Noises During RidingWhile some hub noise is normal, new or increasingly loud sounds often indicate problems. Grinding, crunching, or irregular clicking noises suggest that bearings may be contaminated or internal mechanisms are failing. The M827 MTB hub features sealed bearings and precision machining to provide smooth, quiet operation in all riding conditions.3. Visible Play or Wobble in the WheelIf you can feel or see side-to-side movement in your wheel when it's securely mounted, this indicates hub bearing wear. This play affects riding stability and can lead to unsafe handling. The Trifox bike hub is engineered with superior bearing seals and precise tolerances to eliminate play while maintaining smooth rotation.4. Rough Rotation and Increased DragA properly functioning hub should allow the wheel to spin freely with minimal resistance. If your wheel stops spinning quickly or feels rough when rotating, the bearings may be damaged. This friction creates drag that slows you down. The M827 mountain bike hub features low-friction seals and high-quality bearings to maintain smooth spinning and reduce rotational drag.5. Frequent Maintenance RequirementsHigh-quality hubs are designed to require minimal maintenance. If you find yourself constantly adjusting or repairing your current hub, it's likely reaching the end of its service life. The Trifox M827 is built for durability with minimal maintenance requirements, saving you time and frustration while providing reliable performance ride after ride.Why Choose Trifox M827 Hub?The Trifox M827 Mountain Bike Hub represents the perfect balance of performance, reliability, and value. With its 54-tooth rapid engagement mechanism, sealed bearing system, and lightweight construction, it delivers professional-level performance for serious riders. Whether you're tackling technical cross-country trails or aggressive all-mountain routes, this hub provides the instant engagement and reliable performance you need.Compatible with most modern mountain bike standards and available in multiple axle configurations, the M827 makes an excellent upgrade for riders looking to improve their bike's performance without breaking the bank. The hub's durable construction ensures it can handle the demands of aggressive trail riding while maintaining smooth operation.Don't let an aging hub limit your riding potential. Recognizing these five signs early will help you maintain optimal performance and get the most from your mountain bike. Upgrading to the Trifox M827 Mountain Bike Hub is one of the most cost-effective ways to transform your bike's responsiveness and reliability. Experience the difference that quality engineering makes in your next ride.
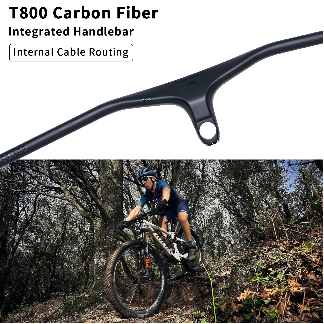
Let's be honest. Are you tired of looking down at your mountain bike bars only to see a tangled nest of shift and brake cables? Not only does it look messy, but those exposed cables can snag on branches, collect grime, and create annoying cable rub on your precious head tube. What if there was a solution? What if you could achieve a sleek, minimalist front end that looks like it belongs on a concept bike? Enter the Trifox RHB600 Ultra-Light Integrated Full Inner Mountain Bike Handlebar. This one-piece carbon fiber handlebar promises the clean look we crave. But is it the real deal? Let's dive in. What Are Integrated Carbon Handlebars? Traditional mountain bike handlebars are a two-piece system: a bar and a separate stem. Cables are typically routed externally, or at best, enter the frame but still loop around the head tube. An integrated handlebar, like the Trifox RHB600, changes everything. It's a single, unified component crafted from carbon fiber, where the bar and stem are one. Its defining feature is full internal routing—channels are molded directly into the structure, allowing brake hoses and shift cables to run completely through the bar and stem, disappearing from view entirely. Are These the Cleanest Mountain Bike Bars? Analyzing the Trifox RHB600 So, does the Trifox RHB600 live up to its promise of a pristine cockpit? The evidence points to a resounding yes. 1. The "Wow" Factor of a Clean Cockpit: The most immediate benefit is the stunning visual upgrade. With all cables seamlessly routed inside the integrated carbon bar, the front of your bike looks fast, modern, and professional. It’s a level of clean that is simply impossible to achieve with traditional components. 2. Aerodynamics (Yes, on a MTB!): While not the primary goal on the trail, reducing cable clutter marginally improves airflow. Every little bit counts when you're chasing speed. 3. Protected Cables: By tucking them away inside the bar, you shield your crucial brake and shift lines from the elements—mud, dust, and moisture—which can contribute to longer component life and more consistent performance. 4. Ultra-Lightweight: Made from high-modulus carbon fiber, the RHB600 is engineered to be exceptionally light. Reducing weight at the cockpit, the most manipulated part of the bike, enhances handling agility and makes the bike feel more responsive. 5.The Installation Consideration: It's important to be upfront. Installing a full inner routing handlebar is more complex than a traditional bar. It requires patience and the right tools, like a hydraulic hose kit for brakes. For many, the unparalleled clean look is well worth the extra effort during the initial build or professional installation. Who Is This Ultimate Clean Cockpit For? The Trifox RHB600 is the perfect upgrade for: The Weight-Weenie: Seeking every gram savings without sacrificing strength. The Aesthetic Perfectionist: Who believes a clean bike is a fast bike and takes pride in a flawless build. The Tech-Savvy Trail Rider: Who appreciates modern engineering and the functional benefits of protected cables. The Upgrader: Looking for a single component that will dramatically transform the look and feel of their modern mountain bike. The Verdict on Cleanliness So, back to our original question: Are These the Cleanest Mountain Bike Bars? If your definition of "clean" is a cockpit completely free of visual cable clutter, then the answer is a definitive yes. The Trifox RHB600 achieves a level of minimalist perfection that sets a new standard. It combines the weight savings and stiffness of carbon fiber with the sleek, professional finish of full internal routing. While it demands a more meticulous installation, the payoff is a breathtakingly clean front end that enhances aesthetics, offers subtle performance benefits, and gives you the pride of owning a bike that looks as high-performance as it rides.
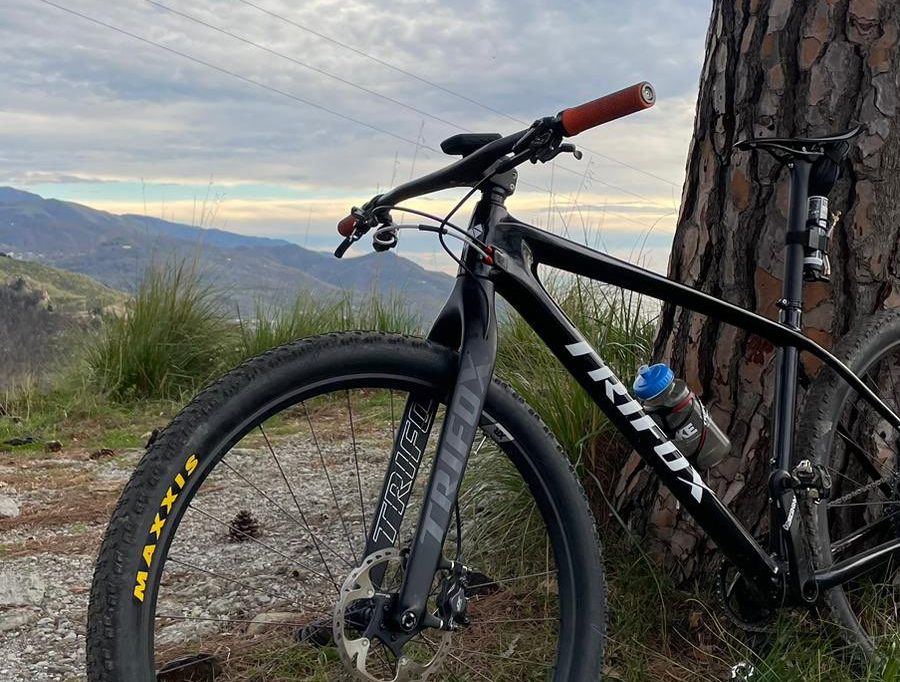
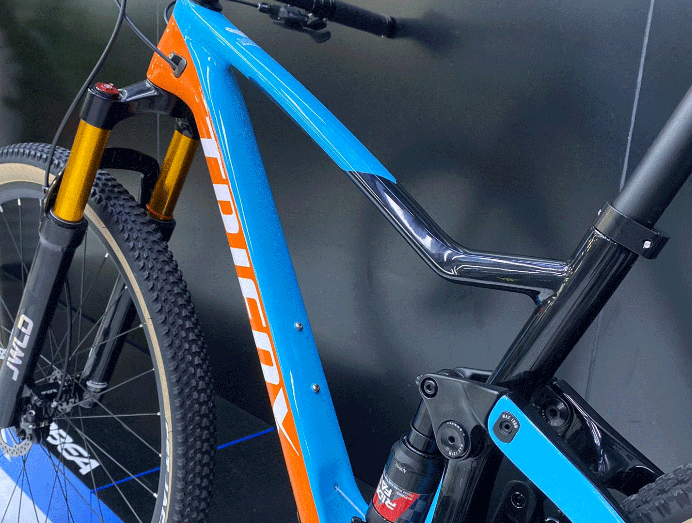
In the world of mountain biking, agility reigns supreme. Whether carving through singletrack or tackling technical descents, responsiveness and control define your ride. The secret to unlocking next-level off-road performance lies in two innovations: an ultralight carbon MTB frame and a Boost fork. Together, they create a synergy that elevates speed, precision, and confidence on any trail. Ultralight Carbon Frame: The Backbone of Speed Carbon fiber's magic lies in its strength-to-weight ratio. Trifox’s SDY20 frame exemplifies this, shedding grams without sacrificing durability. A lighter bike accelerates faster, climbs easier, and flicks through tight turns effortlessly. Carbon’s natural vibration damping also enhances comfort, reducing fatigue on long rides. But the real win is stiffness—optimal torsional rigidity ensures every watt of power translates to forward motion, while compliant seatstays absorb trail chatter for better traction. Boost Fork: Precision Meets Stability The Boost standard (110mm front axle spacing) isn’t just a buzzword—it’s a game-changer. Wider hub spacing increases wheel stiffness, preventing flex during hard cornering or rock strikes. This means sharper steering response and unwavering control in loose terrain. Paired with a lightweight carbon frame, the Boost fork ensures your front wheel tracks true, boosting confidence on steep descents and technical climbs. The Dynamic Duo Combine the SDY20's featherlight frame with a Boost fork, and agility reaches new heights. The frame's nimble character complements the fork’s stability, creating a bike that’s both quick and composed. Tight switchbacks? Effortless. Rocky descents? Unshakable. This pairing reduces rider fatigue, letting you push harder for longer. For riders seeking an edge, Trifox’s SDY20 merges cutting-edge materials and smart engineering. It's not just about weight or stiffness—it’s how these elements harmonize to redefine off-road agility.
1. Promote cardiopulmonary health. Cycling, like running, is a very typical aerobic exercise. The biggest benefit of aerobic exercise is that it can enhance cardiopulmonary function. And during cycling, we need to breathe evenly to ensure the intake of oxygen. Increase lung capacity. Therefore, cycling is a good form of exercise to promote cardiorespiratory fitness. 2. Reduce the incidence of cardiovascular and cerebrovascular diseases. Cycling for a long time can increase the amount of hemoglobin in the body, improve the body's resistance, resist aging, improve the work efficiency of the cerebral cortex, and reduce the incidence of cardiovascular and cerebrovascular diseases. 3. Lose weight and relieve stress. Losing weight should be an eternal topic that we pursue. Because we sit in the office for a long time, cannot exercise, and face the computer for a long time, our shoulders and necks are sore, making each of us feel exhausted after work. Cycling can effectively alleviate this problem. Regular cycling is not only a good way to lose weight, but also because when riding, we need to look up at the road ahead, so that the cervical spine problems of those of us with bowed heads can also be effectively alleviated. Long-term persistence can not only achieve the effect of weight loss, but also relieve our tense muscles and relieve fatigue. 4. Shape muscles. Cycling can not only lose weight, but also improve and shape muscles, especially the lower body, calves, thighs and buttocks. 5. Relax your mind. Cycling is one of the few sports that allows you to free your mind while engaging in activities. When we are mentally exhausted or depressed, riding a bicycle on a beautiful road can relieve our entire depressed mood. Therefore, regular cycling is beneficial to reducing psychological stress and preventing depression. 6. Prevent high blood pressure. Cycling can prevent high blood pressure. Exercise can speed up blood circulation and reduce blood vessel pressure. It can also prevent hardening of blood vessels and achieve the purpose of lowering blood pressure. 7. Low-carbon and environmentally friendly, cycling can effectively reduce the use of bicycles, reduce exhaust emissions, alleviate air pollution, and at the same time reduce the use of cars, making roads less congested and smoother. 8. Increase oxygen intake. Cycling aerobic exercise can absorb enough oxygen and is an effective exercise to burn accumulated fat. 9. Anti-aging. We can find that cycling is a whole-body exercise. Both hands must hold the handlebars, and the feet must alternately pedal to move forward. The eyes must look ahead and the surrounding environment. Therefore, during the riding process, not only the body is exercised, but also the whole body is exercised. It improves coordination and trains people's reaction speed, so it can prevent aging. 10. Time freedom. As long as we want to ride, we can do it on the way to and from get off work, on weekends, etc., without having to worry about queues at the gym.
Mountain biking is a thrilling adventure sport that demands high-performance bikes to take on challenging terrain. When it comes to choosing the right mountain bike, there are many factors to consider, such as the frame, suspension, speed, and braking system. Currently, the trend is shifting towards disc brake bikes due to their superior stopping power and durability. One of the best options in the market is Trifox Carbon Fiber Mountain PIONEER Bicycle, equipped with the latest technology, including high-quality disc brakes. Let's see why the Trifox Carbon Fiber Mountain PIONEER Bicycle is the best choice for disc brake mountain bikes. 1. Superior Stopping Power: One of the major advantages of disc brakes is their superior stopping power compared to rim brakes. Disc brakes use calipers to grip a rotor instead of pressing against a rim, which increases the mechanical advantage and stopping power. Trifox Carbon Fiber Mountain PIONEER Bicycle has hydraulic disc brakes from Shimano, a leading brand in the biking industry. These brakes are easy to operate and offer responsive stopping power in all weather conditions. 2. Easy to Control: Disc brakes offer better control and modulation than rim brakes. The rider can apply brakes with greater precision and finesse, enabling them to maintain speed and stability on challenging terrain. In contrast, rim brakes can overheat, warp, or fail in wet conditions. Trifox Carbon Fiber Mountain PIONEER Bicycle's Shimano hydraulic disc brakes provide excellent control, allowing riders to navigate steep descents confidently. 3. Low Maintenance: Disc brakes are low maintenance compared to rim brakes. Rim brakes require frequent adjustment, replacement, and servicing due to wear and tear caused by road debris and weather conditions. Disc brakes, on the other hand, are self-adjusting and require minimal maintenance. They also offer consistent braking performance over a broader range of temperatures and terrain. Trifox Carbon Fiber Mountain PIONEER Bicycle's Shimano hydraulic disc brakes are durable and require little maintenance. 4. Durability: Disc brakes offer exceptional durability compared to rim brakes. Rim brakes can wear down the sidewalls of the rim, leading to rim failure, especially on long descents. Disc brakes, on the other hand, don't wear out the rims, reducing the risk of rim failure. Trifox Carbon Fiber Mountain PIONEER Bicycle's Shimano hydraulic disc brakes are built to last, ensuring that riders can enjoy smooth and responsive stopping power for years to come. 5. Optimal Performance: Disc brakes offer optimal performance on challenging terrain due to their superior stopping power and control. Trifox Carbon Fiber Mountain PIONEER Bicycle is built with a full suspension carbon frame that provides exceptional shock absorption, allowing riders to maintain speed and stability on the most challenging terrains. Along with the Shimano hydraulic disc brakes, the bike's SHIMANO M6100 12speeds and strong shock absorption make the Trifox Carbon Fiber Mountain PIONEER Bicycle the best choice for disc brake mountain bikes in the market. Conclusion: The Trifox Carbon Fiber Mountain PIONEER Bicycle is an exceptional mountain bike that offers superior performance and durability, especially in challenging terrains. Equipped with Shimano hydraulic disc brakes, the bike provides exceptional stopping power, control, and low maintenance. Along with the full suspension carbon frame, Shimano 12speeds, and strong shock absorption, the bike offers optimal performance for mountain bikers of all skill levels. When it comes to choosing the best disc brake mountain bike, the Trifox Carbon Fiber Mountain PIONEER Bicycle is the perfect choice for those seeking adventure and high-performance biking.
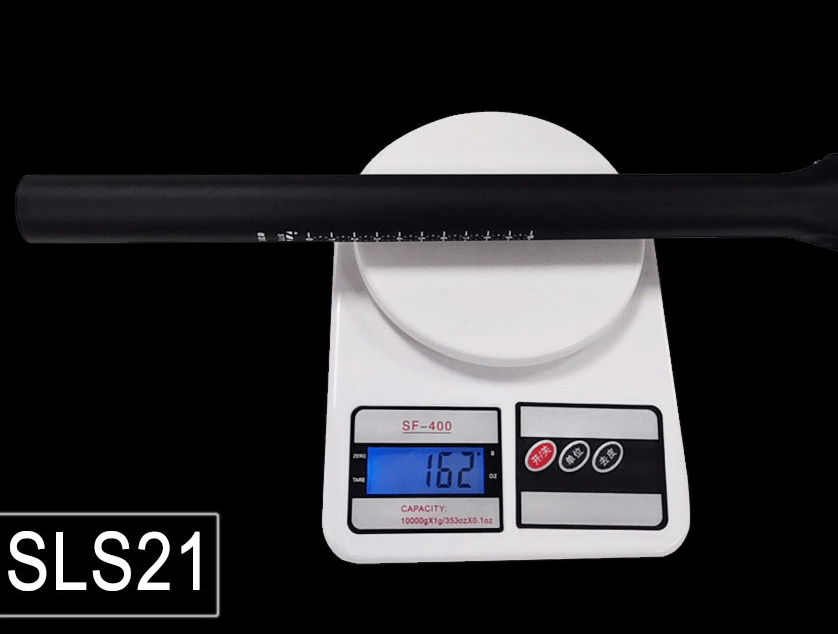
As a cyclist, you're always on the lookout for ways to improve your ride. If you're looking for a way to make your bike even lighter, an ultralight seatpost could be the answer. In this blog post, we'll discuss why an ultralight seatpost is worth investing in and the benefits it can provide for your cycling experience. 1. Weight savings One of the main reasons to choose an ultralight seatpost is weight savings. By swapping out your heavy seatpost for a lighter one, you can shave off a few extra ounces or even grams from your bike's overall weight. While this might not seem like a lot, every little bit counts when it comes to endurance and performance cycling. The Trifox Super Light Straight Carbon Seatpost SLS21 mentioned above is a great option for those looking to reduce their bike's weight. 2. Improved handling Another benefit of an ultralight seatpost is improved handling. Since the seatpost is one of the most important contact points between you and your bike, any improvements made to its weight or stiffness can affect how the bike handles. An ultralight seatpost can help you feel more connected to your bike, providing a more responsive and stable ride. 3. Increased comfort While an ultralight seatpost can improve handling, it can also increase comfort. The use of carbon fiber makes these seatposts more flexible and able to absorb more vibrations than their heavier counterparts. This results in a smoother and more comfortable ride, especially on rough terrain. The Trifox Super Light Straight Carbon Seatpost SLS21 comes with a length of 400mm, which can further enhance rider comfort. 4. Durable and long-lasting Despite being lightweight, top-quality ultralight seatposts like the Trifox Super Light Straight Carbon Seatpost SLS21 mentioned earlier in this blog post are incredibly durable and long-lasting. They can withstand a lot of wear and tear and are highly resistant to damage from impact or vibration. Investing in a high-quality ultralight seatpost can save you money in the long run by reducing the need for frequent replacements or repairs. 5. Aesthetically pleasing Finally, an ultralight seatpost can add a sleek and stylish look to your bike. The matte finish of the Trifox Super Light Straight Carbon Seatpost SLS21, for instance, complements the black color and enhances the overall aesthetics of the bike. It's a small detail that can make a big impact on how your bike looks and feels. Conclusion: Choosing an ultralight seatpost can provide several benefits for your cycling experience, including weight savings, improved handling, increased comfort, durability, and aesthetic appeal. While they might be more expensive than traditional seatposts, the long-term benefits make them a worthwhile investment. So, if you're looking to take your cycling experience to the next level, consider upgrading to an ultralight seatpost today!
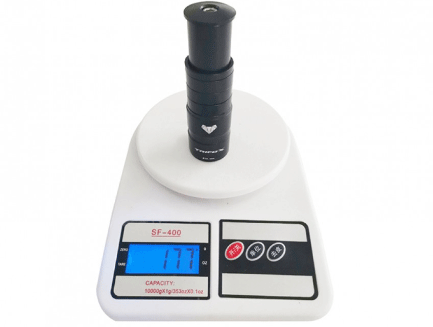
Bicycling has been a popular sport and means of transportation for centuries. However, with different types of bicycles and riding styles, you need to ensure that your ride is comfortable, stable, and efficient. One way to achieve this is by getting a stem extender, an accessory designed to raise your handlebars. You may be hesitant to invest in one, but with the benefits it offers, it's worth considering. 1. Improves Comfort and Ergonomics If you've ever experienced neck, shoulder, or back pain during or after a ride, then you understand the importance of proper positioning on a bike. With a stem extender, you can raise the handlebars to a suitable height, ensuring that you don't experience discomfort. Additionally, a higher handlebar position will help you maintain a more upright posture, preventing you from experiencing numbness in the hands and fingers. 2. Enhances Control and Stability When you ride your bike in a relaxed position, you can maneuver your bike with ease, allowing you to take on different terrains. With a stem extender, you can achieve a relaxed and comfortable posture, enabling you to ride with control and stability. You'll be able to ride longer distances without experiencing strain on your back, neck, or shoulders. 3. Versatility and Customization A stem extender gives you versatility when it comes to adjusting the height of the handlebars. You can adjust it to suit your riding style, preferences, and body type, ensuring that you ride in a comfortable and controlled position. Additionally, with a stem extender, you can play around with different handlebar styles, such as drop bars or bullhorns, which can enhance your grip and control on the bike. 4. Cost-effective Solution Getting a bike customized to your needs or purchasing a new bike with customized features can be expensive. However, with a stem extender, you can achieve the same customization on your current bike, saving you money in the long run. A stem extender is easy to install and does not require any modifications to your current bike, making it an affordable solution to optimize your riding experience. 5. Suitable for Different Bikes and Riding Styles Stem extenders come in different sizes and styles, making them suitable for different types of bikes, such as road bikes, hybrid bikes, mountain bikes, and BMX bikes. Whether you're a commuter, a leisure rider, or a professional cyclist, a stem extender can enhance your comfort, control, and performance on the bike. Conclusion: Investing in a stem extender is a cost-effective and versatile way to enhance your bicycle's performance and your riding experience. With the improved comfort, control, and ergonomics that come with a stem extender, you can ride longer and enjoy your ride more. So why not consider getting one for your bicycle today?
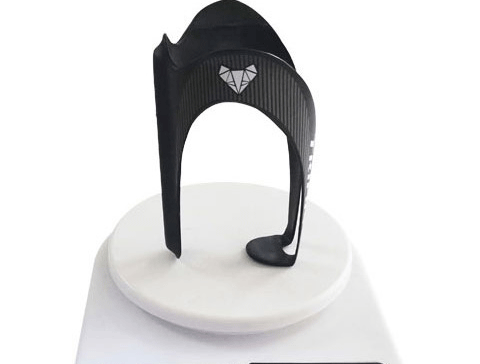
Roaming around on your bicycle during summer can be a refreshing and fulfilling activity. But, with the summer heat, it becomes essential to stay hydrated and have enough water while cycling. Fortunately, technology has brought a solution to this problem in the form of bicycle bottle cages.These cages are an essential accessory, and in this blog post, we will explore what makes them so important. 1. Convenience and Accessibility: One of the primary reasons to invest in bicycle bottle cages is convenience. It allows you to carry the water bottle with you rather than trying to hold it in your hand or shoving it in your pocket. It’s important to stay hydrated during a long ride, and bike bottle cages make it easy to carry a reliable source of hydration. It also enables you to drink water at any point during your ride. This convenience is why bottle cages have become one of the essential bicycle accessories. 2. Better Control and Safety: With bottle cages, you can keep your hands on the handlebars, providing better control and balance on the bike. Being free of having to carry or hold the water bottle, you can focus more on safe cycling practices to reduce the risk of accidents. You can also eliminate the risk of losing a bottle or accidentally dropping it on the road, which can be a safety hazard. 3. Versatlity and Durability: Bottle cages are mainly made of steel, plastic, or carbon fiber, which makes them durable even in the most extreme weather conditions. These cages can hold not only water bottles but any other drink bottles or food items as well. The versatility of bottle cages makes them suitable for any cyclist, whether you are a professional or a beginner. 4. Fits on Most bicycles: Bottle cages come in a range of sizes, shapes, and designs, and fit on most bikes, from the road bikes to mountain bikes. Multiple cages can also be fit on one bike to carry multiple bottles. They provide a variety of mounting options so one can install them on the frame, handlebars or even the saddle. Bottle cages are easy to install and affordable, making it an easy to acquire accessory for every cyclist. 5. Style and Look: Bottles cages are not just a functional accessory; they also add to the bike's styling and aesthetics. They come in a range of colors and designs, which allows you to personalize and customize your bike. You can choose the color that blends with your bike's framework or even match it to your cycling apparel. In conclusion, bicycle bottle cages make for an essential accessory for every cyclist. Their primary function of providing easy access to hydration ensures they play a crucial role in the cyclist's overall performance. With better control, safety, durability, versatility, and style, bottle cages provide an all-round solution to a cyclist's comfort and performance. Their easy installation and affordability make them a must-have bike accessory. Whether you are a beginner or an experienced cyclist, investing in a bicycle bottle cage is an excellent decision. Stay hydrated while enjoying the refreshing ride on your bicycle.
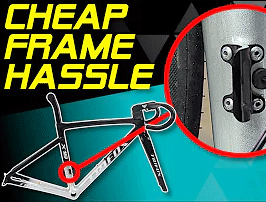
Carbon bike frames have become increasingly popular in recent years for their lightness, stiffness, and aerodynamics. However, one of the biggest challenges with these frames is damage. Carbon frames can be vulnerable to cracks, chips, and dents, leaving riders to wonder if repair is a viable option. Let's start with the pros of repairing a carbon bike frame. Firstly, repairing a carbon frame costs less than buying a new one. Carbon frames can be expensive, and repairing them can be a much more affordable option compared to buying a new one. Secondly, if you're attached to your bike, and it fits you like a glove, repairing it can be emotionally satisfying. Thirdly, repairing rather than replacing a carbon frame is environmentally friendly. It reduces the amount of waste created, which is a great way to help the planet. While there are some pros of repairing carbon frames, there are also some cons you should be aware of. The first and most significant disadvantage is safety. When a carbon frame cracks, it’s hard to spot the damage, and fixing it can lead to further weaknesses in the structure. Moreover, the repair process can’t always be guaranteed and can only be as strong as the manufacturer’s original build. In essence, the structural integrity of the frame is compromised, making it unsafe. Additionally, repairing a carbon frame can be time-consuming, which can mean being without your bike for an extended period. Another factor to consider when thinking about repairing a carbon frame is the type of damage. You should recognize that some types of damage can't be repaired. For example, a crushed tube, or a large hole caused by impact, are irreparable, and the only solution is a replacement. Lastly, aesthetic concerns should also be noted. After a repair job, there may be a visible patch that can be unsightly and be a constant reminder of the accident. Repairing a carbon bike frame is a viable option for minor damage like chips and scratches, and it can be a cost-effective and environmentally friendly way to maintain your bike. However, you should note that repairing a carbon frame comes with some risks; it can compromise the structural integrity of the frame, making it unsafe. Before you decide to repair your carbon bike frame, make sure you seek advice from an experienced bike mechanic or manufacturer to ensure it is safe to ride. And always remember that safety is paramount when it comes to bikes, especially with carbon bike frames


