


When it comes to enhancing your biking experience, investing in new components can make a world of difference. One upgrade that has gained immense popularity among mountain bikers is the dropper seatpost. But is it the upgrade your bike needs? Let’s explore the benefits and considerations to help you decide.
What is a Dropper Seatpost?
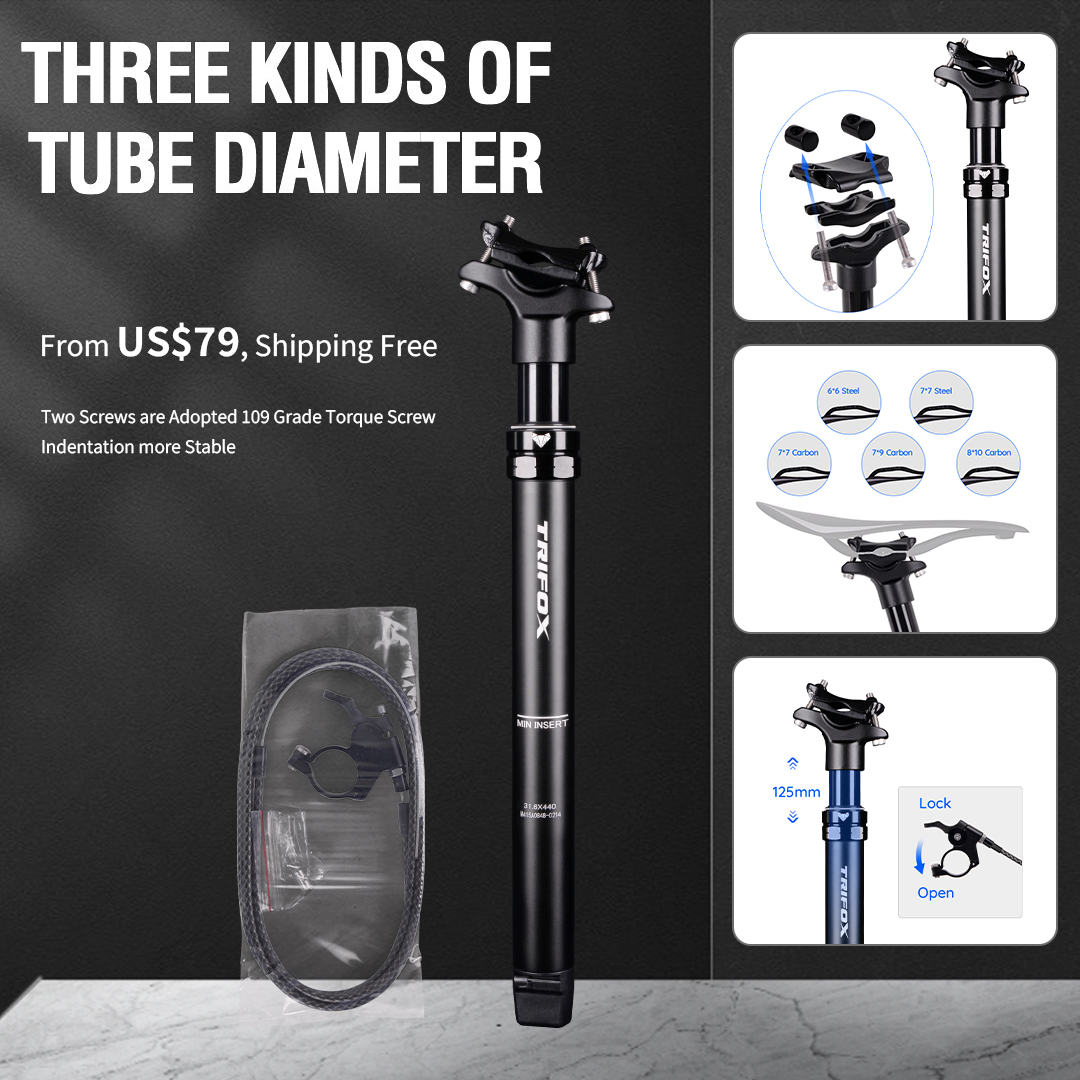
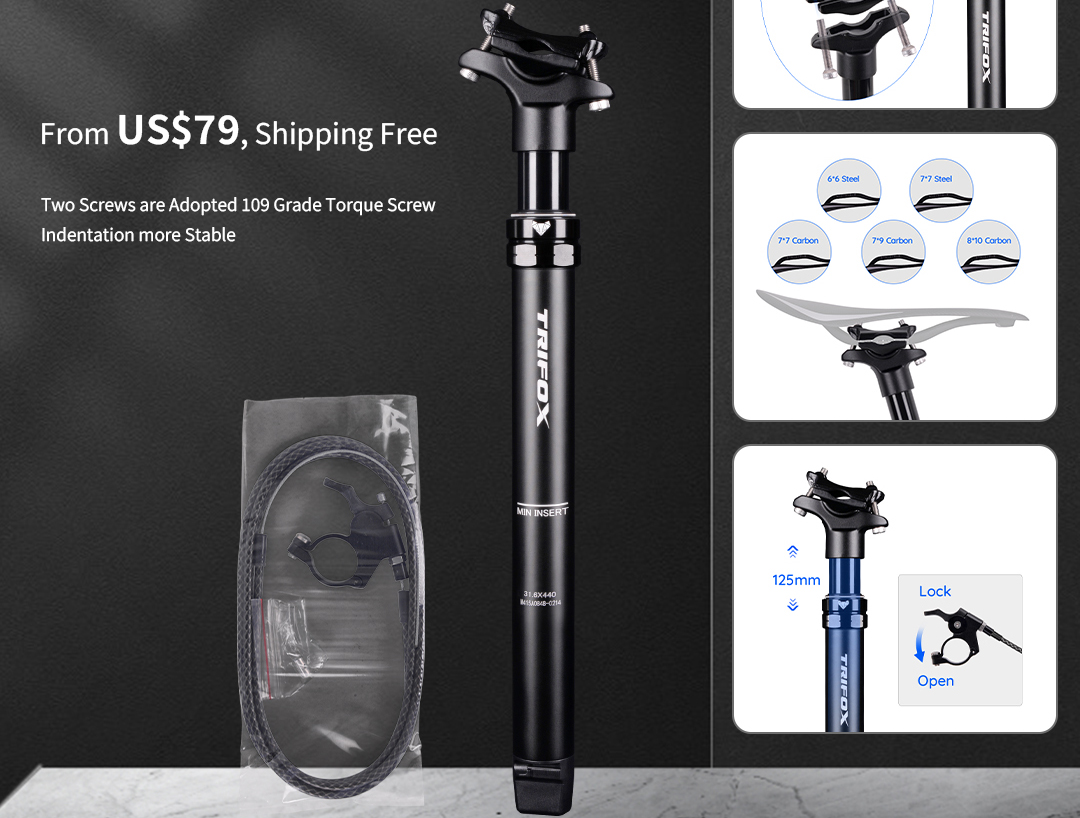
A dropper seatpost is a type of adjustable seatpost that allows the rider to change the height of the saddle on the fly, typically using a remote lever mounted on the handlebars. This feature is invaluable for mountain bikers who navigate varying terrains and need to adjust their saddle height frequently for optimal performance and safety.
Key Benefits of a Dropper Seatpost
Improved Control and Safety:Lowering the saddle while descending steep or technical trails lowers your center of gravity, providing better balance and control. This leads to increased confidence and safety on challenging descents.
Enhanced Climbing Efficiency:At full height, a dropper seatpost allows you to maintain an efficient pedaling position while climbing. This dual functionality ensures that you’re always in the best position for the section of the trail you're tackling.
Versatility:Whether you’re hitting jumps, navigating rocky terrain, or cruising down smooth paths, a dropper seatpost adapts to your needs. This adaptability makes it an essential component for avid mountain bikers who face diverse trail conditions.
Reduced Fatigue:Constantly stopping to manually adjust your saddle can be tiring and interrupt your flow. With a dropper seatpost, adjustments are seamless and quick, allowing you to focus more on riding and less on fiddling with your bike.
Considerations Before Upgrading
Compatibility:Ensure your bike frame is compatible with a dropper seatpost. Some older frames might not have the required routing for internal cables or the correct diameter for the seatpost.
Cost:Dropper seatposts can be a significant investment. However, considering the improvement in performance and enjoyment, many riders find it a worthy upgrade.
Maintenance:Dropper seatposts have moving parts and hydraulic systems that may require maintenance over time. Consider the additional upkeep when deciding on this upgrade.
Top Pick: Trifox Dropper Seatposts
If you're convinced that a dropper seatpost is the upgrade your bike needs, check out the Trifox Dropper Bike Seatposts. Trifox offers high-quality dropper posts known for their reliability and smooth operation. With options catering to different budgets and requirements, you’re sure to find a model that fits your biking style and enhances your overall ride.
Conclusion
A dropper seatpost is more than just a luxury; it's a practical upgrade that can significantly improve your mountain biking experience. By offering better control, efficiency, and versatility, it can transform your rides and boost your confidence on the trails. Evaluate your needs and consider making this valuable addition to your bike setup.

Matching your bike frame with the right rim brakes is essential for achieving better control and a safer ride. Rim brakes are a popular choice for road bikes due to their lightweight design and effective braking performance. Here’s how to ensure your bike frame and rim brakes work seamlessly together for optimal control.
First, consider the compatibility of your bike frame with rim brakes. Not all frames are designed to accommodate rim brakes, especially modern models that may favor disc brakes. Check the manufacturer’s specifications to ensure your frame has the necessary mounts and clearances for rim brakes. This includes confirming the placement and type of brake bosses on the frame and fork.
Next, evaluate the brake calipers. Rim brakes typically come in two main types: caliper brakes and cantilever brakes. Caliper brakes are common on road bikes, offering direct pull and consistent braking power. Ensure the reach of the caliper brakes matches the distance from the brake mounts to the rim. Cantilever brakes, often found on cyclocross and touring bikes, provide more clearance for wider tires and are ideal for mixed terrain.
The wheel size and tire width are also crucial factors. Rim brakes need to align perfectly with the braking surface on the rim. For instance, 700c wheels are standard on road bikes, and the brake pads should make full contact with the rim for maximum braking efficiency. Wider tires might require longer-reach brakes to fit properly within the frame and fork.
Consider the material of your rims as well. Alloy rims are commonly used with rim brakes because they offer a solid braking surface and good heat dissipation. Carbon rims can also be used but often require specific brake pads to avoid overheating and ensure reliable performance. Matching the brake pads to the rim material is critical for consistent braking power and longevity.
Pay attention to the brake levers and cables. High-quality brake levers and well-maintained cables ensure smooth operation and responsive braking. Make sure the brake levers are compatible with your brake calipers. Regularly check and replace worn cables to maintain optimal performance.
Lastly, fine-tuning and regular maintenance are key. Properly adjusting the brake pads to sit parallel to the rim and ensuring even pad wear can significantly improve control. Regularly inspect and replace brake pads as needed to maintain effective braking.
In conclusion, matching your bike frame with the right rim brakes involves considering frame compatibility, brake type, wheel size, rim material, and brake components. By paying attention to these details, you can achieve better control and a safer ride. For high-quality rim brakes and bike frames, explore trusted brands and components.
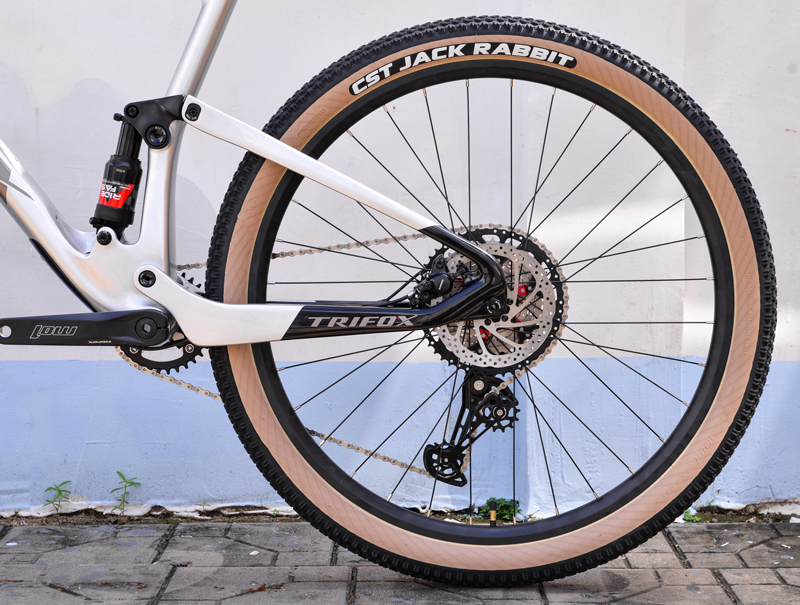
Choosing the right wheel size is crucial for optimizing your cycling experience, whether you’re an avid road cyclist, a mountain biker, or a commuter. The wheel size impacts your bike's handling, comfort, and performance. Here’s how to pick the right wheel size to meet your specific cycling needs.
First, identify your riding style and terrain. Road cyclists typically use 700c wheels, which offer a good balance of speed and stability on paved surfaces. These wheels have a larger diameter, allowing for smoother rolling over long distances.
If you're into mountain biking, you might choose between 26-inch, 27.5-inch (650b), and 29-inch wheels. Each size has its benefits: 26-inch wheels are nimble and responsive, 27.5-inch wheels offer a mix of agility and rollover capability, while 29-inch wheels provide better traction and roll over obstacles more easily.
Next, consider your height and frame size. Taller riders often feel more comfortable with larger wheels like 700c or 29-inch, as they better match their proportions. Smaller riders may prefer 650c or 27.5-inch wheels for better maneuverability and control. Ensure that your bike frame is designed to accommodate the wheel size you choose, as this affects the bike’s geometry and overall ride quality.
Think about the type of riding you do most frequently. If you commute or prefer leisure rides on smooth roads, 700c wheels are usually ideal. For mixed-terrain or adventure riding, 650b wheels provide versatility with wider tire options for added grip and comfort. Mountain bikers who enjoy technical trails might favor the agility of 27.5-inch wheels, while those tackling rough, cross-country trails might opt for the stability of 29-inch wheels.
Evaluate the availability of tires and components for your chosen wheel size. Some sizes, like 700c and 29-inch, have a broader range of tire options, making it easier to find replacements or upgrade your setup. Make sure the wheel size you choose offers the flexibility you need for your riding style.
Finally, test ride bikes with different wheel sizes if possible. Personal preference plays a significant role in how comfortable and confident you feel on a bike. Trying out various sizes can help you determine which wheel size provides the best fit for your needs.
In conclusion, picking the right wheel size involves considering your riding style, terrain, height, frame compatibility, and personal preference. By taking these factors into account, you can select a wheel size that enhances your cycling experience and meets your specific needs.


Determining the perfect tire width is essential for achieving a comfortable bike ride. Tire width influences various aspects of your cycling experience, including comfort, rolling resistance, and handling. Here's how to select the ideal tire width for your needs.
First, consider your riding terrain. If you primarily ride on smooth, paved roads, narrower tires (23-28mm) are typically preferred. These tires offer less rolling resistance, allowing for faster speeds and efficient performance. However, if you frequently encounter rough or uneven surfaces, wider tires (30-35mm or more) provide better shock absorption and comfort, as they can handle bumps and imperfections more effectively.
Next, think about your riding style. Competitive road cyclists often opt for narrower tires because they prioritize speed and aerodynamics. On the other hand, recreational riders and commuters may find that wider tires are more comfortable for longer rides, as they reduce vibrations and provide a smoother experience.
Bike compatibility is another important factor. Ensure that your bike frame and fork have enough clearance to accommodate the desired tire width. Modern road bikes and gravel bikes are designed to support wider tires, but it's always best to check the manufacturer's specifications for your specific model.
Consider the impact of tire width on pressure. Wider tires can be run at lower pressures without the risk of pinch flats. Lower pressure allows the tire to conform to the surface better, improving grip and comfort. For instance, a 32mm tire can be comfortably ridden at lower pressures than a 25mm tire, providing a cushier ride.
Evaluate the trade-off between comfort and performance. While wider tires offer enhanced comfort, they can slightly increase rolling resistance compared to narrower ones. However, advancements in tire technology have minimized this gap, making wider tires a viable option even for performance-oriented cyclists.
Finally, personal preference plays a significant role. Some cyclists prefer the nimble feel of narrower tires, while others appreciate the stability and confidence that wider tires provide. It's a good idea to experiment with different widths to find what feels best for you.
In conclusion, determining the perfect tire width involves considering your riding terrain, style, bike compatibility, and personal preference. By taking these factors into account, you can select a tire width that enhances comfort and improves your overall cycling experience. Happy riding!
Choosing the best alloy frame for your bike is a crucial step in ensuring a comfortable and efficient ride. alloy frames, typically made from aluminum, offer a balance of strength, lightweight, and affordability.
First, consider your riding style. Are you an avid mountain biker, a road cyclist, or a commuter? Each discipline has specific requirements that an alloy frame can address. For mountain biking, durability and shock absorption are key. The [Trifox Aluminum Mountain Bikes]offer robust construction ideal for rugged terrains. On the other hand, road cyclists might prioritize lightweight and aerodynamics, which aluminum frames also cater to effectively.
Next, think about the frame geometry. The shape and angles of the frame can affect your riding posture and comfort. Mountain bikes generally have a more relaxed geometry, providing better control on rough trails. Road bikes feature a more aerodynamic geometry, placing the rider in a forward-leaning position for speed efficiency.
Another essential factor is the frame size. An incorrectly sized frame can lead to discomfort and potential injury. Measure your inseam and use sizing charts provided by manufacturers like Trifox to find the right fit. Most brands provide detailed guides to help you choose the correct frame size based on your height and riding style.
Additionally, check the weight of the frame. One of the advantages of alloy frames is their lighter weight compared to steel. This makes them easier to handle and maneuver, especially during climbs. However, ensure that the reduced weight doesn't compromise the frame's strength and durability.
Lastly, consider your budget. Alloy frames are generally more affordable than carbon fiber, making them an excellent choice for those looking for quality without breaking the bank. The [Trifox Aluminum Mountain Bikes]offer various options that combine performance and value.

In conclusion, choosing the best alloy frame for your bike involves understanding your riding needs, selecting the right geometry and size, considering the weight, and staying within your budget. With the right frame, you can enhance your riding experience, whether on rugged trails or smooth roads. Happy cycling!
Selecting the right performance wheelset can drastically improve your bike's speed and efficiency. Here's how to make an informed choice to elevate your cycling experience.
1. Understand Your Riding Style
Consider whether you're into road racing, mountain biking, or long-distance touring. Each discipline demands different wheel characteristics. Road cyclists often prefer lightweight, aerodynamic wheels, while mountain bikers need robust, durable options.
2. Focus on Material
Carbon fiber wheelsets are a top choice for serious cyclists due to their lightweight and strength. They provide excellent stiffness and responsiveness, crucial for both acceleration and maintaining speed. However, they are more expensive than aluminum alternatives.
3. Consider Rim Depth
Rim depth affects aerodynamics and handling. Deeper rims (50mm+) are more aerodynamic, making them ideal for flat courses and time trials. Shallow rims (30mm or less) are better for climbing due to their lighter weight and improved maneuverability.
4. Check Hub Quality
High-quality hubs reduce rolling resistance and enhance overall performance. Look for sealed bearings that offer smooth rotation and require less maintenance.
5. Evaluate Spoke Count
Wheelsets with fewer spokes are generally lighter and more aerodynamic but might sacrifice durability. Opt for higher spoke counts if you’re heavier or ride on rough terrains frequently.
6. Factor in Budget
Performance wheelsets can be a significant investment. Balance your budget with your riding goals to find the best value without compromising essential features.

Installing the Ultra Light SF-QR 2.0 Quick Release on your bike may seem daunting, but with a few straightforward steps, you can ensure a secure and efficient setup. This quick release skewer, available at Trifox, offers lightweight performance and reliability ideal for serious cyclists. Here's a detailed guide to help you install it correctly.
Step 1: Gather Your Tools
Before starting, gather the necessary tools:
Bike stand (optional but helpful)、Allen wrench or quick-release lever、Grease or lubricant
Step 2: Prepare Your Bike
Place your bike on a stable surface or bike stand. Make sure the bike is stable and won't tip over during the installation process.
Step 3: Remove the Old Skewers
If your bike already has skewers installed, you'll need to remove them first. Open the quick-release lever and unscrew the nut on the opposite side. Slide the skewer out of the hub and set it aside.
Step 4: Apply Lubricant
Apply a small amount of grease or lubricant to the threads of the quick-release skewer. This helps ensure smooth operation and prevents seizing.
Step 5: Insert the Ultra Light SF-QR 2.0 Skewer
Insert the new Ultra Light SF-QR 2.0 skewer through the hub axle. Ensure the lever side is positioned on the non-drive side of the bike (the side opposite the chain).
Step 6: Attach the Nut
Thread the nut onto the skewer from the drive side. Tighten the nut by hand until snug, but do not fully tighten yet.
Step 7: Adjust the Lever Position
Position the lever in an open position. The lever should be parallel to the fork or frame for proper alignment. Ensure the lever won’t interfere with any components when closed.
Step 8: Close the Quick Release
Close the quick-release lever. It should require firm pressure to close securely. If too loose, open the lever and tighten the nut slightly before closing again. A properly adjusted lever should leave an imprint on your palm when closed.
Step 9: Check Alignment
Ensure the wheel is properly aligned in the dropouts and centered between the forks or stays. Spin the wheel to check for any wobbling or misalignment.
Step 10: Test and Secure
Ensure the quick release is securely fastened by pressing down on the lever. There should be no movement in the wheel. For added safety, double-check that the lever is tightly closed and locked.

By following these steps, you can easily install your Ultra Light SF-QR 2.0 Quick Release, ensuring a secure and smooth ride. Proper installation not only enhances performance but also ensures your safety on the road.
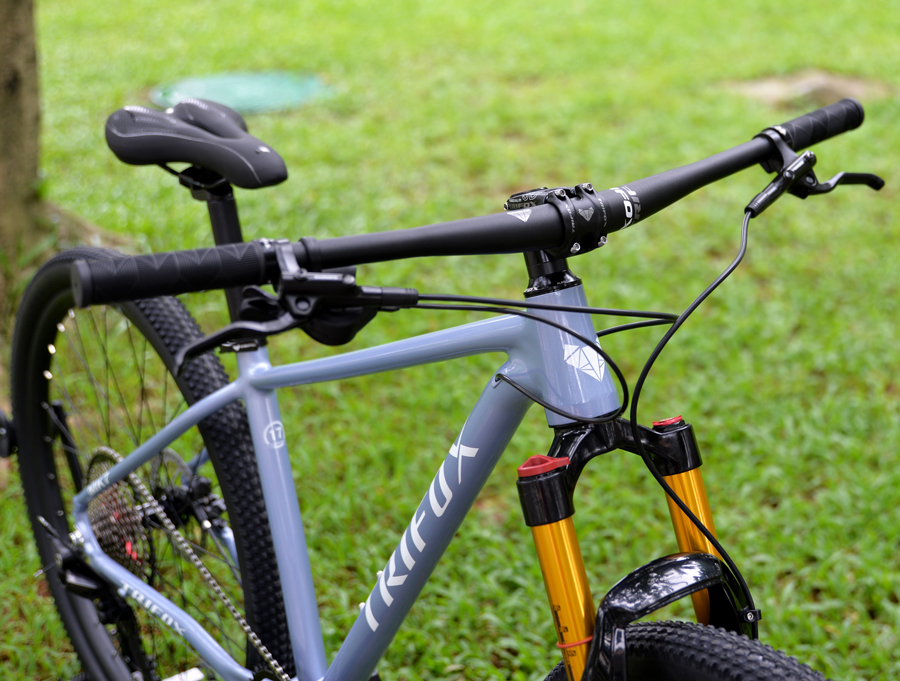
Choosing the right handlebar can significantly enhance your cycling experience, providing comfort, control, and efficiency. With options like the high-quality carbon bike handlebars from Trifox, it's essential to understand which type suits your riding style best. Here's a guide to help you make the perfect choice.
1. Identify Your Riding Style
Your riding style is the first consideration when selecting a handlebar. Are you into road racing, mountain biking, or casual commuting? Each style demands different handlebar characteristics for optimal performance.
Road Racing: For speed and aerodynamics, drop bars are usually preferred. They offer multiple hand positions and reduce drag;Mountain Biking: Flat or riser bars are ideal for control and stability on rugged trails;Commuting: Comfort and ease of use are key, making flat bars or cruiser bars a good choice.
2. Consider the Material
Carbon handlebars, like those offered by Trifox, provide several advantages. They are lightweight, strong, and absorb vibrations better than aluminum, offering a smoother ride. This is particularly beneficial for long-distance cyclists and competitive racers.
3. Understand Handlebar Dimensions
Width: A wider handlebar offers more control, especially in technical terrains, while a narrower bar can be more aerodynamic;Drop and Reach: For drop bars, consider the drop (vertical distance) and reach (horizontal distance). A deeper drop allows for a more aerodynamic position, while a shorter reach is more comfortable for casual rides;Rise: For flat and riser bars, the rise (height difference between the center of the bar and the ends) affects your riding posture. More rise means a more upright and comfortable position.
4. Test Different Shapes
Handlebars come in various shapes to suit different preferences:
Drop Bars: Ideal for road cyclists needing aerodynamic positions.Flat Bars: Common in mountain bikes for improved control;Riser Bars: Provide a higher position, enhancing visibility and comfort;Bullhorn Bars: Offer an aggressive position suitable for time trials and track racing.
5. Ergonomics and Comfort
Pay attention to ergonomics. Some handlebars have ergonomic bends or specific shapes designed to reduce fatigue and increase comfort on long rides. Carbon bars, such as those available from Trifox, often include these features, making them a great investment for serious cyclists.
6. Installation and Adjustments
Ensure proper installation and adjustment. Handlebars need to be securely fitted and adjusted to your preference. Seek professional help if necessary to avoid any mishaps that could affect your ride quality or safety.
Conclusion
Choosing the perfect cycling handlebar is crucial for enhancing your cycling experience. With options like the Trifox carbon bike handlebars, you can find the balance between weight, strength, and comfort tailored to your riding style. Take the time to assess your needs, try different options, and invest in the best handlebar for a more enjoyable and efficient ride.

Explore Trifox's range of carbon bike handlebars here.
Achieving carbon painting techniques can transform your bike, car, or any other equipment into a sleek and modern masterpiece. Whether you’re looking to refurbish an old item or customize a new one, mastering carbon painting can give your project a professional finish.
Understanding Carbon Painting
Carbon painting techniques involve creating a faux carbon fiber look using paint. This technique mimics the appearance of carbon fiber, offering a high-tech, stylish finish without the need for actual carbon fiber materials. It’s commonly used on bikes, automotive parts, and various accessories.
Materials Needed
Primer: Ensures proper adhesion of the paint.
Base Coat: Typically black, this serves as the foundation color.
Carbon Fiber Decal Sheet or Mesh: Creates the carbon fiber pattern.
Transparent Top Coat: Protects the paint and adds a glossy finish.
Sandpaper: For prepping the surface (various grits).
Masking Tape and Paper: To protect areas you don’t want painted.
Spray Gun or Aerosol Spray Paint: For applying the primer, base, and top coats.
Protective Gear: Gloves, mask, and goggles.
Step-by-Step Guide
1. Preparation
Clean the Surface: Thoroughly clean the item to remove any dirt, grease, or residue. Use a degreaser if necessary;Sanding: Sand the surface with fine-grit sandpaper (e.g., 400-600 grit) to create a smooth, matte finish. This helps the primer adhere better;Masking: Use masking tape and paper to cover areas you don’t want to be painted.
2. Priming
Apply Primer: Using a spray gun or aerosol can, apply a coat of primer evenly over the surface. Allow it to dry completely;Sand Again: Lightly sand the primed surface with fine-grit sandpaper to smooth out any imperfections. Wipe away dust with a clean cloth.
3. Base Coat Application
Apply Base Coat: Spray the black base coat evenly over the primed surface. Multiple thin coats are better than one heavy coat to avoid runs and drips. Let each coat dry thoroughly before applying the next.
4. Creating the Carbon Fiber Pattern
Position Decal or Mesh: Once the base coat is dry, carefully position the carbon fiber decal sheet or mesh over the surface;Spray Over Mesh: Lightly spray a contrasting color (often silver or dark gray) over the mesh to create the carbon fiber effect. Remove the mesh carefully before the paint dries.
5. Top Coat Application
Apply Top Coat: Once the pattern is set and dry, apply several coats of a clear top coat to protect the paint job and add shine. Allow each coat to dry thoroughly before applying the next.
Final Touches
Curing Time: Let the painted item cure for several days in a dust-free environment to ensure the paint fully hardens;Polishing: After curing, you can polish the surface to enhance the gloss and smoothness further.
Tips for Success
Use Quality Materials: Investing in high-quality paints, primers, and top coats will yield the best results;Practice Patience: Rushing through the steps can lead to imperfections. Take your time with each layer and let it dry completely;Proper Ventilation: Work in a well-ventilated area to avoid inhaling fumes from the paints and solvents.

Conclusion
Mastering carbon painting techniques can give your projects a sleek, professional look that stands out. With careful preparation, precise application, and attention to detail, you can achieve a stunning carbon fiber effect that rivals the real thing.


