


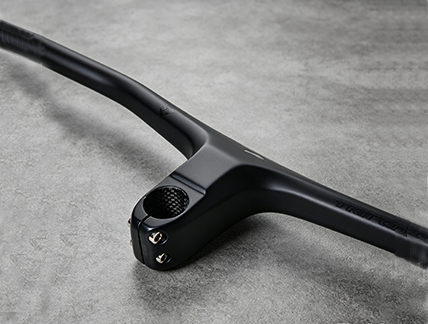
So you’ve bought a Trifox RHB600 carbon xc bars upgrade—and you’re staring at the box, wondering how not to turn that beautiful carbon cockpit into expensive scrap. Good news: integrated carbon bars aren’t as scary as they seem. You just need the right technique, a few essential tools and a little patience. This guide walks you through every step of installing your carbon fiber bar safely, without cracking it, crushing it or cutting too much off. Before You Start: What You’ll Need * Torque wrench (the single most important tool for carbon) * Hex keys (4mm, 5mm) * Carbon assembly paste (never grease!) * Measuring tape or ruler * Fine-tooth hacksaw with carbon blade * Masking tape * Fine-grit sandpaper (400 grit) * Cable routing tool or safety wire (for internal routing) * Safety glasses and soapy water (for cutting) Step 1: Route the Cables First (Don’t Skip This) The RHB600 is a full internal routing design. All brake hoses, derailleur cables and dropper housings run completely inside the bar and stem structure. That means you must route the cables before clamping anything. Remove the port covers at the stem area and lever mounting points. Use a cable routing tool or a length of thin safety wire with a small hook bent at the end. Feed the wire from the stem entry port toward the lever exit port, attach the cable housing to the wire, then pull it through. Repeat for both sides. This step takes patience—but it’s far easier than trying to fish cables after the bar is clamped in place. Tip: Use a few drops of isopropyl alcohol as lubricant to help housing slide through the internal channels. Step 2: Check Bar Width Before Cutting Most integrated bars come at a standard 800mm width. That’s wide for stability, but many riders prefer 760mm or 780mm for tighter singletrack. Before cutting, mount the bar loosely (without fully torquing) and sit on the bike. Feel whether your hands naturally fall slightly inside the grips. Remember: you can cut more off later, but you can’t add material back. Measure twice, cut once. When you’re ready to cut: wrap masking tape around both sides at the cut mark to prevent carbon splintering. Use a fine-tooth hacksaw blade and keep the cut surface sprayed with soapy water to contain carbon dust (which is harmful to breathe). After cutting, smooth the raw edge with 400-grit sandpaper—never use a metal file on carbon. Step 3: Apply Carbon Paste—Never Grease Standard grease makes carbon surfaces slippery and risks over-torquing. Carbon assembly paste contains tiny particles that increase friction between components, allowing you to achieve a secure hold at lower torque. Apply a thin, even layer to the stem clamp area and the steerer tube contact points. Smooth with your finger. Don’t glob it on—a thin coat is all you need. Step 4: Torque Correctly (This Is Non‑Negotiable) The most common cause of carbon handlebar failure is over‑tightening. Use a calibrated torque wrench. General torque for carbon bar clamp bolts is 4–6 Nm, but always follow the manufacturer’s specific recommendation for your stem. Tighten the faceplate bolts in a cross pattern (X‑pattern), not all on one side first, to distribute pressure evenly. For control clamps (brake levers and shifters), use a lower torque—around 2–4 Nm. Overtightening these can crush the carbon tube. If you don’t own a torque wrench, buy one before touching carbon components. It’s not optional. Step 5: Final Check and Cable Trim Once everything is torqued to spec, cycle the fork through its travel to ensure cables aren’t binding or pulling taut. Then trim excess housing at the lever and frame entry points, install end caps, and seal the internal routing ports with the included rubber plugs. The Takeaway Installing an RHB600 carbon xc bars is a step‑by‑step process that rewards patience. The key rules: route cables first, measure cuts carefully, use carbon paste, and always—always—use a torque wrench. Follow these steps and your carbon fiber bar will stay intact, silent and safe for thousands of trail miles. And if you’re unsure at any stage, a local bike shop can handle the installation for a small fee—still far cheaper than replacing a cracked carbon bar.
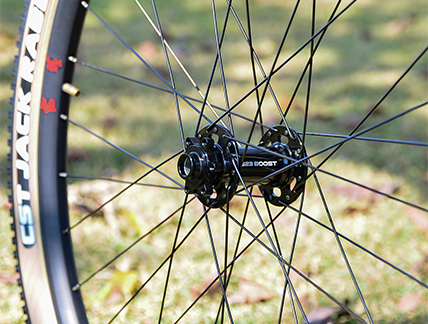
Whether you’re building a new mountain bike from the frame up or simply replacing a worn‑out set of hoops, wheel compatibility is rarely as straightforward as “it’s a 29er.” A modern MTB wheelset must align with your frame’s rear dropout spacing, match your brake rotor mounting standard, and support a tire width that suits your terrain. Overlook any of these three parameters and you risk anything from a subtle rotor rub to a wheelset that simply won’t fit. In this technical deep dive we break down the three pillars of MTB wheel compatibility: the Boost 148 rear hub, the 6‑bolt disc interface, and the 25mm internal rim width. We use the Trifox WM823 bicycle wheel as our reference example because it combines all three modern standards in one durable alloy package. Hub Spacing: Why Boost 148 Has Become the Norm The first and most critical compatibility check is the rear hub’s spacing, today measured by its “Over Locknut Distance“ (OLD). While older mountain bikes used 135mm quick‑release (QR) or 142mm thru‑axle spacing, almost every contemporary trail, enduro and cross‑country frame now requires **Boost 148mm** rear spacing. As the name implies, Boost adds 6mm to the overall hub width—3mm on each side—compared to the older 142mm standard. That seemingly small increase has a big mechanical benefit: it pushes the hub flanges farther apart, which allows the spokes to form a wider bracing angle. The result is a significantly stiffer, stronger rear wheel without adding extra material weight. According to early industry data, a 29˝ wheel built around a 148mm Boost hub achieves the same lateral stiffness as a smaller 27.5˝ wheel with a 142mm hub. Stiffer wheels track more accurately, resist flex under hard cornering and improve pedaling efficiency—exactly what you want on aggressive singletrack. The WM823 hub is built specifically for the **Boost 148x12mm** rear standard (front: 15x110mm), making it a perfect match for any modern hardtail or full‑suspension frame. The WM823’s rear axle attachment is a **thru‑axle**, which further increases stiffness by threading directly into the frame dropout rather than relying on a QR skewer. And if you are currently riding an older QR frame, the WM823 includes optional end caps that convert it to a 9x100mm (front) and 10x141mm (rear) QR, a versatile feature not found on many competing wheelsets. Rotor Mount: 6‑Bolt Remains the Trail‑Ready Choice The second major interface is the disc rotor mount. Two standards dominate the MTB world: the traditional **6‑bolt (ISO)** pattern and Shimano’s proprietary **Center Lock** system. While both work perfectly well, each has trade‑offs that affect the mountain bike rider. Center Lock rotors are secured by a single lockring, which makes wheel installation and removal marginally faster, especially on the side of the trail. However, 6‑bolt rotors are far more common (especially at replacement time), generally slightly lighter, and easier to repair on the trail because no special tool is needed to remove a stuck lockring. The WM823 uses a **6‑bolt disc interface**, a choice that aligns perfectly with the demands of cross‑country and all‑mountain riding. The six bolts distribute clamping force evenly around the rotor, and repair is simple: you only need a 5‑mm hex key and an appropriately sized rotor—both can be found at almost any bike shop. The WM823’s braking system also accepts both Shimano and SRAM rotors (and most other brands), so you are never locked into a single component ecosystem. Rim Width & Tire Compatibility: Matching Tire Profile to Trail The third compatibility dimension is rim width, which determines how a tire sits once inflated. Too narrow a rim for a given tire will “lightbulb” the tire, rounding the tread contact patch and reducing grip. Too wide a rim can make the tire feel overly square, risking burping on low‑pressure setups. The industry standard for a **29er MTB wheelset** riding 2.2–2.4 inch tires is an internal rim width in the 25–30mm range. The WM823 hits right in the sweet spot with a **25mm internal width** and a **30mm external width**. This profile is engineered to support tires from 1.9 inches (for fast‑rolling XC rubber) up to 2.5 inches (for aggressive trail tread). The low 25mm rim depth further helps you run lower pressures without the risk of rim dings because the tire has a stable, broad platform to rest on. Lower pressure means more traction, better small‑bump compliance, and a much more forgiving ride over roots and rocks—all without adding appreciable weight. The WM823’s alloy rims are tubeless‑ready clinchers, making the switch to tubeless sealant simple and reliable. Putting It All Together: Building a Compatible MTB Wheelset Choosing a wheelset that aligns on all three dimensions—Boost spacing, 6‑bolt rotor mount and a modern internal rim width—eliminates most compatibility headaches before they arise. The Trifox WM823 mtb wheelset 29 was conceived as a turn‑key solution for today’s frames: a 148x12mm rear hub, a 15x110mm front hub, a 6‑bolt rotor interface, and a durable 25mm internal rim. The wheelset includes stainless steel Pillar spokes, 32 holes per wheel, and ceramic bearings. Each wheelset is backed by a two‑year warranty and supports rider weights up to 125 kg (275 lb). Ultimately, when you check the three compatibility boxes properly, you stop worrying about spec sheets and start enjoying a ride that is stiffer, more responsive and more capable wherever the trail leads.
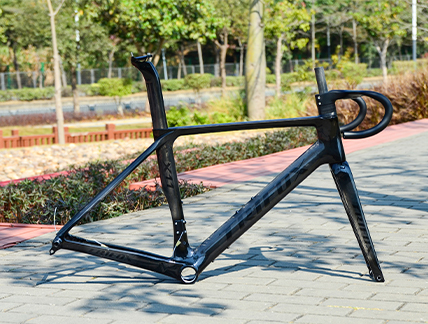
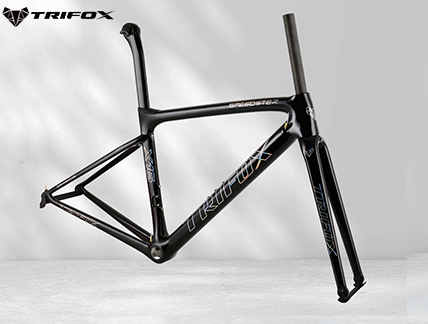
There is a point in every builder’s journey when a box arrives. Inside, wrapped in foam and bubble wrap, is a carbon frame—a thing of sculpted beauty, ready to become someone’s pride. The question that lingers in that moment is: is this one built right? For the Trifox X11, the answer is shaped long before the box is sealed. Behind every one of these road bike frameset clearance creations stands a quality control process that runs from raw carbon fibre to final inspection. Here is how the X11 is built—consistently, reliably, and with the precision that defines a modern chinese carbon fiber frame at its best. From Prepreg to Autoclave: The Layup Foundation Every X11 begins as prepreg—carbon fibre fabric pre-impregnated with epoxy resin. The layup process is where the frame’s character starts. Sheets of T800 carbon are cut as plies and layered by hand in orientations that govern stiffness, compliance, and impact resistance. Some layers are placed at 0° to resist pedaling forces; others at 45° or 90° to manage torsional loads through corners. Each frame uses a specific sequence of plies, a recipe refined through finite element analysis to ensure the right balance of rigidity and vibration damping. This is not guesswork. The layup crew trains for weeks before touching a production frame, and each ply is positioned with a margin of error measured in millimeters, verified against laser-cut templates to ensure consistency part to part. After the plies are placed into the mold, the frame enters an autoclave—a pressurized oven where heat (typically 120–130°C) and pressure cure the resin, eliminating voids and bonding the layers into a homogeneous structure. This step is arguably the most critical in carbon frame manufacturing. Incomplete curing or trapped air can compromise strength, so autoclave cycles are logged and monitored for every production batch. Finding the Invisible Flaws: Non‑Destructive Testing Once a frame emerges from the autoclave, its true integrity must be verified without damaging it. This is where non-destructive testing enters the process. High-end carbon frame manufacturing employs **ultrasonic testing** to peer inside the carbon. High-frequency sound waves are passed through the laminate; reflections reveal delaminations, voids, or areas where plies failed to bond. This is the same inspection technology used in aerospace composite structures, and it catches flaws invisible to the naked eye. Advanced manufacturers—and those producing frames intended for international markets—also use **X‑ray computed tomography** and **thermography** to detect subsurface anomalies. For a frame like the X11, intended to withstand years of road vibration and occasional road hazards, this level of scrutiny is non‑negotiable. Visual Inspection and Dimensional Precision Before any frame leaves the production floor, it receives a thorough visual examination. Inspectors check for surface irregularities—pinholes, dry spots, or uneven clear coat—and also look inside bottom bracket shells and head tubes for signs of cured resin pooling or misaligned plies. The frame is then mounted on a geometry fixture to verify its alignment against the X11’s published specifications: head tube angle, bottom bracket drop, chainstay length, and rear dropout alignment. A frame that is misaligned by even a few millimeters can cause tracking problems and accelerated component wear. The X11 is also designed to carry a 2‑year warranty, a commitment that requires each frame to meet consistent standards across every batch. Raw Materials and Supply Chain Accountability Quality control begins long before the layup table. The X11 is built from **T800 carbon fibre**, a high‑modulus material known for its stiffness‑to‑weight ratio. But raw fibre is only as good as its source. Reputable manufacturers require certificates of analysis for each roll of carbon, verifying fibre density, resin content, and tensile strength. Incoming rolls are staged in climate‑controlled storage to prevent moisture absorption, which can compromise the resin during curing. The bottom bracket shell is machined to accept a **T47 threaded bottom bracket**—a standard chosen for its reliability, but one that requires precise machining to ensure proper bearing alignment. Every machined interface, from the headset cups to the brake mounts, is checked with calibrated gauges. Real‑World Verification Specifications alone do not build trust; real‑world performance does. Owners of Trifox carbon frames have noted that components fit precisely—bottom brackets thread cleanly, headset bearings seat without creaking, and wheels slot into dropouts without binding. They also point to the importance of the company’s responsiveness, with one reviewing the overall experience as efficient and reliable. While no manufacturing process is perfect, a systematic quality control protocol directly reduces the likelihood of defects and uneven bond lines. The X11’s **full internal cable routing** and integrated carbon handlebar are additional examples of complex features that rely on precise molding to ensure smooth housing paths. These details are not afterthoughts—they are designed and validated through the same quality framework that governs the frame’s structural elements. Why Consistency Matters to You Every time you climb out of the saddle, carve a descent, or ride through a rainstorm, you are testing your frame. What you hope not to discover is a variance from one frame to the next—a bottom bracket that creaks, a rear triangle that flexes more on one side, or a dropout that twists under load. Consistency is the quiet virtue of a mature supply chain. A frame that is built the same way, inspected with the same tools, and tested to the same standards, batch after batch, earns the right to be called reliable. The X11 represents that kind of engineering discipline: not flashy, not overstated, but built with the precision that lets a rider stop thinking about the frame and start enjoying the road. For more details or to explore the X11 further, visit the product page linked below. Road Bike Frameset Clearance Options The Trifox X11 is available in multiple sizes to fit a wide range of riders: XS (49cm) for heights 155-168cm, S (52cm) for 165-178cm, M (54cm) for 175-188cm, and L (56cm) for 185-196cm. With a bare frame weight starting at just 965g and a full internal cable routing design, the X11 represents an uncompromising road bike frameset clearance choice for those seeking a high-performance carbon chassis without the premium price tag attached to bigger brand names. Its T47 bottom bracket and disc brake compatibility further ensure this frame remains current as component standards continue to evolve. For riders who have hesitated to invest in a chinese carbon fiber frame, the X11’s documented quality control provides the reassurance that this is a frame built to last. Choose the X11, and you choose consistency—ride after ride, mile after mile.
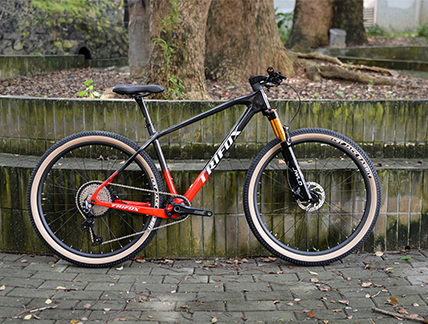
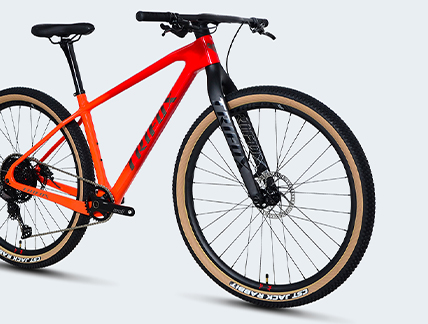
The mountain biking industry has long sold us on a simple message: stiffer is better. Stiffer frames, stiffer wheels, stiffer cockpits. The logic seems impeccable—less flex means more power transfer, more precise steering, and a bike that goes exactly where you point it. But like many simple truths, this one overlooks a crucial nuance. Real-world trails are not smooth, predictable tracks. They are chaotic tapestries of roots, rocks, off-camber turns, and sliding loam. On such terrain, an extremely stiff bike can actually hold you back. A frame with just the right amount of lateral compliance—controlled side-to-side flex—can improve traction, enhance cornering confidence, and reduce fatigue, transforming a good hardtail into a great one. The Trifox SDY21 carbon hardtail embodies this balanced philosophy, proving that sometimes, a little bit of give is exactly what you need. The Problem with Total Rigidity An ultra-stiff frame resists flex in all directions. On smooth pavement, this is ideal. On a rough trail, however, a supremely rigid rear end fights the terrain's natural irregularities. When you lean into a loose corner, an overly stiff frame can feel skittish, breaking traction rather than conforming to the surface. Worse, it transfers every vibration and shock directly to the rider, accelerating hand, arm, and back fatigue. This is not a hypothetical problem. Industry designers are increasingly questioning the "stiffer is better" mantra. As noted in recent analyses of carbon wheel design, the pendulum may have swung too far: "the goal posts may be shifting" as manufacturers dial back extreme lateral rigidity to achieve better real-world performance. A bike that is too stiff can actually feel slower because it demands more effort to hold a line through unpredictable, high-frequency trail chatter. Lateral Compliance vs. Vertical Compliance To understand this, it helps to distinguish between two types of frame flex. Vertical compliance is the frame’s ability to absorb impacts and vibrations from trail bumps. It improves comfort and traction on rough ground. Lateral (or horizontal) compliance is the frame’s ability to twist slightly side‑to‑side under cornering loads. While marketing has long focused on making frames both "laterally stiff and vertically compliant," the reality is more complex. Controlling the degree of lateral flex is an engineering art. A frame that exhibits controlled lateral compliance—essentially, a small amount of torsional twist—can help the rear wheel track the ground more faithfully through a corner, maintaining a larger contact patch and improving grip. The Rocky Mountain Instinct Carbon 70 AXS review noted that lateral flex "helped on my fast, local, hardpacked trails," and the bike “bends quite literally around corners,” flexing in a way that makes it “a scalpel on the trail.” This controlled flex is not a flaw; it is a feature that enhances handling precision. How Carbon Fiber Allows Precise Tuning The advantage of a high-quality carbon frame like the SDY21 is the ability to tune stiffness in specific directions. Unlike aluminum, which has a more uniform stiffness profile, T800 carbon fiber allows engineers to orient the layup of carbon sheets to achieve a desired ride character. Through finite element analysis (FEA), designers model stresses across the frame and strategically place stiffer carbon in high-load zones while allowing a calculated degree of compliance in others. The SDY21 geometry also contributes to this balance. With a 70° head tube angle and 443mm chainstays, the bike is stable at speed yet agile enough for tight switchbacks. The short chainstays improve maneuverability, while the carbon layup in the rear triangle is tuned to track through corners without feeling harsh. This design prioritizes real‑world handling over raw acceleration. The Rider Experience What does controlled lateral compliance feel like on the trail? Owners of the SDY21 consistently report that the bike “soaks up trail chatter” and “climbs like a dream,” yet feels “planted” on descents. One reviewer noted that it “just disappears under you”—the mark of a frame that works with the rider rather than fighting the terrain. Another praised it as “lightweight, agile, and very fun on the trail.” This is the magic of a well-tuned carbon frame. You stop thinking about the bike and start focusing on the trail. The frame’s subtle forgiveness allows you to hold your line through loose sections, and its vibration damping lets you ride longer with less fatigue. The Practical Bottom Line For riders considering an entry level hardtail mountain bike, the SDY21 represents an exceptionally compelling choice. It is a genuine cheap mountain bikes option that delivers premium features: a full T800 carbon frame weighing as little as 1,028 grams, full internal cable routing, and compatibility with three axle standards (135mm QR, 142mm TA, and 148mm Boost). But its real value lies in its ride quality—a balanced tuning of stiffness and compliance that proves you do not need to suffer a harsh ride to enjoy the benefits of carbon. The next time you hear “stiffer is better,” remember that engineering excellence is about balance. A frame that bends just enough to hold traction, absorbs just enough chatter to keep you fresh, and reacts precisely when you need it to is not a compromise. It is a smarter design. The Trifox SDY21 is proof that sometimes, the best frames are the ones that give a little to gain a lot.
The most persistent question in road cycling hasn't changed in decades: is a carbon frame worth the premium? For riders eyeing the Trifox X16QR, this calculation involves a 979-gram 56cm frameset, T800 carbon construction, and the enduring simplicity of rim brakes. The price gap between this carbon frame and a comparable alloy alternative is real. But so are the performance returns. Let's weigh them. The Weight Equation: How Much Does 200 Grams Actually Matter? Spec sheets tell one part of the story. The X16QR 56cm frameset weighs 979g ±30g. A high-quality aluminum frame in the same size typically lands between 1,200g and 1,500g. That's a 200-500g difference—the equivalent of carrying a full water bottle or leaving it at home. But raw grams don't capture the riding experience. The X16QR's T800 carbon fiber construction offers a stiffness-to-weight ratio that aluminum can't match. Every pedal stroke feels immediate, with less energy lost to frame flex. On a climb or out of a corner, that responsiveness translates into tangible performance. For competitive cyclists, a 500g lighter frame can improve climbing speed by 1-2%, potentially saving 20-30 seconds per hour on steep ascents. For the rest of us, the benefit is less about seconds and more about sensation—a bike that feels eager, lively, and responsive to every input. Beyond Weight: The Ride Quality Argument Weight savings are only part of carbon's value proposition. The X16QR's natural vibration-damping properties fundamentally change how a road bike feels over long distances. Carbon fiber excels at absorbing high-frequency road vibrations—the relentless chatter of chipseal, worn pavement, and expansion joints. Studies have shown that carbon frames can reduce high-frequency vibration transmission to the rider by 23–37% compared to aluminum. Riders report up to 30% less forearm fatigue after two hours on carbon-equipped bikes. This means you arrive at the end of a long ride less beaten down, with fresher hands, arms, and focus. For endurance riders and century enthusiasts, this comfort advantage alone justifies the upgrade. Additionally, carbon frames can be "tuned" through different layup schedules to achieve specific ride characteristics—stiff where you need power transfer, compliant where you want relief from road imperfections. This level of engineering refinement is difficult to achieve with aluminum. The Rim Brake Advantage: Simplicity and Savings The X16QR is a road frameset rim brake design at a time when the industry has largely shifted toward discs. For many riders, this is a feature, not a drawback. Rim brakes offer lighter overall system weight, simpler maintenance, and easier wheel changes compared to disc systems. There are no rotors to align, no calipers to bleed, and no risk of contaminated pads. For riders who don't regularly descend mountains in the rain, rim brakes remain more than adequate. The pragmatic advantage is cost. Disc brake frames and wheels command premiums at every price point. By choosing a rim brake frameset like the X16QR, you're investing more of your budget into the frame itself—the foundation of the bike—rather than into a braking system you may not fully utilize. The quick-release dropouts (front 9×100mm, rear 10×130mm) further simplify wheel compatibility and maintenance. Building Your Dream: The Complete Frameset Package The X16QR isn't just a bare frame. The complete 56cm frameset includes a full carbon fork (325g) and a carbon seatpost (182g), ensuring weight savings are carried throughout the entire build. Internal cable routing keeps the cockpit clean and the frame looking modern, while compatibility with both DI2 electronic and mechanical groupsets ensures flexibility regardless of your drivetrain preference. Tire clearance up to 700×28C provides a moderate increase in comfort and grip over the standard 25C limit, allowing for slightly wider rubber without compromising the frame's race-oriented geometry. Who Is the X16QR For? The X16QR's weight savings and ride quality are most valuable for: - Climbing specialists who spend significant time on steep grades. - Endurance riders who prioritize comfort over long hours in the saddle. - Enthusiast builders who want a high-quality carbon foundation without paying the premium for disc brakes. - Riders who value simplicity—quick-release wheels, easy maintenance, and decades of rim brake compatibility. For a pure budget build, an aluminum frame will save money upfront. But for the rider who understands that a frame is the heart of the bike and that weight and ride quality matter on every ride, the X16QR offers a compelling value proposition. The question isn't whether carbon is "worth it." It's whether your riding deserves the upgrade.
The fork is one of the most important contact points between you and the trail. It influences steering precision, front-end weight, and how much vibration reaches your hands. For riders building or upgrading a hardtail, the choice between a carbon bike fork and an aluminum model can feel like a trade-off between cost, weight, and durability. The Trifox TMK200 is a premium carbon bike fork designed for 29er mountain bikes, but is it the right choice for you? Here's a detailed comparison to help you decide. Weight: Where Carbon Shines Brightest The most obvious difference between carbon and aluminum forks is weight. Carbon fiber's exceptional strength-to-weight ratio allows manufacturers to build forks that are remarkably light without sacrificing stiffness. The Trifox TMK200 boost rigid fork weighs just 507 grams (without the thru-axle). To put that in perspective, many aluminum rigid forks weigh between 800 and 1,200 grams, depending on construction. That's a potential saving of 300 to 700 grams right at the front of the bike—weight that you'll feel on every climb and every acceleration. Shedding this much weight from the front end transforms how a bike handles. The front wheel becomes easier to lift over obstacles, the bike feels more agile in tight switchbacks, and your shoulders and arms experience less fatigue over long days on the trail. For cross-country racers, bikepackers, or anyone who spends significant time climbing, a carbon fork's weight advantage is a compelling reason to upgrade. Ride Quality and Vibration Damping Weight savings are only part of the story. The way a fork handles trail chatter and vibration has a profound impact on comfort and control. Carbon fiber has natural vibration-damping properties that aluminum simply cannot replicate. When you ride over washboard gravel, root sections, or chattery hardpack, a carbon fork absorbs many of those high-frequency vibrations before they reach your hands. The result is less arm pump, reduced fatigue, and a more connected feel to the trail—you stay fresh and focused longer. Aluminum, by contrast, transmits vibration more directly. Many riders describe the sensation as "harsh" or "buzzy." While an aluminum fork can be engineered with some degree of compliance, it will never match carbon's ability to filter out trail noise. For riders covering long distances on mixed terrain, the comfort advantage of a carbon bike fork is significant. Stiffness and Steering Precision A fork needs to be stiff enough to track precisely through corners and under braking, without flexing or wandering. High-quality carbon forks like the TMK200 are engineered with unidirectional carbon layups that optimize stiffness in the directions that matter. The result is exceptional lateral rigidity—when you lean the bike into a turn or brake hard on a descent, the fork resists twisting and flexing, providing predictable, confidence-inspiring handling. Aluminum forks can also be very stiff, but they often achieve that stiffness through thicker tubing, which adds weight. A well-designed carbon fork offers the best of both worlds: race-ready stiffness at a fraction of the weight. The TMK200's tapered steerer tube (1-1/8" to 1-1/2") and Boost 110x15mm thru-axle further enhance steering precision, ensuring the front wheel stays exactly where you point it. Durability and Impact Resistance This is where the debate gets nuanced. Both materials are strong, but they fail in different ways. Aluminum is tough and resistant to abrasion. It can take repeated impacts without sudden failure. However, aluminum does have a fatigue life. Over years of hard riding, the material can develop micro-cracks that eventually lead to failure, often around weld points. Carbon fiber does not fatigue in the same way. It can theoretically last indefinitely if not damaged. However, carbon is more vulnerable to sharp impacts—a direct rock strike or a crash that pinches the fork against a sharp edge can cause hidden delamination. The good news is that quality carbon forks like the TMK200 are built with robust layups around high-stress zones, and modern epoxy resins offer excellent impact resistance. For most riders, the durability difference is less about which material is "stronger" and more about how you ride. If you frequently ride in rocky terrain where fork strikes are common, aluminum's toughness may offer peace of mind. If you prioritize weight and ride smoother trails or gravel, carbon's fatigue-free lifespan is a major asset. Cost and Value Aluminum forks are generally more affordable, making them a popular choice for budget builds. A decent aluminum rigid fork can cost $50 to $150. Carbon forks command a premium, but the price gap has narrowed significantly. The Trifox TMK200 is priced at just $109—a remarkably accessible entry point for a T800 carbon fork with Boost spacing, a tapered steerer, and disc brake compatibility. At this price, the value proposition shifts dramatically. You're getting carbon's weight savings, vibration damping, and stiffness for only a modest premium over aluminum. Which One Is Right for You? Choose a carbon bike fork like the Trifox TMK200 if: - You prioritize low weight for climbing and acceleration. - You ride long distances and want reduced hand fatigue. - You value precise steering and responsive handling. - You're building a lightweight XC hardtail, gravel bike, or bikepacking rig. Choose an aluminum fork if: - You're on a very tight budget (under $100). - You frequently ride in extremely rocky terrain where impacts are common. - You prefer the feel of a stiffer, more direct front end (some riders do). Final Thoughts The Trifox TMK200 represents a compelling option for riders seeking a carbon bike fork that delivers on weight, ride quality, and modern standards. At just 507 grams, with T800 carbon construction, Boost 110x15mm spacing, and clearance for tires up to 29×3.0 inches, it's a versatile upgrade for any 29er hardtail. Whether you're upgrading a stock aluminum fork or building a lightweight race bike, the TMK200 offers performance that rivals forks costing two or three times as much. For riders who value a responsive, comfortable, and lightweight front end, this boost rigid fork is an investment that pays off on every ride.
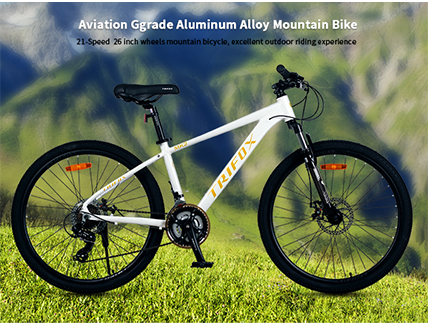
Not every rider needs a carbon fiber race machine or a long-travel enduro sled. Sometimes, you need a bike that simply works—for the trails behind your house, for the daily commute to work or campus, and for those spontaneous adventures that don't require a four-figure investment. The Trifox Ventura 26 Path is exactly that bike: a thoughtfully equipped 26 inch mountain bike that blends modern features with genuine value. Here's how it fits into three different riding lives. For the Trail Rider: Capable, Confident, and Fun Let's start where the Ventura 26 Path truly shines: on the dirt. The foundation of any good trail mountain bikes is its frame, and this bike delivers a lightweight AL6061 aluminum alloy frame that's both stiff and corrosion-resistant. At 14.1–14.3kg (depending on size), it's noticeably lighter than the heavy steel bikes found at big-box stores, which translates directly to easier climbing and more playful handling on singletrack. The 21-speed Shimano Tourney drivetrain (3×7) gives you a wide gear range—from a low 14T to a high 34T cassette. This means you'll have a gear for steep climbs and another for flat-out rolling sections. The mechanical disc brakes provide consistent stopping power in wet or dry conditions, a critical safety feature when descending loose or muddy trails. And with 26×1.95 Kenda tires and a spring front fork, the bike absorbs enough chatter to keep you comfortable on light to moderate trail conditions. One rider, a larger individual living on a sailboat, noted that the bike rides "far better than I expected" and praised its solid construction. For weekend warriors, beginners, or anyone looking for a reliable trail companion, the Ventura 26 Path punches well above its $199 price point. For the Commuter: Durable, Practical, and Low-Maintenance City streets and bike paths present a different set of challenges: potholes, curbs, rain, and the need for reliable stopping power. The Ventura 26 Path handles commuting duties with ease. The AL6061 aluminum frame is resistant to corrosion, meaning it won't rust out after a season of wet rides. The 26-inch wheels are nimble enough for dodging traffic and stable enough for loaded panniers. The 21-speed gearing provides the range to tackle hills on the way to work while still offering a high enough gear for cruising on flat sections. The mechanical disc brakes excel in stop-and-go traffic, offering predictable modulation and all-weather performance that rim brakes simply can't match. The included alloy flat handlebar (620mm wide) and comfortable silicone gel saddle make daily miles less fatiguing. Maintenance is straightforward: the 7-speed cassette and chain are inexpensive to replace, and the mechanical disc brakes are easy to adjust with basic tools. For students, urban dwellers, or anyone who wants a bike that can handle daily abuse without constant tinkering, this is a smart choice. For the Backyard Explorer: Affordable, Versatile, and Ready for Anything Sometimes the best rides are the unplanned ones—a quick loop around the neighborhood, a spin on the local rail trail, or teaching a child to ride on a grassy field. The Ventura 26 Path excels as a versatile, do-anything bike that won't break the bank. Available in 15-inch and 17-inch frame sizes, it fits a wide range of riders, from teens to adults. The 26-inch wheel size is the classic all-arounder: agile enough for tight spaces, stable enough for new riders, and compatible with a vast ecosystem of affordable tires and tubes. The bike comes in three attractive colors—Blue, Grey, and White—so you can choose a look that suits your personality. The 21-speed Shimano Tourney drivetrain is forgiving for beginners learning to shift, while the disc brakes provide the stopping power that builds confidence. For parents buying a bike for a growing teen, or for anyone who wants a second bike for guests or errands, the Ventura 26 Path offers genuine value. Why the Ventura 26 Path Works Across So Many Lives The secret to this bike's versatility is simple: it focuses its budget on what matters. The AL6061 aluminum frame provides a lightweight, durable foundation. The Shimano Tourney drivetrain delivers reliable, wide-range gearing. The mechanical disc brakes offer all-weather stopping power. And the 26-inch wheels strike a balance between agility and stability that works for trails, streets, and paths alike. Whether you're a beginner looking for your first trail mountain bikes, a commuter seeking a reliable daily driver, or a parent wanting a capable 26 inch mountain bike for the family, the Ventura 26 Path fits your life. At just $199, it's an investment in adventure that doesn't require a second mortgage. Get out there and ride.
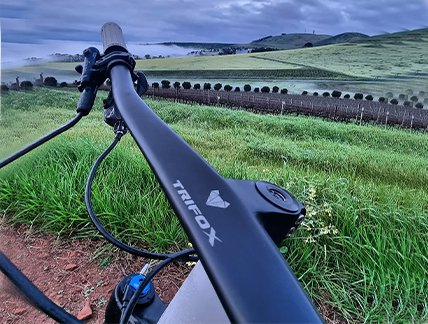
You’ve spent good money on a carbon cockpit upgrade. It looks fast just sitting there—sleek matte finish, clean lines, no visible cables. But after a season of sweaty summer rides, dusty trail days, and relentless sun exposure, will that beautiful finish still look the part? More importantly, will it still perform? The Trifox RHB100 carbon mtb bar isn’t just another integrated cockpit. Its T800 carbon construction and UD (unidirectional) matte finish are engineered to handle real-world abuse, not just look good in product photos. Let’s take a closer look at how this finish holds up under three common threats: friction from grips, chemical assault from sweat, and UV degradation from the sun. The Challenge: Three Threats to Every Handlebar Finish Before diving into the RHB100’s performance, it’s worth understanding what any handlebar finish is up against: 1. Grip Friction and Clamping Pressure – Your grips or bar tape constantly rub against the surface. Over time, this micro-abrasion can wear through clear coats and even damage the underlying resin if the finish isn’t durable. 2. Sweat and Body Chemistry – Sweat contains salts and acids that can corrode alloy components and damage clear coat finishes on carbon. Harsh degreasers and chemical cleaners can also attack the resin structure. 3. UV Radiation – The epoxy resin that binds carbon fibers is sensitive to ultraviolet light. Prolonged sun exposure can degrade unpainted carbon, leading to surface chalking, micro-cracking, and eventual weakening. A truly durable handlebar needs to resist all three. Here’s how the RHB100 measures up. UD Matte Finish: Built for Wear Resistance The RHB100 features a UD (unidirectional) matte finish, a surface treatment that’s become the gold standard for high-performance carbon components. Unlike glossy finishes that can show every fingerprint and micro-scratch, the matte UD surface is remarkably resistant to visible wear. Under the grip area—where friction is highest—the finish holds up exceptionally well. Users who have ridden the RHB100 for extended periods report that the matte surface doesn’t polish or become glossy under grips, a common problem with cheaper carbon finishes. The key is the quality of the clear coat itself; a properly formulated matte clear coat resists abrasion far better than many riders expect. Trifox specifies a 4–6 Nm torque range for the stem faceplate bolts. This isn’t just about safety—it’s about protecting the finish. Over-tightening can compress the carbon fibers and damage the surface layer. Following the recommended torque ensures the grip area remains uncompromised for years. Sweat and Chemical Resistance: More Than Skin Deep One of the RHB100’s standout features is its corrosion resistance. The product page explicitly notes that the T800 carbon fiber material is “resistant to corrosion” with “high temperature tolerance, ensuring longevity”. But what does that mean in practice? The epoxy resin used in quality carbon components—including the RHB100—is formulated to withstand exposure to sweat, mild cleaners, and environmental moisture. Unlike alloy handlebars that can pit or oxidize over time, carbon simply doesn’t corrode. That said, maintenance still matters. Sweat that dries on the surface won’t damage the carbon itself, but over many months it can leave mineral deposits or dull the finish if not cleaned periodically. The best practice is simple: wipe down your bars after particularly sweaty rides with a damp cloth and mild bike-safe cleaner. Avoid degreasers or solvents, which can attack the resin. One user reported riding a Trifox carbon handlebar for over 10,000 km with “no issues at all,” noting that the bars still “look awesome”. That’s real-world evidence of the finish’s durability under sustained use. UV Protection: Does the Sun Damage the RHB100? This is where many budget carbon components fall short. Unprotected epoxy resin will degrade under prolonged UV exposure, turning chalky and brittle over time. But the RHB100’s matte finish includes UV-inhibiting additives in the clear coat. The aerospace-grade clear coat used on the RHB100 serves as a barrier against UV radiation, moisture, and scratches, ensuring the bar maintains both its structural integrity and sleek appearance. While no finish is completely immune to years of direct sun exposure, the RHB100’s coating is formulated to resist UV degradation far better than unpainted or poorly finished carbon. For riders in particularly sunny climates, a few simple habits extend the life of any carbon component: store your bike indoors or in the shade when possible, and avoid leaving it baking in direct sunlight for hours on end. The Verdict: A Finish That Earns Its Place The Trifox RHB100’s UD matte surface isn’t just for show. It’s a functional, durable finish that resists abrasion, shrugs off sweat and moisture, and includes UV protection to prevent sun damage. Combined with the stiffness and vibration damping benefits of the T800 carbon construction, this mountain bike aero bars setup delivers performance that lasts. Whether you’re grinding up sweaty climbs, ripping through dusty descents, or leaving your bike parked in the sun between rides, the RHB100’s finish is engineered to handle it. Clean it occasionally, torque it correctly, and ride with confidence—this bar is built for the long haul.
A full-suspension mountain bike lives or dies by its rear suspension. The right design transforms a rough trail into a flowing ribbon of traction and control. The wrong one leaves you fighting pedal bob, brake jack, and a rear wheel that refuses to track. The Trifox MFM100 carbon full-suspension frame is engineered around a four-bar linkage system with a Trunnion-mounted rear shock—a combination that prioritizes climbing efficiency, descending composure, and long-term reliability. Here's how this suspension design works and why it makes the MFM100 an outstanding mtb trail bike frame for XC and light trail riding. Four-Bar Linkage: The Science of Predictable Traction The MFM100 employs a Horst-link-style four-bar linkage, a design proven over decades of mountain bike development. Unlike a simple single-pivot system, a four-bar linkage uses a series of linkages to create a virtual pivot point—a floating center of rotation that can be positioned anywhere the designer chooses. This unlocks two critical benefits for trail performance. Anti-Squat and Pedaling Efficiency: Anti-squat measures how much the suspension resists compressing under pedaling forces. Too little anti-squat, and the bike bobs excessively on climbs. Too much, and the suspension becomes harsh and unresponsive. With a four-bar linkage, the designer can tune the anti-squat curve to be maximally effective right at the sag point—where the bike sits most of the time—while relaxing it deeper in the travel. The result is a frame that climbs with the urgency of a hardtail but remains active and plush over roots and rocks. Anti-Rise and Braking Stability: Anti-rise describes how braking forces affect suspension compression. When you grab the brakes on a steep descent, some designs cause the rear suspension to stiffen (high anti-rise), reducing traction and control. The four-bar layout of the MFM100 reduces the effect of braking forces on the suspension, meaning the rear wheel stays active and glued to the trail even when you're on the anchors. For riders pushing hard on technical descents, this predictable, unflappable rear-end behavior is what separates a confidence-inspiring mtb trail bike frame from one that keeps you guessing. Independent reviews confirm that the MFM100 tracks straight on steep, rocky runs, with the carbon frame staying composed under hard hits. Trunnion Mount: A Compact, Efficient Shock Interface The MFM100 features a Trunnion rear shock mount, a design that has rapidly become the standard on modern performance frames. Instead of the traditional eyelet-and-bolt attachment at both ends, a Trunnion mount secures the shock at two points on the frame. This design choice delivers several tangible benefits. Improved Suspension Performance: The Trunnion mount allows the shock to pivot more freely around its mounting points, producing a smoother, more linear suspension curve. The shock compresses and extends with less friction, translating to better traction and control on uneven surfaces. Reduced Weight and Enhanced Geometry: By eliminating the need for long eyelets and reducing the overall length of the shock, the Trunnion mount contributes to a lighter overall frameset. It also allows frame designers to optimize bike geometry and create better clearance for larger tires. On the MFM100, this translates to generous tire clearance up to 29×2.35 inches, giving you the freedom to run high-volume rubber for comfort and traction. T800 Carbon: Stiff, Light, and Composed All this sophisticated suspension hardware is wrapped in a T800 carbon fiber frameset. T800 is a high-modulus carbon fiber known for its excellent stiffness-to-weight ratio. The result is a frame that weighs just 2170–2420 grams depending on size (XS to L)—remarkably light for a full-suspension chassis. More importantly, the carbon construction provides the lateral stiffness needed to keep the bike tracking precisely through corners and under power. Riders who have built up the MFM100 consistently praise its rigidity. One owner noted that the frame is "very fast and rigid," with pedaling force transmitting directly to the wheels without wasteful flex. On the descents, the carbon frame stays composed and planted, never feeling nervous or twitchy. Versatility: From Geared Trail Bike to Single Speed The MFM100's T800 carbon frame and threaded BSA 68mm bottom bracket provide an exceptionally versatile platform. While it's designed for geared 1× drivetrains, its solid rear triangle and robust pivot construction also make it a surprisingly capable candidate for a single speed bike frame build. Converting a full-suspension frame to single speed requires a chain tensioner mounted to the derailleur hanger (the MFM100 uses a replaceable hanger). The bike's four-bar linkage exhibits minimal chain growth through its travel, which keeps the chain tension stable and reduces the risk of drivetrain binding or chain snap—a common issue when converting less sophisticated suspension designs to single speed. For riders seeking an ultra-low-maintenance, quiet, and mechanically pure trail experience, the MFM100 offers a compelling single-speed platform. Trail-Ready Geometry and Modern Standards The MFM100's geometry is tuned for modern XC and trail riding. A 68.5° head tube angle provides stability at speed without sacrificing front-end traction on climbs. The 74.7° seat tube angle places the rider in a powerful, centered pedaling position. Boost 148×12mm rear spacing increases wheel stiffness and allows for shorter chainstays, enhancing agility. Internal cable routing keeps the frame clean and protects hoses from trail debris. Conclusion The Trifox MFM100 carbon full-suspension frame delivers a suspension system that punches well above its price class. The four-bar linkage provides tunable anti-squat for efficient climbing and reduced anti-rise for confident braking. The Trunnion-mounted rear shock ensures smooth, linear suspension action while saving weight and improving geometry. And the T800 carbon construction offers the stiffness and light weight that serious riders demand. Whether you're building a dedicated XC race machine, a versatile mtb trail bike frame, or even a minimalist single speed bike frame, the MFM100 is a platform that handles the trail with composure and confidence.


