


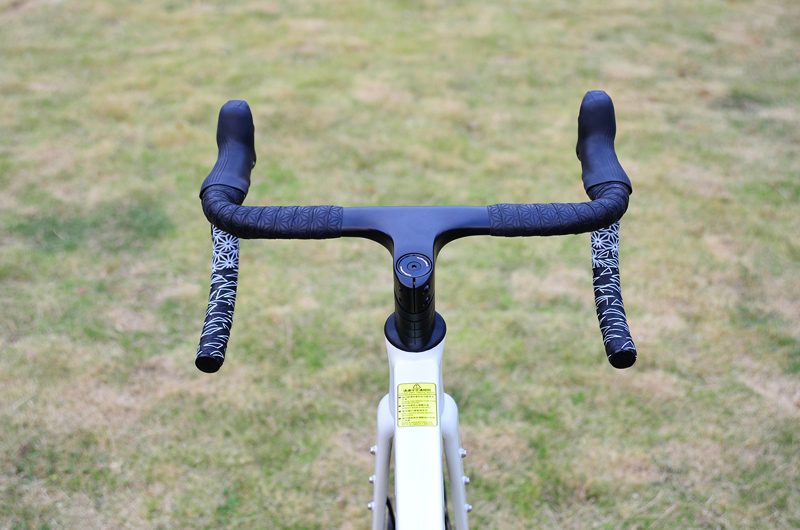
Your hands are one of only three contact points with your bike. Yet, handlebar tape is often treated as an afterthought—something to wrap on and forget about. The truth is, the right tape can transform your ride. It can reduce fatigue, improve control, and make even the longest days in the saddle feel more manageable. The Trifox BHT100 is designed to do exactly that. It’s a best road bike handlebar tape that balances comfort, durability, and grip—without breaking the bank.
What Makes the BHT100 Different?
The BHT100 uses a dual-layer EVA + PU leather construction. The EVA foam base provides the shock absorption that fights hand fatigue, while the PU leather outer layer delivers consistent, all-weather grip and resists wear. This combination is what sets it apart from single-layer tapes that either lack cushioning or wear out too quickly. It’s a tape that stays comfortable mile after mile, season after season.
Comfort That Lasts
Road vibration is the silent enemy of long rides. It creeps into your hands, arms, and shoulders, slowly draining your energy. The BHT100’s EVA foam core absorbs high-frequency vibration before it reaches your palms. This means less arm pump, less numbness, and more focus on the road ahead. Riders consistently praise the tape for its “good grip and cushioning,” noting that it stays firm and stretched even after extended use. Whether you’re grinding out a century or tackling steep climbs, the BHT100 keeps your hands fresher for longer.
Grip You Can Trust
A tape that’s comfortable but slippery is useless. The BHT100’s PU leather surface provides a secure, tactile grip in all conditions—dry or damp. The texture prevents your hands from sliding, even when you’re sweating hard or climbing in warm weather. This consistent grip reduces the tension you need to hold the bar, which in turn reduces fatigue. Less squeezing means more relaxed hands, better steering precision, and greater confidence on descents.
Durable and Easy to Install
Cheap tape peels, cracks, or loses its cushioning after a few rides. The BHT100 is built to last. Its waterproof adhesive strip helps the tape stay in place through rain and pressure-washing, and the included end plugs and finishing tape ensure a clean, durable wrap. Installation is straightforward, and the tape stays put without lifting or shifting. For riders who want a comfortable bike handlebar tape that doesn’t need constant replacement, the BHT100 is a smart investment.
A Smart Upgrade for Any Road Bike
At just $11.99, the BHT100 is one of the most cost-effective upgrades you can make[. It refreshes your cockpit, improves comfort, and enhances control—all for less than the price of a decent pair of cycling socks. Whether you’re a weekend warrior, a club racer, or a daily commuter, fresh tape is a simple way to make your bike feel new again. The BHT100 proves that you don’t need to spend a fortune to get premium performance.
Conclusion
Your handlebar tape is your direct connection to the road. Don’t settle for worn-out, slippery, or uncomfortable tape. The Trifox BHT100 delivers the grip, cushioning, and durability that serious riders demand. It’s a best road bike handlebar tape that punches well above its price point, and a comfortable bike handlebar tape that keeps you riding longer with less fatigue. Upgrade your cockpit today—your hands will thank you.
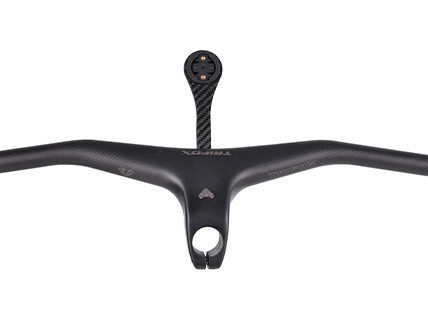
As modern bicycles become more aerodynamic and visually refined, integrated handlebars and cockpits have become increasingly popular among road, gravel, and mountain bike riders. These sleek systems improve cable management, reduce wind resistance, and create a cleaner appearance. However, they also present a challenge: where should you securely mount your cycling computer?
That's where a high-quality carbon computer mount comes in. Designed specifically for integrated handlebars, these mounts provide a lightweight, secure, and professional solution for displaying ride data exactly where you need it.
Why Integrated Handlebars Need a Dedicated Computer Mount
Traditional handlebar-mounted computer brackets often create clutter and may not fit well on modern integrated cockpits. Riders need a mounting solution that complements the design of their bike while maintaining easy access to important ride information.
A dedicated bike computer stem mount positions your cycling computer directly in front of the stem, creating a more natural viewing angle while keeping your handlebars clean and organized. This setup not only looks better but also improves safety by allowing riders to check speed, navigation, and performance metrics without taking their eyes too far off the road or trail.

The Advantages of Carbon Fiber Construction
Material choice matters when selecting a computer mount. Carbon fiber has become a preferred option because it combines exceptional strength with extremely low weight.
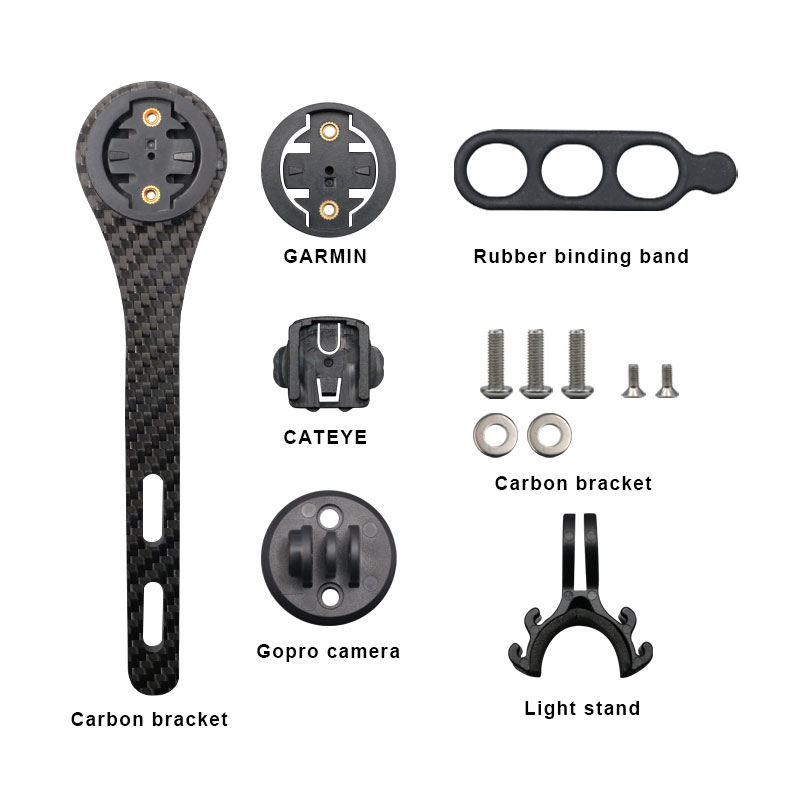
The TRIFOX SBH100 is constructed from premium 3K carbon fiber, providing an outstanding stiffness-to-weight ratio. Unlike heavier aluminum alternatives, carbon fiber adds minimal weight to your cockpit while maintaining excellent durability. It also helps reduce vibration, keeping your cycling computer stable even on rough roads and technical trails.
For performance-focused cyclists, every gram matters. A lightweight cockpit contributes to a more responsive bike while preserving the sleek appearance of an integrated handlebar setup.
More Than Just a Computer Mount
Today's riders often use multiple devices during a ride. In addition to a cycling computer, many cyclists rely on action cameras, bike lights, and GPS accessories.
The TRIFOX SBH100 goes beyond being a simple computer holder. Its versatile design supports major cycling computer brands such as Garmin, Bryton, CatEye, and iGPSPORT while also accommodating GoPro-compatible accessories and compatible bike lights. This makes it an excellent choice for riders looking to build a complete and organized cockpit system.
Whether you're training on the road, exploring gravel routes, or hitting technical trails, having all your devices mounted in one centralized location improves convenience and overall ride experience.
Ideal for Road and Mountain Bike Riders
While many cyclists associate computer mounts with road bikes, they are equally valuable for off-road riding. A secure mountain bike computer mount allows riders to monitor navigation, elevation, heart rate, and ride statistics without compromising control.
Mountain biking often involves rough terrain and constant vibration, making mount stability especially important. The rigid carbon construction of the SBH100 helps ensure that your cycling computer remains secure even during aggressive trail riding. Its centered position also improves visibility while maintaining a balanced cockpit setup.
What to Look for When Choosing a Computer Mount
When shopping for a computer mount for integrated handlebars, consider the following factors:
• Lightweight but durable construction
• Compatibility with major cycling computer brands
• Support for accessories such as cameras and lights
• Aerodynamic design
• Secure attachment system
• Vibration resistance
• Clean integration with modern cockpits
The SBH100 checks all of these boxes while offering the premium appearance expected from a carbon fiber component.
Benefits of an Aerodynamic Cockpit Setup
Modern cyclists increasingly focus on aerodynamic efficiency. By integrating your cycling computer neatly into the cockpit, a carbon computer mount reduces clutter and helps create a cleaner airflow around the handlebars. While the gains may seem small, every advantage matters during long rides, races, and endurance events.
Additionally, a well-organized cockpit improves the overall appearance of the bike, giving it a professional look often seen on high-end race machines.
Final Thoughts
As integrated handlebars become the standard on many modern bikes, choosing the right computer mount is more important than ever. A quality carbon mount enhances both functionality and aesthetics while keeping your cockpit organized and aerodynamic.
The TRIFOX SBH100 combines lightweight carbon construction, broad device compatibility, and clean integrated styling, making it an excellent upgrade for cyclists who want a more professional and efficient setup. Whether you're a competitive road rider, gravel adventurer, or trail enthusiast, investing in a premium carbon computer mount can significantly improve your riding experience.
There was a time when mountain bikers had to make an impossible choice: set your saddle high for efficient climbing, or drop it low for descending control. You couldn't have both — not without stopping, reaching for a hex key, and manually adjusting your seatpost mid-ride. That compromise is over. The dropper seatpost has revolutionized how we ride, transforming the mountain bike into a truly adaptable machine. If you haven't yet made the switch, here's why every mountain biker — from XC racer to weekend trail rider — should consider adding a dropper to their setup.
The Problem: One Height Doesn't Fit All
Saddle height is one of the most critical variables in mountain biking. Too high on a descent, and you can't shift your weight back far enough, reducing your center of gravity and compromising control. Too low on a climb, and you lose pedaling efficiency, draining energy with every stroke. Before dropper posts, riders had to compromise — sacrificing either climbing efficiency or descending confidence. A dropper post eliminates that trade-off entirely. It allows you to have both positions — and anything in between — on demand, meaning you can transition from technical descending to climbing without pause or loss of efficiency.

The Benefits: Control, Confidence, and Speed
The advantages of a dropper seatpost extend far beyond convenience. Here's what a quality dropper brings to your ride:
1. Improved Descending Control
By lowering your saddle on descents, you can shift your weight back and lower your center of gravity, dramatically improving stability and control. This allows you to tackle steeper, more technical terrain with confidence. You'll find yourself carving through rock gardens and dropping into chutes with a level of agility that feels almost like a different bike.
2. Enhanced Climbing Efficiency
When the trail points upward, you can raise your saddle back to your optimal pedaling height, maintaining full pedaling efficiency without the drag of a lowered post. This means you can climb faster and with less fatigue, arriving at the top with more energy for the descent ahead.
3. Greater Maneuverability and Safety
A dropper post gives you the ability to drop your saddle quickly when you need to put a foot down on a tricky section, improving safety and reducing the risk of falls. It also makes mounting and dismounting the bike easier, especially on uneven terrain. The improved weight distribution and bike handling translate directly to more confidence and a more enjoyable ride.
4. Smoother, More Flowing Rides
Perhaps the most underrated benefit is the flow. With a dropper, you can attack a descent, drop the saddle, flow through the bottom, and raise it again seamlessly as you start the next climb — all without breaking rhythm. The ride becomes smoother, faster, and more engaging.
Choosing the Right Dropper: What to Look For
Not all dropper posts are created equal. When shopping for a bicycle adjustable seatpost, consider these factors:
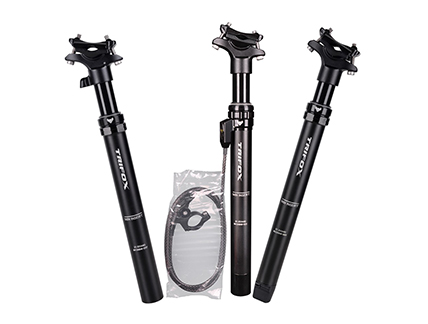
Travel: The amount of drop, typically ranging from 100mm to 200mm. XC riders often prefer 100–125mm, while trail and enduro riders benefit from 125–180mm or more. The Trifox AP309 offers 125mm of travel — a sweet spot that provides enough drop for aggressive descending while remaining compatible with most frame geometries.
Diameter: You must match the post diameter to your frame's seat tube. Common sizes are 27.2mm, 30.9mm, and 31.6mm. The AP309 is a 30.9 external dropper post, making it compatible with a wide range of modern mountain bike frames.
Cable Routing: Dropper posts come with internal or external cable routing. Internal routing offers a cleaner look and better cable protection, while external routing is easier to install and maintain. The AP309 offers versatile external routing options (upper and center), making installation straightforward and reliable. External routing is particularly well-suited for frames without internal cable ports, or for riders who prefer the simplicity of maintenance.
Materials and Build Quality: Look for durable materials like 7075 aluminum, which offer strength without excessive weight. The AP309 is constructed from high-quality AL7075, making it both sturdy and durable, and features a corrosion-resistant stainless steel screw. Weight is also a consideration; the AP309 weighs approximately 783g depending on the routing option, making it lightweight enough for all-day rides.
Why the Trifox AP309 Stands Out
The Trifox AP309 is an excellent example of what a modern dropper post should be. With its 125mm of air-sprung travel, it provides the perfect range for trail, all-mountain, and even aggressive XC riding. Its 30.9mm diameter fits most modern mountain bike frames, and the external cable routing simplifies installation and maintenance. The post features an adjustable return speed dial, allowing you to fine-tune the drop and return speed to match your riding style and the demands of the trail. The responsive remote lever is designed for single-finger operation, with a smooth, consistent action that gives you subconscious confidence on the trail. Riders who have installed the AP309 report a noticeable improvement in control and flow, with one reviewer noting that it "disappears into the ride, becoming an instinctive lever for control".
Conclusion: The Upgrade That Transforms Your Ride
A dropper seatpost is not a luxury — it's a performance upgrade that fundamentally changes how you ride. It gives you the control to descend with confidence, the efficiency to climb with power, and the flow to ride with joy. Whether you're a seasoned enduro racer or a weekend trail rider, a quality bicycle adjustable seatpost like the 30.9 external dropper post AP309 is an investment that pays dividends on every ride. If you've been on the fence, take the leap — your trails will never feel the same again.
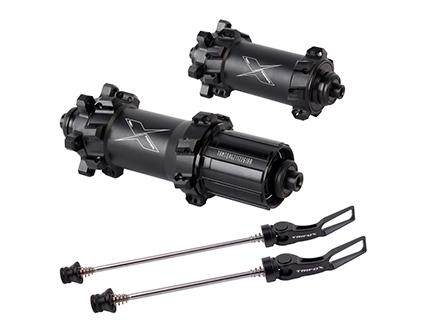
Picture a steep, rock‑strewn climb where every fraction of a pedal stroke matters. You stall for a split second, put your foot down, and the climb is over. That frustrating delay between when you start pedaling and when power actually reaches the wheel is the "dead zone" — caused by a hub's engagement angle. The Trifox M821 downhill hub is engineered to minimize that delay precisely where it matters most: on technical ascents.
Eliminating the Dead Zone
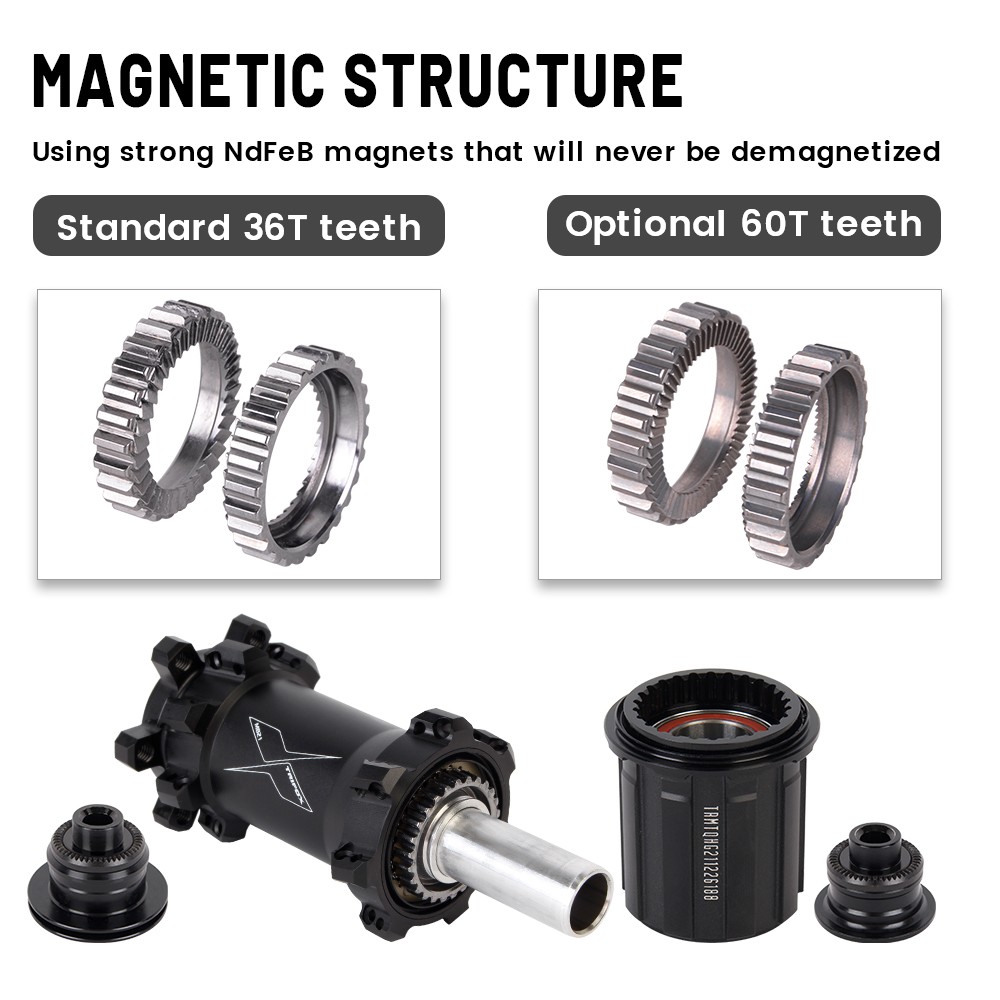
Every hub has an engagement angle — the number of degrees the cassette must rotate before the pawls lock and power transfers. A standard hub might have 6-10° of dead zone, meaning your pedal moves up to a centimeter before anything happens. The Trifox M821 uses a 36‑tooth magnetic ratchet system that dramatically reduces this lag. Riders upgrading to a high‑engagement hub consistently report a noticeable difference, with one review noting that hubs with ultra‑low engagement angles offer a “huge advantage on technical climbs” — especially when you need to quickly transfer power into a trail feature or accelerate after a momentary stall.
For tech climbing, this means you can ratchet the pedals — make small, partial pedal strokes to reposition your crank over a rock or root — without losing momentum. With a slow‑engaging hub, those micro‑adjustments yield no power. With the M821, each tiny input delivers immediate thrust, letting you crawl through the gnarliest sections without dabbing.
Why Magnetic Ratchet Outperforms Springs
Traditional hubs use steel leaf springs to push pawls outward into the ratchet ring. Those springs wear, weaken, and add drag. The Trifox M821 replaces springs with rare earth magnets that pull the pawls into the drive ring. This design offers three distinct advantages for technical climbing.
First, reliability — magnets don’t fatigue over time like steel springs, so engagement consistency remains high year after year. Stan’s, which uses a similar magnetic pawl system, notes that magnets “allow the freehub to engage more reliably and consistently than traditional spring‑based pawl designs”. Second, reduced friction — magnets create less rotational resistance when coasting, preserving momentum on rolling singletrack approaches to climbs. Third, consistent engagement feel — magnetic force remains constant regardless of temperature or wear, unlike springs that weaken over time.
The Upgrade Path: 60‑Tooth Ratchet
The M821 comes stock with a 36‑tooth magnetic ratchet, which delivers approximately 10 degrees of engagement — a meaningful upgrade over entry‑level hubs. For riders seeking even faster response, the hub accepts an optional 60‑tooth ratchet, dropping engagement to about 6 degrees. That reduction may sound small, but each degree shaved translates to less wasted pedal travel before the wheel responds. On steep, technical climbs where you‘re constantly interrupting your pedal stroke to clear obstacles, that fractional reduction can be the difference between cleaning a move and stalling out.
Built for Downhill — and the Climb Back Up
The M821 bike rim hub is classified as a downhill hub, meaning its construction prioritizes durability under high loads. For tech climbing, this matters because the hub must withstand repeated high‑torque inputs without flexing or failing. The 4‑pawl mechanism distributes engagement forces across multiple points, reducing stress on individual components. The result is a hub that feels immediate when you need power but remains robust enough to survive harsh landings and aggressive trail riding.
Riders who have switched to high‑engagement hubs often describe the sensation as “the bike just feels more alive” on climbs. One industry analysis notes that hubs with low engagement angles provide “instant power on either a technical climb, or when backpedaling to avoid a crank strike” — that split‑second difference “makes a real difference on the trails”. The M821 delivers that difference without sacrificing the durability required for aggressive descending.
For the rider who truly climbs — not just spins up fire roads but wrestles up rocky, rooty switchbacks — the rear hub is not a passive component. It‘s an active partner. The Trifox M821 high‑pawl magnetic ratchet hub ensures that when you need power, it’s there now. Not a pedal stroke from now. Not after a worrying slip. Now. That‘s what high‑pawl technology does for tech climbing — and why the M821 earns its place on builds that demand both climb and descent performance.
The seatpost is a component most riders overlook—until they notice it. That slight discomfort on rough roads, the creak that develops after a year, or the bike weight that feels just a little too heavy. The choice between a carbon fiber and an aluminum seatpost comes down to balancing weight, comfort, durability, and cost. Here are the seven key differences to help you decide which is right for your ride.
1. Weight
Carbon fiber is significantly lighter. A quality aluminum seatpost can weigh 220-300g. A carbon seatpost like the Trifox SLS21 tips the scale at just 160g (for the 30.8 x 400mm size), offering a weight reduction of 30-40% or more. That savings may seem small, but at the top of the seat tube, it reduces total bike weight and improves the bike’s overall feel.
2. Vibration Damping and Comfort
This is carbon’s strongest advantage. Carbon fiber naturally absorbs high-frequency “road buzz”—the vibration from rough pavement, chip seal, or gravel that causes fatigue over long miles. Aluminum transmits that vibration more directly, which can lead to numbness and discomfort. For long-distance road riders, gravel enthusiasts, or anyone seeking a smoother experience, carbon provides a meaningful increase in ride comfort.
3. Stiffness and Power Transfer
Both materials can be stiff, but carbon offers tunable stiffness. A well-designed carbon post can maintain the rigidity needed for efficient power transfer while still offering vertical compliance to absorb shocks. Aluminum is predictably stiff but cannot offer the same tuned flex characteristics.
4. Durability and Impact Resistance
Here, aluminum has the edge. Aluminum seatposts are tougher and can withstand direct impacts from rocks, crashes, or trail debris. If you regularly ride rocky terrain or subject your bike to hard use, aluminum offers peace of mind. Carbon can be damaged by overtightening or sharp impacts, though modern quality carbon posts are far more durable than early versions.
5. Installation and Maintenance
A carbon seatpost requires careful attention to torque specs and the use of carbon assembly paste (never grease). Carbon paste contains micro-grip particles that increase friction, allowing you to achieve a secure hold at lower torque to prevent slipping without crushing the carbon. An aluminum seatpost can be installed with standard grease and is more tolerant of minor torque variations. That said, an aluminum post in a carbon frame can corrode and seize over time, a problem carbon paste largely prevents. Either way, a torque wrench is recommended for both materials.
6. Aesthetics
Carbon’s UD matte or 3K weave finish looks undeniably premium. Aluminum posts typically have a painted or anodized finish. For builders who care about visual details, carbon offers a distinctive, high-end appearance.
7. Price and Value
Carbon costs more. A quality carbon seatpost typically ranges from $150 to $400, while aluminum options often run $50 to $150. The question becomes: is the weight savings and vibration damping worth the premium? For competitive riders, touring cyclists, or anyone spending long hours in the saddle, the answer is often yes. For casual or budget-conscious riders, aluminum remains a excellent choice.
Making Your Choice
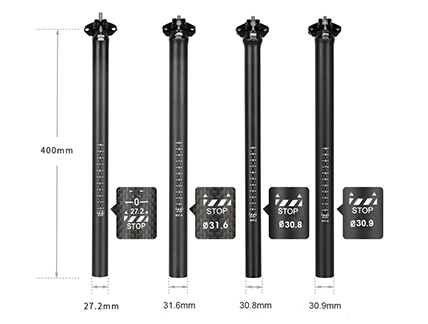
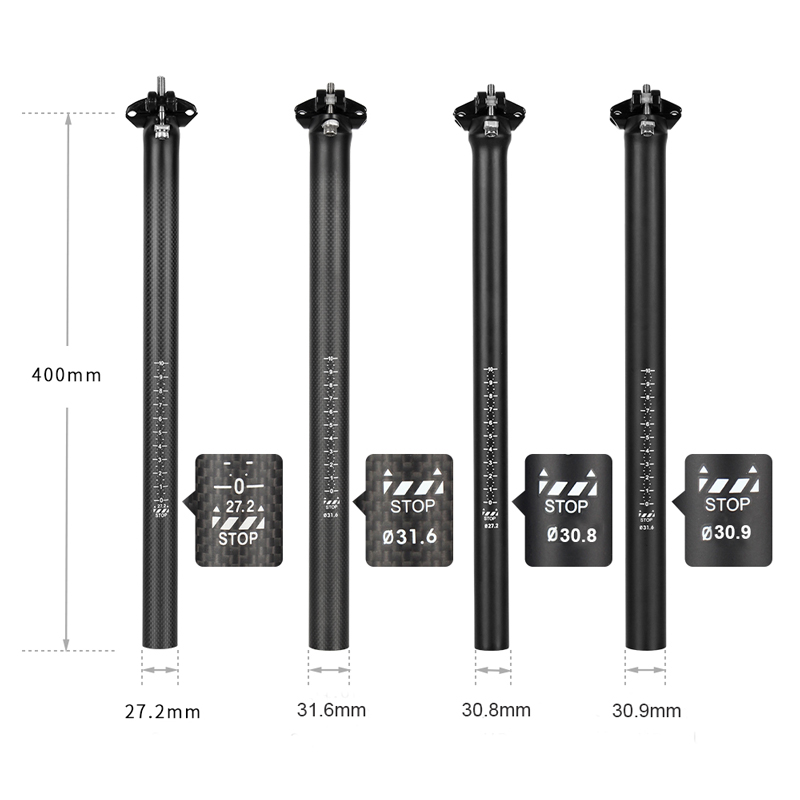
If you prioritize durability and cost, aluminum is a reliable choice. If you value weight reduction, ride comfort, and a premium aesthetic—and you’re willing to install it correctly with a torque wrench and carbon paste—a carbon seatpost like the carbon fiber seatpost SLS21 delivers measurable benefits on every ride. The Trifox SLS21 is available in multiple diameters, including the popular 27.2mm seatpost size for Mtb,road and gravel bikes, and features a 400mm length, T800 carbon construction, and titanium hardware. Upgrading your seatpost is one of the most effective ways to improve both bike performance and rider comfort—without changing how your bike looks from 10 feet away.
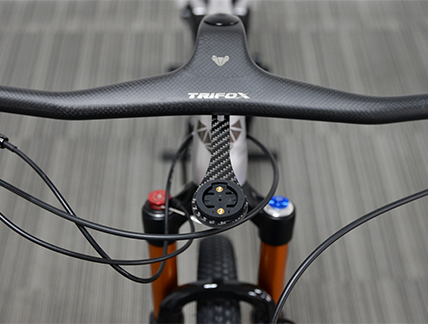
You’ve invested in a quality cycling computer, but where should you place it? The three most common mounting positions—out‑front, stem, and handlebar—each offer different trade-offs in visibility, aerodynamics, and cockpit clutter. Choosing the right one can transform your riding experience. Here’s how to decide.
Out‑Front Mount: The Racer’s Choice
An out‑front mount extends your computer forward of the handlebar, placing the screen directly in your line of sight. This keeps your gaze near the road ahead—ideal for fast group rides, criteriums, or technical descents where every millisecond of attention matters. By positioning the computer in front of the stem, out‑front mounts can also improve aerodynamics compared to bulky top‑cap setups. The drawback? They place more stress on the mount (especially over rough roads) and can make the cockpit feel slightly longer. For weight weenies and aero purists, the slight drag reduction of a low‑profile out‑front mount is often worth the trade.
Stem Mount: Clean and Secure
A stem‑mounted computer sits directly above your steerer tube, nestled between the handlebars. This location is exceptionally stable, with minimal vibration, and keeps the cockpit looking tidy—no protruding arms or extra brackets. It’s a great choice for bikepackers, commuters, or any rider who values simplicity and durability. However, because the screen sits further back and lower than an out‑front mount, you may need to glance down more noticeably to read data. For GPS models that benefit from a clear sky view, a stem mount can also position the device at a favorable angle for satellite reception.
Handlebar Mount: The Versatile Traditionalist
The classic handlebar mount clamps directly around your bar, placing the computer off to one side. This leaves the center of your cockpit free for a light, bell, or action camera. It’s often the easiest mount to install and swap between bikes, and it works with virtually any handlebar shape. The trade‑off is that your computer may be slightly off‑center, requiring a bit more head movement to check your stats. For casual riders or those who frequently switch computers between bikes, the handlebar mount’s simplicity and broad compatibility make it a solid choice.
One Mount, Many Possibilities
Why choose just one function? The Trifox SBH100 computer mount for bike takes versatility further by integrating a GoPro‑style accessory port below the computer cradle. This allows you to attach a bike flashlight mount directly beneath your GPS, keeping your handlebar uncluttered while positioning the light perfectly for nighttime visibility. Made from lightweight 3K carbon fiber, the SBH100 weighs just grams yet offers the rigidity to hold both devices steady on the roughest roads. Compatible with Garmin, Bryton, Cat Eye and other popular quarter‑turn computers, it’s a true multi‑tasker for the modern cyclist.
Making Your Choice
Ultimately, the best position is the one that suits your specific riding. Competitors chasing seconds will love the aerodynamic, eyes‑forward placement of an out‑front mount. Riders seeking a clean, bombproof cockpit will appreciate the subtle integration of a stem mount. And if you want to keep your handlebar free for other accessories—like a light or camera—a handlebar mount or the SBH100’s multi‑function design is the way to go. Whichever you choose, a secure, well‑positioned mount ensures that your data is always visible, and your focus stays on the road ahead.
Few components spark as much quiet frustration among riders as the bottom bracket. You feel it when a persistent creak ruins an otherwise perfect ride, or when an upgrade turns into a search for obscure adapters. For years, the industry swung hard toward press-fit standards, promising lighter frames and stiffer pedal platforms. But recently, the pendulum has swung back, and many manufacturers have returned to the classic threaded bb —specifically the BSA standard. Here’s a real‑world breakdown of what each system does well, and where it falls short.
BSA Threaded: The Rock‑Solid Standard
The BSA (British Standard/English) threaded bottom bracket is the gold standard for reliability. Unlike press‑fit systems held in by friction, a bsa bottom bracket is secured by substantial metal threads cut directly into the frame or bonded into a metal insert. This mechanical lock virtually eliminates the loosening and movement that cause creaking. When the bearings eventually wear out, service is refreshingly simple: unscrew the old unit with standard tools and thread in a new one. BSA bottom brackets are also remarkably adaptable. The 24mm spindle standard (used by Shimano Hollowtech and many others) is widely supported, and the design has proven itself across decades of road, mountain, and gravel riding. If you value peace of mind and despise chasing mystery creaks, the BSA system is a proven, no‑compromise solution.
Press-Fit: The Pursuit of Stiffness and Lightness
Press‑fit systems arose from a valid engineering goal: reducing weight and increasing stiffness. By eliminating threaded metal inserts, frame manufacturers could use larger‑diameter carbon tubes around the bottom bracket area, potentially improving power transfer. BB86 (road) and BB92 (mountain) standards are common examples. When manufacturing tolerances are perfect and installation is flawless, a press‑fit bottom bracket can be quiet and efficient. However, that margin of error is narrow. Minor inconsistencies in frame molding can lead to bearing misalignment, which accelerates wear and creates the dreaded creak. Because the cups rely on friction to stay in place, flexing during hard pedaling can cause microscopic movement that eventually eats into the frame shell. For riders who work on their own bikes, press‑fit also requires specialized bearing presses and removal tools—adding cost and complexity to a routine job.
Making Your Choice: Real‑World Priorities
The best bottom bracket system is the one that suits your frame and your tolerance for maintenance. Choose a threaded bb (BSA) if you prioritize: long‑term reliability above marginal weight savings; simple, at‑home service with common tools; and compatibility with the widest range of cranksets. Choose press‑fit if you have a frame designed specifically for that standard, you don't mind potential creaks, and you want the absolute maximum BB shell width for frame stiffness. However, if you value peace of mind and want a bottom bracket you can install and forget, the BSA bsa bottom bracket remains the smartest choice.
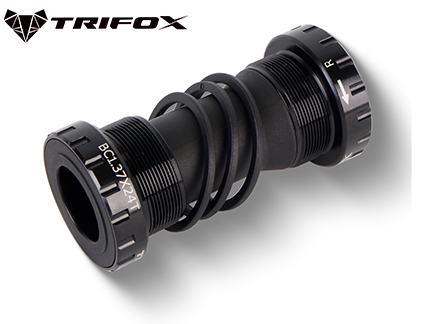
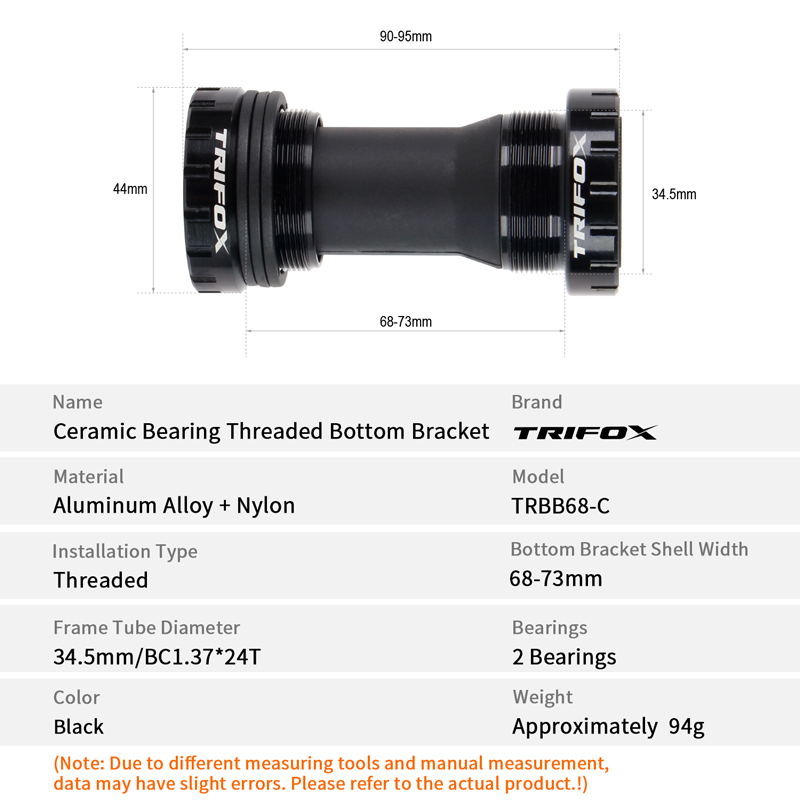
The Trifox TRBB68: Threaded Simplicity, Ready to Roll
The Trifox TRBB68 is a direct reflection of the BSA philosophy. Designed for 68mm English‑threaded shells, it uses a dependable aluminum body with robust sealed bearings. Installation is straightforward with standard tools, and the threaded cups provide a secure, creak‑free interface that stays quiet ride after ride. Whether you’re refreshing an existing bike or building up a new frame, the TRBB68 delivers the no‑fuss performance that keeps you focused on the road, not on a mystery squeak.
Most mountain bikers assume that more suspension equals better control. But there is a different path—one that many experienced riders are rediscovering. A quality mountain bike forks with a rigid carbon design strips away complexity and delivers something rare: a direct, unfiltered connection to the trail. The Trifox TMK200 is a 29er-specific rigid mtb fork that proves how lightweight construction and modern geometry can transform a hardtail‘s handling. Let’s explore how a carbon rigid fork sharpens your performance on the trail.
Reduced Unsprung Mass for Quicker Steering
Weight at the front of your bike directly affects how quickly it changes direction. A typical suspension fork weighs roughly 2.5 pounds (1.1–1.3 kg), while a high-quality carbon rigid fork like the TMK200 tips the scales at just 507 grams (1.1 lb). Dropping over a kilogram from the front end dramatically reduces the fork‘s rotational inertia, allowing the bike to respond to steering inputs with less effort. The result is a front wheel that feels eager, flickable, and far more precise through tight singletrack. Lighter unsprung mass also means your suspension fork’s spring rate and rebound damping are no longer a factor—every lean and countersteer transmits directly to the trail.
Greater Stiffness for Cornering Confidence
Flexibility in a fork creates vagueness. When you push hard into a berm or rail through a high-speed sweeper, any torsional flex in the fork causes the front wheel to lag, reducing traction and forcing mid‑corner corrections. The Trifox TMK200 is engineered for exceptional lateral rigidity. Its full‑carbon construction and Boost 110x15mm thru‑axle spacing eliminate unwanted flex, locking the front wheel precisely to your steering angle. The wider Boost spacing also pushes the hub flanges farther apart, which further improves spoke bracing angles and wheel stiffness. Riders who have tested the TMK200 consistently report feeling “more precise steering and less flex,” translating into greater confidence during aggressive cornering. This is the true advantage of a modern rigid mtb fork: the front end goes exactly where you aim it, without delay or deflection.
Superior Vibration Damping Without Isolation
Suspension forks excel at absorbing large impacts, but they also isolate the rider from the subtle feedback that helps you read the trail. Carbon fiber offers a unique solution: it filters out harsh, fatigue‑inducing high‑frequency vibration while transmitting the low‑frequency information you actually need. Carbon forks are known to be significantly stiffer than aluminum while also having better vibration damping. The TMK200’s T800 carbon layup is specifically designed to reduce trail “buzz” that leads to arm pump and hand numbness, yet it retains the precise steering feedback that keeps you in control on loose or chunky surfaces. You stay fresher on long days without losing the connection that helps you choose the smoothest line.
Enhanced Trail Feedback for Better Line Choice
Perhaps the most overlooked benefit of a rigid fork is how it sharpens your riding skills. Without suspension to mask mistakes, you learn to read the trail differently. You look further ahead, spot smoother lines, and develop a more active, flowing riding style. A carbon mountain bike forks transmits a clear feel of the trail surface—more so than forks that mix carbon with alloy crowns or steerers. That feedback helps you place the front wheel exactly where you intend, improving overall bike handling and line choice on technical sections. Over time, rigid-fork riding builds better fundamentals that make you a faster, safer rider even when you return to a suspended bike.
The TMK200: A Modern Standard for Rigid Handling
The Trifox TMK200 is purpose‑built for today‘s hardtails. It features a 1-1/8” to 1-1/2” tapered steerer, Boost 110x15mm thru‑axle spacing, and a 45mm offset—specs that complement modern trail geometry perfectly.Clearance for tires up to 29x3.0” makes it versatile enough for everything from XC racing to bikepacking, while its disc brake compatibility (160/180mm rotors) ensures confident stopping power. Riders who have installed the TMK200 note that it transforms their bikes into “lightweight, durable, and off‑road‑capable” machines. At just $109, it represents an accessible entry into precision handling.
The shift to a carbon rigid fork isn‘t for everyone—if you spend your days charging through rock gardens at warp speed, suspension remains the better tool. But for riders who prioritize responsiveness, feedback, and a pure connection to the trail, a modern rigid mtb fork like the TMK200 is a revelation. It sharpens handling, reduces fatigue, and, most importantly, makes every trail feel more alive.

Your hands are the primary connection between you and the trail. If that connection is compromised—by slippery rubber, harsh vibration, or an ill-fitting shape—your control, confidence, and comfort suffer. The right mtb bar grips aren’t just about “feel good”; they’re a performance component. But with rubber, silicone, foam, and even cork available, how do you choose? Here’s a practical guide to grip materials and what they mean for your riding.
Rubber: The Time‑Tested All‑Rounder
Rubber remains the most common mtb bar grips material for good reason. High-quality rubber compounds offer an excellent balance of durability, shock absorption, and all-weather traction. Many premium rubber grips now use dual‑compound construction: a harder, tough base layer underneath with a softer, tackier outer layer. This provides a secure hold without sacrificing durability.
Rubber also excels across a wide range of conditions. Quality rubber maintains grip in rain, sweat, and mud, making it a favorite for aggressive trail, enduro, and all‑mountain riders. If you ride year‑round in fluctuating conditions, a good lock‑on rubber grip is a safe and effective choice.
Foam: Weight‑Weenie Favorite with Trade‑Offs
Foam grips are the lightest option available, making them popular among cross‑country (XC) riders who prioritize every gram. The lightweight foam material also provides a soft, cushioned feel that some riders find comfortable for long days in the saddle. However, foam is the least durable of the three main materials. It tends to wear faster, can tear more easily in crashes, and offers less grip in wet or muddy conditions. Foam also has a reputation for shifting or rotating on the bar during hard efforts unless it’s lock‑on style. For dry‑weather XC racing or casual riding, foam can be a good choice. For aggressive terrain or wet climates, it’s less ideal.
Silicone: The Modern Comfort King
Popularized by brands like ESI, silicone grips are now the preferred choice for many mountain bikers seeking vibration damping and long‑ride comfort. Silicone is remarkably effective at absorbing high‑frequency trail chatter—the kind that leads to arm pump, hand numbness, and fatigue over hours of rough terrain. Riders who have switched to silicone report that they are “far more comfy than rubber grips” and can even switch to minimalist gloves after making the change.
Silicone offers excellent wet‑traction properties, often gripping better when damp. The downside is that silicone can be slightly more expensive than rubber, may tear if dragged against rocks, and is one of the more difficult materials to install because it grips the bar so tightly. But for riders who prioritize comfort, vibration damping, and a supple feel, silicone is hard to beat.
Cork and Other Alternatives
Cork grips offer a unique option: natural material with moderate cushioning and a distinctive aesthetic. Cork is more solid than rubber or silicone, offering a direct, connected feel. It also has the unusual property of gripping better when wet, as moisture is absorbed into the natural fibers. However, cork tends to be firm (60–80 Shore A vs. 20–40 for traditional rubber) and less durable than rubber, especially against rock strikes. Cork also lacks lock‑on collars, making installation more involved. It’s a niche choice for bikepackers or riders seeking a natural feel and sustainable material, but not the first choice for aggressive trail riders.
Lock‑On vs. Slide‑On: Installation and Security
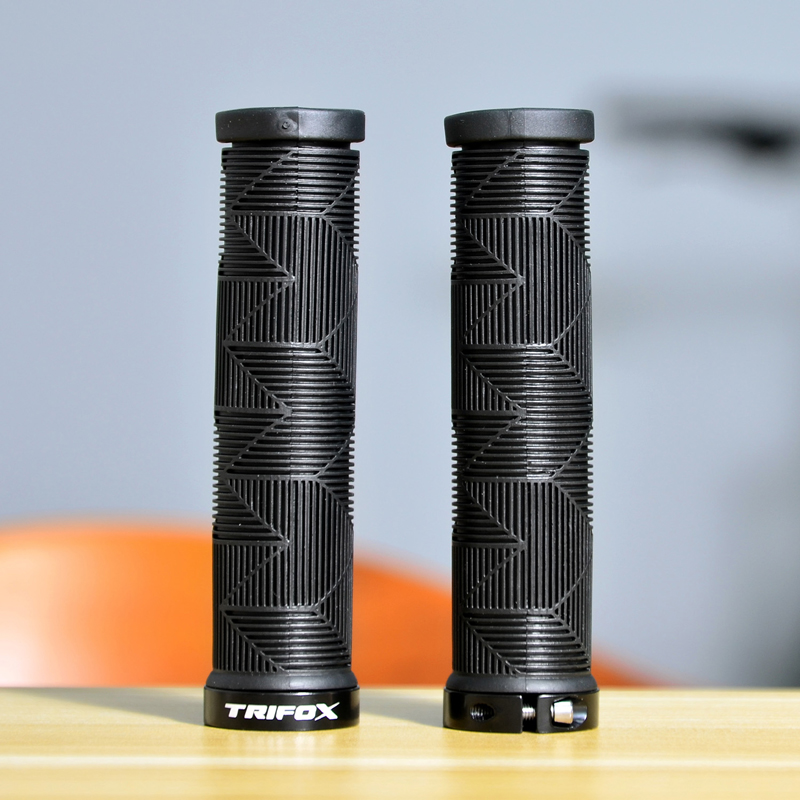
Beyond material, grip attachment type matters. Lock‑on grips use metal or plastic collars tightened with an Allen key to secure the grip. They are easy to install, remove, and swap, and they prevent any rotational slippage under hard riding. Slide‑on grips are lighter and cheaper but require adhesive or friction to stay in place. If you frequently swap parts or ride aggressively, lock‑on grips are strongly recommended. Many of today’s best mountain bike bar grips—including the Trifox MBT100—use a lock‑on design for security and ease of use.
Making Your Choice
There is no single “best” material—only the right material for your riding. For a breakdown by use case:
XC and Light Trail: Silicone foam or high‑quality foam for weight savings and comfort; lock‑on preferred. ← Recommended: Trifox MBT100 silicone grip.
Trail, All‑Mountain, Enduro: Quality dual‑compound rubber with lock‑on for all‑weather reliability. ← Recommended: Trifox MBT100 silicone grip (also suitable here).
Wet / Muddy Climates: Rubber or silicone with aggressive tread pattern; lock‑on mandatory.
Long‑Distance / Bikepacking: Silicone for superior vibration damping and hand fatigue prevention.
Budget Builds: Rubber, lock‑on style for value and durability.
The Trifox MBT100 silicone grip combines a soft, vibration‑damping silicone core with a secure lock‑on system, wide-diameter design, and durable alloy clamps. It delivers the vibration absorption of silicone and the installation confidence of lock‑on collars—an excellent balance for riders tired of hand fatigue. The set includes two lock‑on grips, bar end plugs, and a compact tool for easy installation. For riders seeking a comfortable, secure, and fatigue‑reducing grip upgrade, the MBT100 fits squarely in the “silicone comfort” camp while still offering the security of a lock‑on design.


