


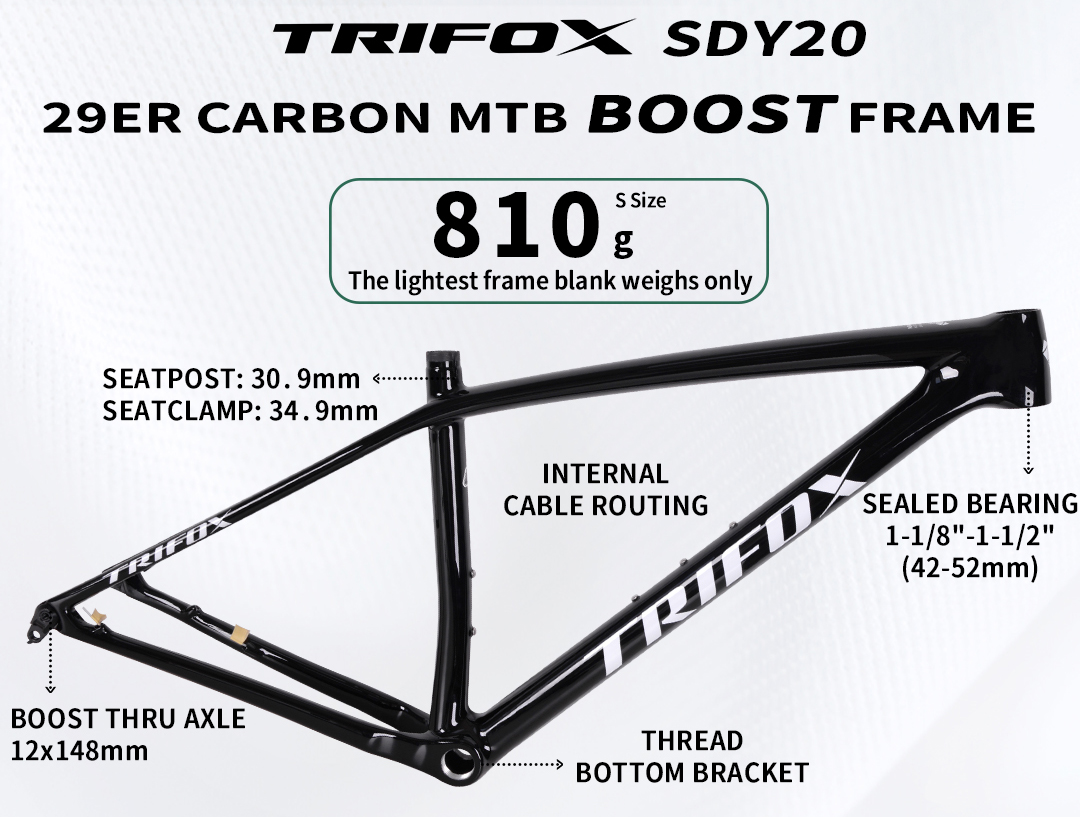
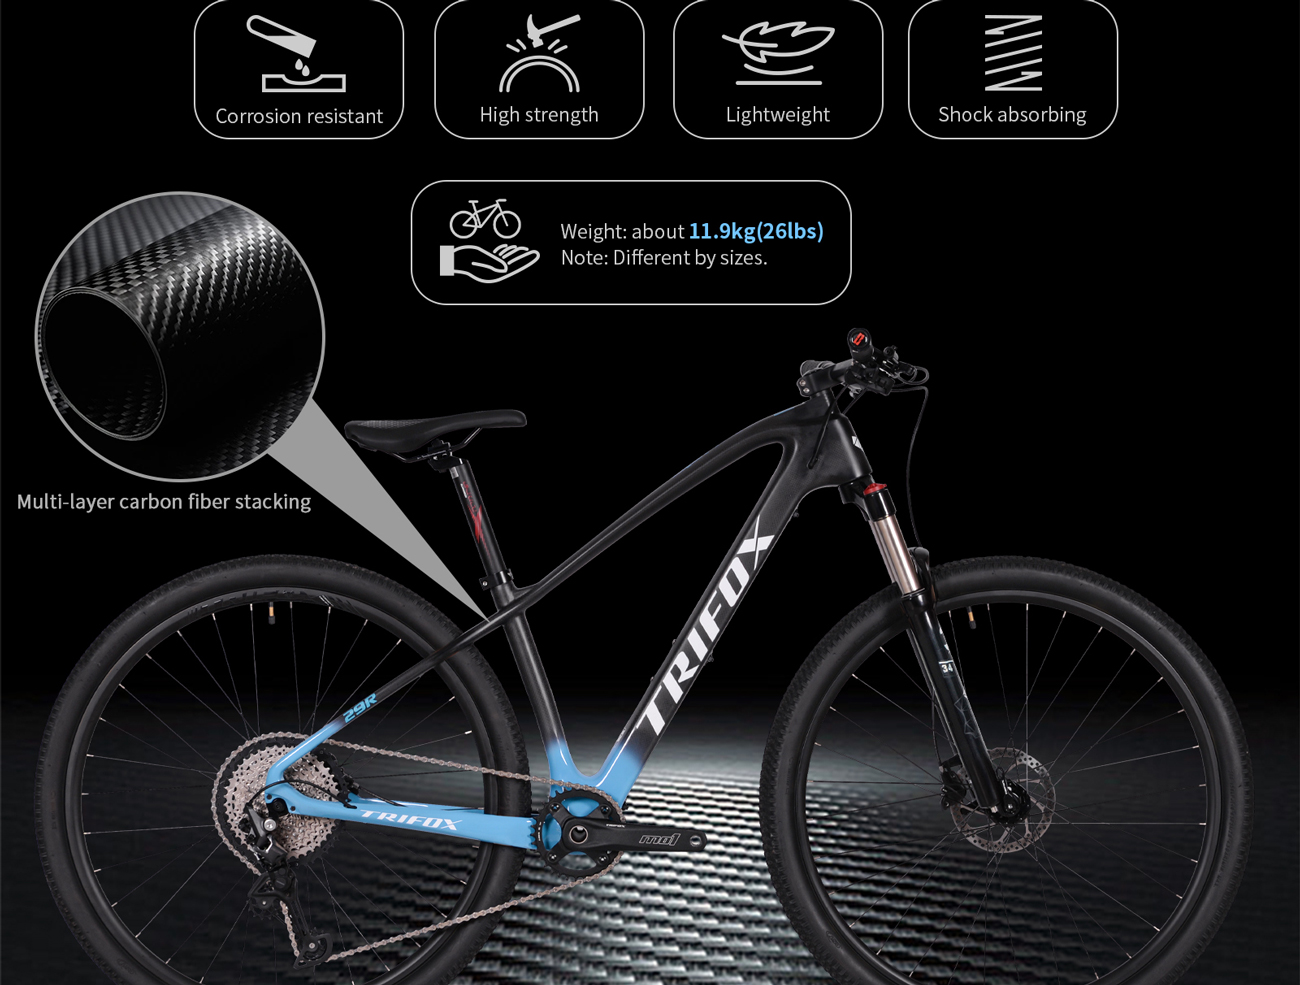
In mountain biking, weight is gravity’s currency. For racers and climb-obsessed riders, every gram shaved unlocks speed, agility, and that precious edge over rivals. At Trifox, this obsession birthed the SDY20 hardtail frame – their lightest 29er carbon chassis ever, engineered to turn ascents into triumphs. The Magic Number: 930g Weighing just 930 grams (size S, unpainted), the SDY20 isn’t just light – it’s a feat of carbon optimization. Using T1000 carbon with refined layering, Trifox achieves staggering stiffness-to-weight while maintaining trail-taming compliance. This frame isn’t delicate; it’s intelligently minimal. Why Lighter = Faster? - Acceleration: Less mass to propel uphill = instant response when you stamp the pedals. - Agility: Flickable on switchbacks and effortless to loft over roots. - Endurance: Reduced fatigue = more watts left for the final kick. Race-Ready DNA Beyond Weight: - XC Geometry: A 68.5° head angle and 445mm reach balance stability and razor-sharp precision. - Boost Spacing: 148x12mm rear / 110x15mm front maximize stiffness and wheel compatibility. - Stealth Integration: Full internal routing (brakes + dropper) for clean looks and snag-free rock gardens. Modern Trail Specs: 1x-only, tapered head tube, and room for 2.4" tires. Who Is the SDY20 For? - XC Racers: Chase podiums with a frame born for efficiency. - Climb Conquerors: Transform suffering into flow. - Weight Weenies: The ultimate gram-shavers'canvas. The Verdict: The SDY20 isn't just a frame – it's Trifox's love letter to climbing. By ruthlessly cutting grams without sacrificing stiffness or control, it delivers a ride experience where the bike disappears beneath you, leaving only you, the trail, and the summit ahead.
Choosing hubs isn't just about spinning wheels; it's about defining your ride. Do you crave lightning acceleration for racing, or bombproof reliability for epic adventures? The right hubs make all the difference. Here’s how to pick your perfect set: 1. The Speed Seeker’s Setup: Lightweight Construction: Prioritize hubs made with premium alloys or carbon (like Trifox's T-Type series) to minimize rotational weight = faster acceleration. High Engagement Points (POE): Look for 3-pawl or 6-pawl designs (e.g., Trifox T-Type hubs offer 72T/108T options). More POE means near-instant power transfer when you stomp the pedals – essential for sprints and technical climbs. Aerodynamic Spokes: Pair with fewer, bladed spokes to cut drag. 2. The Durability Dominator’s Choice: Robust Shell & Flanges: Choose hubs with thick, CNC-machined alloy shells (like Trifox's DH/Enduro-focused hubs). Stronger flanges better handle spoke tension and impacts. Sealed Bearings: Double-lip, cartridge bearings (standard in quality hubs like Trifox) keep out grit, water, and grime for longer life in harsh conditions. Higher Spoke Count: 32h or 36h builds offer greater strength and redundancy for rough trails or heavy loads. 3. The Sweet Spot? Know Your Terrain: Road/Gravel Racing: Ultra-light hubs (like Trifox T-Type Carbon) + High POE. Weight savings reign supreme. XC/Trail Riding: Balance is key. Moderate weight, good POE (e.g., Trifox T-Type Alloy), and reliable sealed bearings. Enduro/Downhill: Durability first! Heavy-duty alloy hubs (like Trifox Titan), max sealing, and 32h/36h builds. POE still matters for control. 4. Don't Forget Compatibility! Ensure the hub matches your: Axle Standard (Quick Release, Thru-Axle size) Brake Type (Rotor mount: 6-bolt or Centerlock) Drivetrain (Cassette body: Shimano HG/SRAM XD/XDR, Microspline) TrifoxBike: Engineered for Your Need Whether you're chasing KOMs (T-Type Carbon Hubs for minimal weight & max engagement) or conquering rugged trails (Titan Alloy Hubs for ultimate strength & reliability), Trifox offers precision-engineered hubs designed to excel. Explore their range to find your perfect balance of speed and durability!
Tired of sore hands, numb fingers, or just a handlebar that looks sad and worn? Upgrading your road bike's handlebar tape is one of the easiest, most cost-effective ways to dramatically boost both comfort and style. Forget the jarring vibrations and slippery grip – fresh tape transforms your connection to the bike. Here’s how to do it perfectly in 5 simple steps: What You Need: New bar tape, sharp scissors, electrical tape (usually included with tape), isopropyl alcohol & rag. 1. Strip & Scrub: Remove the old tape and all adhesive residue. Thoroughly clean the bars, brake levers, and shifters with isopropyl alcohol. A clean, grease-free surface is crucial for the new tape to adhere properly. Let it dry completely. 2. Start Strong (Right Side First!): Begin taping the right side. Unroll about 4-5 inches of tape. Place the end inside the bar end, plugging it slightly. Wrap downwards and outwards (away from the stem) for 2-3 wraps to create a secure anchor over the bar plug. Pro Tip: Slightly stretch the tape as you wrap for a tighter, smoother finish. 3. Wrap with Rhythm & Overlap: Continue wrapping down the bar towards the brake hood. Maintain consistent tension and a slight stretch. Overlap each previous wrap by about 1/3 to 1/2 the tape's width. This ensures full coverage and prevents gaps. When you reach the brake hood, wrap under the hood clamp for a clean look. 4. Master the Hoods: This is the trickiest part! Wrap up the brake hood body towards the lever. Make a diagonal wrap over the top of the hood, then continue wrapping down the backside towards the bar. Aim for smooth, flat wraps without bunching. Rejoin the main bar wrap smoothly below the hood. 5. Finish Flush & Secure: Continue wrapping towards the stem. Stop about 1-2 inches short. Cut the tape diagonally for a clean edge. Secure the end tightly with the included electrical tape, wrapping neatly around the bar. Repeat steps 2-5 for the left side, starting inside the bar end and wrapping downwards and inwards (towards the stem). Voila! You've just conquered a key bike maintenance skill. Enjoy the plush vibration dampening of quality cork or gel-backed tape, the secure grip even with sweaty palms, and the head-turning style of fresh colors or patterns. Your bike will thank you for miles to come! Remember, tape wears out – re-wrap when it gets thin, hard, or torn. Ride comfortable, ride stylish!
Saddle soreness, numb bits, or aching backs can ruin the joy of cycling. The good news? Discomfort isn't inevitable! Achieving a pain-free ride hinges on proper bike fit, smart positioning, and choosing the right gear. Here’s your guide to sitting comfortably: 1. Find Your Foundation: Saddle Height is Key Heel Method: Sit on the saddle. Place your heel on the pedal at its lowest point. Your leg should be almost straight (slight bend). When pedaling with the ball of your foot, you’ll have a 25-35 degree knee bend. Why it works: Too low strains knees; too high causes rocking hips and saddle pressure. Correct height ensures efficient power transfer and stability. 2. Dial in Fore/Aft Position (Saddle Setback): Your knee should align vertically over the pedal spindle when the crank is horizontal (3 o'clock position). Use a plumb line or have someone check. Why it matters: Incorrect setback overloads hands, shoulders, or perineum, causing pain. 3. Level Your Saddle (Usually!): Start with the saddle perfectly level. Use a spirit level app on your phone. Minor adjustments (1-2 degrees nose down or up) can help, but drastic angles often create new problems. Avoid: Tipping the nose up significantly increases perineal pressure. Tipping it down slides you forward, straining arms and shoulders. 4. Engage Your Sit Bones (Ischial Tuberosities): Sit upright on the saddle’s widest rear section. You should feel your weight firmly on these two bony points – not on soft tissue. Tip: Wear padded cycling shorts ("chamois") to cushion these bones. Regular underwear causes friction and chafing. 5. Maintain a Neutral Spine & Relaxed Upper Body: Avoid rounding or over-arching your lower back. Engage your core slightly. Keep elbows slightly bent, shoulders relaxed and down (not hunched near ears). A stiff upper body transmits shock and causes neck/shoulder pain. 6. Stand Up Regularly! Shift your weight, pedal out of the saddle for 10-30 seconds every 10-15 minutes. This relieves pressure and boosts circulation, preventing numbness. 7. Invest in the Right Saddle: Measure Your Sit Bones: Use cardboard or a memory foam pad to find your sit bone width. Choose a saddle at least 20mm wider than this measurement. Shape Matters: Consider cutouts/relief channels if you experience soft tissue pressure or numbness. Test saddles if possible. 8. Consider Suspension & Dampening: A carbon seatpost, suspension seatpost, or wider tires run at lower pressure can significantly reduce road/trail vibration transmitted to your body. Listen to Your Body & Adjust Gradually: Minor tweaks (1-2mm saddle height, slight tilt) make a big difference. Change one thing at a time and test ride. Some initial discomfort adapting to a correct position is normal, but sharp pain or numbness means STOP and re-evaluate. The Takeaway: Comfort comes from aligning your body correctly on a bike suited to you. Prioritize saddle height, setback, and level. Support your sit bones, stay relaxed, move often, and don’t suffer silently – the right setup feels amazing! If pain persists, consult a professional bike fitter. Ride happy, ride pain-free!
In a world dominated by full-suspension mountain bikes and plush gravel rigs, rigid frames and forks might seem outdated. Yet, for many riders and disciplines, rigid suspension (i.e., no suspension at all) offers compelling advantages. Here’s why going rigid could transform your ride: 1. Unmatched Efficiency: Every bump absorbed by suspension saps pedaling energy. Rigid bikes convert 100% of your power into forward motion. This makes them ideal for climbing, smooth trails, gravel roads, or urban commuting where speed and efficiency trump impact absorption. 2. Lighter Weight: Eliminating shocks, springs, and pivots slashes weight significantly. A lighter bike accelerates faster, feels nimbler, and is easier to carry – a major perk for bikepacking, cyclocross, or long-distance riders. 3. Lower Maintenance & Cost: No suspension means no seals to service, no air springs to tune, and no pivot bearings to replace. Rigid setups are simpler, cheaper to buy/maintain, and less prone to mechanical issues on long adventures. 4. Enhanced Direct Feel & Control: Experience unparalleled connection to the trail. Rigid bikes offer instant feedback through the bars and saddle, allowing precise line choice, sharper cornering, and improved bike handling skills. You feel the terrain, fostering greater rider engagement. 5. Increased Frame Stiffness & Compatibility: Without suspension constraints, frames can be designed for optimal stiffness and weight distribution. Rigid forks also simplify compatibility with any wheel size, tire width, or braking system (rim or disc). 6. Better Power Transfer: No suspension bob means power surges – sprints or steep climbs – transfer directly to the rear wheel without energy loss. This responsive feel is cherished by racers and performance-focused riders. Where Rigid Reigns Supreme: Gravel & Road Riding: Efficiency and speed rule. Smooth Singletrack/Hardpack: Where precision trumps plushness. Commuting/Touring: Reliability and low maintenance win. Cyclocross: Lightweight agility is critical. Bikepacking: Weight savings and durability matter most. The Trade-Off: Rigid isn't for everyone. On technical, rocky, or rooty terrain, suspension smooths impacts and reduces fatigue. Your hands, arms, and back absorb more vibration. Maximizing Rigid Comfort: Wider Tires: Run lower pressures (within safe limits) for natural cushioning. Compliance Tuning: Look for carbon forks/frames designed to flex subtly. Eronomic Touchpoints: Quality grips, a supportive saddle, and padded gloves help. The Verdict: Rigid suspension champions purity, efficiency, and connection. It rewards skilled riders with lightning-fast responses and liberates you from complex maintenance. If your terrain allows, embracing rigidity means rediscovering the joy of direct control and unadulterated speed. It’s not about rejecting suspension; it’s about choosing the right tool for your ride. Ready to simplify? A rigid bike might redefine "smooth" for you.

That frustrating moment: you've got a shiny new seatpost clamp, ready to eliminate seat slippage once and for all... only to find it doesn't fit your frame. Don't worry, you're not alone! Choosing the right seat clamp size is crucial, and thankfully, it boils down to one key measurement: your bike frame's seat tube outer diameter. Why Size Matters: Seatpost clamps work by tightening around the outside of your frame's seat tube, applying pressure to secure the seatpost inside. If the clamp is too small, it simply won't fit. If it's too large, it won't tighten evenly or effectively, potentially leading to: - Persistent Slipping: Your seatpost gradually sinks during rides. - Frame Damage: Uneven pressure can crush or distort thin-walled seat tubes, especially on carbon frames. - Clamp Failure: Over-tightening a too-large clamp to compensate can strip bolts or break the band. Finding Your Magic Number (in millimeters): Here's how to find your frame's seat tube outer diameter: 1. The Gold Standard: Calipers: Digital or Vernier calipers give the most accurate reading. Measure the outer diameter of the seat tube near the top, where the clamp sits. Avoid measuring over decals or thick paint layers. 2. Check Existing Clamp: If your current clamp works, it likely has the size stamped or engraved on the inside of the band (e.g., "31.8", "34.9", "36.4"). 3. Frame Sticker/Model Info: Some manufacturers print the seat tube diameter on a frame sticker near the bottom bracket or include it in the online specs for your bike model. 4. Manufacturer's Website: Look up your specific bike model year specs – the seat clamp size is often listed. 5. Common Sizes (But MEASURE to Confirm!): - Road Bikes: Often 28.6mm, 31.8mm, or 34.9mm. - Mountain Bikes: Common sizes include 30.0mm, 31.8mm, 34.9mm, 36.4mm, 38.0mm, and 39.8mm. - Gravel Bikes: Can vary, often overlapping road and MTB sizes (e.g., 31.8mm, 34.9mm). - Older Steel Bikes: May use sizes like 26.8mm, 27.2mm (seatpost size, clamp is larger!), 28.6mm. Trifox Bike Alloy Seatpost Clamps: A Great Example Trifox Bike offers lightweight and durable alloy seatpost clamps (like the one linked: https://www.trifoxbike.com/alloy-seatpost-clamp) in a wide range of precisely sized options – typically 28.6mm, 30.0mm, 31.8mm, 34.9mm, 36.4mm, 38.0mm, and 39.8mm. This variety highlights why knowing your exact measurement is essential! Don't guess; measure your frame first, then select the matching Trifox clamp size. Installation Tip: Torque It Right! Once you have the perfect size clamp (e.g., a 34.9mm clamp for a 34.9mm seat tube): 1. Clean the seat tube and clamp contact points. 2. Apply a small amount of carbon or aluminum assembly paste to the seatpost inside the tube (prevents slippage, crucial for carbon posts/frames). 3. Position the clamp with any logos facing forward. 4. Crucially: Tighten the bolt(s) gradually and evenly to the manufacturer's recommended torque setting (usually printed on the clamp or in your bike manual). Over-tightening can damage the frame or clamp. Use a torque wrench if possible. Forget "standard" sizes. Your bike's seat tube outer diameter (OD) dictates the seatpost clamp size you need. Measure accurately using calipers, check your old clamp, or consult your frame specs. Once you know your size (e.g., 31.8mm), choosing a high-quality, correctly sized clamp like those from Trifox Bike ensures a secure, reliable, and damage-free connection, letting you focus on the ride ahead!
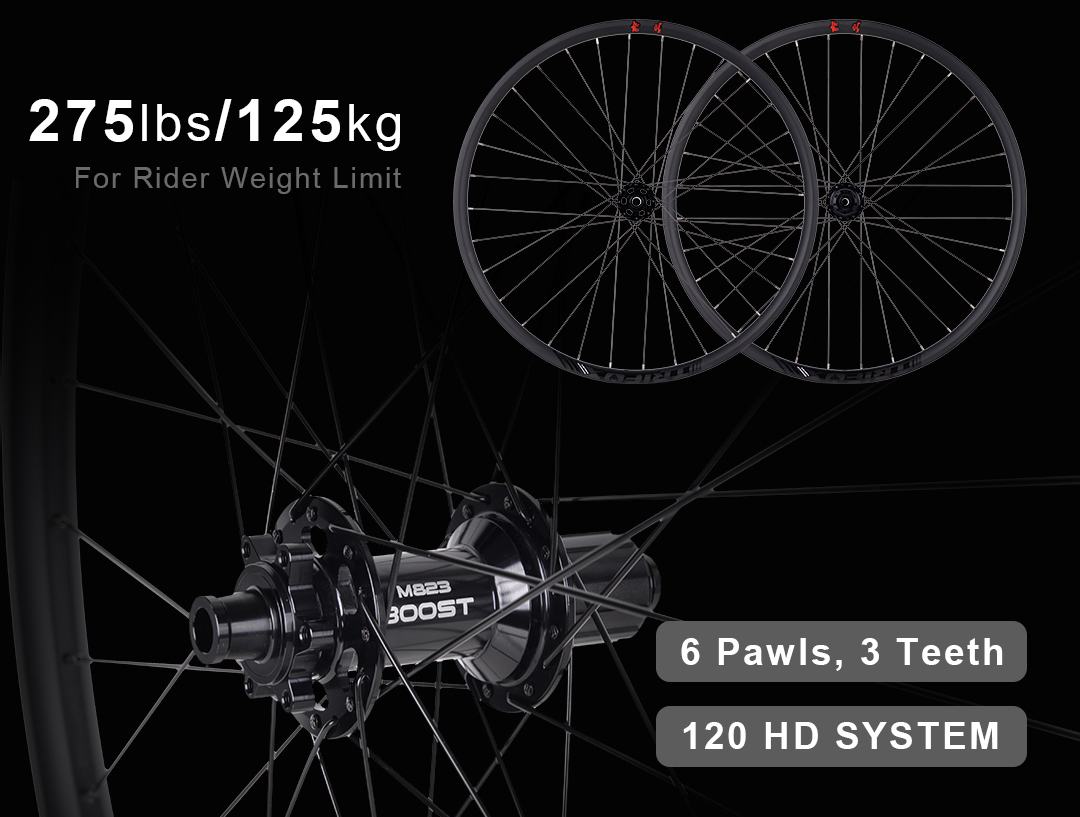
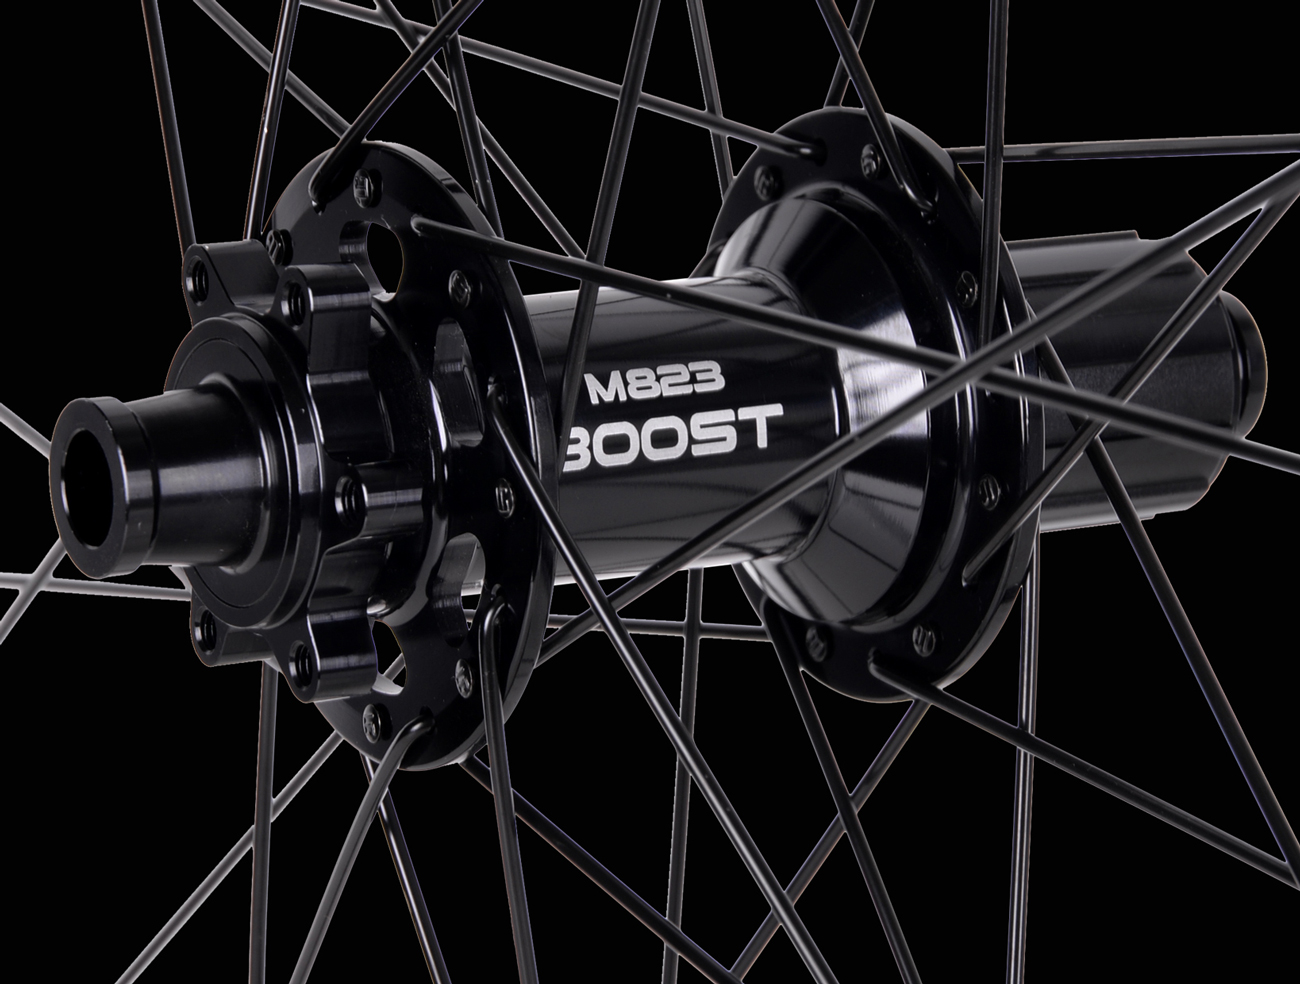
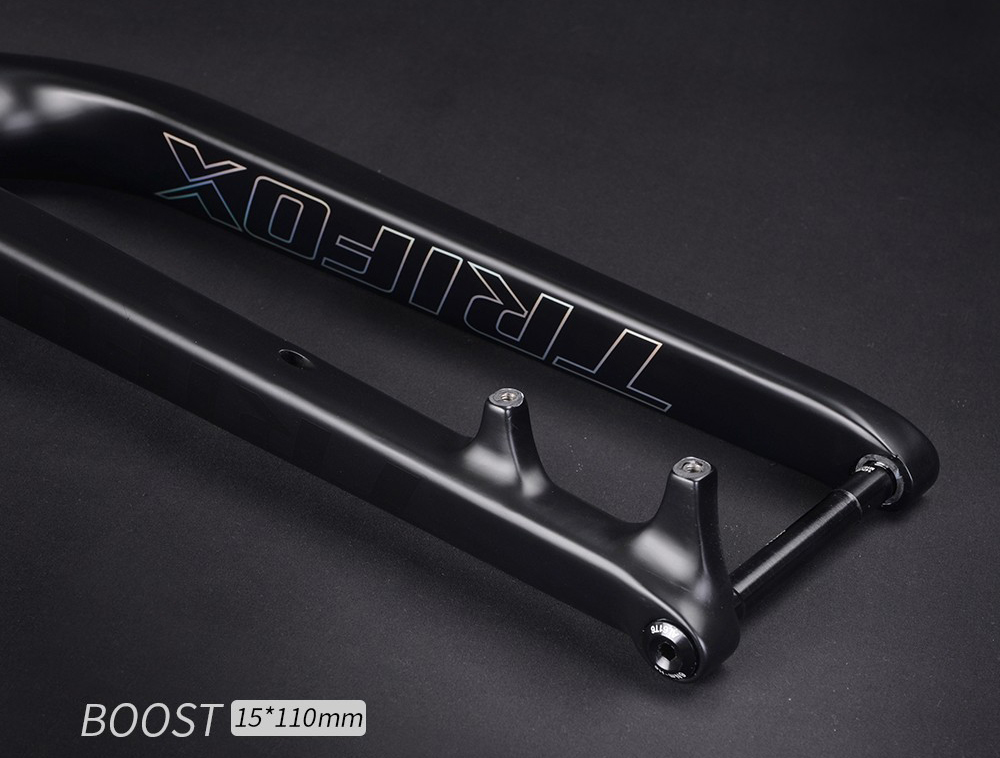
That "Boost" label on wheels and frames isn't marketing fluff – it's a significant evolution in mountain bike standards solving real problems. Here's the lowdown: The Core Idea: Wider Hub Spacing - Old Standard (Non-Boost): Front: 100mm width. Rear: 142mm width. - Boost Standard: Front: 110mm width. Rear: 148mm width. Why Bother Going Wider? Key Benefits: 1. Stiffer Wheels: The wider hub flanges (the points where spokes attach) move the spokes further apart laterally. Think of it like a wider stance. This dramatically increases wheel stiffness, especially crucial for: Hardtails: Reducing flex under pedaling and cornering. Modern Geometry: Supporting wider tires and longer, slacker bikes that put more stress on wheels. Preventing Brake Rub: Stiffer wheels flex less under hard braking (disc brakes), reducing the chance of pads hitting the rotor. 2. Better Tire Clearance: The wider spacing allows frame designers to create wider rear triangles and fork crowns. This provides ample room for today's popular wider tires (2.4" to 2.8"+) without compromising chainline or risking tire rub on the frame. 3. Improved Frame Design: The extra space allows designers to: Create shorter chainstays (improving maneuverability). Use wider, stiffer bottom brackets (like BB92/BB121). Improve suspension kinematics (on full-suspension bikes). 4. Better Chainline: The wider rear hub shifts the cassette slightly outboard. Combined with modern 1x drivetrains, this creates a straighter chainline across all gears, improving shifting performance and efficiency. What Do You Need for Boost? - Boost Frame & Fork: Your bike frame must have Boost rear spacing (148x12mm thru-axle) and your fork must have Boost front spacing (110x15mm thru-axle). - Boost Wheels: You need wheels built with hubs specifically designed for Boost spacing. (Like the Trifox WM823 Boost wheels linked above). - Boost Crankset: While not always mandatory, most modern Boost frames pair best with cranks designed for a wider "Boost chainline" (often 52mm vs the old 49mm). Is Boost Backwards Compatible? Generally, no. You can't fit a Boost wheel into a non-Boost frame/fork without adapters (which often compromise stiffness). Non-Boost wheels won't fit Boost frames/forks. Boost isn't just "newer," it's genuinely better. It delivers tangibly stiffer, stronger wheels, enables modern frame designs and tire sizes, and improves drivetrain performance. If you're buying a new mountain bike or wheels (like the Trifox WM823 Boost), Boost is the modern standard you want. It solved real engineering limitations and is here to stay.
You see "T800 carbon" touted in bike specs, often positioned between "entry-level" T700 and premium "high-modulus" (like T1000+). But what does it actually mean, and is it good? Here's the breakdown: 1. What "T800" Means: It refers to the tensile modulus of the carbon fiber strands (measured in Gigapascals - GPa). T800 fiber has a higher modulus (stiffer) than T700, but lower than ultra-high-modulus fibers like T1000 or T1100. Higher modulus generally means stiffer and stronger fibers for their weight. 2. The Benefits: Improved Stiffness-to-Weight Ratio: Compared to T700, T800 allows frame designers to use less material to achieve the same stiffness, or make a frame stiffer at the same weight. This translates to better power transfer and responsiveness. Good Strength: T800 offers excellent strength, crucial for durability and impact resistance. Balanced Performance: It hits a sweet spot between the relative affordability/forgiveness of T700 and the extreme stiffness (and often higher cost/brittleness potential) of higher modulus fibers. 3. The Reality Check: Layup is KING: The raw fiber grade is only part of the story. How the fibers are oriented, woven, layered (the "layup"), and bonded with resin determines the frame's final ride quality, strength, weight, and compliance. A genius layup with T700 can outperform a poor one with T800. Not All T800 is Equal: Quality control in fiber production and frame manufacturing is paramount. Reputable brands ensure consistency; cheap frames might use "T800" but with questionable processes. Higher Modulus ≠ Always Better: Ultra-high-modulus fibers (T1000+) can be too stiff, leading to a harsh ride. T800 often provides a better balance of stiffness and some vertical compliance (comfort). Verdict: T800 carbon is a very good, high-performance material commonly found in quality mid-range to high-end road, gravel, and MTB frames. It offers a significant step up from basic T700 in terms of stiffness and efficiency without necessarily venturing into the ultra-stiff (and potentially less comfortable or more expensive) realm of top-tier moduli.
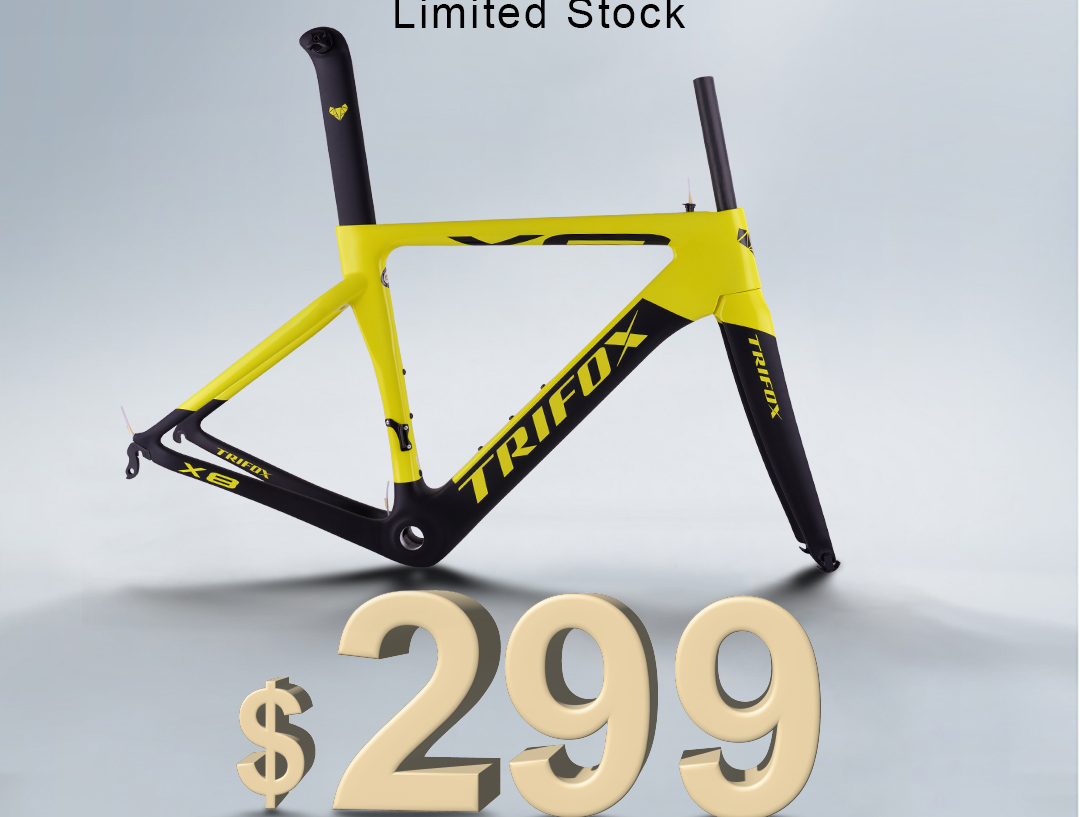
Yes, you read that right. $299 for a full Aero Carbon Road Bike Frame. Trifox Bike's X8 model is dropping jaws and potentially barriers to entry for carbon performance. But is this too good to be true? Let's break it down. What You Get (Specs Matter!): Material: Toray T800 Carbon Fiber . This is a legitimate, high-modulus grade used by many reputable brands. Weight: Claimed ~1250g (size M) – impressively light for the price. Aero Design: Truncated airfoil tube shapes, integrated seatpost clamp, and aero seatpost (included!) aim to cheat the wind. Compatibility: Designed for rim brakes (V-brakes/cantilevers - crucial point!), standard road groupsets (Shimano 10/11s), and a conventional cockpit. Includes headset, seatpost clamp, and derailleur hanger. If you dream of a lightweight carbon build but have champagne taste on a beer budget, this is your starting block. Prioritize weight and aero gains? Don't mind rim brakes? This could be a rocket ship. Experienced Tinkerers: Comfortable sourcing parts and building a bike? The value proposition is immense. The Trifox X8 frame is a legitimate disruptor. For $299, you get a very light, aero-profiled carbon frame using reputable materials. Is it worth it? If you understand the limitations, crave a lightweight carbon project, and prioritize raw speed/weight over all-weather braking and cutting-edge standards, this deal is borderline revolutionary. It proves high-performance carbon can be accessible.


