


A mountain bike hub is the core rotating component of your wheel. Many riders wonder about its service life, but actual durability varies hugely depending on riding intensity and material quality. Entry‑level hubs may only last 3,000–8,000 km, while well‑made best mtb hubs with proper care can easily exceed 20,000 km. Among them, the mtb rear hub wears out 2–3 times faster than the front hub and is the decisive factor for the whole wheelset’s lifespan. 1. Core factors that affect MTB hub lifespan - Riding terrain and intensity: Casual riding on paved roads causes minimal wear. Rocky trails, muddy descents, and water crossings dramatically accelerate bearing and pawl wear. Mud and water penetrate seals, turning grease into an abrasive paste that soon creates bearing play and noise. The rear hub, which carries both pedaling and impact loads, wears its pawls and freehub body much faster than the front. - Internal design and materials: Bearing count, pawl configuration, and alloy quality directly determine durability. Cheap hubs use thin shells and basic bearings that deform under heavy use. Premium models like Trifox MTB hubs use 6061+7075 aerospace aluminium, with 2 bearings up front, 4 sealed bearings at the rear, and a 6‑pawl, 72‑click ratchet system that distributes forces evenly for far better impact resistance. - Maintenance routine: Cleaning the seal rings after every muddy ride and re‑greasing bearings and pawls every 2,000 km can double hub life. Neglected hubs suffer irreversible corrosion and wear, often requiring a full replacement. 2. How long can a reliable MTB hub last? – a tiered reference - Entry‑level (~$30–50) – With casual use, expect 3,000–5,000 km before noise or play appears; under heavy off‑road riding, the rear hub may need replacement as early as 3,000 km. - Mid‑range quality hubs (e.g., Trifox M827, priced $44.99–$109.99) – Regular trail riding gives 15,000–20,000 km; with diligent maintenance, over 25,000 km is achievable. The 6‑pawl 72‑click design spreads pawl stress, and the hardened freehub body resists cassette wear. - Pro‑level hubs (over $300) – They can last 30,000+ km in enduro racing, but the cost is high and seldom justified for average riders. 3. Why the Trifox M827 MTB hub is built to last longer As a top value choice among best mtb hubs, this hub extends service life through smart engineering: - 4 sealed rear bearings give the mtb rear hub excellent support, reducing side loads on bearings during impacts. High‑grade seals keep water and mud out, minimising corrosion. - 6‑pawl 72‑click drive with a 5° engagement angle distributes force across multiple pawls, preventing single‑point fatigue. The freehub accepts HG, XD, and MS cassettes, so you can switch cassettes without changing the hub. - 6061+7075 alloy shell and 32‑hole drilling spread impact forces evenly. The hub supports both quick‑release and thru‑axle standards, letting you use one set across multiple bikes – lowering long‑term cost. 4. Practical tips to extend your MTB hub’s life - After rainy or muddy rides, rinse the wheel exterior and wipe dry the end caps to prevent sediment build‑up. - Every 2,000 km, remove the end caps and apply waterproof grease to bearings and pawls. - Avoid harsh pedal stomps and hard flat landings to reduce sudden shock to the rear hub. - When choosing durable best mtb hubs, prioritise models with more bearings, multiple pawls, and a thick alloy shellubs. Selecting a quality mtb rear hub like the Trifox M827 and following basic maintenance will significantly extend its life, saving you from repeated repairs and wheel changes. It’s a cost‑effective upgrade for any mountain biker.

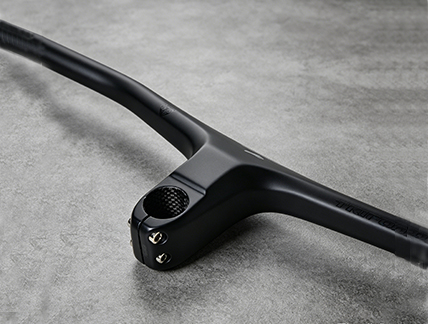
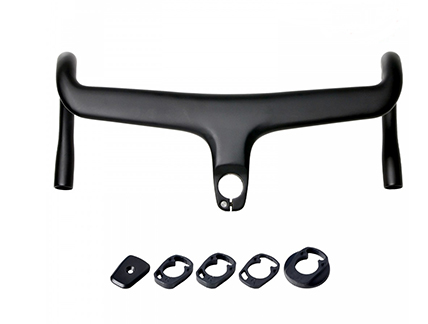
Your mountain bike's front end is where the trail meets your control. Every input you make—steering, leaning, weighting the front wheel—travels through the handlebar. If that connection is compromised by flex, weight, or a less-than-optimal interface, your handling suffers, and so does your confidence. Enter the carbon mtb cockpit upgrade, exemplified by the Trifox RHB100. By fusing the bar and stem into a single, continuous carbon structure, this integrated handlebar delivers measurable improvements in stiffness, weight, and steering precision—all of which translate directly to better handling and stability on the trail. Enhanced Stiffness: The Foundation of Precision Traditional bar-and-stem combinations have an inherent weak point: the interface where the stem clamps the handlebar. Even with perfect torque, that junction can allow micro-flex under load, dulling steering response and absorbing energy that should be directed to the front wheel. The RHB100 eliminates that weak link entirely. Its integrated, one-piece design (with a 6° rise and 40/50/60/70mm stem length options) creates an exceptionally stiff, direct connection between your hands and the fork. The result is “zero detectable flex” under load—whether you're pulling up for a manual or leaning into a high-speed corner. This rigidity instills confidence, especially on technical descents where precise steering input is critical. Independent research supports this advantage. One study on integrated cockpits found that a one-piece design increases front-end stiffness by up to 20% compared to a separate bar and stem combination. A stiffer front end means your steering inputs are translated more immediately and accurately, allowing you to hold your line through rock gardens, root sections, and loose corners with greater control and less correction. Reduced Weight: Agility and Reduced Fatigue At just 244 grams for the complete bar and stem assembly, the RHB100 represents a significant weight saving over almost any alloy combination. A typical alloy bar and stem setup often weighs over 400 grams; some integrated carbon designs are up to 40% lighter than their aluminum counterparts. This reduction is immediately noticeable when you pick up the bike—and even more so on the trail. A lighter front end feels more agile and easier to maneuver. It reduces the bike's overall rotational inertia, making it quicker to turn and easier to loft over obstacles. Furthermore, reduced weight at the handlebar contributes to less arm fatigue over long rides. A lighter setup demands less muscular effort to control, helping you stay fresher and more in control during marathon XC races or all-day trail adventures. Optimized Geometry: Natural Control Position The RHB100's geometry—6° rise and 6° backsweep—is designed to place your hands in a natural, comfortable position that enhances control. The backsweep aligns your wrists with your forearms, reducing strain and improving leverage when pulling up on the bars or weighting the front wheel. The rise brings the grips to a height that balances an aggressive riding posture with all-day comfort, allowing you to maintain a stable, centered position over the bike. Clean Cockpit: A Professional, Uncluttered Feel While aerodynamics are less critical on a mountain bike than a road bike, the RHB100's integrated profile does offer benefits. The lack of a protruding stem faceplate creates a smoother, more aerodynamic surface. More importantly, the clean lines provide a tidy cockpit for mounting a computer or light, contributing to a professional, finished look. The printed alignment marks on the bar also simplify setup and ensure your controls are positioned perfectly. T800 Carbon Fiber: The Material Behind the Performance The RHB100 is constructed from premium T800 carbon fiber, which offers an excellent strength-to-weight ratio. T800 carbon provides the rigidity needed for precise steering while offering enough compliance to mitigate trail buzz and fatigue. This balance is critical: you want a handlebar that is stiff enough to transmit steering inputs accurately but compliant enough to absorb high-frequency vibrations that cause arm pump and hand numbness. The result is a ride that is both precise and comfortable, allowing you to ride harder and longer. Conclusion Upgrading to an integrated carbon MTB handlebar like the Trifox RHB100 is one of the most effective ways to improve your bike's handling and stability. By eliminating the bar-stem interface, you gain a stiffer, more responsive front end. By shedding significant weight, you gain agility and reduce fatigue. And by optimizing the geometry, you gain a more natural, controlled riding position. For riders seeking a high-performance aero bicycle handlebars upgrade that delivers tangible on-trail benefits, the RHB100 represents a significant and worthwhile step forward.
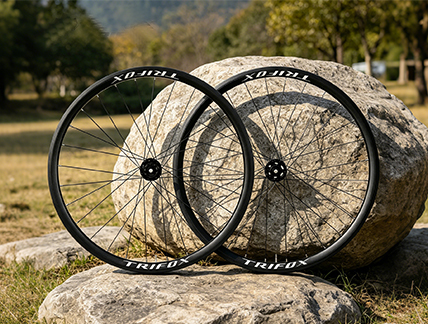
For years, road cyclists believed that narrow tires at sky‑high pressure were the only path to speed. That era is over. Today, riders understand that a wider rim — even by a few millimeters — fundamentally changes how a tire behaves. It reshapes the contact patch, lowers optimal pressure, and transforms ride quality. The Trifox AWT7 alloy disc brake wheelset is a perfect example of this modern philosophy. With its 14mm internal width, it’s engineered to do something simple but powerful: make your tires work better, so you ride faster, safer, and more comfortably. At an affordable price, it’s one of the best cheap bike wheelset options available for riders who want real performance without breaking the bank. Rim Width Shapes the Tire, Not Just the Wheel The rim isn’t just a hoop that holds the tire. Its internal width dictates the tire’s profile once inflated. On a narrow rim, a tire bulges into a light‑bulb shape — tall and narrow, with a small contact patch. This shape forces high pressure to keep the sidewalls stable, which translates into a harsh, unforgiving ride. A wider rim supports the tire’s sidewalls more effectively, creating a flatter, wider profile. This shape stabilizes the tread, reduces squirm, and dramatically increases the contact patch. As one industry analysis notes, “when the internal width of a rim reaches 21mm or more,” the contact surface rises considerably, enhancing redistribution of contact pressure and increasing lateral grip during cornering. The result is more predictable handling and better traction, especially on wet or loose surfaces. The AWT7’s 14mm internal width is purpose‑selected for modern 25‑28mm tires. Rather than forcing a tire to bulge unnaturally, it creates a smooth, continuous surface from the rim to the tread. This profile improves stability when cornering and reduces the vague, wandering sensation that plagues narrow‑rim setups. Riders using the AWT7 on classic road routes have noted the wheels feel “planted” and “predictable” — a direct result of matching rim width to tire shape. How Width Unlocks Lower Pressure and Higher Comfort The most direct benefit of a wider rim is what it allows you to do with air pressure. A properly supported tire can be run at significantly lower pressures without risking pinch flats or rim strikes. According to wider rim research, using a 21mm internal width rim allows tires to be run at lower pressures, absorbing road vibrations more effectively and reducing the impact transmitted to the rider’s body and the frame. The AWT7’s 14mm width, while not as extreme as gravel‑oriented rims, hits the sweet spot for road use. It lets you drop pressure from the traditional 100‑120 psi range down to 80‑95 psi, depending on rider weight and tire choice. At these lower pressures, the tire flexes over road imperfections rather than bouncing off them. The result is dramatically reduced hand and saddle fatigue on rough pavement, longer chip seal, and worn asphalt. This pressure flexibility also helps the tire maintain traction. A tire at lower pressure deforms around irregularities, increasing the effective contact patch. As one manufacturer explains, a wider internal rim maximizes tire support and grip, enhancing stability and comfort, and the lower pressure setup “absorbs road vibrations more effectively, therefore lowering the impact sent to the rider’s body.” That’s the difference between a bike that feels fragile on rough roads and one that inspires confidence mile after mile. Alloy Efficiency Meets Budget‑Friendly Performance Carbon wheels get the headlines, but alloy wheels like the AWT7 deliver 95% of the performance at a fraction of the cost. The AWT7’s 30mm rim depth offers a balance of aerodynamics and crosswind stability, while the 28 Pillar stainless steel spokes and welded aluminum construction provide the stiffness needed for efficient power transfer. Weighing approximately 1,956g per pair, the wheels are light enough for climbing yet durable enough for daily training. The 6‑pawl, 120‑point engagement hubs deliver crisp acceleration, and the disc brake compatibility ensures consistent stopping power in all weather. For riders seeking an affordable but capable bicycle disc wheel, the AWT7 represents exceptional value — a wheelset that doesn’t compromise on the fundamentals of ride quality. The Bottom Line Rim width isn’t a secondary spec. It’s a primary determinant of how your bike feels on the road. A 14mm internal width strikes a balance: wide enough to support the tire’s sidewalls and enable comfortable lower pressures, yet narrow enough to remain aerodynamically efficient for road use. The Trifox AWT7 alloy disc wheelset capitalizes on this design principle, delivering a ride that is stable, grippy, and noticeably more comfortable than traditional narrow‑rim wheelsets. For cyclists on a budget who refuse to sacrifice ride quality, the AWT7 is a smart upgrade that proves modern alloy engineering can rival carbon’s best traits — without the premium price tag.
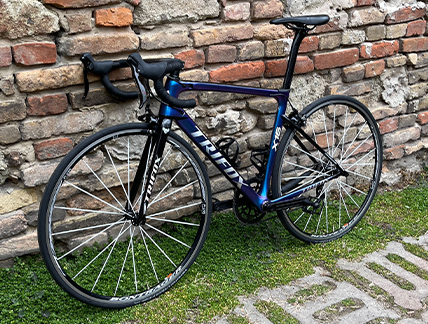
You've invested in a beautiful new carbon frame – the Trifox X16TA, with its stunning chameleon blue and purple finishes, built for both men and women. It’s light, stiff, and fast. You carefully install the bottom bracket, route the cables, and fit the groupset. Then, you reach for your hex key to tighten the seatpost clamp. "Just a little extra for safety," you think. That single moment of over‑enthusiasm could be the beginning of the end for your expensive frame. Here’s why. The Fragile Nature of Carbon Fiber Carbon fiber is an anisotropic composite material. It is phenomenally strong in the directions it was designed for – typically along the length of the tubes to withstand pedaling and impact forces. But it is surprisingly weak and vulnerable to forces it wasn't designed for, such as the concentrated, crushing pressure of a clamp or a bolt head. While aluminum or steel bolts will stretch and deform before breaking, giving you a tactile warning, carbon fiber is rigid and unforgiving. As an engineer explains, carbon is “more susceptible to crushing and cracking when improperly set up. Simply put, the margin for error is much smaller”. It doesn't bend or give; it cracks, and once cracked, its structural integrity is compromised, often catastrophically and without warning. The Risky Clamps and Bolts on Your Frame Every bolt on your carbon bike has a precise torque specification, typically measured in Newton-meters (Nm). Ignoring these specs is a gamble. The most common points of failure include: • The Seatpost Collar: This is the most frequent victim. Most manufacturers specify a torque of 4–6 Nm for seatpost clamps. Over-tightening it can crush the carbon seatpost itself, leading to a slipping saddle or a sudden, dangerous collapse. One mechanic notes that “a chronically slipping seatpost (even after tightening it down numerous times) is often the result of overtightening the clamp, damaging the carbon”. • The Stem Faceplate and Steerer Tube: The stem bolts that clamp your handlebars and the steerer tube of your fork are also highly vulnerable. A stem-to-steerer clamp torque of 5–7 Nm is common. Over-torquing the stem bolts on a medium bike frame can crush the carbon steerer tube, leading to a loss of steering control. This is exacerbated by using an incorrectly sized or too-short expander plug, as the stem’s pinch bolts then have no internal support, making the steerer tube easy to crack. • Bottle Cage Bolts: Even seemingly insignificant bolts pose a risk. Over-tightening a bottle cage bolt on a down tube can create a “stress riser.” This is a small area of intense localized stress that, over time and with road vibration, can propagate into a crack that travels through the carbon layers, potentially splitting the frame tube. How to Build and Ride with Confidence Protecting your investment in a high‑performance ladies bike frame or any carbon bike requires a change in mindset and technique. • Invest in a Quality Torque Wrench: This is non‑negotiable. A “click‑type” torque wrench is the most common and user‑friendly option, providing an audible and tactile click when the set torque value is reached. As one industry expert warns, “overtightening components could result in damaging the carbon or even breaking the bolt” and using a torque wrench is vital for the weekend mechanic. For critical parts of a carbon frame, it's simply not worth the risk to work by feel alone. • Use Carbon Assembly Paste: Never grease seatposts, handlebars, or steerer tubes. Grease lubricates the interface, artificially reducing friction and causing you to need to tighten the bolt more to achieve the same hold. Carbon assembly paste contains tiny abrasive particles that increase friction between two carbon surfaces, allowing you to achieve a secure, non-slip hold at a much lower torque. Ritchey, a leading component manufacturer, notes its friction-enhancing paste can “allow tightening torque to be reduced by up to 30%”. • Clamp the Bike Correctly: When working on your bike in a repair stand, never clamp it directly by the frame tubes. A carbon tube “can be crushed if it's over-tightened”. Always secure your bike by clamping the seatpost. If you have a carbon seatpost, use a work-stand adaptor or a sacrificial alloy post. Conclusion The Trifox X16TA is a masterpiece of modern carbon engineering, offering a lightweight and responsive ride in a range of sizes and colors to fit a diverse range of riders, from those seeking a medium bike frame to those looking for a ladies bike frame. But its ultimate longevity and safety are in your hands. The immense strength of a carbon frame is precisely engineered. By respecting torque specifications, investing in the right tools, and using correct assembly compounds, you can ensure that your dream bike remains a source of speed and joy for many thousands of miles, not a heartbreaking lesson in mechanical sympathy.

Tire clearance is one of those numbers every frame manufacturer lists in their spec sheet — and one of those numbers that very few riders bother to actually test before the first muddy race day. The Trifox TRAIL II PRO carbon frameset lists a clean, confident 29 x 2.25″ as its official maximum tire size. But spec sheets don‘t account for real-world mud, clay, sticky loam, or the subtle way a tire’s profile expands at lower pressures. So we took this frame out of the catalog and put it into the conditions that matter: wet, cloggy mess. The Official Number vs The Muddy Reality On paper, 2.25 inches is respectable. That width sits right in the modern XC and light trail sweet spot, offering enough volume for traction and comfort while still rolling fast enough to hang with the race crowd. The TRAIL II PRO’s T800 carbon construction and sculpted chainstays provide a claimed maximum of 29 x 2.25″ clearance — no ambiguity, just a clean number on a spec sheet. But the trails don‘t read spec sheets. Wet clay and decaying leaves don’t measure themselves against manufacturer tolerances before accumulating. When we pushed this frame into actual mud, a more nuanced picture emerged. The Dry Condition Overachiever Several owners have reported that in clean, dry conditions, the TRAIL II PRO can accommodate a 2.3″ tire without rubbing. The extra 0.05 inches (about 1.3 mm) of width is possible thanks to the frame’s generous chainstay and seatstay shaping. One reviewer even noted 74 mm of clearance between the chainstays — enough space that they planned to try a 2.4″ tire for dry, fast summer racing. That’s not just clearance; that’s versatility for riders who change tires by season. Where Mud Changes the Equation The key word, however, is clean. When mud, clay, or sticky loam accumulates, the same 2.3″ tire that clears perfectly in dry conditions can start contacting the frame, especially near the seat tube bridge or the chainstay yoke. Mud doesn‘t compress. It builds. And with heavy, claggy conditions, even the official 2.25″ tire will demand caution. The TRAIL II PRO’s mud clearance is adequate for race‑day slop, but it’s not designed for deep, sticky clay expeditions. This isn‘t a design flaw — it’s a design philosophy. The TRAIL II PRO is an XC full-suspension frame first. Its geometry prioritizes efficient pedaling, short chainstays (437–438mm), and a 67.5° head angle for planted but responsive handling. Mud clearance is a real consideration; the relatively wide chainstay bridge and sculpted seat tube help, and the UDH dropout with thru-axle keeps the wheel precisely aligned even under load. But if your local trails turn into peanut butter for half the year, you‘ll want to stick to the official 2.25″ maximum and run channel‑clearing tread patterns that self‑eject mud rather than packing it tight. Why Real-World Testing Matters For riders considering a best carbon frameset under 1000, the numbers on the spec sheet only tell part of the story. Yes, the TRAIL II PRO is built from T800 carbon, weighs 1660–1700g depending on size, and features Boost 148x12mm spacing, internal cable routing, and a threaded BB68. All of that is impressive on paper. But the real value reveals itself when you’re three hours into a wet race, lapping through a mud bog, and your wheels keep spinning without the dreaded drag of tires rubbing against the frame. That’s when well-engineered clearance matters. If you’re a taller rider running a bike frame 17 inch (the 17″ option fits riders 160–175 cm with a 430 mm seat tube), you’ll appreciate that the clearance scales with the frame size — the geometry is proportional, and the chainstay length remains consistent across sizes, so smaller frames don’t lose clearance to accommodate taller riders. The Balanced Verdict The Trifox TRAIL II PRO clears 2.25″ tires in all conditions without drama. In dry, dusty conditions or summer race days, you may be able to sneak a 2.3″ tire for extra grip and comfort. But for truly wet, cloggy trails — especially those that feature deep clay or sticky organic loam — the official 2.25″ maximum remains the safe and smart bet. The spec sheet gives you a number. Wet trail testing gives you confidence. The TRAIL II PRO delivers honest clearance that matches its listed spec, with a little extra breathing room for dry days. That’s the kind of transparency that turns a best carbon frameset under 1000 into a frame you actually trust when the sky opens up and the mud starts flying.
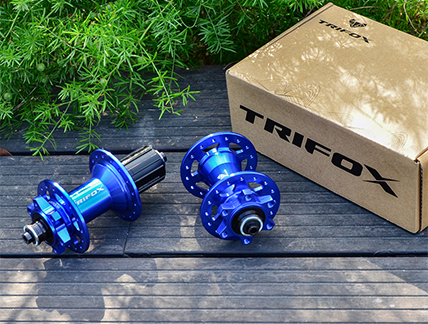
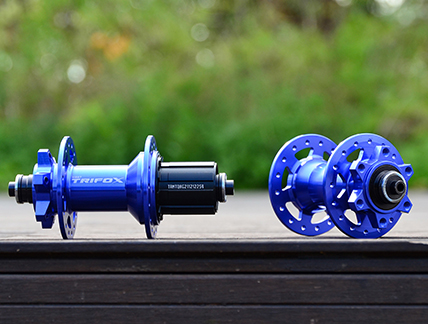
Few mechanical failures on a mountain bike are as frustrating as a hub that starts grinding, clicking, or developing play after a single muddy ride. The culprit is rarely catastrophic breakage — it‘s the slow, silent intrusion of water and fine dust past the hub’s seals. Hub seal design is the single most overlooked factor in how your wheels perform over time, especially if you ride in wet or dusty conditions. Understanding seals means fewer ruined bearings, less maintenance, and more time on the trail. Why Seals Matter More Than You Think A bicycle hub is not a sealed system. Water, mud, and dust exploit every tiny gap between the axle, bearings, freehub body, and hub shell. When contaminants penetrate the bearings, they mix with lubricating grease, turning it into a gritty abrasive paste. The result is accelerated wear, grinding noises, increased rolling resistance, and eventual bearing seizure. Properly sealed cartridge bearings — often designated as “2RS” or “LLB” — create a physical barrier that protects the internal bearing components. The Trifox M827 uses sealed cartridge bearings: two in the front and four in the rear, keeping grease in and grit out for smooth, long-lasting performance with minimal maintenance. That level of sealing directly translates to longer service intervals and fewer surprise failures mid‑ride. Contact Seals vs. Non‑Contact (Labyrinth) Seals Not all seals work the same way. Hub seals fall into two main categories: Contact seals (lip seals) use a flexible rubber lip that physically touches the rotating surface. They provide excellent contamination protection, but generate friction and heat — which costs you watts and eventually wears the seal itself. Non‑contact seals — commonly called labyrinth seals use a complex, tortuous path of interlocking grooves that makes it extremely difficult for water and dust to travel inward, without physically touching the rotating part. A labyrinth seal will not damage shafts, has a virtually unlimited life, and is frictionless, which means no power loss. Many premium hubs now combine both approaches. The M827’s design integrates sealed cartridge bearings with an optimized seal path — protecting against contaminants while keeping drag low. How Water and Dust Actually Enter Your Hub Much of the contamination happens not while riding, but when cleaning the bike. High‑pressure water from a garden hose or pressure washer is the fastest way to destroy a hub. Water can penetrate the seal in microseconds, flooding the bearing cavity, washing away grease, and leaving abrasive particles behind as it eventually evaporates. Visible signs of seal failure include cracked or missing seals on the hub shell, which allow contaminants to wreck bearings directly. Regular inspection is critical: check for cracks, dents, or corrosion on the hub shell, and feel for rough spinning or grinding noises when you rotate the axle. What to Look for in a Well‑Sealed Hub When choosing a durable mountain bike hub, examine four key aspects: 1. Bearing specification — Cartridge bearings with proper rubber seals (2RS) are essential. The M827 uses sealed cartridge bearings front and rear. 2. Seal protection — Look for hubs whose seals actively resist water, mud, and contaminant ingress. M827 bearings resist mud and water ingress. 3. Material robustness — Hubs made from corrosion‑resistant alloys with quality finishes help seals seat properly. The M827 is machined from 6061 and 7075 aluminum for strength and lightness. 4. Compatibility — A great hub must also fit your drivetrain. The M827 comes standard with a shimano hg hub freehub body supporting 8- to 12‑speed cassettes, with optional freehub bodies for SRAM XD and Shimano Micro Spline for modern drivetrains. Why the Trifox M827 Is Built for All‑Weather Durability The Trifox M827 is engineered for riders who don’t avoid mud, rain, or dust. Its combination of sealed cartridge bearings, robust aluminum construction, and optimized seal path keeps contaminants out without introducing excessive drag. Beyond sealing, the M827 delivers 72 points of engagement from a 6‑pawl driver — immediate power transfer for technical climbing — and convertible end caps that let you switch between QR and thru‑axle standards. For riders seeking best mountain bike hubs that balance durability, low drag, and long‑term reliability, the M827 is a compelling choice. Well‑designed seals mean fewer workshop hours and more miles of trouble‑free riding — and that‘s the kind of reliability that makes every trail better. Check out the Trifox M827 hub here to build your next durable wheelset.
So you’ve bought a Trifox RHB600 carbon xc bars upgrade—and you’re staring at the box, wondering how not to turn that beautiful carbon cockpit into expensive scrap. Good news: integrated carbon bars aren’t as scary as they seem. You just need the right technique, a few essential tools and a little patience. This guide walks you through every step of installing your carbon fiber bar safely, without cracking it, crushing it or cutting too much off. Before You Start: What You’ll Need * Torque wrench (the single most important tool for carbon) * Hex keys (4mm, 5mm) * Carbon assembly paste (never grease!) * Measuring tape or ruler * Fine-tooth hacksaw with carbon blade * Masking tape * Fine-grit sandpaper (400 grit) * Cable routing tool or safety wire (for internal routing) * Safety glasses and soapy water (for cutting) Step 1: Route the Cables First (Don’t Skip This) The RHB600 is a full internal routing design. All brake hoses, derailleur cables and dropper housings run completely inside the bar and stem structure. That means you must route the cables before clamping anything. Remove the port covers at the stem area and lever mounting points. Use a cable routing tool or a length of thin safety wire with a small hook bent at the end. Feed the wire from the stem entry port toward the lever exit port, attach the cable housing to the wire, then pull it through. Repeat for both sides. This step takes patience—but it’s far easier than trying to fish cables after the bar is clamped in place. Tip: Use a few drops of isopropyl alcohol as lubricant to help housing slide through the internal channels. Step 2: Check Bar Width Before Cutting Most integrated bars come at a standard 800mm width. That’s wide for stability, but many riders prefer 760mm or 780mm for tighter singletrack. Before cutting, mount the bar loosely (without fully torquing) and sit on the bike. Feel whether your hands naturally fall slightly inside the grips. Remember: you can cut more off later, but you can’t add material back. Measure twice, cut once. When you’re ready to cut: wrap masking tape around both sides at the cut mark to prevent carbon splintering. Use a fine-tooth hacksaw blade and keep the cut surface sprayed with soapy water to contain carbon dust (which is harmful to breathe). After cutting, smooth the raw edge with 400-grit sandpaper—never use a metal file on carbon. Step 3: Apply Carbon Paste—Never Grease Standard grease makes carbon surfaces slippery and risks over-torquing. Carbon assembly paste contains tiny particles that increase friction between components, allowing you to achieve a secure hold at lower torque. Apply a thin, even layer to the stem clamp area and the steerer tube contact points. Smooth with your finger. Don’t glob it on—a thin coat is all you need. Step 4: Torque Correctly (This Is Non‑Negotiable) The most common cause of carbon handlebar failure is over‑tightening. Use a calibrated torque wrench. General torque for carbon bar clamp bolts is 4–6 Nm, but always follow the manufacturer’s specific recommendation for your stem. Tighten the faceplate bolts in a cross pattern (X‑pattern), not all on one side first, to distribute pressure evenly. For control clamps (brake levers and shifters), use a lower torque—around 2–4 Nm. Overtightening these can crush the carbon tube. If you don’t own a torque wrench, buy one before touching carbon components. It’s not optional. Step 5: Final Check and Cable Trim Once everything is torqued to spec, cycle the fork through its travel to ensure cables aren’t binding or pulling taut. Then trim excess housing at the lever and frame entry points, install end caps, and seal the internal routing ports with the included rubber plugs. The Takeaway Installing an RHB600 carbon xc bars is a step‑by‑step process that rewards patience. The key rules: route cables first, measure cuts carefully, use carbon paste, and always—always—use a torque wrench. Follow these steps and your carbon fiber bar will stay intact, silent and safe for thousands of trail miles. And if you’re unsure at any stage, a local bike shop can handle the installation for a small fee—still far cheaper than replacing a cracked carbon bar.

A full-suspension mountain bike lives or dies by its rear suspension. The right design transforms a rough trail into a flowing ribbon of traction and control. The wrong one leaves you fighting pedal bob, brake jack, and a rear wheel that refuses to track. The Trifox MFM100 carbon full-suspension frame is engineered around a four-bar linkage system with a Trunnion-mounted rear shock—a combination that prioritizes climbing efficiency, descending composure, and long-term reliability. Here's how this suspension design works and why it makes the MFM100 an outstanding mtb trail bike frame for XC and light trail riding. Four-Bar Linkage: The Science of Predictable Traction The MFM100 employs a Horst-link-style four-bar linkage, a design proven over decades of mountain bike development. Unlike a simple single-pivot system, a four-bar linkage uses a series of linkages to create a virtual pivot point—a floating center of rotation that can be positioned anywhere the designer chooses. This unlocks two critical benefits for trail performance. Anti-Squat and Pedaling Efficiency: Anti-squat measures how much the suspension resists compressing under pedaling forces. Too little anti-squat, and the bike bobs excessively on climbs. Too much, and the suspension becomes harsh and unresponsive. With a four-bar linkage, the designer can tune the anti-squat curve to be maximally effective right at the sag point—where the bike sits most of the time—while relaxing it deeper in the travel. The result is a frame that climbs with the urgency of a hardtail but remains active and plush over roots and rocks. Anti-Rise and Braking Stability: Anti-rise describes how braking forces affect suspension compression. When you grab the brakes on a steep descent, some designs cause the rear suspension to stiffen (high anti-rise), reducing traction and control. The four-bar layout of the MFM100 reduces the effect of braking forces on the suspension, meaning the rear wheel stays active and glued to the trail even when you're on the anchors. For riders pushing hard on technical descents, this predictable, unflappable rear-end behavior is what separates a confidence-inspiring mtb trail bike frame from one that keeps you guessing. Independent reviews confirm that the MFM100 tracks straight on steep, rocky runs, with the carbon frame staying composed under hard hits. Trunnion Mount: A Compact, Efficient Shock Interface The MFM100 features a Trunnion rear shock mount, a design that has rapidly become the standard on modern performance frames. Instead of the traditional eyelet-and-bolt attachment at both ends, a Trunnion mount secures the shock at two points on the frame. This design choice delivers several tangible benefits. Improved Suspension Performance: The Trunnion mount allows the shock to pivot more freely around its mounting points, producing a smoother, more linear suspension curve. The shock compresses and extends with less friction, translating to better traction and control on uneven surfaces. Reduced Weight and Enhanced Geometry: By eliminating the need for long eyelets and reducing the overall length of the shock, the Trunnion mount contributes to a lighter overall frameset. It also allows frame designers to optimize bike geometry and create better clearance for larger tires. On the MFM100, this translates to generous tire clearance up to 29×2.35 inches, giving you the freedom to run high-volume rubber for comfort and traction. T800 Carbon: Stiff, Light, and Composed All this sophisticated suspension hardware is wrapped in a T800 carbon fiber frameset. T800 is a high-modulus carbon fiber known for its excellent stiffness-to-weight ratio. The result is a frame that weighs just 2170–2420 grams depending on size (XS to L)—remarkably light for a full-suspension chassis. More importantly, the carbon construction provides the lateral stiffness needed to keep the bike tracking precisely through corners and under power. Riders who have built up the MFM100 consistently praise its rigidity. One owner noted that the frame is "very fast and rigid," with pedaling force transmitting directly to the wheels without wasteful flex. On the descents, the carbon frame stays composed and planted, never feeling nervous or twitchy. Versatility: From Geared Trail Bike to Single Speed The MFM100's T800 carbon frame and threaded BSA 68mm bottom bracket provide an exceptionally versatile platform. While it's designed for geared 1× drivetrains, its solid rear triangle and robust pivot construction also make it a surprisingly capable candidate for a single speed bike frame build. Converting a full-suspension frame to single speed requires a chain tensioner mounted to the derailleur hanger (the MFM100 uses a replaceable hanger). The bike's four-bar linkage exhibits minimal chain growth through its travel, which keeps the chain tension stable and reduces the risk of drivetrain binding or chain snap—a common issue when converting less sophisticated suspension designs to single speed. For riders seeking an ultra-low-maintenance, quiet, and mechanically pure trail experience, the MFM100 offers a compelling single-speed platform. Trail-Ready Geometry and Modern Standards The MFM100's geometry is tuned for modern XC and trail riding. A 68.5° head tube angle provides stability at speed without sacrificing front-end traction on climbs. The 74.7° seat tube angle places the rider in a powerful, centered pedaling position. Boost 148×12mm rear spacing increases wheel stiffness and allows for shorter chainstays, enhancing agility. Internal cable routing keeps the frame clean and protects hoses from trail debris. Conclusion The Trifox MFM100 carbon full-suspension frame delivers a suspension system that punches well above its price class. The four-bar linkage provides tunable anti-squat for efficient climbing and reduced anti-rise for confident braking. The Trunnion-mounted rear shock ensures smooth, linear suspension action while saving weight and improving geometry. And the T800 carbon construction offers the stiffness and light weight that serious riders demand. Whether you're building a dedicated XC race machine, a versatile mtb trail bike frame, or even a minimalist single speed bike frame, the MFM100 is a platform that handles the trail with composure and confidence.
Look at the front of most road bikes, and what do you see? A tangle of brake hoses, shift cables, and handlebar tape ends. It’s functional, but it’s not beautiful. Worse, those exposed cables create aerodynamic drag, add weight, and can rattle or collect dirt. The DHB1000 fully-integrated carbon drop bar changes all of that. By routing every cable and hose completely inside the bar and stem, it transforms your bike’s front end into a clean, aerodynamic, and professional-looking cockpit. Here’s how this one component upgrades both performance and aesthetics. The Problem with Traditional Handlebars Standard road handlebars have cables that run externally along the front of the bar, then down the stem and into the frame. This design has persisted for decades, but it comes with downsides: - Drag: Exposed cables disrupt airflow, creating turbulence and slowing you down. - Clutter: A busy cockpit distracts from the bike’s lines and can interfere with accessories. - Maintenance: Cables can rub against the frame, wear through paint, and collect grime. - Safety: In a crash, external cables can snag or be damaged. The DHB1000 solves all these issues with a single, elegant design. Full Integration: How It Works The DHB1000 is a carbon fiber bicycle handlebars system that integrates the bar, stem, and cable routing into one seamless unit. The bar features internal channels that guide brake hoses and shift cables from the shifters, through the bar, and directly into the stem. From there, they enter the frame through a dedicated port in the headset or top tube. The result: no cables visible anywhere from the shifters to the frame. The cockpit looks like a single, sculpted piece of carbon fiber. Aerodynamic Benefits Every cyclist knows that reducing drag is the key to going faster with less effort. The DHB1000’s fully internal routing cleans up the leading edge of the bike, reducing turbulence and lowering drag. While the exact savings depend on speed and wind angle, studies have shown that a fully integrated front end can save several watts at 30-40km/h. For racers and time-conscious riders, this is a free speed upgrade. For everyone else, it means riding faster or easier for the same effort. A Clean, Professional Aesthetic Beyond the numbers, there’s the look. A bike with fully internal cables looks like it came from the future. The clean lines of the DHB1000 complement modern drop bar road bike frames with internal routing, creating a cohesive, high-end appearance. No more zip ties, no more cable rub patches on the head tube. Just pure carbon and smooth curves. This is the kind of detail that makes a custom build stand out. Weight and Stiffness The DHB1000 is constructed from high-modulus T800 carbon fiber, offering an exceptional stiffness-to-weight ratio. The one-piece design eliminates the need for a separate stem and faceplate, saving weight and improving rigidity. When you sprint or climb out of the saddle, the bar transfers power directly without flex. Yet carbon’s natural vibration damping keeps the ride comfortable over rough pavement. With a width of 380mm (center-to-center) and a compact drop shape, it’s ideal for riders who prioritize an aerodynamic, forward position. Installation Considerations Installing a fully integrated bar like the DHB1000 requires more patience than a traditional bar, but the result is worth it. You’ll need to route the hoses and cables through the internal channels before attaching the shifters. It’s helpful to use a internal routing kit (guide wire) and take your time. Once installed, the system is maintenance-free—cables are protected from the elements and won’t shift or rattle. Trifox includes detailed instructions, and many bike shops can handle the installation if you prefer professional help. Compatibility The DHB1000 is designed to work with most modern road bikes that have a standard 1-1/8” steerer tube and accept internal cable routing through the stem or headset. It’s compatible with mechanical and electronic shifting systems, as well as hydraulic disc brakes. The 380mm width is measured center-to-center at the drops, providing a narrow, aero position favored by racers and performance-oriented riders. The Transformation Installing the DHB1000 is more than an upgrade; it’s a transformation. The front of your bike becomes a statement of intent: clean, fast, and modern. You’ll notice less cable noise, easier cleaning, and a cockpit that simply looks right. And on the road, the aerodynamic advantage and stiffness give you a tangible performance edge. Conclusion For riders seeking the ultimate carbon fiber bicycle handlebars for their drop bar road bike, the DHB1000 represents the pinnacle of integration. It eliminates clutter, reduces drag, saves weight, and delivers a professional, high-tech look. Whether you’re building a dream race bike or upgrading your current machine, the DHB1000 transforms your bike into something truly special.


