


Modern riding demands modern gear. Your handlebar is home to your GPS computer, your headlight, maybe an action camera, and sometimes a phone mount. The result? A cluttered cockpit where cables tangle, devices compete for space, and nothing feels secure. The Trifox SBH100 carbon computer mount is designed to solve this exact problem. It’s not just a mount—it’s an integrated solution that organizes your essential devices into a single, clean, and rock-solid platform. The Problem: A Handlebar That’s Out of Space Traditional mounting means a separate bracket for your computer, another clamp for your light, and perhaps a third for a camera. Each adds weight, consumes precious handlebar real estate, and often results in a setup that looks messy and feels unstable. Worse, these individual mounts can interfere with your controls or create distracting vibration. For riders seeking a clean stem bike computer mount that can handle more than one device, the options have been limited—until now. The Solution: One Mount, Three Functions The SBH100 is engineered as a multi-device hub that attaches cleanly to your stem or handlebar. Its 3K carbon fiber construction is incredibly lightweight yet exceptionally rigid, ensuring your devices stay exactly where you put them—no wobble, no sag. At the heart of the system is a universal quarter-turn interface that securely holds most major cycling computers, including Garmin Edge series, Bryton, Cat Eye, iGPSPORT, and Blackbird. This makes it an ideal gps mountain bike computer mount for riders who rely on accurate navigation and performance data. But the real innovation is the SBH100’s modular expansion. Integrated into the mount are standard GoPro-style mounting points, allowing you to attach an action camera or a bike light (up to 25mm diameter) directly below or above your computer. Everything is aligned and centered, creating a professional, aerodynamic profile that doesn’t clutter your bars. No additional clamps, no zip ties, no compromises. Why Carbon Fiber Matters The SBH100 is constructed from 3K carbon fiber, a material chosen for its exceptional stiffness-to-weight ratio. Weighing just grams, it adds virtually no weight to your bike while providing the rigidity needed to keep devices steady on rough terrain. Carbon also absorbs high-frequency vibration better than aluminum, reducing the risk of your computer shaking loose or your camera footage appearing shaky. It’s a small detail that makes a big difference in real-world use. Compatibility and Versatility The SBH100 is designed to work with the most popular cycling electronics on the market. Whether you use a Garmin Edge 830, a Bryton Rider 750, or a CatEye Padrone, the quarter-turn interface ensures a secure fit. The GoPro-compatible accessory mounts accept lights from brands like Lezyne, NiteRider, and others, as well as action cameras from GoPro and similar. This versatility means you can build your perfect cockpit without being locked into a proprietary ecosystem. A Cleaner, Safer, More Professional Cockpit By consolidating your computer, light, and camera into one integrated mount, the SBH100 does more than just organize—it improves safety. Your view of the trail is unobstructed. Your light beam isn’t blocked by a computer. Your cables can be routed cleanly. And when you stop for a coffee or a rest, you can quickly remove the entire assembly with a simple twist. For riders who value a clean, functional cockpit, the Trifox SBH100 is the solution. It transforms the handlebar from a collection of individual brackets into a unified command center, proving that the best way to solve the multi-device puzzle is to stop adding mounts—and start integrating them.
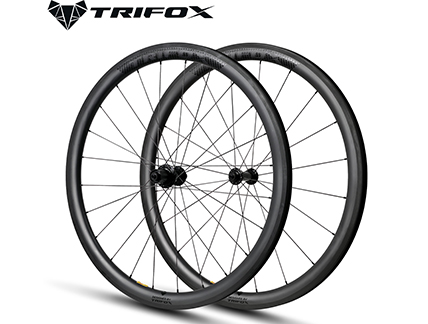
Investing in a set of carbon wheels is one of the most transformative upgrades you can make to your road bike. But with choices like 40mm, 45mm, 50mm, and 60mm depths, how do you decide which is right for you? The Trifox WT18 carbon rimset offers all four options, allowing you to tailor your wheel choice to your riding style, terrain, and performance goals. Understanding the trade-offs between depth, weight, and aerodynamics is the key to making the perfect choice. The Shallow End: 40mm – The All-Rounder Climber At 40mm, this is the shallowest option in the WT18 lineup. Weighing in at just 678g (front) and 846g (rear) for the pair, these are the lightest wheels in the range. This low rotational mass makes them the ideal choice for riders who prioritize climbing and quick acceleration. If your routes are defined by steep, sustained climbs and punchy surges, the 40mm depth will feel responsive and eager. They are also the most stable choice in crosswinds, offering predictable handling for lighter riders or those riding in variable conditions. The 40mm depth is the quintessential “all-rounder,” excelling in the mountains while remaining competent on the flats. The Versatile Middle: 45mm and 50mm – The Sweet Spot The 45mm and 50mm depths represent the modern “do-it-all” sweet spot. These depths offer a noticeable aerodynamic advantage over shallower rims without a significant weight penalty. The 50mm version, for example, weighs only 716g (front) and 878g (rear)—only 38 grams heavier per wheelset than the 40mm version. This slight weight increase is a worthwhile trade for the improved aerodynamic efficiency. These depths are ideal for rolling terrain, group rides, and competitive racing where both climbing and flat speed matter. They provide a planted, stable feel and have become the standard choice for riders seeking one wheelset to handle everything from mountainous gran fondos to fast criteriums. For many, the 45mm or 50mm best chinese carbon wheels represent the perfect balance of weight and aero performance. The Deep Section: 60mm – The Aero Specialist The 60mm depth is designed for one thing: speed on flat to rolling terrain. With a deeper profile, these wheels cut through the air more efficiently, delivering a measurable aerodynamic advantage, especially at higher speeds. They are the choice for time trialists, triathletes, and riders who spend most of their time on flat roads or in fast, aggressive pacelines. Weighing 744g (front) and 906g (rear), they are still remarkably light for their depth, but they will be more affected by crosswinds. If your primary goal is maximizing speed on the flats and you are comfortable managing a deeper rim in gusty conditions, the 60mm option is a potent weapon. The Deciding Factors When making your choice, consider three things: 1. Your Terrain: If you live in the mountains, choose 40mm. For rolling hills and mixed terrain, 45mm or 50mm. For flat, fast roads, choose 60mm. 2. Your Weight: Lighter riders may prefer shallower depths (40-50mm) for better crosswind stability. 3. Your Goals: If you’re chasing KOMs on climbs, prioritize weight with 40mm. If you’re racing or seeking top-end speed on the flats, prioritize aero with 60mm. All WT18 wheels share the same high-quality T800 carbon fiber construction, reliable Pillar spokes, and smooth T18 aluminum hubs. By selecting the depth that matches your riding profile, you’ll unlock the full potential of your bike. Whichever you choose, this carbon rimset delivers exceptional value, proving that high-performance carbon wheels are accessible to all riders.
A warranty is a promise on paper. It’s a guarantee that a manufacturer stands behind its product for a set period. The Trifox MFM200 carbon hardtail frame comes with a solid 2-year warranty, offering immediate peace of mind. But for many riders, the true measure of a frame isn't a piece of paper; it's earned over countless miles, through seasons of hard riding, and across varied terrain. It’s the confidence that your frame will endure long after the warranty period becomes a memory. This is where the MFM200 truly distinguishes itself, building trust through robust engineering, quality materials, and consistent real-world performance. The Foundation: T800 Carbon and Enduring Strength Long-term confidence begins with the fundamental material and construction. The MFM200 is crafted from T800 carbon fiber, a high-grade material chosen for its exceptional stiffness-to-weight ratio and, crucially, its fatigue resistance. This isn't just about being light; it's about maintaining structural integrity over years of repetitive stress—the constant flex, vibration, and impacts that are part of every ride. The frame's construction, with its carefully engineered layup in high-stress zones like the head tube, bottom bracket, and chainstay yokes, is designed to resist the propagation of micro-cracks and maintain its crisp, responsive feel for the long haul. Riders like Jason Caron, who noted in a review, “I’ve owned my frame(bike) since January and it’s held up very well. I’m 200lbs and I do not take it easy on the trails… after a few runs I have full confidence that the bike will hold up,” speak to this real-world durability. Geometry That Grows with You A frame that earns long-term confidence also needs to remain relevant. The MFM200's geometry—a 70° head tube angle and 74.7° seat tube angle with a 440mm chainstay—strikes a balanced, modern stance. It's efficient for cross-country climbing yet stable enough for confident descending. This versatility means the frame can adapt as your riding style evolves. As one reviewer noted, "It has modern geometry so upgrades down the road won’t be an issue." You're not buying a frame that will feel dated in a few seasons; you're investing in a platform that will continue to perform and accept modern component upgrades. This is particularly important for smaller riders seeking a 15.5 bike frame or those looking for a womens mtb frame that offers a proper, confidence-inspiring fit with modern trail geometry. Versatility and Serviceability A frame built for the long haul must also be easy to live with and maintain. The MFM200 features internal cable routing, which not only looks clean but protects cables from the elements, prolonging their life. It's designed to accommodate a wide range of components, from mechanical to electronic groupsets, and offers the flexibility to choose between a Quick Release or Thru-Axle rear end by selecting the appropriate derailleur hanger. This forward-thinking design ensures you can adapt the bike to new standards and maintain it easily, year after year. In the end, the Trifox MFM200's reputation for longevity isn't just built on its warranty card. It's forged from the choice of durable T800 carbon fiber, a timeless and versatile geometry, and the thousands of miles logged by riders who have come to trust it. For anyone seeking a carbon hardtail that offers not just an entry point but a long-term companion for trail adventures, the MFM200 provides the confidence that your frame is built to last well beyond the warranty period.
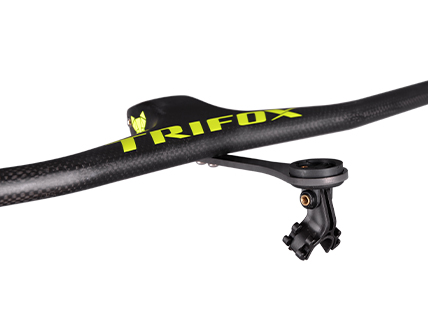
When it comes to mountain bike handling, the handlebar is your primary connection to the trail. Its geometry—the angles and dimensions—dictates how you control the bike, how efficiently you climb, and how confidently you descend. The Trifox RHB200 integrated carbon handlebar features a purposeful combination of a -17° stem angle and a 9° backsweep, a pairing meticulously chosen to deliver a balanced, powerful, and comfortable riding position for aggressive trail riding. Understanding these numbers reveals why the RHB200 is engineered for control. The -17° Stem: Aggressive and Stable The stem angle is critical for setting your front-end height and reach. A -17° stem is on the lower end of the angle spectrum, meaning it positions the handlebar lower and further forward relative to the steerer tube. This creates a more aggressive, aerodynamic riding position that lowers your center of gravity. On steep descents, this lower stance inspires confidence, allowing you to weight the front wheel effectively for traction and control. During high-speed sections, it promotes stability by placing your body in a balanced, centered position over the bike. This angle is favored by riders who prioritize precise, aggressive handling and want to maintain a low, powerful profile on the trail. The 9° Backsweep: Natural Wrist Position The backsweep angle dictates how far the grips are angled back toward the rider. A 9° backsweep is a carefully calibrated figure for mountain biking. It places your hands and wrists in a more natural, neutral alignment, which is crucial for two reasons. First, it significantly reduces strain and fatigue in your wrists, forearms, and shoulders during long climbs and extended rides. By allowing your hands to sit in a position that follows your arm's natural angle, you can maintain a relaxed, powerful grip with less muscular tension. Second, it optimizes leverage and control when descending. This natural wrist angle allows you to pull up on the bars for manuals or absorb impacts with greater strength and less effort, giving you more precise command over the front wheel through rough sections. The Integrated Advantage: Stiffness and Feedback Beyond the angles, the RHB200's integrated, one-piece T800 carbon fiber construction is key to translating this geometry into performance. By eliminating the separate stem and bar interface, this design creates an incredibly stiff and direct connection. When you lean the bike into a corner or make a sudden line correction, the response is immediate and precise, with zero detectable flex or delay. This stiffness provides exceptional feedback, allowing you to feel exactly what the front wheel is doing. Despite its rigidity, carbon's natural vibration-damping properties filter out high-frequency trail chatter, reducing arm pump without sacrificing the valuable feedback you need to stay in control. A Customizable Fit for Every Rider The RHB200 is available in stem lengths of 80mm, 90mm, 100mm, and 110mm, and the 800mm width can be cut down, allowing you to fine-tune your reach and leverage to match your body and riding style perfectly. Weighing in at approximately 280g, it's a significant weight saving over most alloy combinations, contributing to a livelier, more responsive front end. In conclusion, the Trifox RHB200's geometry isn't an accident; it's an engineered system designed to enhance trail control. The -17° stem provides an aggressive, stable platform for descents, while the 9° backsweep ensures ergonomic comfort and powerful leverage. For riders seeking a set of high-performance bars for mountain bike that offer this precise blend of control and comfort, the RHB200 represents a compelling choice. It transforms the cockpit into a cohesive, responsive tool that instills confidence on every climb and descent, solidifying its place as a contender for the best mtb handlebars available.
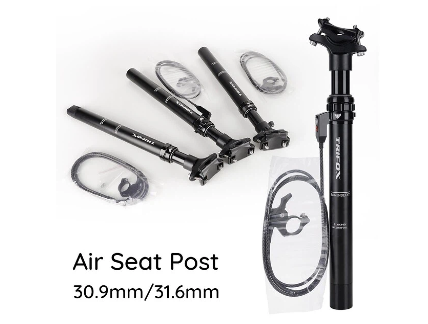
Choosing a dropper post can often feel like a compatibility puzzle. You find a post with the right travel and diameter, only to discover your frame's cable routing doesn't match. The Trifox AP316 eliminates this frustration entirely. Instead of a one-size-fits-all approach, it's engineered with three distinct cable routing options, ensuring that regardless of your frame's design—whether it's an older quick-release model or a modern carbon machine—the AP316 can be installed cleanly and function flawlessly. This adaptability, combined with robust construction, makes it a top contender for the best budget dropper post on the market. Understanding the Three Routing Options The AP316 series is available in three specific models, each designed for a different frame interface: * Upper Routing (APS316): The cable enters near the top of the seatpost. This is ideal for frames with external cable guides positioned high on the seat tube, often found on older or more traditional mountain bike frames. It offers a straightforward, easy-to-install solution for riders seeking a reliable external routed dropper post. * Center Routing (APM316): The cable entry point is located around the middle of the post. This is a versatile and popular choice, as it aligns well with many modern frame designs that have a guide or port near the middle of the seat tube. It often provides the cleanest external cable line. * Bottom Routing (APD316): The cable enters at the very bottom of the seatpost. This is designed specifically for frames with full internal cable routing, where the cable or hose runs inside the seat tube and exits near the bottom bracket. This option creates an exceptionally clean, seamless look. Performance You Can Depend On Regardless of which routing option you choose, the core performance of the AP316 is identical and impressive. It features 125mm of smooth, adjustable travel, powered by a reliable air-sprung cartridge. This allows you to drop your saddle out of the way on descents and pop it back up for climbs with the simple press of a remote lever. The post is constructed from high-quality aviation-grade 7075 aluminum, a material chosen for its exceptional strength-to-weight ratio. This ensures the post is both lightweight and durable enough to withstand the rigors of trail riding, enduro, and even all-mountain abuse. The 1.5m cable housing provides ample length for any bike setup. Why the AP316 is the Best Budget Dropper Post For riders seeking to add a dropper without breaking the bank, the AP316 offers an incredible value proposition. Its combination of 125mm travel, durable 7075 aluminum construction, and—most importantly—its three adaptable routing options, addresses the primary compatibility headaches that plague budget dropper posts. You can confidently purchase the version that matches your frame, knowing you're getting a reliable, functional component. This thoughtful engineering, paired with a sub-$70 price point, firmly establishes the AP316 as a leading candidate for the best budget dropper post, proving that you don't need to spend a fortune to get a dropper that fits perfectly and performs reliably on every ride.
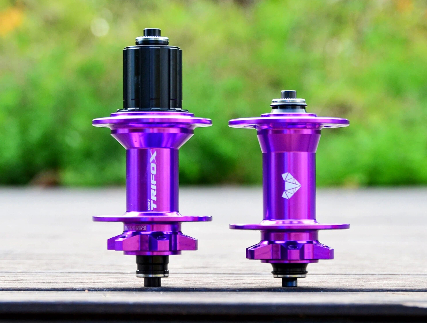
At the heart of every great wheelset lies the hub—a component often overlooked until performance falls short. The Trifox M827 mountain bike hub is designed to be noticed, not for its sleek aesthetics alone, but for the sophisticated engineering within. Its 6-pawl, 72-point engagement system promises rapid power transfer and reliable performance, but the technical story goes even deeper, offering a level of versatility that makes it a standout choice for any builder. The Engagement System: Instant Response The core of the M827's performance is its driver mechanism. Inside the hub shell, six precision-engineered pawls engage simultaneously with a 72-tooth ratchet ring. This configuration is key. With 72 points of engagement, the hub requires only a 5-degree rotation of the crank before the pawls lock into place. In practical terms, this means when you stomp on the pedals out of a corner or over a technical obstacle, power is delivered almost instantly. There's no lag or "dead spot" where the pedals spin freely before catching—just immediate, decisive forward momentum. This rapid engagement is a game-changer for technical climbing and aggressive trail riding where every pedal stroke counts. Convertible Axle System: One Hub, Two Standards Modern mountain biking is in a state of transition, with Quick Release (QR) and Thru-Axle (TA) standards both prevalent. The M827 solves this compatibility puzzle elegantly. The hub is sold with standard QR end caps (front 9x100mm, rear 10x135mm). However, its design allows you to purchase and install optional end caps to convert it to modern Thru-Axle standards (front 15x100mm TA, rear 12x142mm TA). This means you can confidently build a wheelset for your current QR frame, and if you upgrade to a newer TA frame later, you don't need new wheels—just swap the end caps on your M827 hubs. It's a future-proofing feature that adds immense long-term value. Universal Freehub Compatibility Versatility extends to the drivetrain as well. The M827 comes standard with a Shimano/SRAM HG-compatible freehub body, supporting 8 to 12-speed cassettes. But recognizing the diversity of modern drivetrains, Trifox offers optional freehub bodies for SRAM XD (11/12s) and Shimano Micro Spline (12s). This simple swap capability ensures the same bicycle rim hub can be adapted to virtually any high-performance groupset on the market, making it an incredibly flexible foundation for custom wheel builds. Built to Last: Materials and Bearings All this sophisticated engagement and adaptability is housed in a durable shell. The hub bodies are machined from 6061 aluminum alloy, while the axles and freehub bodies use stronger 7075 aluminum. The rear hub spins on four sealed cartridge bearings (two in the front) for smooth, long-lasting performance with minimal maintenance. Weighing in at a competitive 165g front and 314g rear, it offers a superb balance of strength and low weight. In summary, the Trifox M827 is far more than a simple mtb hub. It's a meticulously engineered component that delivers instant power through its 6-pawl, 72-point system, while its convertible end caps and freehub bodies make it one of the most adaptable hubs on the market. For the discerning wheel builder seeking a hub that combines rapid engagement with genuine long-term versatility, the Trifox mtb hub M827 represents a compelling, high-performance choice.
When browsing for a new road bike frame, the lines between "Linkrace" and "endurance" can sometimes blur. Marketers use the terms freely, but the true story is told by the geometry chart. Numbers don't lie. They reveal whether a frame is designed for aggressive, aerodynamic speed or for all-day comfort and stability. The Trifox X16TA carbon frameset presents an interesting case. By analyzing its key figures, we can uncover its genuine character and determine the ideal rider it's built for. The Race Geometry Indicators Let's look at the numbers for a size 54 inch bike frame (listed as 54cm). The head tube angle is 73°, which is firmly in the territory of a responsive race bike. This relatively steep angle provides quick, precise steering, ideal for fast cornering and rapid direction changes in a criterium or a spirited group ride. The seat tube angle is 74°, positioning the rider's hips directly over the bottom bracket for efficient power transfer—a hallmark of a climbing and racing-oriented geometry. The Endurance Geometry Indicators However, the X16TA also incorporates figures that suggest comfort and stability. The chainstay length is a consistent 410mm across all sizes. This is a moderate length that balances responsiveness with a planted feel, preventing the bike from feeling "twitchy." The wheelbase, at 982mm for the 54cm size, is not excessively long but provides a stable platform. Critically, the stack-to-reach ratio tells the comfort story. With a stack of 544mm and a reach of 384mm (a ratio of about 1.42), this frame offers a position that is performance-oriented yet not impossibly low. It allows for a moderately aggressive drop without requiring extreme flexibility, bridging the gap between an all-out race bike and a relaxed endurance machine. The Verdict: A Versatile Performer The X16TA, with its T800 carbon fiber construction, flat-mount disc brakes, and thru-axles, is engineered as a modern, versatile road bike. Its geometry charts a middle course. It offers the sharp handling and efficient pedaling position of a race bike, making it a joy to push hard on climbs and through corners. Yet, it tempers this with a wheelbase and stack height that provide real-world stability and comfort for longer days in the saddle. It's not a pure, unforgiving race bike, nor is it a slack, upright endurance tourer. It is, instead, a highly capable all-rounder that will satisfy the sportive rider, the club racer, and the enthusiast seeking one bike to do it all. For a rider looking for a medium bike frame that delivers performance without extreme discomfort, the X16TA presents a compelling and well-balanced option.
Upgrading your handlebar tape is one of the simplest ways to refresh your bike's look and feel. Quality bar tape like the Trifox BHT100 can transform your ride by providing better grip, cushioning road vibration, and giving your cockpit a clean, professional appearance. While the task might seem fiddly, with a little patience and the right technique, you can achieve a flawless wrap. Here’s our step-by-step guide to installing bicycle handlebar tape like a seasoned mechanic. Before You Start: Preparation Begin by removing your old tape and thoroughly cleaning the handlebar surface. Use isopropyl alcohol to remove any sticky residue. Ensure your brake levers are positioned correctly and that your handlebar end plugs are removed (new ones are included with the BHT100). Gather your new tape, scissors, and the finishing tape and end plugs provided in the kit. Step 1: Begin at the Bar Ends This is the foundation of a good wrap. Start by threading the new bicycle handlebar tape through the bar end, leaving about 2-3 inches protruding. This starting tab will be tucked inside later. Begin wrapping from the very end of the drop, working your way up towards the stem. Apply firm, even tension as you wrap, overlapping each new layer by about one-third to one-half of the tape's width. This overlap is crucial for preventing gaps and ensuring a comfortable, cushioned feel. Step 2: Navigating the Brake Levers When you reach the brake lever clamp, you'll need to create a neat transition. A common technique is to make a small "figure-eight" or "half-lap" around the lever body. Simply pull the tape tight and carefully wrap it around the front of the lever clamp, then continue wrapping up the handlebar. The key is to maintain tension so the tape lies flat without bunching. The BHT100's EVA foam core is forgiving and compresses nicely around these contours. Step 3: Finishing at the Stem Continue wrapping until you reach the stem. Cut the tape with sharp scissors at a slight angle for a clean, tapered edge. Use the provided finishing tape—a thin, adhesive strip—to secure the end of the bar tape neatly against the bar. Wrap it around a few times, pressing firmly for a secure hold. Step 4: Secure the Ends Finally, insert the new handlebar end plugs that came with your BHT100 kit. These are not just cosmetic; they are essential for safety and prevent the bar tape from unraveling. Gently push the protruding starting tab of tape into the bar end before inserting the plug for a completely clean finish. With these simple steps, your new Trifox bar tape will be installed perfectly, ready to provide miles of comfortable, confident riding. The BHT100's combination of shock-absorbing EVA foam and durable, easy-to-clean PU leather makes it an ideal choice for this upgrade. A fresh wrap of quality bicycle handlebar tape is a small investment that pays huge dividends in comfort and control on every ride.
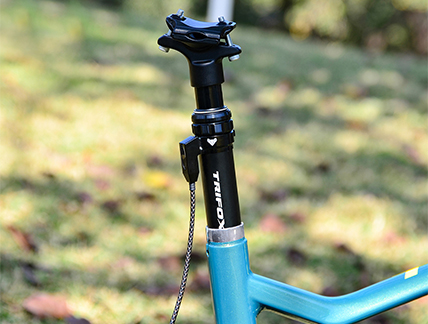
Choosing a dropper post can be a game-changer for your trail riding, but the technical details—travel, diameter, and especially cable routing—can feel overwhelming. The worry of ordering the wrong part for your specific frame is real. Don't stress. This guide will demystify the process, focusing on the crucial choice between internal and external routing to ensure you select the perfect dropper, like the versatile Trifox AP316, for your bike. The Core Question: What Does Your Frame Allow? This decision is primarily dictated by your bike frame’s design, not personal preference. You must match the post to your frame's capabilities. * Internal Routing (Bottom Routing): This style, represented by the APD316 model, is the cleanest and most modern. The cable enters the post at the very bottom and runs entirely inside the frame. Your frame must have a dedicated internal routing port at the bottom of the seat tube to accommodate this. This is common on newer mountain bikes seeking a sleek, protected look. * External Routing: This is the universal solution and a hallmark of the best budget dropper post. The cable is routed along the outside of the frame. The Trifox AP316 offers two external options to fit different frame geometries and cable guides: * Upper Routing (APS316): The cable enters the post near the top. Ideal for frames with cable guides on the top tube. * Center Routing (APM316): The cable enters around the middle of the post. Often the easiest to install and maintain, working with a wide variety of frames. Your 3-Step Decision Flowchart Follow this simple process to eliminate guesswork: 1. Inspect Your Frame: Look at the area where your seatpost enters the frame (the seat tube). Are there small cable guide ports near the top or on the top tube? You likely need an external routed dropper post. Is there a clean hole at the very bottom of the seat tube, inside the frame? Your bike is ready for internal routing. 2. Measure Your Seat Tube Diameter: This is non-negotiable. Remove your current seatpost—the diameter (e.g., 31.6mm) is stamped on it. The AP316 comes in 30.9mm and 31.6mm sizes to fit most bikes. 3. Consider Maintenance & Budget: External routing is simpler to install, adjust, and service, making it a reliable and often more affordable choice. Internal routing looks fantastic but can be trickier to set up initially. Why the Trifox AP316 Solves the Compatibility Puzzle The AP316 series exemplifies user-friendly design by offering a single performance specification across three routing options. Whether you choose the APS316 (upper), APM316 (center), or APD316 (internal bottom), you get the same reliable core: 125mm of smooth air-suspension travel, a durable 7075 aluminum construction, and a 1.5m cable for flexible setup. This means you don't sacrifice quality or features based on your frame's routing limitations. For riders seeking a high-value, capable upgrade, it stands out as a top contender for the best budget dropper post that doesn’t cut corners. Making the Final Choice If your frame has internal routing ports and you value a clean aesthetic, the APD316 is your match. For everyone else—especially those with older frames, complex full-suspension designs, or who prioritize easy maintenance—the external routed dropper post options (APS316 or APM316) are the smart, hassle-free choice. By taking five minutes to inspect your bike and following this guide, you can confidently select the component that will unlock more dynamic, confident, and fun riding on every trail. The right dropper post isn't just a part; it's the key to a more capable and enjoyable bike.


