


The Basics of a Bike Hub
A hub is the core part of a bicycle wheel, located at the center where the spokes connect. It houses the axle, bearings, and other mechanisms that allow the wheel to rotate freely. Hubs come in various types, including front hubs, rear hubs, and those designed for specific disciplines like road biking, mountain biking, or commuting.
Key Components of a Hub
1. Axle: The axle is the rod that runs through the hub, connecting it to the bike's frame or fork. It can be quick-release, thru-axle, or bolt-on, depending on the bike’s design.
2. Bearings: Bearings reduce friction between the hub and axle, enabling smooth rotation. They can be either loose ball bearings or sealed cartridge bearings.
3. Hub Shell: The outer shell is the part of the hub where the spokes attach. It’s typically made from lightweight materials like aluminum or carbon fiber.
4. Freehub or Freewheel: Found on the rear hub, this mechanism allows the wheel to spin independently of the pedals when coasting. Modern bikes usually feature a freehub, which integrates with the cassette.
Types of Hubs
- Front Hub: Simpler in design, the front hub connects to the fork and focuses on smooth rotation.
- Rear Hub: More complex, the rear hub includes the freehub or freewheel and is responsible for transferring power from the pedals to the wheel.
- Disc Brake Hub: Designed for bikes with disc brakes, these hubs have mounts for brake rotors.
- Internal Gear Hub: Found on some commuter bikes, these hubs contain gears inside the hub shell, offering a low-maintenance alternative to derailleurs.
Why Hubs Matter
A well-functioning hub is essential for a smooth, efficient ride. High-quality hubs reduce friction, improve power transfer, and enhance durability. They also play a role in wheel stiffness and overall bike performance. Whether you’re climbing hills, sprinting on flat roads, or navigating rough trails, a reliable hub ensures your wheels spin effortlessly.
Maintenance Tips
To keep your hubs in top condition, regularly check for play or grinding noises, which may indicate worn-out bearings. Clean and lubricate the hubs periodically, and consider professional servicing if you’re unsure about maintenance.

The hub is a small but vital part of your bike, ensuring smooth rotation and efficient power transfer. Understanding its role and keeping it well-maintained can significantly enhance your riding experience. Whether you’re a casual rider or a seasoned cyclist, a reliable hub is key to keeping your wheels—and your adventures—rolling smoothly.
When it comes to cycling, the performance of your bike isn’t just determined by your frame or gears. The wheels play a pivotal role, and within the wheels, the wheel hubs and associated parts are often the unsung heroes of your ride. Wheel hubs are crucial to your bike’s overall performance, affecting everything from speed to handling, efficiency, and comfort.
1. Efficient Power Transfer with Quality Hubs
Wheel hubs are at the heart of your bike’s wheel system, and they play a significant role in how power is transferred from your pedals to the ground. When you pedal, the energy you generate is transmitted through the drivetrain and into the wheel hubs. A high-quality hub can efficiently transfer this energy with minimal loss, making your efforts more effective. This efficiency is essential for long rides, competitive cycling, and hilly terrain where every bit of energy counts.
For example, hubs with a higher engagement rate—meaning the number of points where the pawls inside the hub engage—provide a quicker response to your pedaling. This is particularly advantageous when you’re climbing hills or sprinting, as it allows you to accelerate faster and transfer more of your power to the road without losing momentum.
2. Smoothness and Low Friction for Better Performance
Another key factor in how hubs affect cycling performance is their smoothness and level of friction. High-quality hubs are designed to reduce friction to a minimum, ensuring that your wheels spin freely with less effort. Hubs with high-quality bearings—often ceramic or sealed ball bearings—are more efficient at reducing friction compared to low-quality bearings. This means less energy is wasted during your ride, making it easier to maintain speed, especially during long-distance rides or on flat sections of road.
Smooth-running hubs are also less prone to wear and tear, which can result in improved longevity and lower maintenance costs over time. Hubs that are built with durability in mind can handle the rigors of various terrains without compromising performance.
3. Weight Considerations for Better Handling
Wheel hubs also impact the overall weight of your bike. Lighter hubs can contribute to a faster and more responsive ride, particularly for riders who participate in competitive cycling or racing. A lightweight hub allows your bike to accelerate more quickly, especially when transitioning between gears or during a sprint. On the other hand, heavier hubs can slow you down, particularly when climbing hills or navigating tight corners.
However, it's important to balance weight with durability and strength. For instance, carbon hubs may be lighter but could be less durable on rougher terrains compared to more robust aluminum hubs. Choosing the right hub for your needs and riding conditions is essential to ensure that you don't sacrifice performance for weight savings alone.
4. Improved Braking Performance with the Right Hubs
The interaction between your hubs and brake components can significantly impact your overall braking performance. For cyclists who use rim brakes, the quality of the wheel hubs can affect how evenly and effectively your braking surfaces work. Poor-quality hubs can lead to uneven braking, while high-quality hubs ensure that the wheels are aligned correctly for smooth and consistent braking power.
For disc brake-equipped bikes, the hub's compatibility with the rotor and the ability to withstand heat buildup is equally important. A quality hub helps maintain the structural integrity of the disc brake system, reducing the risk of warping or overheating, which can compromise braking efficiency and safety.
5. Durability for Longevity
When it comes to cycling, durability is key—especially if you ride regularly or tackle rough terrain. The right hubs, built with high-quality materials and precision engineering, offer improved longevity. Hubs made from durable materials like aluminum or steel tend to be more resilient to impacts, moisture, and dirt. This is particularly crucial for off-road cyclists or mountain bikers who face harsh conditions that can wear out components faster.
Additionally, hubs with sealed bearings or internal grease systems are better at keeping out dirt and water, ensuring the hubs maintain their smoothness and performance over time. This means less maintenance and fewer repairs, allowing you to focus more on your ride and less on frequent bike tune-ups.
6. Customization for Specific Cycling Needs
One of the most attractive features of modern wheel hubs is the variety of options available for different types of cycling. Whether you're a road cyclist, mountain biker, or triathlete, there are hubs specifically designed to meet the needs of your riding style. Road cyclists may opt for lightweight hubs with quick engagement for improved acceleration, while mountain bikers might prioritize durability and the ability to handle rough terrain.
Hubs also come in different axle types and configurations, allowing you to customize your bike to fit your riding style. For instance, through-axle hubs offer increased stability and strength, particularly for off-road cycling, while quick-release hubs provide convenience for road cyclists who need to make frequent tire changes.

Wheel hubs and their associated parts are crucial to your bike’s overall performance. From improving power transfer and reducing friction to enhancing comfort and longevity, the right hubs can make a noticeable difference in your cycling experience.
Investing in quality wheel hubs ensures that your bike runs more efficiently, lasts longer, and delivers a smoother ride—whether you're on the road, trail, or competing in races. By understanding how wheel hubs influence your performance, you can make better choices when upgrading your bike, ensuring a more enjoyable and efficient ride every time.

Bicycle wheels are fundamental to both the efficiency and performance of a bike. Understanding the essential components that make up a bicycle wheel can help ensure better maintenance and upgrades, leading to a more enjoyable ride. Let's delve into the key wheel parts and explore how Trifox Bike offers affordable, high-quality options for these components.
Hubs: The Heart of the Wheel
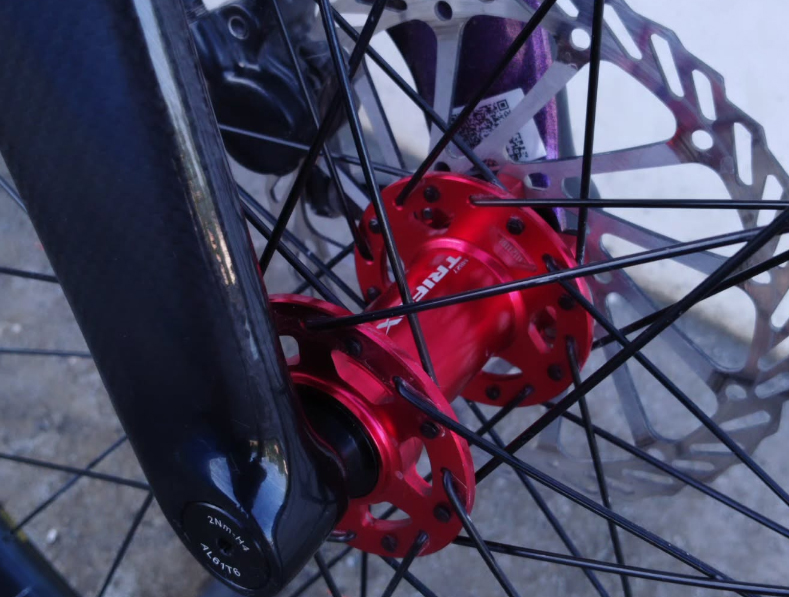
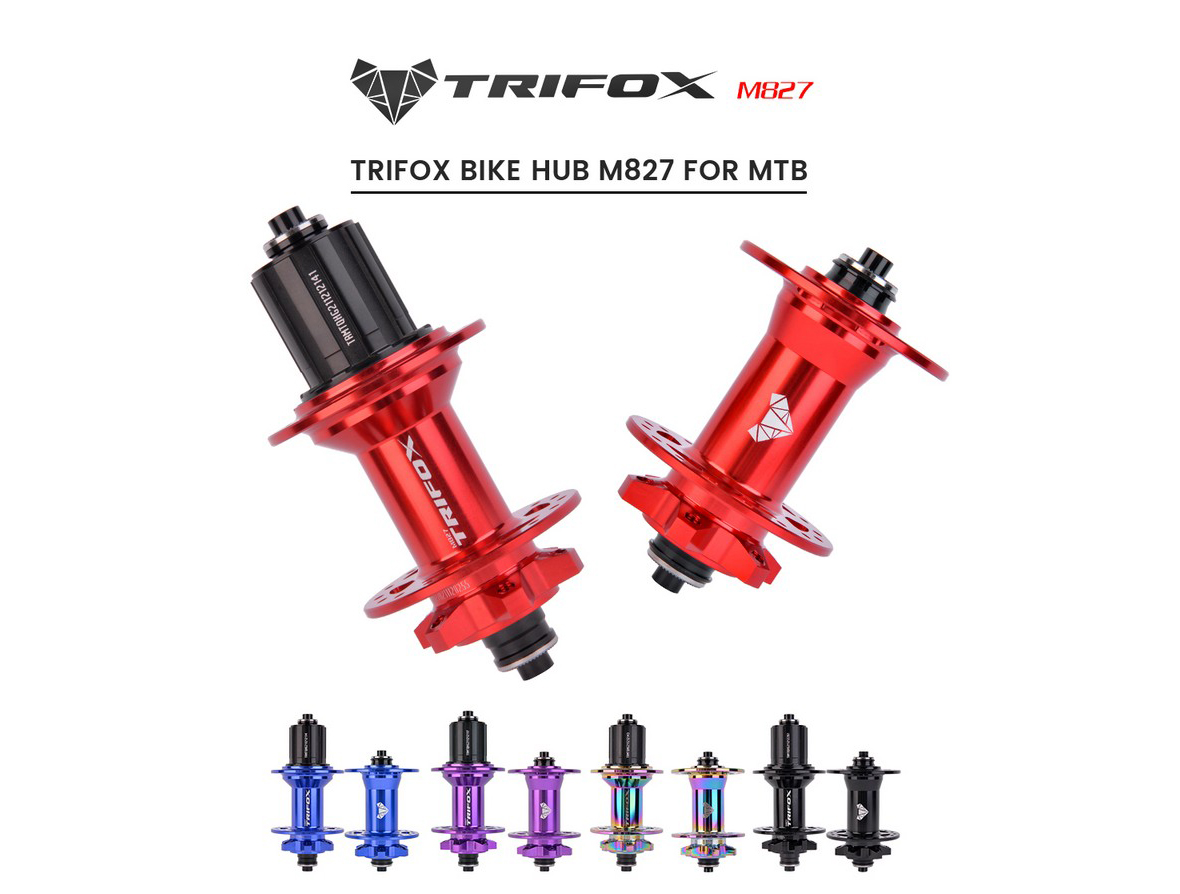
Hubs are the central part of the wheel that connects to the bike frame via the axle. They house the bearings that allow the wheel to spin smoothly. High-quality hubs, like those offered by Trifox Bike, such as the Bike Hub M827, are crucial for reducing friction and improving ride efficiency. Choosing a robust hub ensures durability and consistent performance, particularly for rough terrains or competitive riding.
Axles: The Wheel's Backbone
Axles run through the hubs and connect the wheels to the frame, supporting the bike's weight and enabling the wheels to rotate. Different types of axles, such as thru-axles and skewers, have unique benefits. Thru-axles, like the Rear Thru Axle Skewer ATS100 from Trifox, provide greater stiffness and security, essential for mountain biking and disc brake setups. Ensuring the right axle choice is crucial for maintaining bike stability and alignment.
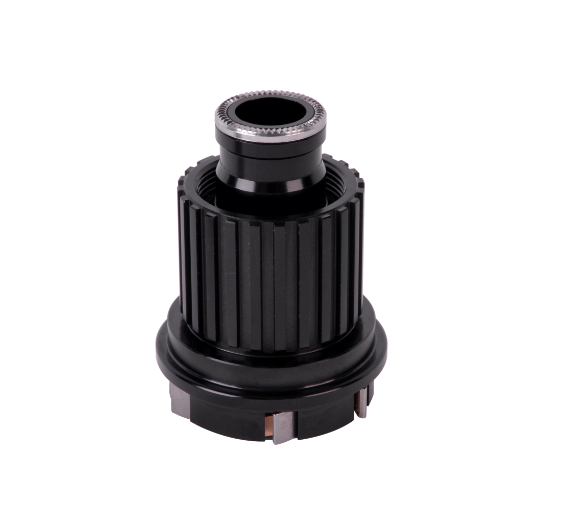
Freehub Bodies: Power Transfer Agents
A freehub body is part of the rear hub, allowing the bike to coast while also housing the cassette. It is responsible for transferring pedal power to the wheel, making it a key component for performance. Trifox's Freehub For M827 exemplifies a high-quality freehub that ensures efficient power transfer and reliable engagement. Investing in a durable freehub body enhances your bike's responsiveness and longevity.
End Caps & Conversion Kits: Adaptability and Customization
End caps and conversion kits are small yet vital components that allow for hub customization and compatibility with different frame standards. These parts, such as the Hub End Cap Adapter CG827 from Trifox, enable cyclists to adapt their wheels to varying axle sizes or hub types. This flexibility is crucial for those upgrading their bikes or switching between different riding styles.
Benefits of Choosing High-Quality Wheel Parts
Opting for high-quality wheel parts can significantly impact your bike's performance and maintenance needs. Quality components reduce the likelihood of breakdowns, provide smoother rides, and often come with better warranties. Trifox Bike offers a range of wheel parts that combine affordability with top-notch quality, making premium cycling experiences accessible to all.
Tips for Purchasing Wheel Parts
1. Compatibility: Ensure the parts are compatible with your existing bike setup. Check specifications like axle size and hub type.
2. Material and Build: Look for parts made from durable materials that can withstand frequent use and varied conditions.
3. Reviews and Reputation: Research customer reviews to gauge the reliability and performance of the parts.
4. Warranty and Support: Choose parts from manufacturers that offer solid warranties and reliable customer support for peace of mind.
Conclusion
Understanding the essential parts of a bicycle wheel—hubs, axles, freehub bodies, and end caps—can empower cyclists to make informed decisions about maintenance and upgrades. Trifox Bike stands out as a reliable source for high-quality, affordable wheel parts, ensuring that every ride is smooth, efficient, and enjoyable. By focusing on compatibility, material quality, and manufacturer support, you can enhance your cycling experience with confidence.

When it comes to enhancing your biking experience, every component of your bicycle plays a crucial role, and one of the unsung heroes of bike performance is the hub. Positioned at the center of your wheels, hubs are pivotal in determining how smooth, fast, and stable your ride will be.
The Role of Bicycle Hubs
Hubs serve as the attachment point for your bike's wheels to the frame, facilitating the wheel's rotation around the axle. The design and quality of a hub can significantly influence your bike's performance, affecting speed, stability, and comfort. A well-designed hub ensures minimal friction, allowing for efficient transfer of energy from your legs to the wheels, propelling you forward with ease.
Materials and Durability
One of the key aspects of a hub's design is the material used in its construction. Trifox Bike offers hubs made from durable aluminum, known for its lightweight and resilient properties. This ensures that the hubs can withstand the rigors of regular use while contributing to a lighter overall bike weight, which is advantageous for speed and maneuverability.
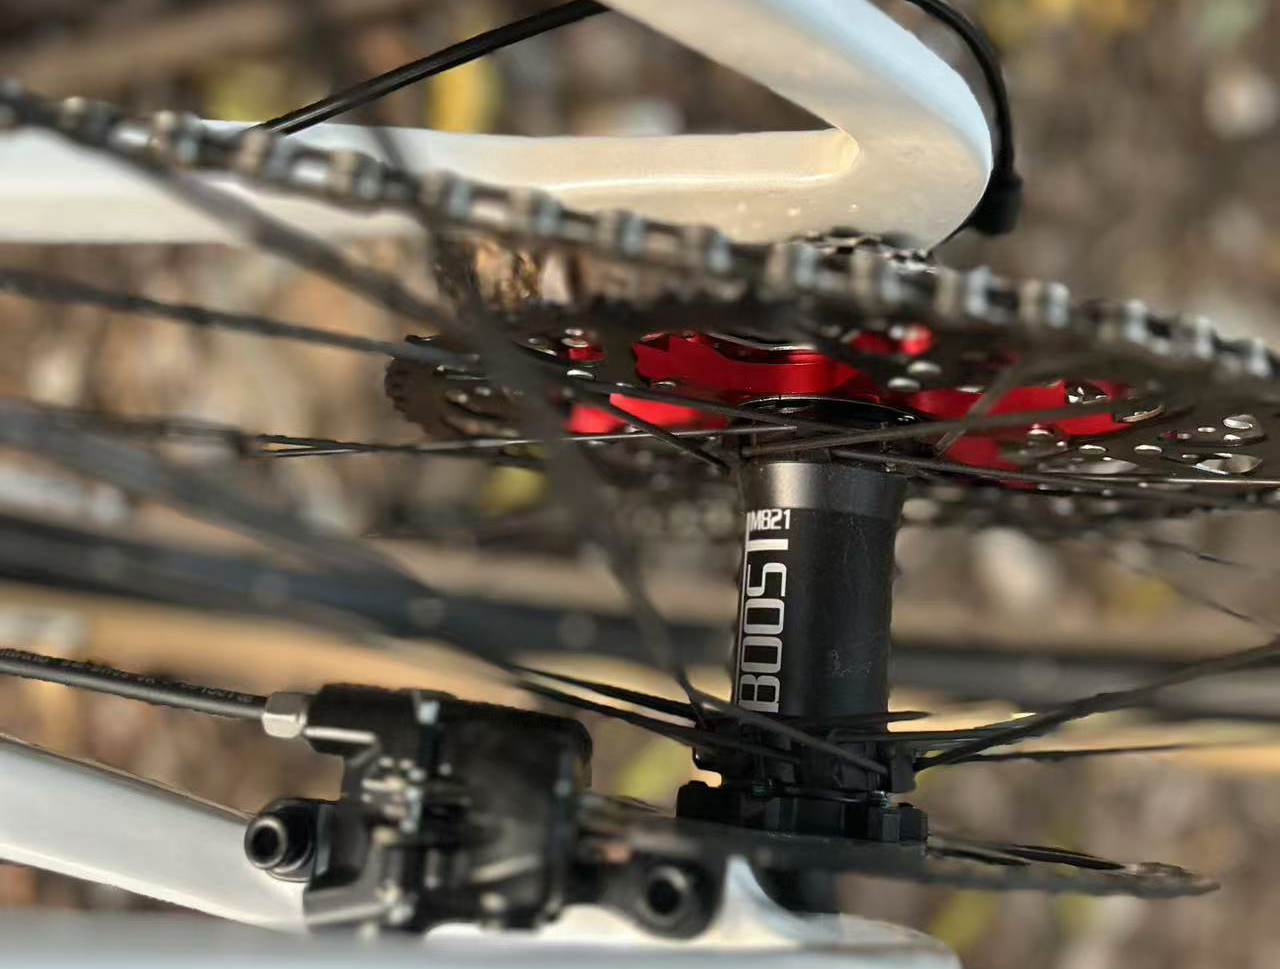
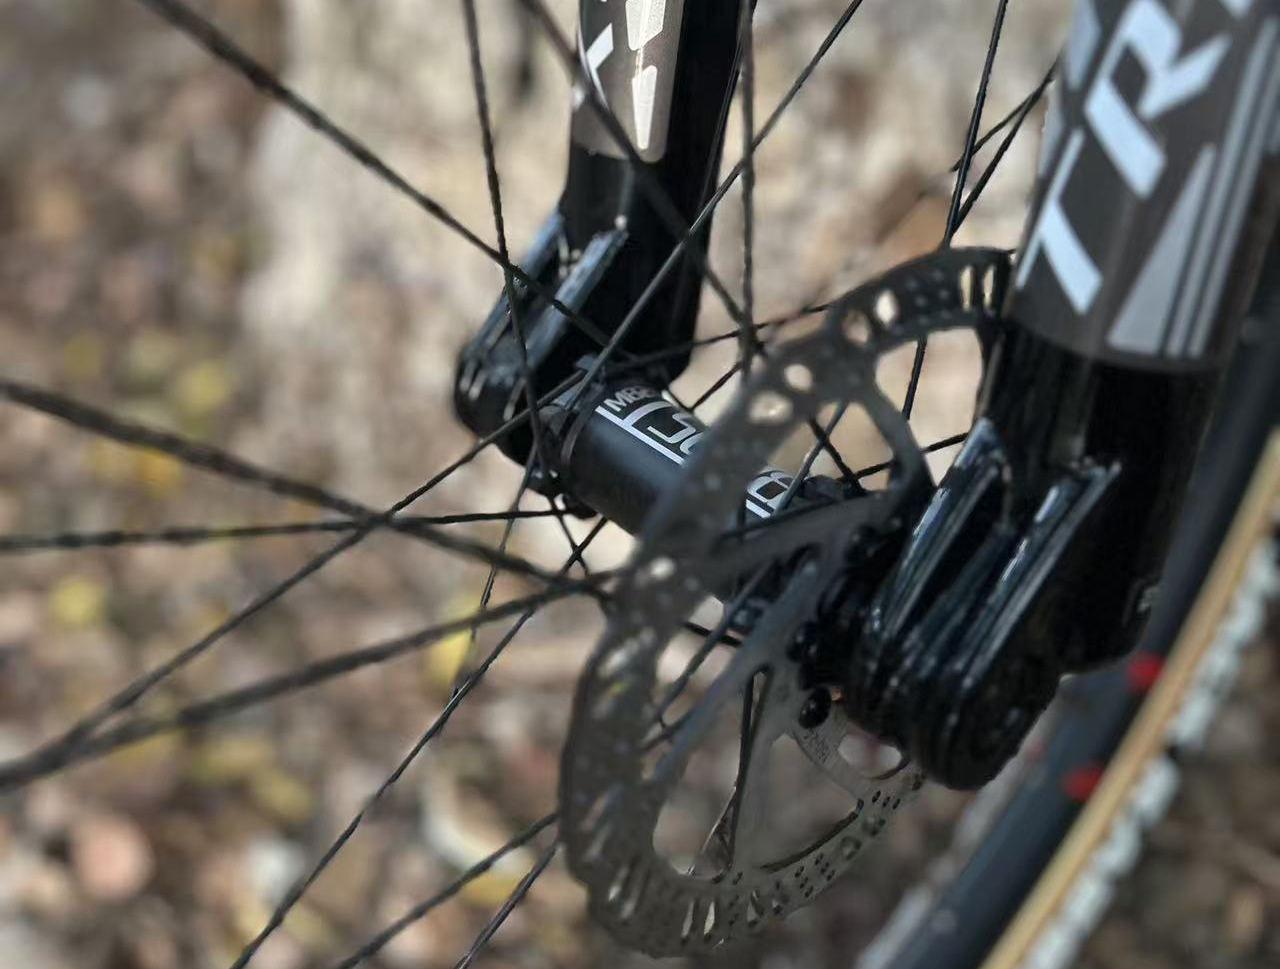
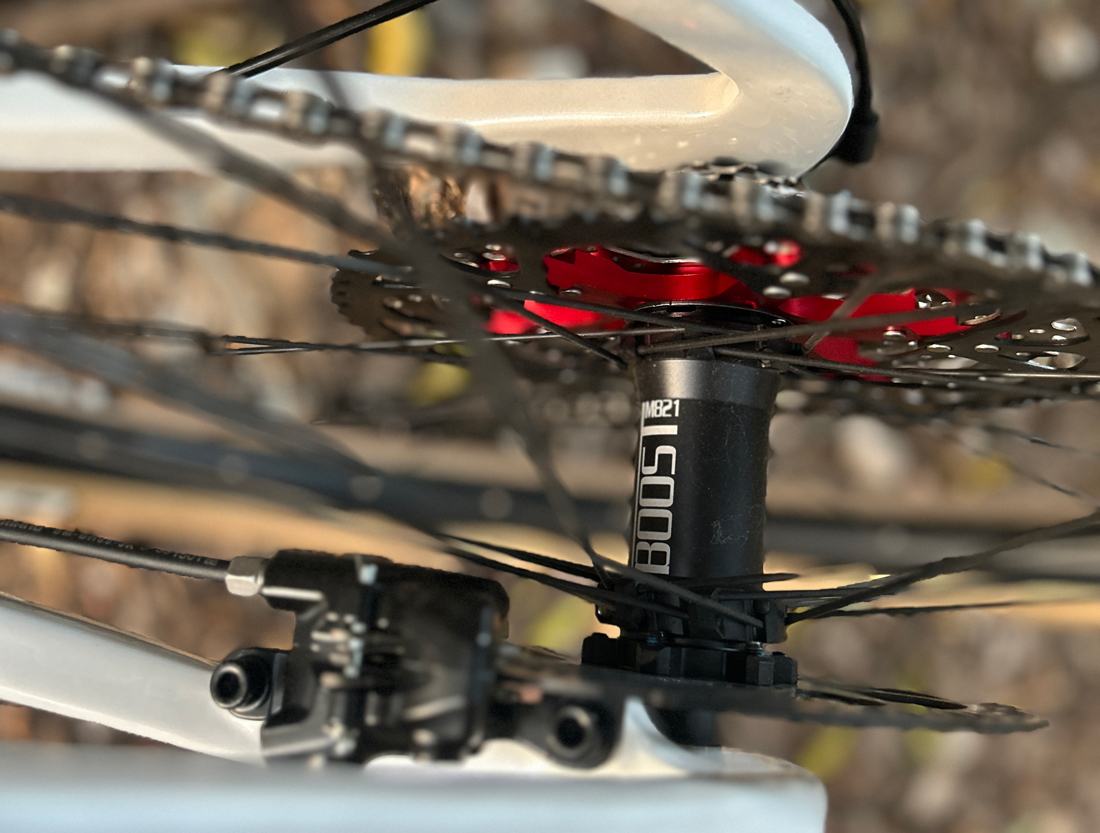
Types of Hubs
At Trifox, you can find a variety of hub designs tailored to different biking needs. For instance, the M821 Boost and M827 are standout models that cater to diverse requirements. The M821 Boost hub, with its wider stance, provides increased stability and is ideal for mountain biking where rugged terrain demands extra support. On the other hand, the M827 is designed for road bikes, focusing on delivering speed and smoothness on paved surfaces.
Impact on Speed and Stability
The design of a hub can directly impact your bike's speed. Hubs like the M827, designed for road use, are optimized for reduced friction and efficient energy transfer, allowing cyclists to maintain higher speeds with less effort. Conversely, hubs made for off-road use, like the M821 Boost, prioritize stability to handle uneven terrains effectively.
Stability is equally critical, especially when navigating tricky paths or making sharp turns. A hub with a wider design, such as the Boost, offers enhanced lateral stability, reducing the risk of wobbling or losing control, thus providing a safer ride.
Comfort and Compatibility
Comfort during rides is often a byproduct of the right hub design. A smooth, frictionless ride reduces the strain on the cyclist, allowing for longer and more enjoyable rides. Trifox Bike's hubs are compatible with most standard bicycles, making them an easy upgrade for cyclists looking to enhance their ride without having to invest in a new bike.
Choosing the Right Hub
Selecting the appropriate hub is crucial for tailoring the biking experience to your specific needs. Whether you're an avid mountain biker requiring maximum stability or a road cyclist seeking speed, the right hub can transform your ride. Trifox Bike offers a range of options, ensuring that every cyclist can find a hub that fits their style and enhances their biking experience.
In summary, while often overlooked, the hub is a critical component that can dramatically affect your ride. By understanding the various designs and materials, such as those offered by Trifox Bike, cyclists can make informed choices to improve their bike's performance and enjoy their rides to the fullest.

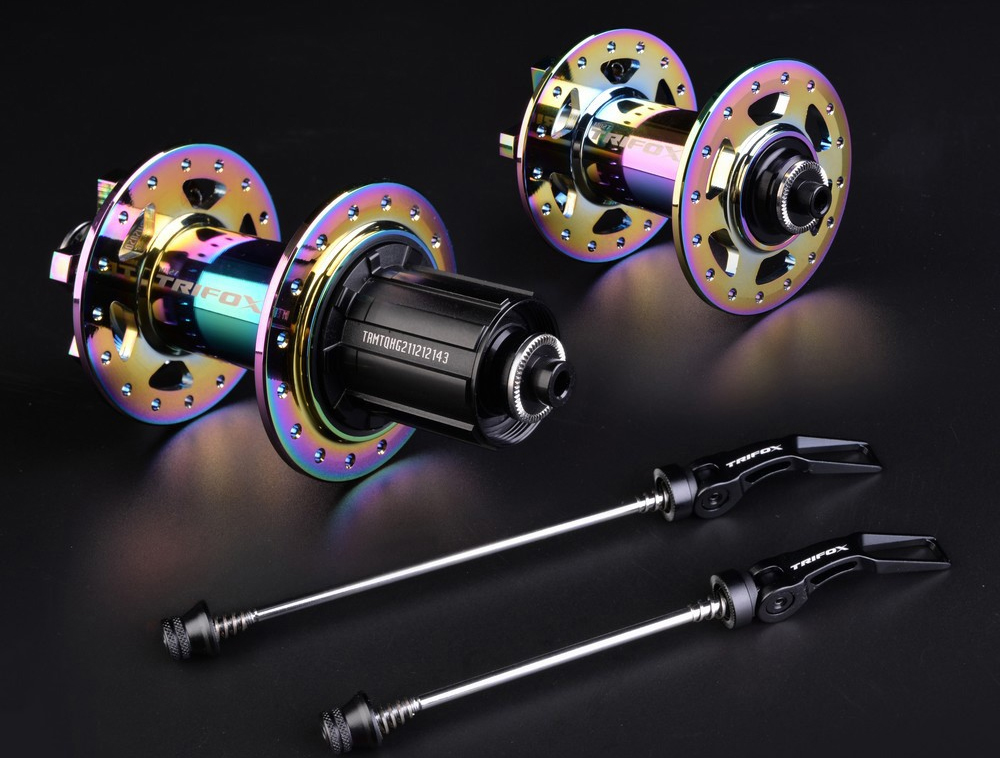
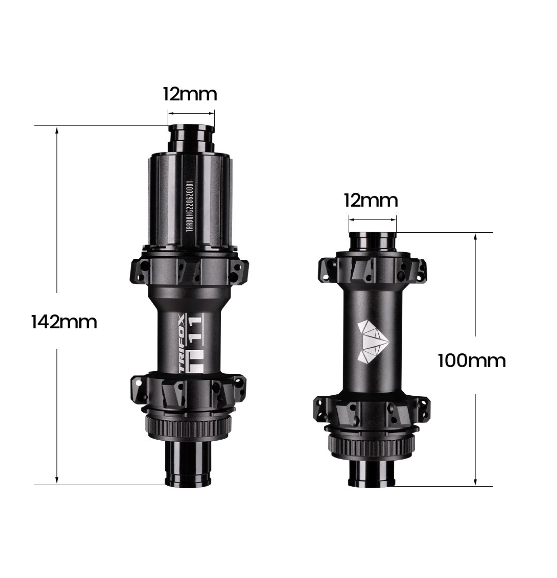
The world of mountain biking is constantly evolving, with innovations designed to improve performance, efficiency, and rider satisfaction. Among these innovations, the MTB hub quick release stands out as a crucial component that can significantly transform your biking experience.
The Trifox M827 is crafted to meet the demands of modern mountain biking. It combines a quick release mechanism with compatibility for both Shimano and SRAM drivetrains, accommodating 8 to 12-speed setups. This versatility ensures that the hub can be seamlessly integrated into a wide range of bike rigs, allowing riders to customize their bikes to their specific needs and preferences.
One of the standout features of the M827 hub is its quick release system. This mechanism allows for rapid wheel changes without the need for tools, making it incredibly convenient for riders who need to maintain or transport their bikes frequently. Whether you're fixing a flat on a trail or adjusting your setup for different terrains, the quick release function saves valuable time and effort, allowing you to focus more on your ride.
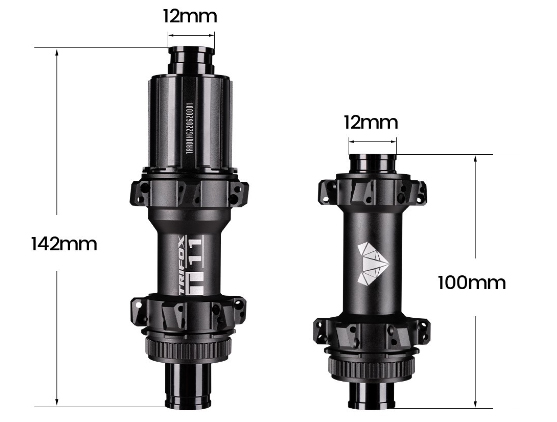
The hub's construction also deserves attention. Made from a combination of AL6061 and 7075 materials, the M827 is both lightweight and durable. The front hub weighs in at just 165 grams, while the rear hub is 314 grams, making it a perfect choice for riders seeking to reduce overall bike weight without compromising durability. This robust build ensures that the hub can withstand the rigors of off-road biking, providing a reliable performance even in challenging conditions.
Performance is further enhanced by the M827's design, which includes 2 front and 4 rear bearings, along with 6 pawls and 72 clicks. This setup offers a smooth and responsive ride, with precise engagement that can handle the demands of technical trails and steep climbs. Riders can enjoy the confidence and control needed to tackle any terrain, knowing that their hub will perform consistently under pressure.
Customer reviews of the Trifox M827 highlight its quality and impact on the biking experience. Users like Rutherford praise the hub for its lightweight design and excellent finish, noting the fast delivery and high-quality packaging. Dios appreciates the impeccable quality and satisfying noise of the hub, which adds to the overall riding experience. With a perfect 5-star rating from all reviews, it's clear that the M827 has garnered a strong reputation among mountain bikers.
The impact of an MTB hub quick release goes beyond just mechanical improvement. It enhances the convenience and efficiency of your biking routine, allowing for quick adjustments and maintenance. This efficiency can lead to longer rides and fewer interruptions, ultimately contributing to a more satisfying biking experience.
In conclusion, the Trifox Bike Hub M827 is a testament to how a well-designed MTB hub quick release can transform your mountain biking adventures. Its combination of lightweight construction, compatibility with leading drivetrain brands, and convenient quick release mechanism make it an essential upgrade for any avid mountain biker. Whether you're a seasoned rider or just starting out, this hub promises to elevate your performance and enjoyment on the trails.
Enhancing your bike's performance can often be as simple as upgrading to straight spokes hubs, a choice that significantly impacts your cycling experience. Trifox's range of bicycle hubs offers the perfect blend of durability and performance, ideal for those looking to replace or upgrade their current setup.
Straight spokes hubs are a popular choice among cyclists for several reasons. Firstly, they provide improved wheel strength. Unlike traditional J-bend spokes, straight spokes experience less stress and are less likely to break under pressure, ensuring more resilience and a longer lifespan for your wheels. This design enhances the overall robustness of the wheel, making it suitable for both road and off-road cycling.
Another advantage is the improved aerodynamics offered by straight spokes hubs. With fewer protruding elements, these hubs reduce air resistance, allowing for smoother and faster rides. This is particularly beneficial for competitive cyclists aiming to shave seconds off their time.
Maintenance is also easier with straight spokes hubs. Their simple design reduces the need for frequent adjustments and repairs, allowing you more time on the road and less in the workshop.
Trifox's hubs, made from durable aluminum, are compatible with most standard bikes, making them a versatile choice for various cycling styles.
Choosing the right hub is crucial for maximizing performance. Consider factors such as the type of cycling you engage in and the compatibility of the hub with your bike.
By selecting the appropriate hub, you can ensure a seamless fit and optimal performance tailored to your specific needs.

Overall, upgrading to straight spokes hubs is a smart investment in your cycling experience, offering enhanced strength, better aerodynamics, and reduced maintenance, all contributing to a more enjoyable and efficient ride.

Installing and maintaining a 32H MTB hub is essential for ensuring smooth rides and extending your bike's lifespan. Here’s a step-by-step guide to help you get it right.
1. Installation
First, choose a high-quality hub like the Trifox M827 MTB Hub for reliability and performance. Begin by threading the axle through the hub shell, followed by securing the bearings in place. Attach the hub to your wheel rim using a spoke wrench, tightening each spoke evenly in a cross-three pattern to maintain wheel integrity.
2. Lubrication
Proper lubrication is crucial for smooth operation. Apply a thin layer of grease to the bearings and axle before installation. This reduces friction and prevents premature wear.
3. Alignment and Tensioning
Ensure the hub is centered and spokes are uniformly tensioned. Uneven tension can lead to wheel wobble and compromised performance. Use a truing stand to check for accuracy and make necessary adjustments.
4. Maintenance
Regular maintenance keeps your 32H MTB hub running smoothly. Clean the hub and surrounding components after every ride, especially in muddy or wet conditions. Periodically disassemble the hub to inspect and lubricate the bearings, replacing them if they show signs of wear.
5. Inspection
Check the hub for damage or loose parts regularly. Pay attention to any grinding noises or resistance while spinning the wheel, as these can indicate issues within the hub.

By following these steps, you can install and maintain a 32H MTB hub like the Trifox M827 effectively, ensuring a reliable and smooth ride on any terrain.

Replacing a freehub might seem daunting, but with the right tools and a bit of guidance, it’s a task any cyclist can handle. A well-functioning freehub ensures smooth shifting and efficient power transfer, making your rides more enjoyable.
1. Gather Your Tools
Before you start, ensure you have the necessary tools: a cassette removal tool, chain whip, hex keys (typically 10mm), a rubber mallet, and grease. Additionally, you'll need your new freehub, like the Trifox Freehub Body.
2. Remove the Rear Wheel
First, shift your chain onto the smallest cog to ease wheel removal. Release the quick-release lever or loosen the axle nuts, then carefully remove the rear wheel from the bike frame.
3. Remove the Cassette
Secure the cassette using the chain whip to prevent it from rotating. Insert the cassette removal tool into the lockring and turn it counterclockwise to loosen and remove the lockring. Carefully slide off the cassette cogs and spacers, keeping them in order for reassembly.
4. Remove the Old Freehub
With the cassette removed, locate the bolt that secures the freehub to the hub shell, typically accessible through the center of the hub. Insert the hex key or appropriate tool and turn counterclockwise to unscrew the bolt. Once loosened, gently tap the freehub with a rubber mallet if needed and slide it off the hub shell.
5. Prepare the Hub Shell
Clean the hub shell thoroughly to remove any dirt or debris. Apply a thin layer of grease to the interface where the new freehub will sit. This prevents corrosion and ensures a smooth installation.
6. Install the New Freehub
Align the new Trifox freehub with the hub shell and slide it into place. Secure it by tightening the fixing bolt clockwise using the hex key. Ensure it's snug, but avoid over-tightening as it can damage the freehub or hub shell.
7. Reinstall the Cassette
Slide the cassette cogs and spacers back onto the freehub body in the correct order. Tighten the lockring clockwise using the cassette removal tool until secure.
8. Reinstall the Rear Wheel
Place the rear wheel back into the bike frame. Tighten the quick-release lever or axle nuts securely. Check that the wheel is properly aligned and spins freely without rubbing against the brake pads or frame.
9. Final Check
Shift through all the gears to ensure smooth operation. Listen for any unusual noises and check that the freehub engages and disengages properly. If everything feels smooth, your replacement is successful.
Replacing a freehub, such as the Trifox Freehub Body, is a straightforward process that can significantly enhance your bike's performance. With a few tools and some careful steps, you can ensure your bike is running smoothly and efficiently, ready for your next adventure. Happy riding!
Choosing the right road hub for your bicycle is crucial for achieving optimal performance and enhancing your riding experience. A well-selected and maintained hub can significantly impact your bike's efficiency, speed, and reliability. Here’s a comprehensive guide on how to select and maintain the perfect road hub.
1. Understanding Road Hubs
A road hub is the central part of a bicycle wheel that connects the wheel to the bike frame and allows it to rotate freely. It consists of several components, including bearings, axle, and hub shell. When selecting a road hub, you’ll want to consider factors like material, weight, and type of bearings.
2. Selecting the Right Road Hub
Material
Road hubs are typically made from aluminum or carbon fiber. Carbon fiber hubs, like those offered by Trifox, are lightweight yet strong, providing excellent stiffness and reduced weight.
Bearings
Hubs can come with either sealed cartridge bearings or loose ball bearings. Sealed bearings are low maintenance and offer better protection against dirt and moisture, making them ideal for road cycling.
Compatibility
Ensure the hub is compatible with your bike’s wheel size and cassette type. The Trifox hubs are designed to fit various wheel sizes and are compatible with multiple drivetrain systems, ensuring a versatile fit for most road bikes.
Weight
For competitive cycling, every gram counts. Choose a lightweight hub to reduce the overall weight of your bike, improving acceleration and climbing efficiency.
3. Maintaining Your Road Hub
Regular Cleaning
Keep your hub clean by wiping it down after rides, especially in muddy or wet conditions. Use a soft cloth and mild detergent to remove dirt and grime.
Lubrication
Regularly lubricate the bearings to keep them running smoothly. Avoid over-lubrication as it can attract dirt and cause wear. High-quality hubs like those from Trifox come pre-lubricated, but periodic maintenance will extend their lifespan.
Inspection
Periodically inspect your hub for signs of wear or damage. Check for any play in the bearings, unusual noises, or rough rotation. If you notice any issues, address them promptly to prevent further damage.
Bearing Replacement
Over time, bearings may wear out and need replacement. Follow the manufacturer’s guidelines for replacing bearings. Trifox hubs are designed for easy servicing, making bearing replacement straightforward.
Torque Settings
Ensure bolts and axle nuts are torqued to the manufacturer’s specifications. Over-tightening can damage components, while under-tightening can lead to instability.
In conclusion, selecting and maintaining the right road hub involves understanding key components, considering compatibility, and performing regular maintenance. By choosing high-quality hubs like those from Trifox and following these maintenance tips, you’ll enjoy optimal performance and a smoother, more reliable ride. Invest in the right road hub today and experience the difference it makes in your cycling journey.


