


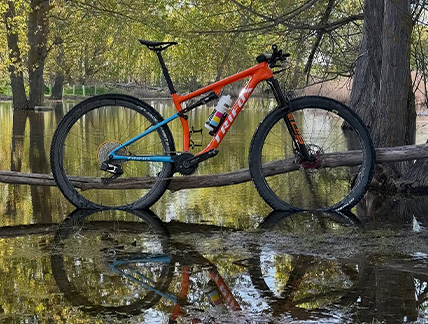
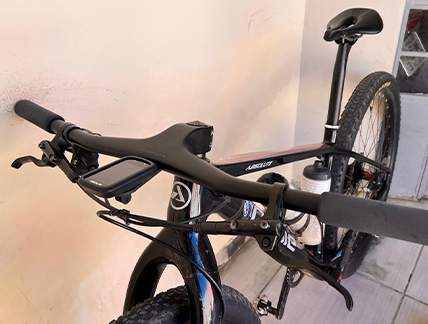
The day has finally arrived. You're ready to move on from that heavy, entry‑level alloy bike and invest in your first true carbon mountain bike. The ride quality, the weight savings, the prestige—it all beckons. But a fundamental fork in the trail awaits you: carbon hardtail or carbon full‑suspension? Both offer massive performance leaps over an entry‑level bike, but they serve very different riders and terrains. This guide will help you navigate the pros, cons, and hidden costs of each, with a special focus on the versatile Trifox SDY20 15 inch bike frame —a featherweight carbon hardtail that proves you don't always need rear suspension to conquer the trail. The Case for the Carbon Hardtail: Efficiency and Simplicity At the heart of the hardtail debate is power transfer. Without a rear shock absorbing your pedaling forces, a carbon hardtail is an efficiency machine. The Trifox SDY20 trial bike frame exemplifies this. Its ultra‑light T1000 carbon layup – the 15” frame weighs just 930g – and exceptional torsional stiffness mean that every watt of power you generate goes straight into propelling you forward, not into compressing a shock. On long, smooth climbs and flowy singletrack, the direct feedback and instant acceleration of a hardtail are unmatched. Furthermore, modern carbon hardtails like the SDY20 are no longer the crude, unforgiving bikes of the past. With clearance for 2.4” tires, you can run high‑volume rubber at lower pressures, effectively turning the tires into a form of suspension. The Boost 148mm rear thru‑axle massively increases rear wheel stiffness, improving tracking and control. And the inclusion of a UDH (Universal Derailleur Hanger) future‑proofs the frame for the latest SRAM Transmission drivetrains. The SDY20 is also a more affordable entry point to carbon, allowing you to invest more in a top‑tier fork or groupset. Choosing the Right Hardtail Fit Fit is crucial for any bike, but especially for a hardtail where your body is the suspension. The SDY20 offers multiple sizes to fit a wide range of riders, from the compact 15 inch bike frame to medium and large sizes. This 15″ model is a perfect option for smaller riders or those seeking a playful, agile feel, ensuring they get the performance benefits of a carbon hardtail without feeling stretched out and out of control. The Full‑Suspension Philosophy: Traction and Forgiveness Full‑suspension is all about traction and control. The rear wheel is better able to maintain contact with the ground over roots and rocks, improving climbing grip on technical ascents and boosting descending confidence dramatically. A full‑suspension bike allows you to ride harder, longer, by reducing the physical battering your body takes. For heavy, aggressive riders or those whose local trails are perpetually chunky, a full‑suspension bike is a significant advantage. However, this comes with a cost. A good full‑suspension frame is significantly heavier, uses a more complex linkage system requiring maintenance, and is considerably more expensive. You also must budget for a rear shock, adding another $200–500 to your build. The complexity of riding a full‑suspension bike is also higher. To get the most out of it, you need to learn to pedal smoothly and manage the bike’s weight. Hidden Costs: The Budget Behind the Build This is where the decision gets real. For your first carbon MTB, the hardtail’s lower cost allows you to invest in premium components that dramatically improve the ride experience. The SDY20 frame, often available for under $600, leaves the bulk of your budget for a top‑of‑the‑line fork (e.g., Fox 34 Step‑Cast or Rockshox SID SL), a lightweight carbon wheelset, and a high‑end groupset. With a full‑suspension frame, you will spend significantly more on the frame alone, forcing you to cut corners elsewhere. This leads to a poorly balanced build with a heavy suspension fork, budget wheels, or a cheap groupset, undermining the full‑suspension experience. Which Should You Choose? Choosing the right first carbon MTB is about aligning the bike with your trails and your ambitions. Choose a carbon hardtail if: - You ride mostly smoother, flowy singletrack, gravel roads, and XC-style trails. - Efficiency, climbing speed, and pedal response are your top priorities. - You are on a strict budget but still want a premium, lightweight frame. - You are a lighter rider or prefer a lively, “playful” bike that rewards active riding. Choose a carbon full‑suspension if: - Your local trails are relentlessly chunky, rocky, and rooty. - You prioritize descending confidence and comfort over flat‑out speed and weight. - You are a heavier rider or have the budget to spend $2,500+ on a quality frameset alone. The Final Verdict Your first carbon mountain bike should match your terrain, budget, and skill level. While a full‑suspension bike is the ultimate tool for extreme terrain, a modern carbon hardtail like the Trifox SDY20 is arguably the smarter, more versatile first purchase for most riders. It offers a massive performance upgrade over an aluminum frame, teaches you to read the trail and pick good lines, and provides a lightweight, efficient, and incredibly fun platform for years to come.
The mountain bike industry has a habit of changing standards just when you think you’ve settled on a dream build. Rear axle spacing, derailleur hangers, tire widths—all have shifted over the past decade, often leaving older frames incompatible with newer, better components. If you’re investing in a disc brake bike frame today, you want to be sure it can accept tomorrow’s drivetrains, wheels, and tires. The Trifox TRAIL II PRO is engineered with three key modern standards: Boost 148mm spacing, a Universal Derailleur Hanger (UDH), and generous tire clearance. Here’s why those specs matter for the future. Boost 148: The Foundation of Future Wheel Stiffness Boost 148x12mm rear spacing has rapidly become the industry benchmark for mountain bikes. By widening the hub flanges compared to older 142mm or 135mm standards, Boost creates a significantly stiffer rear wheel through improved spoke bracing angles. This isn‘t just a performance upgrade—it’s a compatibility necessity. Nearly every modern frame, fork, and wheelset uses Boost spacing today, and the standard is likely to remain dominant for years. Choosing a non-Boost frame means limiting your wheel and hub options. The TRAIL II PRO’s Boost 148mm thru-axle dropout ensures you’ll have access to the best wheels on the market now and in the foreseeable future, from lightweight XC race hoops to rugged trail builds. UDH: Your Gateway to Next-Generation Drivetrains The Universal Derailleur Hanger (UDH) is arguably the most important future-proofing feature on any modern frame. Originally developed by SRAM, the UDH standardizes the derailleur mounting interface across all bikes. This has two profound benefits. First, it eliminates the hunt for frame-specific hangers—replacements are now universal. Second, and more critically, the UDH is the mandatory interface for SRAM’s revolutionary Transmission and Full Mount drivetrains. These next-generation systems mount the derailleur directly to the frame, bypassing a traditional hanger entirely for unmatched shift precision and crash durability. A frame with a UDH is compatible with all current derailleurs and ready for whatever full‑mount systems the future holds. The TRAIL II PRO’s UDH dropout ensures you won‘t be left behind as drivetrain technology evolves. Tire Clearance: Room to Grow as Rubber Expands Tire widths have been steadily increasing across all mountain bike disciplines. XC race tires that were once 2.1” are now routinely 2.4”, with 2.6” options appearing for more aggressive terrain. The TRAIL II PRO is designed with 29 x 2.25” as its official clearance, but real-world experience shows the frame can accommodate a 2.3” tire in dry conditions, and some owners have successfully mounted 2.4” rubber on standard rims. This generous clearance means you’re not locked into narrow tires as the industry trend toward wider, more capable rubber continues. Whether you want the grip of a 2.4” for loose races or the volume of a 2.6” for trail adventures, the TRAIL II PRO has the breathing room to adapt. Built for Tall Riders Too: The 19‑Inch Frame Option The TRAIL II PRO is available in 17” and 19” sizes. For taller riders, the 19 inch bike frame provides a roomy reach (470mm) and taller stack (606.1mm), accommodating riders from 175–190cm without compromising the frame’s progressive 67.5° head tube angle. Importantly, the future-proofing benefits—Boost, UDH, and tire clearance—scale across both sizes, ensuring tall riders enjoy the same long-term compatibility as their shorter counterparts. Why These Standards Matter for Your Wallet Buying a frame that anticipates future standards isn’t just about performance; it’s about value. A frame that can accept new drivetrains, wider wheels, and larger tires won’t become obsolete quickly. You can upgrade components piecemeal over years, breathing new life into the bike without replacing the chassis. The TRAIL II PRO’s T800 carbon construction, internal routing, and threaded BB68 bottom bracket further enhance its longevity. When you invest in this disc brake bike frame, you’re not just buying a bike for this season—you’re buying a platform that will remain competitive and compatible for seasons to come. Future-proof your build today.
Walk into any bike shop and the advice is almost universal: “Buy complete. It’s cheaper.” And in many cases, that’s true. Manufacturers buy components in massive volumes, so they can offer a fully built bike for less than the sum of its parts — often by hundreds of dollars. A 2025 analysis found that sourcing all components individually for a mid-range mountain bike cost about $876 more than buying the complete version. So why would anyone buy just a frameset? Because the full story is more complicated, and for many riders, buying a frameset actually saves money in ways that aren’t immediately obvious. The “Cheaper to Buy Complete” Myth Needs Context The conventional wisdom is correct if you intend to ride the bike exactly as it comes from the factory. But how many enthusiasts actually do that? The moment you swap the saddle, change the handlebars, replace the wheels, or fit different tires, you‘re paying for parts twice — the stock components you never wanted and the upgrades you actually ride. One forum user described this reality perfectly: “Having bought a complete bike and replacing every single part except the fork, I say just buy the frame. it’s less work and you won’t save all that much because you‘ll have to sell the take off parts for less than what people can get them online for”. Sell those “new take‑off” parts on eBay, and you’ll recoup maybe 50‑70% of their retail value. That hidden loss is money you never see again. Customization Isn’t a Luxury — It’s a Performance Upgrade The real value of a frameset isn‘t just about cost — it’s about getting exactly the bike you want. Buying a complete bike means accepting someone else‘s choices: their saddle, their stem length, their crank arms, their handlebar width. For many riders, this is fine. But for serious cyclists, the ability to select every component transforms the riding experience. As one builder noted, “I’m small and I like weird things like 38cm bars and 165mm cranks. Those are hard to find stock on a bike. I‘m also a big tubeless fan, so I’m probably switching wheels. Again, stock wheels often get replaced right away”. Building from a carbon road bike frame disc brake means you choose your favorite crank length, your preferred cassette range, the exact handlebar width, and the saddle that fits your anatomy — not the one the factory spec’d to save $15. The Hidden Costs of “Cheap” Complete Bikes Complete bikes often hide compromises in components you can’t easily see: heavy OEM wheels, low‑spec finishing kit, basic tires, and budget brake rotors. Upgrading these items later costs significantly more than buying quality parts upfront. Building from a carbon fiber road bike frame 54cm lets you allocate your budget exactly where it matters — premium wheels, a reliable drivetrain, and contact points that fit you. One experienced builder confirmed that for high‑end builds, “It’s cheaper to build up from a frameset than it is to buy the high end stuff like S‑Works, etc. Plus you can select which components you really want and not waste anything”. That’s the overlooked math: buying a frameset isn’t about paying less; it’s about wasting less on parts you’ll replace anyway. Frameset Economics: Spread the Cost, Buy Better Components Another financial advantage of starting with a frameset is the ability to spread your investment over time. A complete bike requires a single large payment. Building from a frameset allows you to buy the frame now, wheels next month, and the groupset the month after. One buyer noted this flexibility: “I can buy parts as I obtain the budget for them, rather than wait a long time to build up a budget and then spend it all at once. That allows me to get better components than I‘d otherwise be able to get”. This approach also lets you shop sales aggressively, securing premium components at discount prices — something a complete bike purchase rarely allows. Quality Control and Frame First — Everything Else Follows Starting with a frameset also ensures your most critical component — the frame itself — is exactly what you want. The frame determines geometry, weight, stiffness, and ride feel. Everything else is replaceable. By investing in a quality carbon road bike frame disc brake up front, you build on a foundation that won’t become obsolete. When components wear out or technology advances, you upgrade individual parts, not the entire bike. This long‑term thinking is how experienced riders build bikes that last for years. When Does Buying a Frameset Make the Most Sense? A frameset purchase is ideal for riders who: - Already own quality components (wheels, groupset, saddle) from a previous bike. - Have strong opinions about fit and component selection. - Plan to ride the bike for years and want a platform that grows with them. - Are building a mid‑to‑high‑end bike where OEM parts would likely be replaced anyway. The Trifox X11: A Frameset Worth Building Around The Trifox X11 exemplifies everything a modern frameset should offer. Its T800 carbon fiber construction delivers exceptional stiffness‑to‑weight, while the full internal cable routing creates a clean, aerodynamic profile. The UDH derailleur hanger future‑proofs the frame for next‑generation drivetrains, and the T47 threaded bottom bracket ensures creak‑free reliability. Sizes from XS to L accommodate a wide range of riders, including the popular 54cm option for heights 175‑188cm. And the included full‑carbon fork, integrated handlebar, and seatpost eliminate the need to source these components separately — a meaningful value addition that further reduces the hidden costs of a custom build. The bottom line: buying a complete bike is often cheaper upfront, but building from a frameset is often the smarter long‑term investment. You get exactly the bike you want, you don‘t pay for parts you’ll replace, and you build on a foundation designed to last. Sometimes the best way to save money is to spend it on what actually matters — starting with the frame.
You’ve invested in a quality cycling computer, but where should you place it? The three most common mounting positions—out‑front, stem, and handlebar—each offer different trade-offs in visibility, aerodynamics, and cockpit clutter. Choosing the right one can transform your riding experience. Here’s how to decide. Out‑Front Mount: The Racer’s Choice An out‑front mount extends your computer forward of the handlebar, placing the screen directly in your line of sight. This keeps your gaze near the road ahead—ideal for fast group rides, criteriums, or technical descents where every millisecond of attention matters. By positioning the computer in front of the stem, out‑front mounts can also improve aerodynamics compared to bulky top‑cap setups. The drawback? They place more stress on the mount (especially over rough roads) and can make the cockpit feel slightly longer. For weight weenies and aero purists, the slight drag reduction of a low‑profile out‑front mount is often worth the trade. Stem Mount: Clean and Secure A stem‑mounted computer sits directly above your steerer tube, nestled between the handlebars. This location is exceptionally stable, with minimal vibration, and keeps the cockpit looking tidy—no protruding arms or extra brackets. It’s a great choice for bikepackers, commuters, or any rider who values simplicity and durability. However, because the screen sits further back and lower than an out‑front mount, you may need to glance down more noticeably to read data. For GPS models that benefit from a clear sky view, a stem mount can also position the device at a favorable angle for satellite reception. Handlebar Mount: The Versatile Traditionalist The classic handlebar mount clamps directly around your bar, placing the computer off to one side. This leaves the center of your cockpit free for a light, bell, or action camera. It’s often the easiest mount to install and swap between bikes, and it works with virtually any handlebar shape. The trade‑off is that your computer may be slightly off‑center, requiring a bit more head movement to check your stats. For casual riders or those who frequently switch computers between bikes, the handlebar mount’s simplicity and broad compatibility make it a solid choice. One Mount, Many Possibilities Why choose just one function? The Trifox SBH100 computer mount for bike takes versatility further by integrating a GoPro‑style accessory port below the computer cradle. This allows you to attach a bike flashlight mount directly beneath your GPS, keeping your handlebar uncluttered while positioning the light perfectly for nighttime visibility. Made from lightweight 3K carbon fiber, the SBH100 weighs just grams yet offers the rigidity to hold both devices steady on the roughest roads. Compatible with Garmin, Bryton, Cat Eye and other popular quarter‑turn computers, it’s a true multi‑tasker for the modern cyclist. Making Your Choice Ultimately, the best position is the one that suits your specific riding. Competitors chasing seconds will love the aerodynamic, eyes‑forward placement of an out‑front mount. Riders seeking a clean, bombproof cockpit will appreciate the subtle integration of a stem mount. And if you want to keep your handlebar free for other accessories—like a light or camera—a handlebar mount or the SBH100’s multi‑function design is the way to go. Whichever you choose, a secure, well‑positioned mount ensures that your data is always visible, and your focus stays on the road ahead.
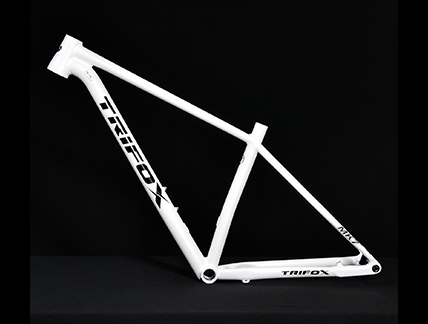
When mountain bikers think of a single frame, one discipline usually comes to mind: cross-country racing. But modern aluminum hardtails have quietly become the most versatile platforms in cycling. A well-designed 29er alloy hardtail can wear multiple hats—XC race rig, backcountry bikepacking mule, city commuter, and even a stripped-down singlespeed. The Trifox MK7 Pro is a perfect example of this new breed. Its combination of Boost 148mm spacing, modern geometry, and ultralight 6061 aluminum construction makes it a bike frame 17 inch that isn‘t locked into a single identity. Boost Spacing: The Foundation of Versatility The MK7 Pro features Boost 148x12mm rear spacing and Boost 110x15mm fork compatibility. This wider hub spacing moves the spokes further apart laterally, dramatically increasing wheel stiffness—especially critical for hardtails that lack rear suspension to absorb chassis flex. On rocky climbs or when powering out of corners, the rear wheel tracks precisely without the vagueness that plagues narrower frames. Boost also enables shorter chainstays (440mm), which enhances agility and makes the bike feel playful on singletrack.For bikepackers, the stiffer rear end handles loaded panniers with less wobble. For commuters, the thru-axle interface provides a rattle-free, secure wheel mount that shrugs off daily abuse. Tire Clearance and Modern Geometry The wider Boost rear triangle gives designers room for generous tire clearance. The MK7 Pro readily accommodates up to 29x2.4" tires—enough volume for aggressive XC tread, plus-size rubber for bikepacking comfort, or durable touring tires for urban commuting. The geometry itself is tuned for balance: a 68.5° head tube angle provides stability at speed without sacrificing climbing precision, while the 74° seat tube angle puts the rider in a powerful, centered pedaling position.This means you can swap between a 100mm race fork for fast summer loops and a 120mm trail fork for rowdier adventures without ruining the bike‘s handling. From XC Race Rig to Bikepacking Machine For XC racing, the MK7 Pro’s hydroformed 6061 aluminum frame keeps weight low—the claimed 1.55kg for the 17” size is competitive with many alloy race frames. The stiff Boost rear end ensures every watt goes into forward motion, not frame flex. Owners report that the frame feels “stiff and lively,” with direct power transfer that rewards hard pedaling. For bikepacking, the frame includes multiple bottle cage mounts and internal routing options for a dropper post or rear light. The robust alloy construction shrugs off the rock strikes, luggage scrapes, and crashes that would punish a fragile carbon frame. Hardtail simplicity also means fewer pivot bearings to fail in remote backcountry. For commuting, the MK7 Pro accepts rack and fender mounts (check compatibility), and the 29” wheels roll efficiently over potholes and curbs. The internal cable routing keeps the bike looking clean and protects cables from winter grime and theft attempts. Singlespeed and Custom Builds The MK7 Pro’s replaceable derailleur hanger and BSA threaded bottom bracket make it an ideal candidate for a singlespeed conversion. BSA 68/73mm bottom brackets are the most widely available standard, offering countless crankset options for custom builds. The frame’s aggressive geometry also shines when stripped down—no clutter, just a direct, analog connection to the trail. Owners call it “perfect for those who want a modern aluminum frame, ready to receive good components and ride without worries.” Classic Appeal Meets Modern Standards There‘s a reason aluminum hardtails have endured through decades of cycling trends. They belong to the tradition of **classic bicycle frames**: honest, durable, and endlessly adaptable. The MK7 Pro honors that legacy while embracing modern necessities like a UDH derailleur hanger (ready for SRAM’s newest Transmission drivetrains), internal cable routing, and tapered head tube. It’s a frame that respects where mountain biking came from while looking squarely toward the future. Who Is This Frame For? The MK7 Pro 17” frame (recommended for riders 5‘4″ to 5’9″) is the ideal platform for the rider who wants one bike to rule multiple disciplines. It’s for the XC racer on a budget, the bikepacker who values repairability over ultimate light weight, the commuter who wants a fun ride to work, and the tinkerer who wants a solid base for a singlespeed build. With its Boost 148mm spacing, modern geometry, and hydroformed 6061 aluminum construction, the MK7 Pro doesn‘t force you to choose. It’s one frame, ready for many rides.
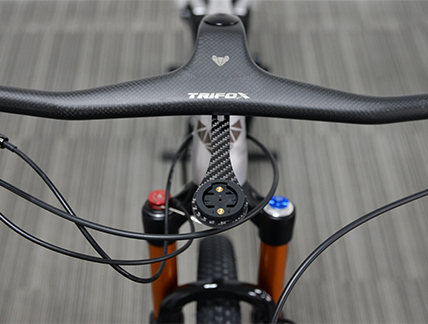
Modern XC racing demands a bike that feels like an extension of your body. Every input matters, every delay costs time, and every gram influences how you flow through a root garden or launch out of a pedal kicker. For years, riders chased these gains through separate high‑end bars and stems. Today, the next step has arrived: the fully integrated carbon cockpit. Here’s why more XC racers are making the switch and why the Trifox RHB200 represents a compelling case for your next build. The Uncompromised Cockpit Traditional bar‑and‑stem assemblies work, but they come with inherent compromises. The interface between the two components introduces a potential flex point. When you wrench the bike into a rocky switchback or power over a punchy climb, that interface can absorb energy that should be going into the trail. An integrated carbon mtb handlebar eliminates this weak link. By molding the bar and stem as a single piece of continuous carbon fiber, manufacturers create a structure that can be tuned for exceptional stiffness without a corresponding weight penalty. This is the engineering reality behind the current trend: a one‑piece construction "increases stiffness by 20% compared to a previous bar‑and‑stem combination". What that means on the trail is sharper steering, quicker feedback, and a front end that goes precisely where you direct it, no lag, no vagueness. For xc handlebars, this heightened precision is transformative. Modern XC courses are no longer smooth fire roads. They include technical rock gardens, off‑camber braking bumps, and steep chutes. Riders report that a truly stiff integrated front end "allows you to feel the trail more directly" and "builds confidence in corners." That confidence translates directly into speed. Weight, Aerodynamics, and the Clean Cockpit Advantage The weight savings of a well‑designed integrated bar are significant. By removing the material needed for overlapping clamps and a separate stem body, the RHB200 tips the scales at just 280 grams—impressively light for a full‑size cockpit. Riders upgrading from a mid‑range alloy bar and stem often save 50–100 grams right at the front of the bike. That’s weight that the fork doesn’t have to loft over obstacles and weight that your shoulders don’t have to manage over a multi‑lap race. Integrated cockpits also clean up the front of the bike. Without a bulky stem faceplate protruding, the frontal area is reduced. This aerodynamic benefit may be marginal on a mountain bike, but in the wind‑exposed sections of a rolling XC course or during a crosswind, the reduction in turbulence is a free speed advantage. As one reviewer of integrated cockpits notes, integrated designs allow the bar and stem to act as "an aerodynamic extension of the frame, channeling airflow to improve efficiency and reduce resistance". More practically, a clean front end means simpler mounting for lights, computers, and action cameras, with fewer cables snagging on brush or your gloves during a quick maneuver. Feedback, Line Choice, and the XC Racing Advantage Perhaps the most significant advantage of a high‑quality xc handlebars is the improvement in trail feedback. Riders transitioning from an older alloy setup often describe the sensation as "a direct pipeline to the trail." The one‑piece carbon construction transmits subtle changes in traction and terrain without the damping or deadening that can occur at the bar‑stem interface. This feedback is critical for maintaining traction on loose climbs and for precisely placing the front wheel through rock gardens. One reviewer of a similar integrated bar noted that "it adequately maintains the same stiffness" as top‑tier aftermarket bars, while another described the upgrade as "completely exceeding expectations" with a "super lightweight and stiff" feel that made the bike feel "more alive". For the serious racer, that sensation of being connected directly to the trail is worth the upgrade alone. A bar that keeps you feeling fresh and confident lap after lap is a bar that helps you place on the podium. The RHB200: Integrated Performance for the Discerning Racer The Trifox RHB200 is built for XC and aggressive trail use. Its T800 carbon fiber construction strikes the ideal balance between race‑ready stiffness and long‑ride compliance. The ‑17° stem rise and 9° backsweep place the rider in an efficient, forward‑leaning position that optimizes weight distribution for climbing and descending. This geometry is specifically dialed for riders who want to lay down power efficiently while maintaining the ability to maneuver through technical sections. Available stem lengths from 80mm to 110mm and a cuttable 800mm width allow for precise fitment, accommodating a wide range of body types and riding styles. Weighing just 280g and constructed with a premium 3K carbon weave, the RHB200 is a direct competitor to integrated cockpits priced two or three times higher. Riders who have installed the RHB200 report that the upgrade is immediately noticeable on the first ride: a lighter, stiffer, more confident front end. For the XC enthusiast who has already optimized wheels, tires, and suspension, the integrated cockpit is the next logical frontier. It’s a single upgrade that enhances control, reduces fatigue, and sharpens your connection to the trail—a combination that serious racers shouldn’t ignore.

You have a budget in hand and a long list of components. The classic dilemma: should you invest first in the frame, or pour your money into a top‑tier rear shock? Choose wrong, and you risk wasted budget or a bike that never feels balanced. The answer is clearer than you might think: frame first, shock second. The frame is the foundation; the shock adds the finishing touch. Frame geometry defines the bike‘s character—XC efficiency, trail composure, or enduro aggression—while the shock simply needs to match that platform. If your budget allows a quality frame to start, the disc brake bike frame MFM100 is an excellent starting point, built with the engineering priorities that align with your riding goals. Why Frame First? A rear shock is not a universal component. Its critical dimensions—eye‑to‑eye length and stroke—are dictated entirely by the frame. Choose a frame first, and you immediately know which shock sizes you need. Spec a shock before the frame and you risk incompatibility, wasted money, or a shock that simply won’t fit. The MFM100 simplifies this by defining clear shock parameters (165mm eye‑to‑eye, 40/45mm stroke), so you can focus on tuning rather than guesswork. Air vs. Coil: The Decision After the Frame Once the frame is locked in, choosing the rear shock becomes a focused decision. Air shocks are the standard for XC and light trail use. They are lightweight, tunable with a simple pump, and suit varied terrain. Coil shocks offer superior small‑bump sensitivity and traction, but add weight. With the MFM100’s efficient, climb‑oriented kinematics, an air shock is the recommended match for most riders—keeping weight low while preserving pedaling efficiency. MFM100: A Smart Foundation The MFM100 is a T800 carbon full‑suspension frame featuring Boost 148x12mm rear spacing, a threaded BSA bottom bracket, and a proven four‑bar linkage. For this frame, the recommended shock dimensions are 165mm eye‑to‑eye and 40mm or 45mm stroke. For XC and marathon use, consider a Rockshox SIDLuxe or Fox Float DPS. For more aggressive trail riding, the Fox Float X or Rockshox Super Deluxe provide additional support and control without overwhelming the frame‘s intended travel range. Room for Taller Riders: The 19‑Inch Frame Option The MFM100 is available in multiple sizes, including a 19 inch bike frame (size L). This larger geometry offers a roomy reach and taller stack, accommodating riders from 180–195cm. Choosing the correct size first ensures your future shock upgrades won’t be hindered by fitment issues—investing in the right frame size upfront saves costly adjustments later. Smart Building Priorities: A Quick Checklist 1. Choose the frame that matches your terrain and fit (e.g., MFM100). 2. Confirm shock dimensions from the frame spec (165 x 40/45mm). 3. Select shock type (air for XC/trail, coil for heavier descending). 4. Check mounting hardware (bushings, bolts) to fit the frame. 5. Set sag and rebound based on rider weight and trail conditions. By leading with the frame, you avoid compatibility traps and build a bike that performs as a cohesive system. The MFM100 provides a reliable, modern disc‑brake platform that makes the rest of your build straightforward. Start with the foundation—everything else will follow.
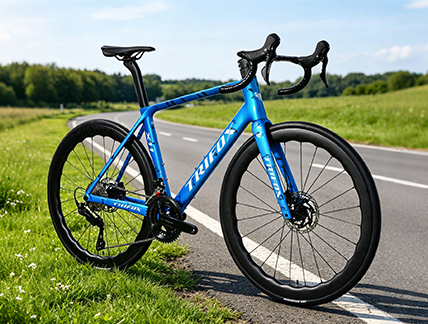
Carbon fiber frames have evolved dramatically over the past decade. Today, a truly modern carbon road bike is defined by three key standards: disc brakes, thru-axles, and tapered steerer tubes. The Trifox X10 carbon road bike frame embraces all three, delivering the performance, safety, and handling that today‘s riders expect. Here’s why each standard matters and how they work together on the X10. Disc Brakes: All-Weather Stopping Power The Trifox X10 is a dedicated disc brake frame, designed specifically for flat-mount calipers. Unlike rim brakes, disc brakes provide consistent stopping power regardless of weather conditions—wet roads, steep descents, or sudden obstacles. The flat-mount standard ensures a clean, integrated look with the frame’s aerodynamics. Disc brakes also allow wider tire clearance (the X10 accepts 700x25C tires, with compatibility for 28C), offering more comfort and grip without sacrificing the frame’s race-ready pedigree. Thru-Axles: Stiffness and Precision The X10 features 12x100mm front and 12x142mm rear thru-axles. Compared to traditional quick-releases, thru-axles thread directly into the frame, creating a much stiffer and more secure wheel-to-frame interface. This stiffness translates into sharper cornering, better tracking under hard braking, and zero disc rotor rub—a common nuisance on QR disc setups. The result is a bike that goes exactly where you point it, with no flex or hesitation. Thru-axles also make wheel installation consistent and repeatable, eliminating guesswork. Tapered Steerer: Steering Confidence The X10 employs a tapered 1-1/8” to 1-1/2” steerer tube. This wider lower diameter creates a dramatically stiffer interface between the fork and head tube compared to straight 1-1/8” steerers. The increased stiffness translates to more precise steering, less flex under hard cornering, and greater confidence on fast descents. For a carbon road bike frame disc brake, this is non‑negotiable for confident handling in all conditions. Complete Integration: A Frame Built for Today The X10 doesn’t stop at these three core features. It also includes full internal cable routing for a clean, aerodynamic profile, a threaded BSA BB68 bottom bracket for creak‑free reliability and easy maintenance, and progressive geometry across sizes from XS to XL. Crafted from T800 carbon fiber, it balances lightweight performance with the durability needed for all‑round use, making it a genuine contender for the best chinese aero frame value in its class. When combined with disc brakes, thru-axles, and a tapered steerer, the X10 delivers a complete platform that’s ready for fast group rides, gran fondos, and everything in between.
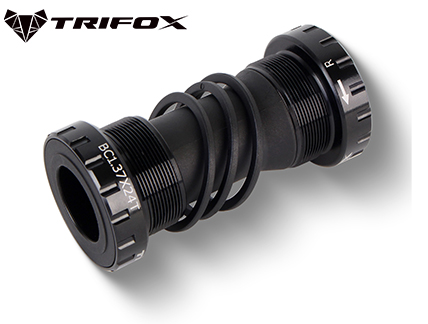
Few components spark as much quiet frustration among riders as the bottom bracket. You feel it when a persistent creak ruins an otherwise perfect ride, or when an upgrade turns into a search for obscure adapters. For years, the industry swung hard toward press-fit standards, promising lighter frames and stiffer pedal platforms. But recently, the pendulum has swung back, and many manufacturers have returned to the classic threaded bb —specifically the BSA standard. Here’s a real‑world breakdown of what each system does well, and where it falls short. BSA Threaded: The Rock‑Solid Standard The BSA (British Standard/English) threaded bottom bracket is the gold standard for reliability. Unlike press‑fit systems held in by friction, a bsa bottom bracket is secured by substantial metal threads cut directly into the frame or bonded into a metal insert. This mechanical lock virtually eliminates the loosening and movement that cause creaking. When the bearings eventually wear out, service is refreshingly simple: unscrew the old unit with standard tools and thread in a new one. BSA bottom brackets are also remarkably adaptable. The 24mm spindle standard (used by Shimano Hollowtech and many others) is widely supported, and the design has proven itself across decades of road, mountain, and gravel riding. If you value peace of mind and despise chasing mystery creaks, the BSA system is a proven, no‑compromise solution. Press-Fit: The Pursuit of Stiffness and Lightness Press‑fit systems arose from a valid engineering goal: reducing weight and increasing stiffness. By eliminating threaded metal inserts, frame manufacturers could use larger‑diameter carbon tubes around the bottom bracket area, potentially improving power transfer. BB86 (road) and BB92 (mountain) standards are common examples. When manufacturing tolerances are perfect and installation is flawless, a press‑fit bottom bracket can be quiet and efficient. However, that margin of error is narrow. Minor inconsistencies in frame molding can lead to bearing misalignment, which accelerates wear and creates the dreaded creak. Because the cups rely on friction to stay in place, flexing during hard pedaling can cause microscopic movement that eventually eats into the frame shell. For riders who work on their own bikes, press‑fit also requires specialized bearing presses and removal tools—adding cost and complexity to a routine job. Making Your Choice: Real‑World Priorities The best bottom bracket system is the one that suits your frame and your tolerance for maintenance. Choose a threaded bb (BSA) if you prioritize: long‑term reliability above marginal weight savings; simple, at‑home service with common tools; and compatibility with the widest range of cranksets. Choose press‑fit if you have a frame designed specifically for that standard, you don't mind potential creaks, and you want the absolute maximum BB shell width for frame stiffness. However, if you value peace of mind and want a bottom bracket you can install and forget, the BSA bsa bottom bracket remains the smartest choice. The Trifox TRBB68: Threaded Simplicity, Ready to Roll The Trifox TRBB68 is a direct reflection of the BSA philosophy. Designed for 68mm English‑threaded shells, it uses a dependable aluminum body with robust sealed bearings. Installation is straightforward with standard tools, and the threaded cups provide a secure, creak‑free interface that stays quiet ride after ride. Whether you’re refreshing an existing bike or building up a new frame, the TRBB68 delivers the no‑fuss performance that keeps you focused on the road, not on a mystery squeak.


