


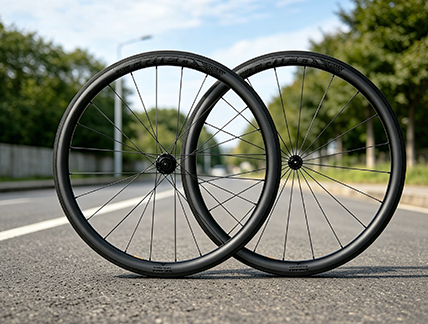
The road cycling world has a new obsession. Not weight, not stiffness — depth. Carbon wheel rim depth has become the single most talked-about variable in performance upgrades, and for good reason. The right depth transforms how your bike accelerates, cuts through the wind, and handles crosswinds. The wrong depth leaves you fighting the bike when you should be flowing. This guide breaks down the three most common depths — 35mm, 45mm, and 50mm — and explains how to choose the one that matches your riding style. The Physics Beneath the Carbon A deeper rim presents more surface area to airflow. When engineered correctly — with a modern U or V profile — that surface acts like an aircraft wing, directing air along a longer, more controlled path that reduces turbulent drag. Wind tunnel data consistently shows that upgrading from a 30mm rim to a 50mm rim saves more watts than almost any other equipment change available to an average rider. But deeper rims also catch more crosswind, and the deeper you go, the more you feel lateral gusts. Shallow rims are lighter, which matters on steep climbs where rotational weight penalizes every pedal stroke. The art is finding where those trade-offs balance for the terrain you actually ride. 35mm — The All-Rounder Climber A 35mm carbon wheel sits at the shallow end of the performance spectrum. It prioritizes weight and responsiveness over pure aero gains. For riders who live in mountainous regions or regularly face 8-12% grades, 35mm depth is often the smart choice. The reduced rotational mass means quicker acceleration out of corners and a lighter feel when standing on the pedals. Crosswind stability is also excellent at this depth — lighter riders or those riding in gusty coastal conditions will appreciate predictable handling that doesn‘t demand constant steering corrections. The compromise is aerodynamic efficiency: at speeds above 35km/h on flat or rolling terrain, a 35mm wheel leaves watts on the table. For the rider who spends 80% of their time climbing and descending, that’s an acceptable trade. For the rider who sees a mix of hills and flats, a slightly deeper wheel is often faster overall. 45mm — The Versatile Sweet Spot The 45mm depth has emerged as the new standard for riders who want one wheelset for everything. It offers genuine aerodynamic benefit — studies show a 45mm rim can save 5-10 watts at 40km/h compared to a shallow box-section rim — without the weight penalty or crosswind sensitivity of deeper sections. The 45mm WT18 wheels from Trifox weigh just 697g (front) and 862g (rear), making them light enough for serious climbing yet aero enough for fast group rides and flat time trials. This “golden middle” around 40-50mm is now the most recommended range for amateur riders because it works well across almost all terrain. Test data confirms this: at a steady 200 watts, a 50mm wheel delivers roughly 0.6km/h more speed than an alloy box rim; at 290 watts (~37.5km/h), the advantage grows to 1.2km/h. For a century ride, those small per-kilometer gains add up to meaningful time savings without a harsh ride penalty. 50mm — The Aero All-Rounder A 50mm carbon wheelset has crossed a meaningful threshold. It’s deep enough to provide substantial aerodynamic gains — more than the 45mm version — yet remains manageable for most riders in real-world conditions. The 50mm WT18 wheels weigh only 716g (front) and 878g (rear), just 38g heavier per pair than the 40mm version. That’s a trivial weight penalty for a significant aero improvement. The 45-50mm range has become the default choice for riders seeking one wheelset to handle everything from mountainous gran fondos to fast criteriums. The aerodynamic advantage of a 50mm rim vs an older shallow rim is substantial at speeds above 30km/h, and modern rim profiles have dramatically improved crosswind stability compared to early deep-section designs. For the enthusiast who rides rolling terrain, participates in group rides, and occasionally races, 50mm is the depth that does it all. The 50mm carbon wheelset WT18 from Trifox offers this balance at a price that makes carbon aero wheels accessible to everyday cyclists. 60mm — The Aero Specialist For completeness, the WT18 also offers a 60mm depth. This is the domain of the aero specialist — time trialists, triathletes, and riders who spend most of their time on flat roads or in fast, aggressive pacelines. The 60mm profile cuts through the wind with exceptional efficiency, delivering measurable speed gains at sustained high speeds. However, crosswind influence is more noticeable, and the weight penalty is real: 744g front, 906g rear. For most road riders, 60mm is best as a second wheelset for race days or specific flat courses, not a daily driver. Which Depth Should You Choose? The question isn‘t which depth is “best” — it’s which depth fits your roads. Use this quick guide: • Choose 35-40mm if you spend most of your time climbing steep mountains, are a lighter rider sensitive to crosswinds, or prioritize quick acceleration over top speed. • Choose 45-50mm if you ride rolling to moderately hilly terrain, participate in group rides or local races, and want one versatile wheelset that does everything well. • Choose 60mm if you race time trials, compete on flat courses, or already have a shallower set for climbing days. Value That Makes Sense For years, the best budget carbon wheelset was an oxymoron — you could have low price or genuine performance, not both. The WT18 changes that equation. At $399, this is a 100% T800 carbon fiber wheelset with depth options from 40mm to 60mm, Pillar stainless steel spokes, high-quality LLU contact bearings, and a tool‑free quick‑release freehub. The braking surface is engineered for consistent rim brake performance, and the quick-release design (100mm front, 130mm rear) ensures compatibility with classic rim brake frames. Riders who have tested these wheels consistently praise the build quality, noting that they spin true out of the box and stay that way. The value proposition is clear: you‘re getting the same T800 carbon construction found in wheelsets costing twice as much, with no meaningful compromise in stiffness, weight, or ride feel. The Trifox WT18 best budget carbon wheelset proves that high‑performance carbon wheels are no longer reserved for racers with deep pockets. By selecting the right depth for your terrain, you can unlock genuine aero and weight benefits without breaking the bank. That’s the new math of rim depth — and it‘s a calculation every road cyclist should run.
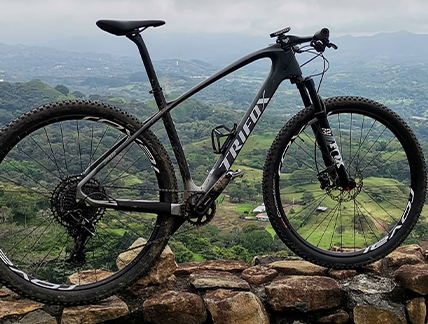
The mountain bike world is full of strong opinions, but few debates run as deep as hardtail vs. full-suspension. Walk into any bike shop or scroll through online forums, and you‘ll hear passionate arguments for both sides. Full-suspension bikes dominate showroom floors and trailheads, while hardtails are often dismissed as “entry‑level” or “budget” machines. But that perception misses the real story. The truth is simpler: there is no universally “better” bike. There is only the bike that matches your terrain, your budget, and your riding style. Whether you're a beginner learning to pick lines, an XC racer chasing efficiency, or a weekend warrior exploring local trails, a well‑chosen hardtail like the Trifox MFM200 bike frame 29er for sale can be the perfect foundation — lightweight, responsive, and surprisingly capable. Let‘s break down the real trade‑offs so you can decide which platform truly suits your ride. The Hardtail: Lightweight Efficiency and Raw Feedback A hardtail has suspension only in the front fork, with a rigid rear triangle. This design isn‘t a compromise — it‘s a deliberate choice for riders who value direct power transfer, climbing efficiency, and a pure connection to the trail. Because there‘s no rear shock or linkage to absorb pedaling energy, almost every watt you put into the cranks goes straight to the rear wheel. There‘s no “pedal bob” — that subtle energy loss that can make a full‑suspension bike feel sluggish on smooth climbs. For cross‑country racing, marathon events, or long days on forest paths, that efficiency advantage is real and measurable. Hardtails are also inherently lighter and simpler. Without a rear shock, pivot bearings, and linkage hardware, a hardtail frame sheds significant weight — often 1‑2 kg less than a comparable full‑suspension bike at the same price point. This weight savings translates directly to easier climbing, quicker acceleration, and a bike that feels lively and eager under power. The MFM200, for example, weighs as little as 1,219 grams (size S), rivaling carbon frames that cost twice as much. When a Hardtail Shines Hardtails excel on smoother singletrack, flow trails, gravel paths, and mixed terrain where the surface is predictable. On climbs, the rigid rear end delivers unmatched efficiency, and the lack of rear suspension encourages active riding — you learn to shift your weight, unweight the rear wheel over obstacles, and pick smoother lines rather than relying on the bike to absorb mistakes. Many experienced riders argue that starting on a hardtail builds better technique than jumping straight to a full‑suspension bike. For taller riders seeking a stable, confidence‑inspiring platform, the MFM200 is available in sizes up to 19”, making it an excellent option for a mens mountain bike xl frame. The frame‘s geometry — a 68° head angle and longer reach — provides stability on descents while keeping the front wheel planted for precise steering. Riders up to 195cm can find a proper fit without compromising the balanced handling that makes this frame so versatile. The Trifox MFM200 bike frame 29er for sale at an astonishingly affordable price, proving that you don‘t need a four‑figure budget to experience real carbon performance. Its T800 carbon construction delivers the classic hardtail advantages: featherlight weight (starting at 1,200g), excellent vibration damping that takes the edge off trail chatter, and a stiff bottom bracket that transfers every pedal stroke into forward momentum. The frame also includes modern standards — 142x12mm rear spacing for stiffness, internal cable routing for a clean look, and a threaded BSA bottom bracket for creak‑free reliability and easy maintenance. The Full-Suspension Case: Comfort, Traction, and Forgiveness Full‑suspension bikes add a rear shock and linkage, which transforms how the bike handles rough terrain. On rocky, rooty trails or chunky descents, the rear wheel tracks the ground more faithfully, maintaining traction where a hardtail might bounce and lose grip. This also reduces fatigue dramatically — the bike absorbs the trail‘s impacts, so your body doesn‘t have to. Riders with back or joint pain often find full‑suspension bikes significantly more comfortable over long days in the saddle. Full‑suspension also offers a larger margin for error. If you take a bad line or misjudge a drop, the rear suspension helps save you from a harsh impact. This makes full‑suspension bikes popular for aggressive trail riding, enduro, and bike park use, where speed and forgiveness are prioritized over pure pedaling efficiency. However, that capability comes with trade‑offs. Full‑suspension bikes are heavier (often 2‑4 lbs more than a comparable hardtail), more expensive to purchase, and require significantly more maintenance — pivot bearings need regular cleaning and greasing, rear shocks require annual servicing, and the added complexity means more parts that can creak, wear out, or fail. Making Your Choice: Terrain, Budget, and Goals So, which is right for you? Start with an honest assessment of where you ride most often. If your local trails are smooth singletrack, flowy climbs, and forest paths, a hardtail will feel fast, efficient, and fun. If your terrain is relentlessly chunky, rocky, and steep, full‑suspension will keep you fresher and more in control. Budget is another critical factor. At the same price point, a hardtail will almost always have better components — a lighter frame, a superior fork, and a higher‑end drivetrain. A $2,500 hardtail often comes with a pro‑level groupset and carbon frame, while a $2,500 full‑suspension bike may use entry‑level components and a heavier alloy frame. The MFM200 mens mountain bike xl frame option, for example, delivers a full T800 carbon chassis at a price that often buys only an entry‑level alloy full‑suspension frame from bigger brands. Finally, consider your goals. If you‘re new to mountain biking, a hardtail forces you to learn proper technique — line choice, weight transfer, and body positioning — that will make you a better rider when you eventually switch to full‑suspension. If you‘re an experienced rider looking for a second bike for winter training or smoother trails, a hardtail offers a refreshing change of pace. And if you‘re building a bikepacking rig, the simplicity and reliability of a hardtail are hard to beat. The Verdict: Hardtails Aren‘t Dead — They‘ve Evolved Hardtails never disappeared from mountain biking. They simply shifted into specialised territory where their simplicity, efficiency, and honesty still make perfect sense. Modern carbon hardtails like the Trifox MFM200 combine featherlight weight, responsive handling, and modern geometry that rivals full‑suspension bikes of just a few years ago. With 29” wheels, and clearance for up to 2.1” tires, the MFM200 is ready for aggressive XC, marathon racing, and all‑day trail adventures. Available in multiple colors and sizes up to 19”, it‘s a versatile platform that delivers the core benefits of carbon — weight savings, power transfer, and trail compliance — at a price that won‘t break the bank. Ultimately, the right frame is the one that spends the most time on the trails you actually ride. Buy for your home trails, not for a hypothetical mountain you visit once a year. And if you‘re still unsure, the 80/20 rule applies: choose a bike that excels on the terrain you ride 80% of the time. For many riders, that bike is still a hardtail — efficient, engaging, and ready to roll.
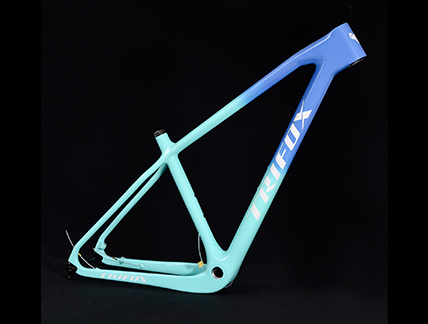
Walk into any mountain bike forum or scroll through group ride photos, and one truth becomes clear: component standards change faster than most of us care to admit. A frame that feels cutting‑edge today can feel hopelessly dated in three seasons — not because the carbon stops working, but because your wheels don’t fit, your hanger is discontinued, and the industry has moved on without you. Relevance isn’t about fashion. It’s about compatibility. A truly relevant frame is one that gives you choices: modern stiffness when you want it, classic simplicity when you need it, and the flexibility to swap components without throwing your whole build away. The Trifox SDY21 carbon hardtail frame is built around exactly that philosophy. Its secret isn‘t a single “best” standard — it’s the ability to choose the right standard from the start. The frame is available in three distinct O.L.D (Over Locknut Distance) versions: 135mm Quick Release, 142x12mm Thru‑Axle, and 148x12mm Boost Thru‑Axle. Each is a purpose‑built frame, not a one‑size‑fits‑all hack. That clarity is the first step to keeping your bike relevant for years. Choose Your Axle, Choose Your Future Many brands claim versatility by offering adapters or interchangeable dropouts — solutions that often introduce play, creaks, or alignment headaches. The SDY21 takes a cleaner path. When you buy, you select the exact axle version that matches your wheelset and your ambitions. Boost 148x12mm TA — The current gold standard. Boost spacing widens the hub flanges, which improves spoke bracing angles and creates a stiffer, stronger rear wheel. On the trail, that translates to sharper cornering, less wheel flex under hard pedaling, and better tracking through rock gardens. If you‘re building a modern XC or trail bike with 29” wheels and want maximum stiffness, this is the version to choose. Boost also gives you the widest compatibility with current wheels, forks, and drivetrains — the path of least future resistance. 142x12mm Thru‑Axle — The immediate predecessor to Boost. It offers much of the security and precision of a thru‑axle without the wider flange spacing. For riders who already own a quality 142mm wheelset or prefer a slightly narrower rear end for certain riding styles, this version provides a stiff, rattle‑free interface that improves handling and braking precision over QR. It‘s not the newest standard, but it’s far from obsolete — and it‘s the right answer if your parts bin already points that way. 135mm Quick Release — The traditionalist’s choice. Simple, lightweight, and compatible with a vast range of entry‑level and classic wheelsets. If you‘re building a budget‑conscious hardtail for smooth singletrack, bikepacking, or a singlespeed conversion, QR keeps things affordable and straightforward. Not every ride needs Boost-level stiffness — and that’s fine. The Frame That Unites Them All Whichever axle version you select, the core SDY21 DNA remains the same. The frame is constructed from T800 full carbon fiber, offering an exceptional stiffness‑to‑weight ratio. Weighing as little as 1028g in the 15.5” size, it‘s a true lightweight contender — a frame that doesn’t punish you on climbs. The geometry is modern and balanced: a 70° head tube angle and 73° seat tube angle provide confident, capable handling that climbs efficiently and descends with stability. The SDY21 also features full internal cable routing through the headset, resulting in a sleek, uncluttered appearance while protecting cables from moisture, mud, and abrasion. The frame clears tires up to 29x2.4”, accommodating modern high‑volume rubber for traction and comfort. And it includes a replaceable derailleur hanger, making it compatible with both geared drivetrains and singlespeed setups — a rare touch of versatility at this price point. The Standards That Matter Beyond the Axle A relevant frame needs more than just axle choices. It needs to speak the industry‘s evolving language. The SDY21’s Boost 148 versions also embrace the Universal Derailleur Hanger (UDH) standard — the same interface that unlocks SRAM‘s Transmission drivetrains and makes hanger replacement universally easy. The frame uses a threaded BSA 73mm bottom bracket — famously creak‑free, easy to service with simple tools, and a deliberate departure from problematic press‑fit shells that can develop annoying noises over time. For riders who want a frame that is both visually striking and technically sound, the SDY21 is available in multiple colors, including a vibrant orange mountain bike frame option that stands out without compromising the carbon‘s structural integrity. It’s a frame that performs as well as it looks. Why This Matters for Your Build The worst feeling in mountain biking is discovering that your dream build is incompatible with the wheels you already own — or with the wheels you hope to buy next season. By offering three distinct axle versions, the SDY21 puts control back in your hands. You don’t have to force adapters or compromise on your vision. You simply choose the version that aligns with your parts, your budget, and your riding style. For riders seeking a no‑compromise rigid frame mtb that balances modern performance with practical compatibility, the SDY21 delivers. It‘s a frame that respects where mountain biking has been — and anticipates where it’s going. Build it with Boost and a 12‑speed drivetrain for a race‑ready XC machine. Build it with QR and a singlespeed tensioner for a minimalist trail weapon. Or build it with TA and a reliable 1x11 groupset for an all‑around hardtail that just works. The right carbon hardtail doesn‘t lock you into a single path. It gives you choices — and the SDY21 gives you three. That’s how you stay relevant.
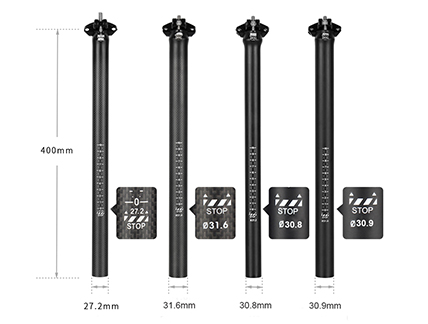
The seatpost is a component most riders overlook—until they notice it. That slight discomfort on rough roads, the creak that develops after a year, or the bike weight that feels just a little too heavy. The choice between a carbon fiber and an aluminum seatpost comes down to balancing weight, comfort, durability, and cost. Here are the seven key differences to help you decide which is right for your ride. 1. Weight Carbon fiber is significantly lighter. A quality aluminum seatpost can weigh 220-300g. A carbon seatpost like the Trifox SLS21 tips the scale at just 160g (for the 30.8 x 400mm size), offering a weight reduction of 30-40% or more. That savings may seem small, but at the top of the seat tube, it reduces total bike weight and improves the bike’s overall feel. 2. Vibration Damping and Comfort This is carbon’s strongest advantage. Carbon fiber naturally absorbs high-frequency “road buzz”—the vibration from rough pavement, chip seal, or gravel that causes fatigue over long miles. Aluminum transmits that vibration more directly, which can lead to numbness and discomfort. For long-distance road riders, gravel enthusiasts, or anyone seeking a smoother experience, carbon provides a meaningful increase in ride comfort. 3. Stiffness and Power Transfer Both materials can be stiff, but carbon offers tunable stiffness. A well-designed carbon post can maintain the rigidity needed for efficient power transfer while still offering vertical compliance to absorb shocks. Aluminum is predictably stiff but cannot offer the same tuned flex characteristics. 4. Durability and Impact Resistance Here, aluminum has the edge. Aluminum seatposts are tougher and can withstand direct impacts from rocks, crashes, or trail debris. If you regularly ride rocky terrain or subject your bike to hard use, aluminum offers peace of mind. Carbon can be damaged by overtightening or sharp impacts, though modern quality carbon posts are far more durable than early versions. 5. Installation and Maintenance A carbon seatpost requires careful attention to torque specs and the use of carbon assembly paste (never grease). Carbon paste contains micro-grip particles that increase friction, allowing you to achieve a secure hold at lower torque to prevent slipping without crushing the carbon. An aluminum seatpost can be installed with standard grease and is more tolerant of minor torque variations. That said, an aluminum post in a carbon frame can corrode and seize over time, a problem carbon paste largely prevents. Either way, a torque wrench is recommended for both materials. 6. Aesthetics Carbon’s UD matte or 3K weave finish looks undeniably premium. Aluminum posts typically have a painted or anodized finish. For builders who care about visual details, carbon offers a distinctive, high-end appearance. 7. Price and Value Carbon costs more. A quality carbon seatpost typically ranges from $150 to $400, while aluminum options often run $50 to $150. The question becomes: is the weight savings and vibration damping worth the premium? For competitive riders, touring cyclists, or anyone spending long hours in the saddle, the answer is often yes. For casual or budget-conscious riders, aluminum remains a excellent choice. Making Your Choice If you prioritize durability and cost, aluminum is a reliable choice. If you value weight reduction, ride comfort, and a premium aesthetic—and you’re willing to install it correctly with a torque wrench and carbon paste—a carbon seatpost like the carbon fiber seatpost SLS21 delivers measurable benefits on every ride. The Trifox SLS21 is available in multiple diameters, including the popular 27.2mm seatpost size for Mtb,road and gravel bikes, and features a 400mm length, T800 carbon construction, and titanium hardware. Upgrading your seatpost is one of the most effective ways to improve both bike performance and rider comfort—without changing how your bike looks from 10 feet away.
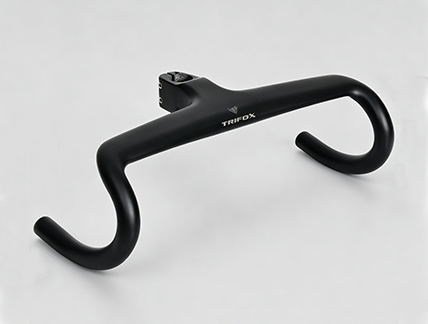
Choosing a road handlebar is about more than finding a width that matches your shoulders. Beneath the surface, three hidden measurements silently govern how your bike feels and how you fit on it: reach, drop, and flare. Understanding these numbers can transform an ill‑fitting cockpit into a personalized command center — one where you ride longer, faster, and with greater control. The Trifox DHB1000 integrated carbon bar serves as an excellent case study, as its compact geometry strikes an ideal balance for riders seeking real‑world performance. bicycle drop bars use these three measurements to define their shape.Reach is the horizontal distance from the center of the handlebar clamp to the most forward curve of the bar before it bends back toward the rider. In simple terms, it determines how far you must stretch to reach the hoods and drops. The DHB1000 has a 75mm reach, which falls into the “compact” category. A shorter reach (75‑80mm) is more forgiving on the lower back and shoulders, especially during long days in the saddle. A longer reach (85mm or more) creates a more stretched‑out, aerodynamic position favored by racers, but demands greater flexibility. For most enthusiasts, a compact reach like 75mm allows an efficient aero tuck without sacrifcing all‑day comfort. While reach controls forward stretch, drop governs vertical posture. Drop is the vertical distance measured from the highest point of the handlebar (typically where the tops meet the stem) down to the lowest point of the drops. The DHB1000 features a 125mm drop. A shallower drop (110‑130mm) makes it easier to transition from hoods to drops, reducing strain on the wrists and neck during descending or sprinting. By contrast, a deeper drop (over 135mm) creates a more aggressive, aerodynamic tuck but can be uncomfortable for riders with limited flexibility. The 125mm drop on this bar is a modern “standard” — low enough to get aero when you need it, yet shallow enough to use comfortably without chronic discomfort. Being able to use the drops comfortably is critical, as it offers the greatest possible braking leverage while descending. The third critical parameter is flare, which is measured in degrees. Flare describes how much the drops angle outward away from the centerline of the bike compared to the hoods. Traditional road handlebars have zero or minimal flare; gravel bars often have 12‑20 degrees. While the DHB1000 has a modest flare, this measurement is important for any road cycling handlebars. A small flare (2‑6 degrees) makes the drops slightly wider than the hoods, which improves stability and wrist clearance during hard cornering or descending. A larger flare (over 10 degrees) provides even more control on rough pavement or gravel but adds frontal area. For pure road riding, a subtle flare offers the best of both worlds — a narrow aero profile at the hoods with a slightly wider, more stable position when you need it most. Width, reach, drop, and flare don’t exist in isolation — they work together as a system. A wider handlebar (the DHB1000 measures 400mm center‑to‑center) offers more steering leverage and stability, especially on descents. A narrower bar reduces frontal area and improves aerodynamics. When you combine a compact 75mm reach with a moderate 125mm drop, the result is a cockpit that is accessible to a wide range of riders — from weekend sportive participants to competitive club racers. Integrated cockpits like the DHB1000 also eliminate the bar‑stem interface, which can creak or introduce unwanted flex. The one‑piece T800 carbon construction ensures that every steering input is transmitted directly to the fork without energy loss.Riders who have installed the DHB1000 note that the 400mm width and 75mm reach “put me in a nice aero position” while the fully internal routing gives a “professional look — no cables flapping in the wind.” Weight came in at 372g on the reviewer’s scale. Ultimately, the right handlebar is the one that fits your body and your riding style. Use reach to find your comfort on the hoods, use drop to find your confidence in the drops, and use flare to fine‑tune your control. For most road cyclists, a compact integrated bar with a shallow drop and moderate reach — like the Trifox DHB1000 — represents the sweet spot of aerodynamic efficiency, all‑day comfort, and precise handling.
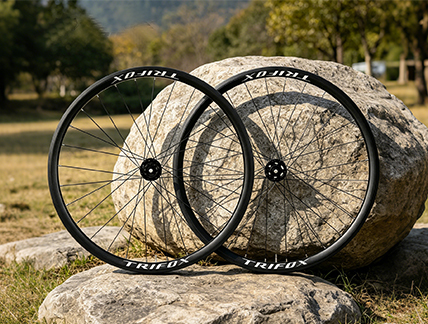
For years, road cyclists believed that narrow tires at sky‑high pressure were the only path to speed. That era is over. Today, riders understand that a wider rim — even by a few millimeters — fundamentally changes how a tire behaves. It reshapes the contact patch, lowers optimal pressure, and transforms ride quality. The Trifox AWT7 alloy disc brake wheelset is a perfect example of this modern philosophy. With its 14mm internal width, it’s engineered to do something simple but powerful: make your tires work better, so you ride faster, safer, and more comfortably. At an affordable price, it’s one of the best cheap bike wheelset options available for riders who want real performance without breaking the bank. Rim Width Shapes the Tire, Not Just the Wheel The rim isn’t just a hoop that holds the tire. Its internal width dictates the tire’s profile once inflated. On a narrow rim, a tire bulges into a light‑bulb shape — tall and narrow, with a small contact patch. This shape forces high pressure to keep the sidewalls stable, which translates into a harsh, unforgiving ride. A wider rim supports the tire’s sidewalls more effectively, creating a flatter, wider profile. This shape stabilizes the tread, reduces squirm, and dramatically increases the contact patch. As one industry analysis notes, “when the internal width of a rim reaches 21mm or more,” the contact surface rises considerably, enhancing redistribution of contact pressure and increasing lateral grip during cornering. The result is more predictable handling and better traction, especially on wet or loose surfaces. The AWT7’s 14mm internal width is purpose‑selected for modern 25‑28mm tires. Rather than forcing a tire to bulge unnaturally, it creates a smooth, continuous surface from the rim to the tread. This profile improves stability when cornering and reduces the vague, wandering sensation that plagues narrow‑rim setups. Riders using the AWT7 on classic road routes have noted the wheels feel “planted” and “predictable” — a direct result of matching rim width to tire shape. How Width Unlocks Lower Pressure and Higher Comfort The most direct benefit of a wider rim is what it allows you to do with air pressure. A properly supported tire can be run at significantly lower pressures without risking pinch flats or rim strikes. According to wider rim research, using a 21mm internal width rim allows tires to be run at lower pressures, absorbing road vibrations more effectively and reducing the impact transmitted to the rider’s body and the frame. The AWT7’s 14mm width, while not as extreme as gravel‑oriented rims, hits the sweet spot for road use. It lets you drop pressure from the traditional 100‑120 psi range down to 80‑95 psi, depending on rider weight and tire choice. At these lower pressures, the tire flexes over road imperfections rather than bouncing off them. The result is dramatically reduced hand and saddle fatigue on rough pavement, longer chip seal, and worn asphalt. This pressure flexibility also helps the tire maintain traction. A tire at lower pressure deforms around irregularities, increasing the effective contact patch. As one manufacturer explains, a wider internal rim maximizes tire support and grip, enhancing stability and comfort, and the lower pressure setup “absorbs road vibrations more effectively, therefore lowering the impact sent to the rider’s body.” That’s the difference between a bike that feels fragile on rough roads and one that inspires confidence mile after mile. Alloy Efficiency Meets Budget‑Friendly Performance Carbon wheels get the headlines, but alloy wheels like the AWT7 deliver 95% of the performance at a fraction of the cost. The AWT7’s 30mm rim depth offers a balance of aerodynamics and crosswind stability, while the 28 Pillar stainless steel spokes and welded aluminum construction provide the stiffness needed for efficient power transfer. Weighing approximately 1,956g per pair, the wheels are light enough for climbing yet durable enough for daily training. The 6‑pawl, 120‑point engagement hubs deliver crisp acceleration, and the disc brake compatibility ensures consistent stopping power in all weather. For riders seeking an affordable but capable bicycle disc wheel, the AWT7 represents exceptional value — a wheelset that doesn’t compromise on the fundamentals of ride quality. The Bottom Line Rim width isn’t a secondary spec. It’s a primary determinant of how your bike feels on the road. A 14mm internal width strikes a balance: wide enough to support the tire’s sidewalls and enable comfortable lower pressures, yet narrow enough to remain aerodynamically efficient for road use. The Trifox AWT7 alloy disc wheelset capitalizes on this design principle, delivering a ride that is stable, grippy, and noticeably more comfortable than traditional narrow‑rim wheelsets. For cyclists on a budget who refuse to sacrifice ride quality, the AWT7 is a smart upgrade that proves modern alloy engineering can rival carbon’s best traits — without the premium price tag.
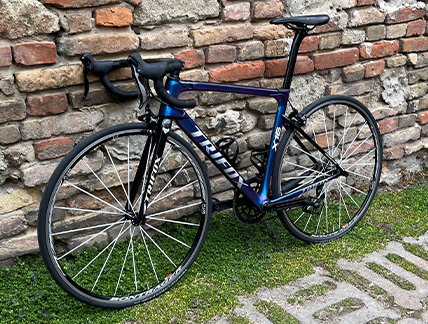
You've invested in a beautiful new carbon frame – the Trifox X16TA, with its stunning chameleon blue and purple finishes, built for both men and women. It’s light, stiff, and fast. You carefully install the bottom bracket, route the cables, and fit the groupset. Then, you reach for your hex key to tighten the seatpost clamp. "Just a little extra for safety," you think. That single moment of over‑enthusiasm could be the beginning of the end for your expensive frame. Here’s why. The Fragile Nature of Carbon Fiber Carbon fiber is an anisotropic composite material. It is phenomenally strong in the directions it was designed for – typically along the length of the tubes to withstand pedaling and impact forces. But it is surprisingly weak and vulnerable to forces it wasn't designed for, such as the concentrated, crushing pressure of a clamp or a bolt head. While aluminum or steel bolts will stretch and deform before breaking, giving you a tactile warning, carbon fiber is rigid and unforgiving. As an engineer explains, carbon is “more susceptible to crushing and cracking when improperly set up. Simply put, the margin for error is much smaller”. It doesn't bend or give; it cracks, and once cracked, its structural integrity is compromised, often catastrophically and without warning. The Risky Clamps and Bolts on Your Frame Every bolt on your carbon bike has a precise torque specification, typically measured in Newton-meters (Nm). Ignoring these specs is a gamble. The most common points of failure include: • The Seatpost Collar: This is the most frequent victim. Most manufacturers specify a torque of 4–6 Nm for seatpost clamps. Over-tightening it can crush the carbon seatpost itself, leading to a slipping saddle or a sudden, dangerous collapse. One mechanic notes that “a chronically slipping seatpost (even after tightening it down numerous times) is often the result of overtightening the clamp, damaging the carbon”. • The Stem Faceplate and Steerer Tube: The stem bolts that clamp your handlebars and the steerer tube of your fork are also highly vulnerable. A stem-to-steerer clamp torque of 5–7 Nm is common. Over-torquing the stem bolts on a medium bike frame can crush the carbon steerer tube, leading to a loss of steering control. This is exacerbated by using an incorrectly sized or too-short expander plug, as the stem’s pinch bolts then have no internal support, making the steerer tube easy to crack. • Bottle Cage Bolts: Even seemingly insignificant bolts pose a risk. Over-tightening a bottle cage bolt on a down tube can create a “stress riser.” This is a small area of intense localized stress that, over time and with road vibration, can propagate into a crack that travels through the carbon layers, potentially splitting the frame tube. How to Build and Ride with Confidence Protecting your investment in a high‑performance ladies bike frame or any carbon bike requires a change in mindset and technique. • Invest in a Quality Torque Wrench: This is non‑negotiable. A “click‑type” torque wrench is the most common and user‑friendly option, providing an audible and tactile click when the set torque value is reached. As one industry expert warns, “overtightening components could result in damaging the carbon or even breaking the bolt” and using a torque wrench is vital for the weekend mechanic. For critical parts of a carbon frame, it's simply not worth the risk to work by feel alone. • Use Carbon Assembly Paste: Never grease seatposts, handlebars, or steerer tubes. Grease lubricates the interface, artificially reducing friction and causing you to need to tighten the bolt more to achieve the same hold. Carbon assembly paste contains tiny abrasive particles that increase friction between two carbon surfaces, allowing you to achieve a secure, non-slip hold at a much lower torque. Ritchey, a leading component manufacturer, notes its friction-enhancing paste can “allow tightening torque to be reduced by up to 30%”. • Clamp the Bike Correctly: When working on your bike in a repair stand, never clamp it directly by the frame tubes. A carbon tube “can be crushed if it's over-tightened”. Always secure your bike by clamping the seatpost. If you have a carbon seatpost, use a work-stand adaptor or a sacrificial alloy post. Conclusion The Trifox X16TA is a masterpiece of modern carbon engineering, offering a lightweight and responsive ride in a range of sizes and colors to fit a diverse range of riders, from those seeking a medium bike frame to those looking for a ladies bike frame. But its ultimate longevity and safety are in your hands. The immense strength of a carbon frame is precisely engineered. By respecting torque specifications, investing in the right tools, and using correct assembly compounds, you can ensure that your dream bike remains a source of speed and joy for many thousands of miles, not a heartbreaking lesson in mechanical sympathy.

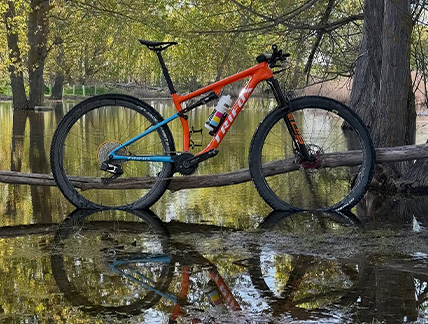
The day has finally arrived. You're ready to move on from that heavy, entry‑level alloy bike and invest in your first true carbon mountain bike. The ride quality, the weight savings, the prestige—it all beckons. But a fundamental fork in the trail awaits you: carbon hardtail or carbon full‑suspension? Both offer massive performance leaps over an entry‑level bike, but they serve very different riders and terrains. This guide will help you navigate the pros, cons, and hidden costs of each, with a special focus on the versatile Trifox SDY20 15 inch bike frame —a featherweight carbon hardtail that proves you don't always need rear suspension to conquer the trail. The Case for the Carbon Hardtail: Efficiency and Simplicity At the heart of the hardtail debate is power transfer. Without a rear shock absorbing your pedaling forces, a carbon hardtail is an efficiency machine. The Trifox SDY20 trial bike frame exemplifies this. Its ultra‑light T1000 carbon layup – the 15” frame weighs just 930g – and exceptional torsional stiffness mean that every watt of power you generate goes straight into propelling you forward, not into compressing a shock. On long, smooth climbs and flowy singletrack, the direct feedback and instant acceleration of a hardtail are unmatched. Furthermore, modern carbon hardtails like the SDY20 are no longer the crude, unforgiving bikes of the past. With clearance for 2.4” tires, you can run high‑volume rubber at lower pressures, effectively turning the tires into a form of suspension. The Boost 148mm rear thru‑axle massively increases rear wheel stiffness, improving tracking and control. And the inclusion of a UDH (Universal Derailleur Hanger) future‑proofs the frame for the latest SRAM Transmission drivetrains. The SDY20 is also a more affordable entry point to carbon, allowing you to invest more in a top‑tier fork or groupset. Choosing the Right Hardtail Fit Fit is crucial for any bike, but especially for a hardtail where your body is the suspension. The SDY20 offers multiple sizes to fit a wide range of riders, from the compact 15 inch bike frame to medium and large sizes. This 15″ model is a perfect option for smaller riders or those seeking a playful, agile feel, ensuring they get the performance benefits of a carbon hardtail without feeling stretched out and out of control. The Full‑Suspension Philosophy: Traction and Forgiveness Full‑suspension is all about traction and control. The rear wheel is better able to maintain contact with the ground over roots and rocks, improving climbing grip on technical ascents and boosting descending confidence dramatically. A full‑suspension bike allows you to ride harder, longer, by reducing the physical battering your body takes. For heavy, aggressive riders or those whose local trails are perpetually chunky, a full‑suspension bike is a significant advantage. However, this comes with a cost. A good full‑suspension frame is significantly heavier, uses a more complex linkage system requiring maintenance, and is considerably more expensive. You also must budget for a rear shock, adding another $200–500 to your build. The complexity of riding a full‑suspension bike is also higher. To get the most out of it, you need to learn to pedal smoothly and manage the bike’s weight. Hidden Costs: The Budget Behind the Build This is where the decision gets real. For your first carbon MTB, the hardtail’s lower cost allows you to invest in premium components that dramatically improve the ride experience. The SDY20 frame, often available for under $600, leaves the bulk of your budget for a top‑of‑the‑line fork (e.g., Fox 34 Step‑Cast or Rockshox SID SL), a lightweight carbon wheelset, and a high‑end groupset. With a full‑suspension frame, you will spend significantly more on the frame alone, forcing you to cut corners elsewhere. This leads to a poorly balanced build with a heavy suspension fork, budget wheels, or a cheap groupset, undermining the full‑suspension experience. Which Should You Choose? Choosing the right first carbon MTB is about aligning the bike with your trails and your ambitions. Choose a carbon hardtail if: - You ride mostly smoother, flowy singletrack, gravel roads, and XC-style trails. - Efficiency, climbing speed, and pedal response are your top priorities. - You are on a strict budget but still want a premium, lightweight frame. - You are a lighter rider or prefer a lively, “playful” bike that rewards active riding. Choose a carbon full‑suspension if: - Your local trails are relentlessly chunky, rocky, and rooty. - You prioritize descending confidence and comfort over flat‑out speed and weight. - You are a heavier rider or have the budget to spend $2,500+ on a quality frameset alone. The Final Verdict Your first carbon mountain bike should match your terrain, budget, and skill level. While a full‑suspension bike is the ultimate tool for extreme terrain, a modern carbon hardtail like the Trifox SDY20 is arguably the smarter, more versatile first purchase for most riders. It offers a massive performance upgrade over an aluminum frame, teaches you to read the trail and pick good lines, and provides a lightweight, efficient, and incredibly fun platform for years to come.
The mountain bike industry has a habit of changing standards just when you think you’ve settled on a dream build. Rear axle spacing, derailleur hangers, tire widths—all have shifted over the past decade, often leaving older frames incompatible with newer, better components. If you’re investing in a disc brake bike frame today, you want to be sure it can accept tomorrow’s drivetrains, wheels, and tires. The Trifox TRAIL II PRO is engineered with three key modern standards: Boost 148mm spacing, a Universal Derailleur Hanger (UDH), and generous tire clearance. Here’s why those specs matter for the future. Boost 148: The Foundation of Future Wheel Stiffness Boost 148x12mm rear spacing has rapidly become the industry benchmark for mountain bikes. By widening the hub flanges compared to older 142mm or 135mm standards, Boost creates a significantly stiffer rear wheel through improved spoke bracing angles. This isn‘t just a performance upgrade—it’s a compatibility necessity. Nearly every modern frame, fork, and wheelset uses Boost spacing today, and the standard is likely to remain dominant for years. Choosing a non-Boost frame means limiting your wheel and hub options. The TRAIL II PRO’s Boost 148mm thru-axle dropout ensures you’ll have access to the best wheels on the market now and in the foreseeable future, from lightweight XC race hoops to rugged trail builds. UDH: Your Gateway to Next-Generation Drivetrains The Universal Derailleur Hanger (UDH) is arguably the most important future-proofing feature on any modern frame. Originally developed by SRAM, the UDH standardizes the derailleur mounting interface across all bikes. This has two profound benefits. First, it eliminates the hunt for frame-specific hangers—replacements are now universal. Second, and more critically, the UDH is the mandatory interface for SRAM’s revolutionary Transmission and Full Mount drivetrains. These next-generation systems mount the derailleur directly to the frame, bypassing a traditional hanger entirely for unmatched shift precision and crash durability. A frame with a UDH is compatible with all current derailleurs and ready for whatever full‑mount systems the future holds. The TRAIL II PRO’s UDH dropout ensures you won‘t be left behind as drivetrain technology evolves. Tire Clearance: Room to Grow as Rubber Expands Tire widths have been steadily increasing across all mountain bike disciplines. XC race tires that were once 2.1” are now routinely 2.4”, with 2.6” options appearing for more aggressive terrain. The TRAIL II PRO is designed with 29 x 2.25” as its official clearance, but real-world experience shows the frame can accommodate a 2.3” tire in dry conditions, and some owners have successfully mounted 2.4” rubber on standard rims. This generous clearance means you’re not locked into narrow tires as the industry trend toward wider, more capable rubber continues. Whether you want the grip of a 2.4” for loose races or the volume of a 2.6” for trail adventures, the TRAIL II PRO has the breathing room to adapt. Built for Tall Riders Too: The 19‑Inch Frame Option The TRAIL II PRO is available in 17” and 19” sizes. For taller riders, the 19 inch bike frame provides a roomy reach (470mm) and taller stack (606.1mm), accommodating riders from 175–190cm without compromising the frame’s progressive 67.5° head tube angle. Importantly, the future-proofing benefits—Boost, UDH, and tire clearance—scale across both sizes, ensuring tall riders enjoy the same long-term compatibility as their shorter counterparts. Why These Standards Matter for Your Wallet Buying a frame that anticipates future standards isn’t just about performance; it’s about value. A frame that can accept new drivetrains, wider wheels, and larger tires won’t become obsolete quickly. You can upgrade components piecemeal over years, breathing new life into the bike without replacing the chassis. The TRAIL II PRO’s T800 carbon construction, internal routing, and threaded BB68 bottom bracket further enhance its longevity. When you invest in this disc brake bike frame, you’re not just buying a bike for this season—you’re buying a platform that will remain competitive and compatible for seasons to come. Future-proof your build today.


