


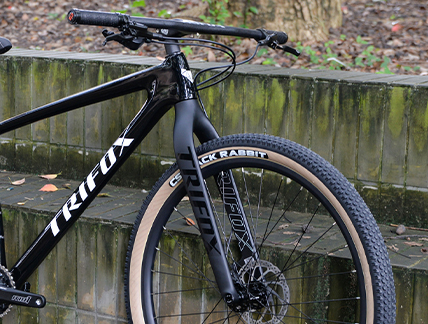
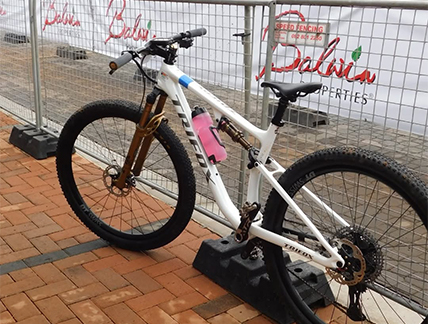
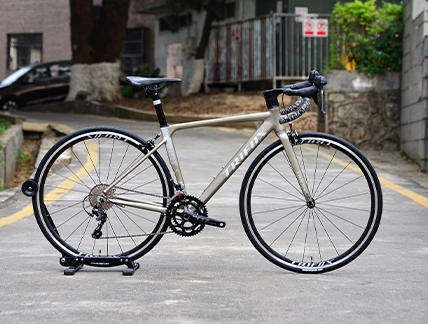
Most mountain bikers assume that more suspension equals better control. But there is a different path—one that many experienced riders are rediscovering. A quality mountain bike forks with a rigid carbon design strips away complexity and delivers something rare: a direct, unfiltered connection to the trail. The Trifox TMK200 is a 29er-specific rigid mtb fork that proves how lightweight construction and modern geometry can transform a hardtail‘s handling. Let’s explore how a carbon rigid fork sharpens your performance on the trail. Reduced Unsprung Mass for Quicker Steering Weight at the front of your bike directly affects how quickly it changes direction. A typical suspension fork weighs roughly 2.5 pounds (1.1–1.3 kg), while a high-quality carbon rigid fork like the TMK200 tips the scales at just 507 grams (1.1 lb). Dropping over a kilogram from the front end dramatically reduces the fork‘s rotational inertia, allowing the bike to respond to steering inputs with less effort. The result is a front wheel that feels eager, flickable, and far more precise through tight singletrack. Lighter unsprung mass also means your suspension fork’s spring rate and rebound damping are no longer a factor—every lean and countersteer transmits directly to the trail. Greater Stiffness for Cornering Confidence Flexibility in a fork creates vagueness. When you push hard into a berm or rail through a high-speed sweeper, any torsional flex in the fork causes the front wheel to lag, reducing traction and forcing mid‑corner corrections. The Trifox TMK200 is engineered for exceptional lateral rigidity. Its full‑carbon construction and Boost 110x15mm thru‑axle spacing eliminate unwanted flex, locking the front wheel precisely to your steering angle. The wider Boost spacing also pushes the hub flanges farther apart, which further improves spoke bracing angles and wheel stiffness. Riders who have tested the TMK200 consistently report feeling “more precise steering and less flex,” translating into greater confidence during aggressive cornering. This is the true advantage of a modern rigid mtb fork: the front end goes exactly where you aim it, without delay or deflection. Superior Vibration Damping Without Isolation Suspension forks excel at absorbing large impacts, but they also isolate the rider from the subtle feedback that helps you read the trail. Carbon fiber offers a unique solution: it filters out harsh, fatigue‑inducing high‑frequency vibration while transmitting the low‑frequency information you actually need. Carbon forks are known to be significantly stiffer than aluminum while also having better vibration damping. The TMK200’s T800 carbon layup is specifically designed to reduce trail “buzz” that leads to arm pump and hand numbness, yet it retains the precise steering feedback that keeps you in control on loose or chunky surfaces. You stay fresher on long days without losing the connection that helps you choose the smoothest line. Enhanced Trail Feedback for Better Line Choice Perhaps the most overlooked benefit of a rigid fork is how it sharpens your riding skills. Without suspension to mask mistakes, you learn to read the trail differently. You look further ahead, spot smoother lines, and develop a more active, flowing riding style. A carbon mountain bike forks transmits a clear feel of the trail surface—more so than forks that mix carbon with alloy crowns or steerers. That feedback helps you place the front wheel exactly where you intend, improving overall bike handling and line choice on technical sections. Over time, rigid-fork riding builds better fundamentals that make you a faster, safer rider even when you return to a suspended bike. The TMK200: A Modern Standard for Rigid Handling The Trifox TMK200 is purpose‑built for today‘s hardtails. It features a 1-1/8” to 1-1/2” tapered steerer, Boost 110x15mm thru‑axle spacing, and a 45mm offset—specs that complement modern trail geometry perfectly.Clearance for tires up to 29x3.0” makes it versatile enough for everything from XC racing to bikepacking, while its disc brake compatibility (160/180mm rotors) ensures confident stopping power. Riders who have installed the TMK200 note that it transforms their bikes into “lightweight, durable, and off‑road‑capable” machines. At just $109, it represents an accessible entry into precision handling. The shift to a carbon rigid fork isn‘t for everyone—if you spend your days charging through rock gardens at warp speed, suspension remains the better tool. But for riders who prioritize responsiveness, feedback, and a pure connection to the trail, a modern rigid mtb fork like the TMK200 is a revelation. It sharpens handling, reduces fatigue, and, most importantly, makes every trail feel more alive.
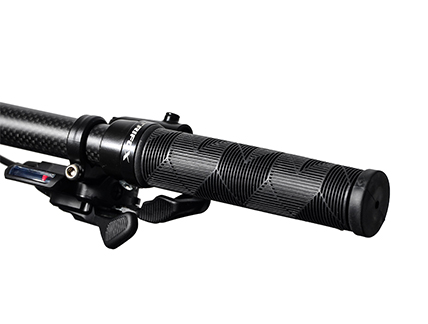
Your hands are the primary connection between you and the trail. If that connection is compromised—by slippery rubber, harsh vibration, or an ill-fitting shape—your control, confidence, and comfort suffer. The right mtb bar grips aren’t just about “feel good”; they’re a performance component. But with rubber, silicone, foam, and even cork available, how do you choose? Here’s a practical guide to grip materials and what they mean for your riding. Rubber: The Time‑Tested All‑Rounder Rubber remains the most common mtb bar grips material for good reason. High-quality rubber compounds offer an excellent balance of durability, shock absorption, and all-weather traction. Many premium rubber grips now use dual‑compound construction: a harder, tough base layer underneath with a softer, tackier outer layer. This provides a secure hold without sacrificing durability. Rubber also excels across a wide range of conditions. Quality rubber maintains grip in rain, sweat, and mud, making it a favorite for aggressive trail, enduro, and all‑mountain riders. If you ride year‑round in fluctuating conditions, a good lock‑on rubber grip is a safe and effective choice. Foam: Weight‑Weenie Favorite with Trade‑Offs Foam grips are the lightest option available, making them popular among cross‑country (XC) riders who prioritize every gram. The lightweight foam material also provides a soft, cushioned feel that some riders find comfortable for long days in the saddle. However, foam is the least durable of the three main materials. It tends to wear faster, can tear more easily in crashes, and offers less grip in wet or muddy conditions. Foam also has a reputation for shifting or rotating on the bar during hard efforts unless it’s lock‑on style. For dry‑weather XC racing or casual riding, foam can be a good choice. For aggressive terrain or wet climates, it’s less ideal. Silicone: The Modern Comfort King Popularized by brands like ESI, silicone grips are now the preferred choice for many mountain bikers seeking vibration damping and long‑ride comfort. Silicone is remarkably effective at absorbing high‑frequency trail chatter—the kind that leads to arm pump, hand numbness, and fatigue over hours of rough terrain. Riders who have switched to silicone report that they are “far more comfy than rubber grips” and can even switch to minimalist gloves after making the change. Silicone offers excellent wet‑traction properties, often gripping better when damp. The downside is that silicone can be slightly more expensive than rubber, may tear if dragged against rocks, and is one of the more difficult materials to install because it grips the bar so tightly. But for riders who prioritize comfort, vibration damping, and a supple feel, silicone is hard to beat. Cork and Other Alternatives Cork grips offer a unique option: natural material with moderate cushioning and a distinctive aesthetic. Cork is more solid than rubber or silicone, offering a direct, connected feel. It also has the unusual property of gripping better when wet, as moisture is absorbed into the natural fibers. However, cork tends to be firm (60–80 Shore A vs. 20–40 for traditional rubber) and less durable than rubber, especially against rock strikes. Cork also lacks lock‑on collars, making installation more involved. It’s a niche choice for bikepackers or riders seeking a natural feel and sustainable material, but not the first choice for aggressive trail riders. Lock‑On vs. Slide‑On: Installation and Security Beyond material, grip attachment type matters. Lock‑on grips use metal or plastic collars tightened with an Allen key to secure the grip. They are easy to install, remove, and swap, and they prevent any rotational slippage under hard riding. Slide‑on grips are lighter and cheaper but require adhesive or friction to stay in place. If you frequently swap parts or ride aggressively, lock‑on grips are strongly recommended. Many of today’s best mountain bike bar grips—including the Trifox MBT100—use a lock‑on design for security and ease of use. Making Your Choice There is no single “best” material—only the right material for your riding. For a breakdown by use case: XC and Light Trail: Silicone foam or high‑quality foam for weight savings and comfort; lock‑on preferred. ← Recommended: Trifox MBT100 silicone grip. Trail, All‑Mountain, Enduro: Quality dual‑compound rubber with lock‑on for all‑weather reliability. ← Recommended: Trifox MBT100 silicone grip (also suitable here). Wet / Muddy Climates: Rubber or silicone with aggressive tread pattern; lock‑on mandatory. Long‑Distance / Bikepacking: Silicone for superior vibration damping and hand fatigue prevention. Budget Builds: Rubber, lock‑on style for value and durability. The Trifox MBT100 silicone grip combines a soft, vibration‑damping silicone core with a secure lock‑on system, wide-diameter design, and durable alloy clamps. It delivers the vibration absorption of silicone and the installation confidence of lock‑on collars—an excellent balance for riders tired of hand fatigue. The set includes two lock‑on grips, bar end plugs, and a compact tool for easy installation. For riders seeking a comfortable, secure, and fatigue‑reducing grip upgrade, the MBT100 fits squarely in the “silicone comfort” camp while still offering the security of a lock‑on design.
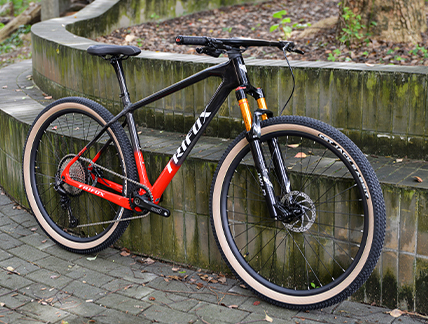
A great ride doesn’t happen by accident. It starts long before you hit the trailhead—with honest self-assessment, smart route planning, and a bike you trust. Whether you’re a first-timer or a seasoned rider, a little planning transforms a good day out into an unforgettable one. Here’s how to plan the perfect mountain bike ride, step by step. Know Yourself: Fitness and Skills Come First The most important part of planning any ride is being realistic about your current fitness and technical ability. If you’re new to the sport, start small. Choose well-marked trails with gentle slopes and avoid overly technical terrain that could lead to frustration or injury. There’s no shame in being a beginner—every experienced rider started exactly where you are now. For group rides, plan for the least experienced rider in the group. A ride is only as enjoyable as its most tired or struggling participant. Choose Your Route with Intention Once you’ve assessed your fitness, match your route to your goals. Are you training for endurance? Look for longer distances and significant elevation gain. Riding for fun with friends? Choose flowy singletrack that keeps everyone smiling. Digital tools make route discovery easier than ever. Apps like Komoot, Trailforks, Strava, and MTB Project offer trail maps, difficulty ratings, and user reviews that reveal trail conditions before you arrive. GPS devices are great for navigation, but always carry a backup—a physical map, a power bank, or both. Batteries die, but a paper map never runs out. Check the Weather—Then Check It Again Mountain weather can shift without warning. Before you head out, check wind speed, precipitation forecasts, and “feels like” temperature. Pay attention to daylight hours and always leave yourself slack. If conditions look questionable, remember: the trails will still be there tomorrow. And let someone know where you’re going and when you expect to be back. That simple act could save your life if something goes wrong. After your ride, text them to confirm you’re safe. Your Bike: The Most Important Piece of Equipment A well-maintained bike is your ticket to a trouble-free day. Before every ride, run through a quick pre-ride checklist: squeeze the brakes to feel lever travel, check tire pressure for both traction and puncture resistance, inspect your chain and derailleur for smooth shifting, and test your dropper post and suspension. For riders seeking a reliable, go-anywhere hardtail, the mens mountain bike SDY21 offers a full T800 carbon frame that soaks up trail chatter while remaining light and stiff for climbs. Its 12-speed range covers everything from steep ascents to fast flats, and internal cable routing keeps cables tidy and rattle-free on descents. Reviewers consistently note that the SDY21 “soaks up trail chatter and climbs like a dream,” making it an ideal companion for everything from short after-work loops to all-day backcountry explorations]. Pack Smart, Ride Lighter The gear on your back matters as much as the bike under you. Essentials include: hydration (more than you think you’ll need), snacks for energy, a multi-tool with chain breaker, spare tube or plug kit, mini-pump, first-aid kit, and an emergency shelter or space blanket for remote rides. A helmet-mounted crash sensor (like those from Specialized or Tocsen) can alert emergency contacts if you crash while riding alone. And always carry a method of communication—fully charged phone and, in remote areas, a personal locator beacon. On the Trail: Have a Plan B and Ride Smart Even the best plans can unravel. Weather changes, a section of trail is blocked, or a rider tires unexpectedly. Professional guides always have a plan B—or even a plan C—in mind. Be willing to adapt. Turn around if conditions worsen. Walk a section you’re not confident riding. The goal is to finish the day safely, smiling. And always respect trail signage, yield to other users, and pack out everything you pack in. The perfect ride isn’t about distance or speed. It’s about preparation, presence, and a little bit of adventure. Plan well, ride smart, and enjoy every moment on the trail.
Trail chatter is the mountain biker’s silent enemy. The constant high-frequency vibration from roots, rocks, and rough ground doesn‘t just make your hands sore—it accelerates muscle fatigue, blurs your focus, and compounds over every mile. Many riders assume that only suspension can solve this. But the frame material itself plays a profound role. A carbon frame like the Trifox SDY20 17.5 bike frame (available in 15″, 17″, and 19″ sizes) transforms the ride experience not just through low weight, but through its unique ability to absorb trail vibration while maintaining pedaling efficiency. Here’s how modern carbon engineering achieves what metal simply cannot. From Metal to Composite: A Fundamental Difference Aluminum is a crystalline metal uniform in all directions. When vibration energy enters an aluminum frame, it transmits as a sharp, undampened shockwave directly to the rider. Steel is more compliant but heavier. Carbon fiber, however, is a composite. Thousands of individual fibers embedded in an epoxy resin matrix create a structure that can be engineered with different properties in different directions. This anisotropy is the key to carbon‘s vibration-damping advantage. The resin matrix acts as a microscopic damping agent. When high-frequency vibration enters the layup, energy is dissipated as heat within the resin and between fiber layers rather than being transmitted onward. The Layup: Where Comfort Is Engineered The magic of carbon isn‘t just the material—it’s how the material is arranged. A carbon frame is built from dozens of thin sheets (plies) of carbon fiber impregnated with resin, each laid at a specific orientation. By controlling the layup schedule—the number of layers, their orientation, and where they are placed—engineers can tune stiffness in one direction while allowing compliance in another. High-modulus fibers laid along the downtube and chainstays resist pedaling forces for crisp power transfer. Yet the same structure can allow controlled flex in the seatstays to absorb rear-wheel impacts, reducing shock transmitted to the rider before it reaches the spine. One study found that carbon fiber‘s damping properties enable road‑shock absorption efficiency of up to 92%, with comfort improvements of 41% on rough sections compared to less-engineered alternatives. Carbon vs. Aluminum: The Ride Feel Difference Aluminum offers excellent stiffness and affordability, but it doesn‘t absorb vibration as effectively, which can result in a harsher ride. Aluminum transmits “trail buzz” directly, leaving your hands and arms to absorb the punishment. This leads to faster fatigue and more difficult line-holding on loose terrain. Carbon’s natural damping filters out high-frequency vibrations, keeping you fresher and more in control. The Trifox SDY20, built with T800 carbon, exemplifies this balance. T800 occupies a sweet spot between entry-level T700 and ultra-stiff premium fibers, offering excellent stiffness for pedaling efficiency while retaining enough vertical compliance for real‑world comfort. What T800 Brings to the Trail T800 carbon has a higher tensile modulus (stiffer) than T700, allowing frame designers to use less material to achieve the same stiffness—or build a stiffer frame at the same weight. This translates to immediate power transfer and responsive handling when accelerating or climbing. More importantly for trail riders, T800‘s balance means you don’t sacrifice comfort for performance. The material is neither so flexy as to feel vague nor so rigid as to be harsh. Professional analysis confirms that T800 often provides a better balance of stiffness and vertical compliance than higher-modulus fibers like T1000. For riders seeking a 17.5 bike frame that climbs efficiently yet stays comfortable over long days, this precise blend of properties makes a tangible difference. Not all T800 is equal—quality control in fiber layup and resin application is critical—and Trifox‘s attention to this detail ensures the SDY20’s layup delivers consistent, predictable damping. Making It Yours: Custom Frame Painting A carbon frame‘s performance core is the same whether it wears subtle livery or bold colors. But personalization matters. Trifox offers custom bicycle frame painting options, allowing you to choose from multiple colors (the SDY20 is available in finishes such as Red, Green, and Glossy black). Whether finishing a stealth race build or a standout trail bike, custom paint doesn’t affect the engineering—it reflects your identity without compromising the frame‘s vibration-damping layup. The Long‑Ride Payoff Over hours in the saddle, vibration isn’t a minor inconvenience—it‘s a performance limiter. Carbon’s ability to reduce transmitted vibration means less muscle tension, clearer vision, and better bike control, especially in technical sections where staying loose matters. The rigid front triangle keeps steering precise, while the rear stays can be tuned to absorb just enough chatter to keep the rear wheel planted. That‘s the real magic of a well-engineered carbon frame: you stop thinking about the bike and start flowing with the trail. The Trifox SDY20 proves that carbon’s advantage isn‘t just about grams on a scale—it’s about how the material makes you feel on mile 30, mile 50, and beyond.
Tire clearance is one of those numbers every frame manufacturer lists in their spec sheet — and one of those numbers that very few riders bother to actually test before the first muddy race day. The Trifox TRAIL II PRO carbon frameset lists a clean, confident 29 x 2.25″ as its official maximum tire size. But spec sheets don‘t account for real-world mud, clay, sticky loam, or the subtle way a tire’s profile expands at lower pressures. So we took this frame out of the catalog and put it into the conditions that matter: wet, cloggy mess. The Official Number vs The Muddy Reality On paper, 2.25 inches is respectable. That width sits right in the modern XC and light trail sweet spot, offering enough volume for traction and comfort while still rolling fast enough to hang with the race crowd. The TRAIL II PRO’s T800 carbon construction and sculpted chainstays provide a claimed maximum of 29 x 2.25″ clearance — no ambiguity, just a clean number on a spec sheet. But the trails don‘t read spec sheets. Wet clay and decaying leaves don’t measure themselves against manufacturer tolerances before accumulating. When we pushed this frame into actual mud, a more nuanced picture emerged. The Dry Condition Overachiever Several owners have reported that in clean, dry conditions, the TRAIL II PRO can accommodate a 2.3″ tire without rubbing. The extra 0.05 inches (about 1.3 mm) of width is possible thanks to the frame’s generous chainstay and seatstay shaping. One reviewer even noted 74 mm of clearance between the chainstays — enough space that they planned to try a 2.4″ tire for dry, fast summer racing. That’s not just clearance; that’s versatility for riders who change tires by season. Where Mud Changes the Equation The key word, however, is clean. When mud, clay, or sticky loam accumulates, the same 2.3″ tire that clears perfectly in dry conditions can start contacting the frame, especially near the seat tube bridge or the chainstay yoke. Mud doesn‘t compress. It builds. And with heavy, claggy conditions, even the official 2.25″ tire will demand caution. The TRAIL II PRO’s mud clearance is adequate for race‑day slop, but it’s not designed for deep, sticky clay expeditions. This isn‘t a design flaw — it’s a design philosophy. The TRAIL II PRO is an XC full-suspension frame first. Its geometry prioritizes efficient pedaling, short chainstays (437–438mm), and a 67.5° head angle for planted but responsive handling. Mud clearance is a real consideration; the relatively wide chainstay bridge and sculpted seat tube help, and the UDH dropout with thru-axle keeps the wheel precisely aligned even under load. But if your local trails turn into peanut butter for half the year, you‘ll want to stick to the official 2.25″ maximum and run channel‑clearing tread patterns that self‑eject mud rather than packing it tight. Why Real-World Testing Matters For riders considering a best carbon frameset under 1000, the numbers on the spec sheet only tell part of the story. Yes, the TRAIL II PRO is built from T800 carbon, weighs 1660–1700g depending on size, and features Boost 148x12mm spacing, internal cable routing, and a threaded BB68. All of that is impressive on paper. But the real value reveals itself when you’re three hours into a wet race, lapping through a mud bog, and your wheels keep spinning without the dreaded drag of tires rubbing against the frame. That’s when well-engineered clearance matters. If you’re a taller rider running a bike frame 17 inch (the 17″ option fits riders 160–175 cm with a 430 mm seat tube), you’ll appreciate that the clearance scales with the frame size — the geometry is proportional, and the chainstay length remains consistent across sizes, so smaller frames don’t lose clearance to accommodate taller riders. The Balanced Verdict The Trifox TRAIL II PRO clears 2.25″ tires in all conditions without drama. In dry, dusty conditions or summer race days, you may be able to sneak a 2.3″ tire for extra grip and comfort. But for truly wet, cloggy trails — especially those that feature deep clay or sticky organic loam — the official 2.25″ maximum remains the safe and smart bet. The spec sheet gives you a number. Wet trail testing gives you confidence. The TRAIL II PRO delivers honest clearance that matches its listed spec, with a little extra breathing room for dry days. That’s the kind of transparency that turns a best carbon frameset under 1000 into a frame you actually trust when the sky opens up and the mud starts flying.
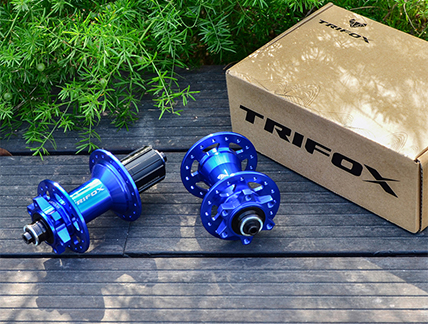
Few mechanical failures on a mountain bike are as frustrating as a hub that starts grinding, clicking, or developing play after a single muddy ride. The culprit is rarely catastrophic breakage — it‘s the slow, silent intrusion of water and fine dust past the hub’s seals. Hub seal design is the single most overlooked factor in how your wheels perform over time, especially if you ride in wet or dusty conditions. Understanding seals means fewer ruined bearings, less maintenance, and more time on the trail. Why Seals Matter More Than You Think A bicycle hub is not a sealed system. Water, mud, and dust exploit every tiny gap between the axle, bearings, freehub body, and hub shell. When contaminants penetrate the bearings, they mix with lubricating grease, turning it into a gritty abrasive paste. The result is accelerated wear, grinding noises, increased rolling resistance, and eventual bearing seizure. Properly sealed cartridge bearings — often designated as “2RS” or “LLB” — create a physical barrier that protects the internal bearing components. The Trifox M827 uses sealed cartridge bearings: two in the front and four in the rear, keeping grease in and grit out for smooth, long-lasting performance with minimal maintenance. That level of sealing directly translates to longer service intervals and fewer surprise failures mid‑ride. Contact Seals vs. Non‑Contact (Labyrinth) Seals Not all seals work the same way. Hub seals fall into two main categories: Contact seals (lip seals) use a flexible rubber lip that physically touches the rotating surface. They provide excellent contamination protection, but generate friction and heat — which costs you watts and eventually wears the seal itself. Non‑contact seals — commonly called labyrinth seals use a complex, tortuous path of interlocking grooves that makes it extremely difficult for water and dust to travel inward, without physically touching the rotating part. A labyrinth seal will not damage shafts, has a virtually unlimited life, and is frictionless, which means no power loss. Many premium hubs now combine both approaches. The M827’s design integrates sealed cartridge bearings with an optimized seal path — protecting against contaminants while keeping drag low. How Water and Dust Actually Enter Your Hub Much of the contamination happens not while riding, but when cleaning the bike. High‑pressure water from a garden hose or pressure washer is the fastest way to destroy a hub. Water can penetrate the seal in microseconds, flooding the bearing cavity, washing away grease, and leaving abrasive particles behind as it eventually evaporates. Visible signs of seal failure include cracked or missing seals on the hub shell, which allow contaminants to wreck bearings directly. Regular inspection is critical: check for cracks, dents, or corrosion on the hub shell, and feel for rough spinning or grinding noises when you rotate the axle. What to Look for in a Well‑Sealed Hub When choosing a durable mountain bike hub, examine four key aspects: 1. Bearing specification — Cartridge bearings with proper rubber seals (2RS) are essential. The M827 uses sealed cartridge bearings front and rear. 2. Seal protection — Look for hubs whose seals actively resist water, mud, and contaminant ingress. M827 bearings resist mud and water ingress. 3. Material robustness — Hubs made from corrosion‑resistant alloys with quality finishes help seals seat properly. The M827 is machined from 6061 and 7075 aluminum for strength and lightness. 4. Compatibility — A great hub must also fit your drivetrain. The M827 comes standard with a shimano hg hub freehub body supporting 8- to 12‑speed cassettes, with optional freehub bodies for SRAM XD and Shimano Micro Spline for modern drivetrains. Why the Trifox M827 Is Built for All‑Weather Durability The Trifox M827 is engineered for riders who don’t avoid mud, rain, or dust. Its combination of sealed cartridge bearings, robust aluminum construction, and optimized seal path keeps contaminants out without introducing excessive drag. Beyond sealing, the M827 delivers 72 points of engagement from a 6‑pawl driver — immediate power transfer for technical climbing — and convertible end caps that let you switch between QR and thru‑axle standards. For riders seeking best mountain bike hubs that balance durability, low drag, and long‑term reliability, the M827 is a compelling choice. Well‑designed seals mean fewer workshop hours and more miles of trouble‑free riding — and that‘s the kind of reliability that makes every trail better. Check out the Trifox M827 hub here to build your next durable wheelset.
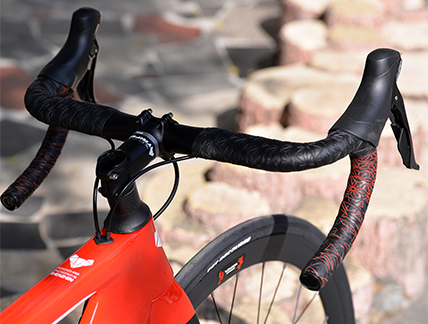
The next time your hands start to ache, tingle or go numb 40 miles into a century ride, don’t automatically blame your saddle or your bike fit. The real culprit could be the tape that connects you to the handlebar. Worn‑out or low‑quality bar tape directly accelerates hand fatigue by failing at its most critical job: managing road vibration. How Fresh Tape Fights Fatigue 1. Vibration Damping That Protects Your Nerves Road surfaces constantly generate high‑frequency vibration—the kind that travels from the front wheel, through the fork and frame, and straight into your hands. Industry studies indicate that effective vibration‑damping bar tape can reduce hand fatigue by up to 30% and allow cyclists to ride 15% longer on rough terrain. The mechanism is simple: fresh tape absorbs part of that vibrational energy before it reaches your palm, keeping your hand muscles and nerves fresher for longer. Sophisticated laboratory testing has confirmed the real‑world effect. SQlab’s research on the 714 handlebar tape showed that high‑quality tape can deliver 45% less rebound than standard tape, meaning it absorbs significantly more vibration from every bump. The same study found that a single 4‑hour ride produces a measurable negative effect on the nerve conduction velocity of the ulnar and median nerves—a direct contributor to the numbness and weakness cyclists often experience after long days in the saddle. Thicker, properly engineered bar tape actively slows this nerve fatigue. 2. Comfort Through Cushioning Every wrap of tape adds a small layer of padding, and those layers add up. Replacing flattened, hardened old tape with fresh material reintroduces the cushioning that your original bar tape once had. Thicker tape generally offers more vibration damping, which is why many long‑distance riders choose 2.5 mm or 3.0 mm tape rather than thinner race‑oriented options. For most road cyclists, this middle ground provides an ideal balance of comfort and direct bar feel. 3. Better Grip, Less Grip Force Worn, slick tape forces you to hold the handlebar tighter to maintain control—especially in wet or sweaty conditions. That extra muscle tension creates a feedback loop of fatigue. Fresh tape delivers superior grip, which reduces the amount of tension you need to hold the bar. When your hands relax, fatigue drops and steering precision improves. The math is simple: less squeezing + less vibration = longer rides with fresher hands. Why the BHT100 Gets the Job Done The Trifox BHT100 uses a dual‑layer EVA + PU leather construction. The EVA foam core delivers the shock‑absorbing resilience that fights hand fatigue, while the PU leather outer layer provides consistent, all‑weather grip and resists wear. A precise UD matt finish further enhances grip, preventing slippage even when you’re sweating hard or climbing in warm conditions. The tape includes a waterproof adhesive strip that helps the tape stay in place through rain and pressure‑washing, plus end plugs and finishing tape for a clean, durable wrap. It’s lightweight (just 25 g per set) and made to last, with multiple reviews noting that it doesn’t peel, crack, or degrade after extended use. Installation Tips for Maximum Comfort To get the full fatigue‑reducing benefit, install BHT100 correctly: - Start at the bottom, wrap outward. Begin at the bar end and spiral upward toward the stem, overlapping each layer by roughly 50%. - Maintain firm, even tension to avoid wrinkles that create pressure points against the palm. Tension also keeps the edge of the tape from lifting over time. - Secure the end properly with the included finishing tape or electrical tape so the wrap doesn’t loosen mid‑ride. A fresh, properly wrapped bar tape shouldn’t be an afterthought—it’s a direct line of defense between your hands and the unforgiving road. Whether you’re training for a century, grinding out winter base miles, or just want weekend rides to feel better, a $11 roll of Trifox bike bar tape can deliver measurable relief. For those who also want to upgrade their handlebar grips, the BHT100 provides a comfortable, durable solution that pairs perfectly with any road bike.
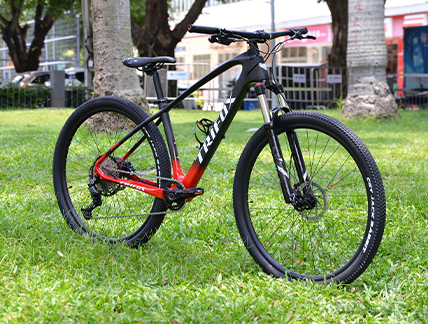
Walking out to the garage, you catch your bike in the mid-morning light. The carbon mtb hardtail 29 you’ve just finished building looks nearly flawless. But you’re also a bit nervous. You’ve read the stories about carbon frames and wondered how to keep yours out of the scrap pile. The good news is that protecting a high-quality 29er like the Trifox M2 is about understanding how carbon works—and building good habits from the inside out. Know What You’re Riding The M2 is a full T800 carbon fiber hardtail, a material valued for its stiffness-to-weight ratio. T800 is a high-modulus carbon, meaning it’s exceptionally rigid where you need power transfer (bottom bracket area, head tube) while still capable of damping trail vibration through the rear triangle. Because T800 is fatigue‑resistant and corrosion‑proof, your frame won't wear out simply from repeated riding. The real threats are impact, abrasion, installation error, and UV exposure. Understanding this shapes every protection decision. Preventative Internal Protection Before you take your carbon single speed 29er out for its first real ride, check the areas where shifting and brake housings enter the frame. The M2 uses internal cable routing, which keeps lines out of the elements. That also means cables can rub against the inside of the carbon layup over thousands of pedal strokes. Even a small vibration over time can wear through the resin. Many builders add small adhesive rubber frame protectors cut to fit around the cable entry ports. This is especially important where the housing makes contact with the raw carbon edge. A few dollars of helicopter tape or pre-cut rubber guides will keep the internal channels smooth and prevent housing from sawing into the composite structure. Structural Integrity Through Correct Assembly One of the most overlooked ways to protect a carbon frame is proper torque management. Over‑tightening components—seatpost clamps, bottle cage bolts, derailleur hangers—creates stress risers that can lead to invisible internal delamination. The frame may look fine, but the carbon layers have separated. Use a calibrated torque wrench. For a carbon single speed 29er build, the seatpost collar should be set to roughly 5–7 Nm for a dry carbon post with carbon paste. Never use grease on carbon interfaces; grease reduces friction, which then tempts you to overtighten. Assembly paste should always be applied. External Physical Protection Your frame’s outer surface faces daily attacks: rock strikes, chain slap, branches, and the inevitable parking-lot lean against a metal rack. The solution is layered protection. - Helicopter tape (clear polyurethane tape) is the first line of defense. Apply it to the downtube (for rock strikes), the chainstays (for chain slap), the top tube (for loading onto a rack) and the underside of the down tube, and anywhere a cable housing might touch the frame. - Rubber chainstay guards. Pre-cut rubber guards damp chain slap noise and keep the drive-side stay chip‑free. - Protective edge strips. Small stick‑on rubber or felt strips at the cable entry holes protect both the housing and the frame. These add almost no weight and preserve both the structure and the resale value of your carbon mtb hardtail 29. Regular Checks for Long‑Term Health After a muddy ride, don’t just blast the frame with high pressure. Use a gentle spray and mild bike cleaner. High-pressure water can force grit past bearings and into the internal cable channels. Check for visible cracks, especially near the bottom bracket, head tube, and seatpost collar. Also feel for soft spots—any “give” in the carbon could indicate delamination. UV exposure is another silent enemy. The clear coat that covers the carbon weave degrades after prolonged sunlight, allowing UV rays to attack the resin and eventually cause surface chalking. Store the M2 indoors away from direct sun. Ride and Forget, But Not Really Carbon frames are not fragile, but they are precise. The Trifox M2 uses T800 full carbon construction, modern cable routing, and a 29er geometry that thrives on aggressive XC and trail riding. Protecting that frame is not about treating it like glass; it’s about building simple habits: torque wrenches, frame tape, internal port protection, and smart storage. Ride hard, inspect often, and your carbon mtb hardtail 29 will still be rolling strong when your friends are already on their third bike.
Walk into any bike shop today and you’d be forgiven for thinking disc brakes have completely taken over. Shelf after shelf is lined with hydraulic stoppers, rotor buzz, and the quiet confidence of all-weather power. But step back and look closer. Some of the most interesting road bikes for real riders sit quietly in the corner—lighter, simpler, and dramatically more affordable. The Trifox R241 C-brake is one of them. In a market where road bikes under 1000 have become increasingly rare, this alloy framed, Tiagra‑equipped machine asks a pointed question: do you *actually* need discs? The 2026 Reality: Discs Aren’t Always Better Disc brakes are genuinely superior in specific conditions—long, rain‑soaked alpine descents or muddy winter miles. But for the vast majority of road cyclists, those conditions are the exception, not the rule. As one 2026 analysis notes, “On lightweight road bikes and hybrid bikes, rim brakes often provide more than enough braking force for everyday riding”. Rim brakes are lighter, simpler to maintain, and significantly cheaper to manufacture. The R241 capitalizes on exactly those strengths. The spec sheet tells a clear story. The R241 tips the scales at approximately 9.75 kg (about 21.5 lb)—respectably light for an alloy frame at this price point. Much of that weight savings comes from eliminating heavy disc rotors, calipers, and thru‑axles. The result is a bike that feels eager on climbs, responsive in corners, and refreshingly uncomplicated. What You Actually Get for $659 At a regular price of $659 (down from $1,399), the R241 is a genuine contender for anyone looking for a capable budget road bike that doesn’t cut corners on the things that matter. The ultralight seamless tube aluminium frame uses AL6061 alloy with T4‑T6 heat treatment, a process that improves strength without adding unnecessary bulk. The fork is alloy, not steel, keeping front‑end weight low and steering precise. But the highlight is the drivetrain. The R241 is equipped with a full Shimano Tiagra R4700 2×10‑speed groupset—Tiagra sits just below the revered 105 tier and benefits directly from trickle‑down engineering. Cycling Weekly’s Tiagra review praised its “excellent front and rear shifting” and noted that the dual‑pivot rim brakes “provide light, comfortable performance… a significant increase in modulation” compared to older designs. You get the same crisp lever feel, reliable shifting, and proven durability that have made Shimano’s mid‑range groupsets legendary. Why C-Brakes Remain a Smart Choice The arguments for rim brakes in 2026 are the same as they’ve always been, but the context makes them more compelling than ever. Simplicity means no bleeding hydraulic lines, no replacing rotors, and no worrying about caliper alignment. Weight remains a tangible advantage, especially on budget builds where every gram is precious. Cost is the undeniable trump card. At under $700, the R241 undercuts virtually every disc‑brake road bike with a comparable groupset by hundreds of dollars. Maintenance is even easier. The R241 uses standard quick‑release wheels (front QRx100mm, rear QRx130mm), so you can swap wheels in seconds without worrying about rotor rub or axle standards. Replacement brake pads cost a few dollars and take minutes to install. For a rider who simply wants to ride—without a degree in hydraulic engineering—that simplicity is a feature, not a compromise. Who Is the R241 Actually For? The R241 is not for the racer chasing marginal seconds on wet mountain passes. It is, however, a near‑perfect fit for: - New riders stepping into road cycling for the first time, who want quality components without a overwhelming upfront cost. - Value‑focused enthusiasts who understand that a good alloy frame with a Tiagra groupset delivers 90% of the performance of bikes costing twice as much. - Dry‑weather riders—let’s be honest, many of us avoid the rain anyway. - Anyone building a smart budget road bike, who would rather invest savings in wheels, tires, or a proper bike fit. The Bottom Line Rim brakes are *not* dead. They have simply found their proper place: affordable, lightweight, and thoroughly practical road bikes for riders who prioritize value over marketing hype. The Trifox R241 C-brake is a compelling example of that philosophy executed well. Light alloy frame, excellent Shimano Tiagra shifting, classic c‑brake simplicity—all for a price that respects your bank account. The disc brake revolution has delivered real benefits, but it has also created opportunity. For those seeking genuine road bikes under 1000 that still deliver a rewarding ride, the R241 deserves a close look. Sometimes the smartest upgrade is knowing what you don’t need.


