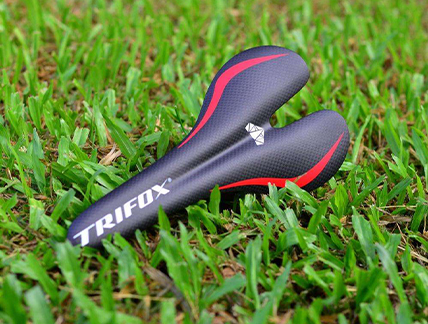
At first glance, a performance carbon saddle like the Trifox CS100 can seem intimidating. Its sleek, minimalist appearance and rigid full-carbon fiber construction stand in stark contrast to the plush, padded saddles many are used to. It's perfectly reasonable to wonder: "Will this be comfortable?" The answer lies in a fundamental shift in thinking. A performance cycling saddle is not designed to provide comfort through cushioning that you sink into. Instead, its core philosophy is support over softness. It aims to provide a stable, precise platform for your sit bones, freeing your legs to focus purely on pedaling power and efficiency. This isn't about passive comfort; it's about active, empowering performance. Let's demystify what it really means to "require" a good position to use such a saddle effectively. * It's About Stability, Not Core Strength: The requirement for good form isn't about needing pro-level fitness. It's about the ability to maintain a stable pelvis and avoid rocking side-to-side on the saddle. A firm, supportive platform like the CS100 actually aids this by giving your sit bones a clear, unwavering point of contact, helping you find and hold an efficient position more naturally. * Precision Setup is a Feature, Not a Bug: Yes, achieving optimal comfort requires more precise saddle angle and fore/aft positioning. However, view this as the saddle's greatest tuning advantage. Because it provides immediate, unambiguous feedback, it acts as a precise micro-adjustment tool. Small changes yield noticeable differences, allowing you (or a bike fitter) to dial in your perfect position faster and more accurately than with a vague, forgiving saddle. So, who is this type of bicycle saddle truly for? It’s an excellent match for the serious enthusiast whose rides regularly exceed 1.5 to 2 hours, who is chasing speed or efficiency gains, and who understands that long-distance comfort is achieved through proper support and fit—not by simply adding more padding. It’s for the rider willing to invest time in optimizing their bike setup. Conversely, it may not be the ideal choice for purely casual, upright riders or those who prefer a more relaxed, static seating position on the bike. If the potential for a lighter, more efficient, and precisely supportive ride appeals to you, your logical next step is clear: prioritize a professional bike fit. A proper fit ensures your overall bike geometry and riding posture are correct. With that solid foundation established, you can then explore whether a performance carbon saddle is the right final piece of your setup puzzle. The Trifox CS100, with its sub-106g weight, ergonomic nose design to prevent numbness, and central vent for airflow, exemplifies this performance-oriented approach, offering a clear upgrade path for riders ready to make the leap.
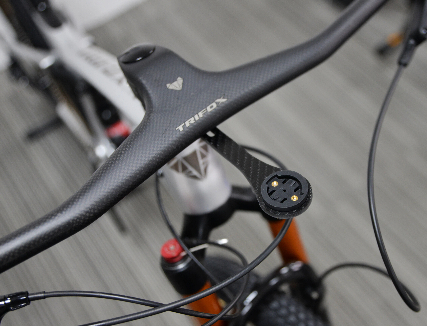
We've all been there: a handlebar cluttered with multiple mounts, zip ties, and dangling accessories. The traditional "stack-and-clamp" approach creates a messy cockpit, adds unnecessary weight and drag, and compromises security. This tangle of brackets not only looks unprofessional but can also lead to vibrations that damage your expensive electronics. The solution? A unified mounting system designed from the ground up to organize, secure, and streamline—introducing the Trifox SBH100 carbon mount. The Core Structure: A Secure Foundation At the heart of the system is a precision-engineered carbon fiber base that serves as your primary mounting platform. It features a standard Garmin/Bryton-style quarter-turn mount as its centerpiece, providing rock-solid attachment for your cycling computer mount. No more wobbly brackets or alignment issues. The carbon construction offers exceptional stiffness-to-weight ratio, ensuring your valuable computer stays precisely where you need it, with minimal vibration transmission even on rough trails. Modular Expansion: Build Your Perfect Setup The true innovation lies in the SBH100's modular design. The mount isn't just for your computer—it's a platform for your entire cockpit ecosystem. Through strategically placed accessory ports and compatible adapters, you can seamlessly integrate: * Action Camera: Dedicated GoPro-compatible mounts position your camera perfectly for capturing trail action or road rides * Bike Lights: Integrated light mounts keep your illumination centered and secure without bulky separate brackets * Additional Accessories: Space for small tools, emergency whistles, or even secondary navigation devices This modular approach means you're not buying multiple separate mounts; you're investing in a system that grows with your needs. The Clean Integration Secret What separates the SBH100 from makeshift solutions is its integrated design philosophy. All components share a unified aesthetic with clean lines and minimal hardware. The system includes clever cable management features like internal routing channels for light cables, keeping everything tidy and protected. The result isn't a collection of parts—it's a cohesive, factory-installed appearance that looks professional and performs reliably. Scenario-Based Configuration Recommendations Your ideal setup depends on your riding style. Here are our recommendations: Road Racing & Fast Group Rides: Computer + Aerodynamic Tail Light Keep your cockpit clean and aerodynamic while maintaining essential visibility. The low-profile design minimizes drag while keeping your computer in optimal viewing position. Mountain & Trail Adventure: Computer + Powerful Headlight + Action Camera Handle technical terrain with confidence. The secure mounting ensures your light illuminates the trail ahead while your camera captures every moment—no more worrying about accessories shaking loose on rough descents. Gravel & Long-Distance Touring: Computer + Navigation Phone Mount + Dual Lights For epic adventures where reliability is paramount. Keep navigation accessible, maintain visibility in changing conditions, and have backup lighting—all organized in one robust system. Commuting & Urban Riding: Computer + Bright Commuter Light + Secondary Device Mount Navigate city streets safely with optimal device positioning and maximum visibility to other road users. The secure mounting prevents theft of accessories during quick stops. The Ultimate Value: Space Management Mastery The Trifox SBH100 isn't just another bicycle garmin mount—it's a complete cockpit management solution. Its value extends beyond the physical product to the time, frustration, and worry it saves. No more pre-ride adjustments of multiple loose brackets. No more anxiety about whether your camera will survive the next descent. No more tangled cables distracting from your ride. By consolidating your essential accessories into one secure, aerodynamic platform, the SBH100 transforms your handlebar from a cluttered workspace into a clean, functional command center. It represents the evolution of bike mounting from afterthought to integrated system—where every component has its place, every connection is secure, and every ride begins with confidence rather than compromise. Whether you're chasing personal bests on the road, exploring new trails, or simply enjoying your daily commute, the right mounting system enhances your experience by removing distractions and keeping your focus where it belongs: on the ride itself. The SBH100 proves that sometimes the most significant upgrades aren't the components themselves, but how elegantly they work together.
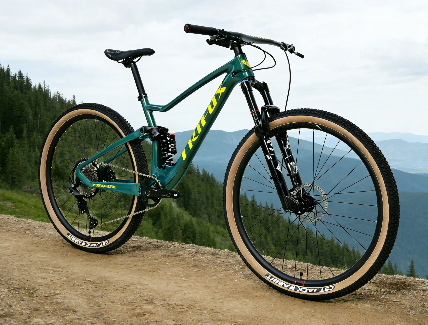
In the world of mountain biking, performance has traditionally come with a premium price tag—until now. The TRIFOX Pioneer shatters this paradigm by delivering a complete carbon fiber fully suspended mountain bike with a Shimano R6100 groupset for just $1399. This isn't a stripped-down compromise; it's a thoughtfully engineered trail machine designed specifically for mtb cross country xc, daily trail riding, and adventure-seeking cyclists who demand quality without breaking the bank. At the heart of the Pioneer is its full carbon frame, a feature rarely found at this price point. Carbon fiber construction offers more than just weight savings; it provides the perfect balance of stiffness for efficient pedaling and compliance for trail comfort. The frame's modern trail geometry—with a slack head angle for descending confidence and balanced chainstays for climbing stability—creates a versatile platform that handles everything from flowy singletrack to technical root sections. Available in multiple sizes and colors, the Pioneer ensures both proper fit and personal expression. The suspension system is precisely calibrated for its intended use. With 140mm of travel front and rear, this fully suspended mountain bike provides enough cushion to smooth out trail chatter and handle moderate obstacles without the weight and inefficiency of longer-travel enduro rigs. The suspension kinematics are optimized for pedaling efficiency, meaning you get traction and comfort when you need it without excessive bob on climbs. For mtb cross country xc enthusiasts and weekend trail riders, this "just right" travel hits the sweet spot between capability and efficiency. Component selection demonstrates intelligent prioritization. The Shimano R6100 1x12 drivetrain delivers reliable, precise shifting across a wide gear range—essential for varied terrain where maintaining momentum is key. Quality hydraulic disc brakes provide consistent stopping power in all conditions, while tubeless-ready wheels offer the option for lower tire pressures and improved traction. Every component choice reflects an understanding of what matters most for trail performance: reliability, functionality, and real-world durability. What makes the $1399 price truly remarkable is the holistic integration of these elements. This isn't simply a collection of parts bolted together; it's a cohesive system where the carbon frame, suspension tuning, and component selection work in concert. The result is a bike that feels greater than the sum of its parts—responsive on climbs, composed on descents, and agile through technical sections. For riders moving up from entry-level hardtails or aluminum full-suspension bikes, the difference in ride quality is immediately apparent. The Pioneer's versatility extends beyond pure trail riding. Its efficient pedaling platform makes it suitable for longer adventures, while its capable handling inspires confidence on more challenging terrain. It's the ideal "one bike" solution for riders who don't specialize in extreme downhill or endurance racing but want a competent, enjoyable companion for their local trails, weekend group rides, and spontaneous adventures. It's important to note the Pioneer's design boundaries. With 140mm travel and trail-oriented geometry, it's not intended for bike park downhill runs or enduro racing. This clarity of purpose is actually a strength—by focusing specifically on trail and XC riding, TRIFOX has optimized every aspect of the bike for that experience without unnecessary compromises or costs. In an industry where carbon full-suspension bikes often start at twice this price, the TRIFOX Pioneer represents a fundamental shift. It proves that advanced materials and quality components don't have to be reserved for elite budgets. For $1399, you're not getting a "budget bike"—you're getting a thoughtfully engineered fully suspended mountain bike that delivers genuine carbon performance, capable suspension, and reliable shifting. The Pioneer isn't just affordable; it's a smart investment in trail enjoyment, redefining what's possible at this price point and inviting more riders to experience the benefits of modern carbon mountain bike technology.
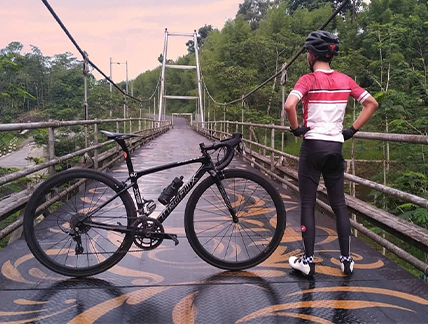
A great bike is more than the sum of its parts—it's an extension of your body. No matter how advanced your components, improper bike fit can lead to discomfort, inefficiency, and even injury. Achieving the right fit transforms your riding experience, maximizing both comfort and performance. This is especially crucial when you're investing in a precision-engineered racing frame like the Trifox X16QR, where every advantage of its lightweight frame design should work in harmony with your physiology. The importance of proper bike fit begins with performance optimization. A well-fitted bike allows you to generate power efficiently through an optimal pedaling motion. When your saddle height, fore/aft position, and handlebar reach are dialed in, you engage the correct muscle groups, reduce energy waste, and maintain an aerodynamic position longer. This is where a quality lightweight frame truly shines—its stiffness and responsiveness translate your effort directly into speed, but only if your body is positioned to deliver that power effectively. Comfort and injury prevention are equally critical. Poor fit is the leading cause of common cycling ailments: knee pain from incorrect saddle height, lower back strain from excessive reach, or hand numbness from improper weight distribution. A professional fit addresses these issues by aligning your joints and distributing pressure appropriately. The Trifox X16QR racing frame, with its multiple size options and modern geometry, provides the ideal starting point for achieving this balanced position. Achieving your perfect fit involves several key measurements and adjustments: 1. Frame Size Selection: This is your foundation. The Trifox X16QR comes in multiple sizes to accommodate different body proportions. Your ideal size is determined primarily by your inseam measurement and torso length, not just overall height. A frame that's too large forces excessive reach, while one too small leads to cramped positioning. 2. Saddle Position: Start by setting saddle height so your leg has a slight bend (25-35 degrees) at the bottom of the pedal stroke. Then adjust fore/aft position so your knee is directly above the pedal spindle when the crank is horizontal (the KOPS method). This ensures proper knee alignment and power transfer. 3. Handlebar Reach and Drop: Your handlebar position determines your upper body comfort. Reach (distance from saddle to bars) should allow a comfortable bend in your elbows without straining your back. Drop (height difference between saddle and bars) affects aerodynamics and back angle—more aggressive for racing, more relaxed for endurance. 4. Cleat Position: For riders using clipless pedals, cleat positioning on your shoes dramatically affects knee alignment and pedaling efficiency. Cleats should generally align with the ball of your foot, with slight adjustments based on your natural foot angle. For the most accurate results, consider a professional bike fit. Many bike shops offer fitting services using motion capture technology, pressure mapping, and experienced fitters who understand biomechanics. While this represents an additional investment, it's often the most valuable upgrade you can make to your cycling experience. When working with a high-performance frame like the X16QR, attention to component compatibility enhances your fit. The frame's geometry is designed for modern component standards, allowing precise adjustments through stem length, handlebar width, and crank arm length. Its carbon construction provides the stiffness needed for efficient power transfer while offering some compliance for long-ride comfort. Ultimately, the perfect bike fit is personal and evolves with your fitness and riding goals. The Trifox X16QR provides an excellent platform with its multiple size options, modern geometry, and lightweight frame construction. By taking the time to dial in your position—whether through professional help or careful self-measurement—you'll unlock the full potential of your equipment. You'll ride faster, farther, and with greater enjoyment, proving that the right fit is where true performance begins.
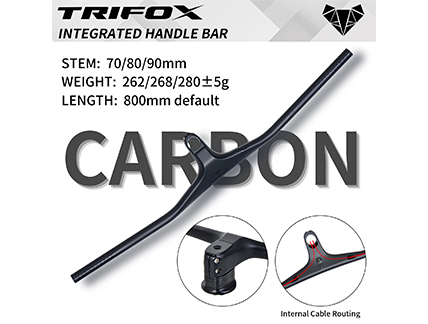
Let's be honest: the sight of a modern internal cable handlebar can be intimidating. The sleek, unbroken lines promise aerodynamic gains and a clean look, but they also whisper of complicated installations and future maintenance headaches. These concerns are valid, but they're also largely based on outdated experiences. Today's integrated cockpits, like the Trifox RHB600, are designed with the user in mind, transforming installation from a daunting task into a straightforward, confidence-building process. The key to success lies in understanding the systematic approach to installation. First and foremost: Torque and Tools Matter. This cannot be overstated. Carbon components require precise installation. For the RHB600 carbon mtb bar, we specify exact torque values for the stem faceplate bolts (typically 4-6 Nm) and the top cap pre-load bolt (typically 2-4 Nm). Using a quality torque wrench is not optional; it's essential to prevent slipping, overtightening, and potential damage. Always apply a thin layer of carbon assembly paste to the handlebar clamp area and the steerer tube to ensure a secure, non-slip interface. This simple step ensures your position stays put without damaging the carbon fibers. The Bolt Layout Design of the stem section is engineered for ease and security. The RHB600 features a 4-bolt front-loading faceplate. This design allows you to easily place the handlebar, set your desired angle, and then evenly tighten the bolts in a cross pattern. This method ensures uniform pressure distribution, eliminating gaps or uneven clamping force that could lead to stress points or slippage. The included top cap and spacers provide the necessary flexibility to fine-tune your stack height before finalizing the headset preload, making initial setup intuitive. Now, let's tackle the elephant in the room: Integrated Routing Simplified. The RHB600 is designed to make cable and hose installation as painless as possible. Key features facilitate this: * Large, Accessible Ports: The entry and exit ports are generously sized, making initial threading much easier. * Smooth Internal Channels: The interior of the carbon bar is molded with smooth guides to prevent hoses from snagging. * Removable Port Covers: The sleek rubber grommets or port covers can be easily removed for routing and just as easily popped back in for a clean finish. Think of it this way: We've done the hard part. The complex internal channels are precision-molded into the carbon structure during manufacturing. Your task is simply to guide the cables and hoses through a pre-designed, optimized path. Start by feeding a mechanic's cable or a dedicated guide wire through from the stem end, attach your housing, and pull it through. A little patience and the right technique make the process manageable for any home mechanic. This focus on user-friendly design extends from installation to long-term Serviceability. The fully integrated design isn't a maintenance trap. Once set up, the system is incredibly reliable. Should you ever need to replace a cable or hose, the process is simply the initial installation in reverse. The design ensures that routine maintenance remains accessible. Ultimately, the RHB600's installation process is a direct reflection of a user-centric design philosophy. By providing clear guidelines, thoughtful engineering in the bolt layout, and simplifying the internal routing path, we've turned a potential barrier into an opportunity. Following these steps doesn't just secure your components; it builds your confidence in the product. A proper installation is the first step in building trust with your new carbon mtb bar, transforming initial apprehension into the satisfying certainty of a secure, professional-grade setup that's ready for the trail.
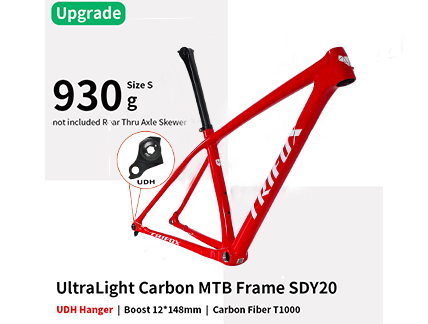
The perception that carbon fiber mountain bikes are delicate relics of road cycling has been thoroughly dismantled by modern engineering. Today's carbon hardtail frames are purpose-built to endure the punishing realities of trail riding while delivering the weight savings and performance benefits that make carbon so desirable. Understanding how frames like the Trifox SDY20 withstand trail hazards reveals the sophisticated engineering behind what appears to be a simple frame. Modern carbon engineering begins with material science advancements. Unlike early carbon designs that used single-direction layups, current frames employ multi-directional carbon fiber weaves with varying modulus fibers. High-modulus fibers provide stiffness in critical areas like the bottom bracket and head tube, while more flexible fibers in seatstays and chainstays absorb impacts. This strategic fiber placement creates frames that are simultaneously stiff where you need power transfer and compliant where you need shock absorption. Impact resistance represents one of carbon's most misunderstood qualities. When properly engineered, carbon frames demonstrate remarkable resilience to trail impacts. The SDY20 light hardtail frame utilizes reinforced zones at common impact points: thicker carbon layups around the downtube where rocks might strike, reinforced chainstay protectors, and impact-resistant finishes. Unlike aluminum that dents permanently or cracks catastrophically, quality carbon construction often shows visible damage before catastrophic failure, giving riders warning signs. Fatigue resistance is another critical factor. Trail riding subjects frames to thousands of vibration cycles and stress fluctuations. Carbon's natural vibration-damping properties reduce rider fatigue, but more importantly, modern resin systems and curing processes create bonds that resist micro-cracking under repetitive stress. The 19 inch bike frame and other sizes in the SDY20 lineup undergo rigorous fatigue testing that simulates years of aggressive trail use, ensuring long-term durability. Connection points receive special attention in trail-oriented carbon frames. The SDY20 features reinforced interfaces where components attach: extra carbon layers around the 148mm Boost axle dropouts, strengthened bottle cage mounts, and oversized bearing seats for headset durability. These reinforcements prevent the common failure points that plagued early carbon mountain bikes, ensuring the frame maintains integrity through years of component swaps and maintenance. Frame geometry itself contributes to durability. Modern trail geometry with slack head angles and longer top tubes distributes impact forces more evenly throughout the frame structure. Rather than concentrating stress at specific points, the frame works as a complete system to absorb and dissipate trail energy. This holistic approach to stress management means frames can be lighter while actually being more durable than their predecessors. Quality control and testing protocols separate modern carbon frames from earlier generations. Each SDY20 frame undergoes multiple inspection stages including ultrasound scanning to detect voids or inconsistencies in the carbon layup. Impact testing simulates rock strikes, fatigue testing replicates years of trail abuse, and static load testing ensures the frame can withstand forces far beyond normal riding conditions. This comprehensive testing provides the confidence needed for aggressive trail use. To back this engineering confidence with customer assurance, Trifox provides a 2-year warranty on the SDY20 frame against defects in materials and workmanship under normal use. This warranty commitment underscores the brand's confidence in their carbon engineering and manufacturing processes. It means riders can invest in this lightweight carbon technology with peace of mind, knowing their frame is protected against unexpected manufacturing issues during years of trail enjoyment. The result is a light hardtail frame that defies outdated perceptions. At approximately 930 grams for the frame(size S), the SDY20 offers significant weight savings over comparable aluminum frames while providing equal or better impact resistance. The weight savings translate directly to trail performance—easier climbing, quicker acceleration, and more playful handling—without sacrificing durability. Ultimately, modern carbon engineering has evolved to meet the specific demands of trail and XC riding. Through advanced material science, strategic reinforcement, intelligent geometry, rigorous testing, and warranty support, frames like the Trifox SDY20 demonstrate that carbon can be both exceptionally lightweight and remarkably tough. For riders who want the performance benefits of carbon without compromising trail readiness, today's engineered carbon hardtails represent the perfect synthesis of technology and durability.
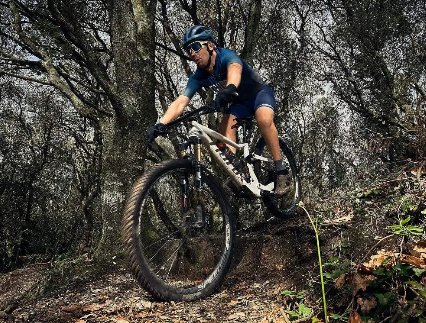
Choosing a carbon mountain bike is about matching technology to terrain. Not all trails demand the same bike, and understanding this relationship helps you select the perfect companion for your riding style. While enduro and downhill bikes dominate technical descents, there's a sweet spot for riders who prioritize efficiency, climbing capability, and playful handling on varied singletrack. This is where thoughtful design—like the Trifox Pioneer 29er full suspension bike—truly shines. For cross-country (XC) enthusiasts and trail riders, the primary considerations differ significantly from enduro or downhill priorities. Weight becomes a crucial factor when you're spending hours climbing and covering long distances. A true lightweight full suspension mountain bike like the Pioneer offers the perfect balance: enough suspension to smooth out trail chatter and handle moderate obstacles while remaining efficient on climbs and flats. Carbon fiber construction is key here, providing the stiffness-to-weight ratio that aluminum can't match, ensuring every pedal stroke translates to forward motion. The Pioneer's suspension design represents what many riders seek in a modern soft tail mountain bike—enough travel to enhance control and comfort without compromising pedaling efficiency. With its 120mm front and rear travel, it's specifically tuned for trail and XC use, absorbing small to medium impacts while maintaining excellent power transfer. This "just right" approach means you're not carrying unnecessary suspension weight or geometry compromises for terrain you rarely encounter. Geometry plays a pivotal role in trail experience. The Pioneer features modern trail geometry that's more progressive than traditional XC bikes but more nimble than enduro rigs. A moderately slack head angle provides stability on descents without sacrificing climbing prowess. The chainstay length and bottom bracket height create a balanced feel that encourages playful handling on twisty singletrack while remaining stable at speed. This careful calibration makes it adaptable to everything from flowing forest trails to technical rock gardens. Component selection further defines the bike's character. Equipped with a Shimano R6100 groupset, the Pioneer delivers reliable, precise shifting across a wide gear range—essential for varied terrain where quick shifts maintain momentum. Quality suspension components complement the carbon frame's capabilities, ensuring the bike handles predictably. The complete package demonstrates how thoughtful specification creates a bike greater than the sum of its parts. What makes the Pioneer particularly compelling is its all-around capability. It's neither an ultra-lightweight race machine nor a heavy-duty bruiser. Instead, it occupies the versatile middle ground where most trail riders actually spend their time. It climbs efficiently, descends confidently, and handles technical features competently. For riders who enjoy varied terrain rather than specializing in extreme downhill or pure racing, this versatility is exactly what's needed. Ultimately, selecting the right carbon mountain bike comes down to honest assessment of your riding style and local trails. If your rides mix climbing with descending, value efficiency alongside capability, and prioritize fun over specialization, a balanced lightweight full suspension mountain bike like the Trifox Pioneer offers exactly what you need. It proves that the best bike isn't necessarily the one with the most travel or lightest weight, but the one that enhances your specific trail experiences most consistently.
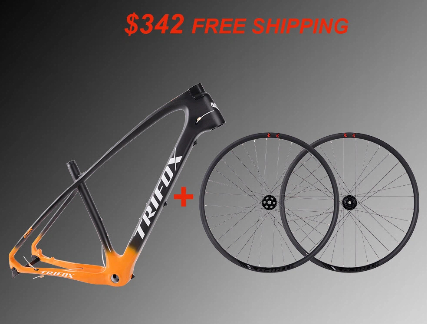
In the pursuit of mountain bike performance, riders often focus on marginal gains—especially weight savings. But what if the most significant upgrade isn't about shaving grams from your wheels, but about transforming the very foundation of your ride? Starting with a carbon frame and proven alloy wheels isn't a compromise; it's a strategic decision that prioritizes ride quality, durability, and real-world value. The carbon frame is the heart of your bike's performance. A frame like the Trifox MFM200 29 inch hardtail frame delivers immediate and tangible benefits: exceptional stiffness for efficient power transfer, advanced geometry for confident handling, and carbon's natural vibration damping for reduced fatigue. These characteristics fundamentally change how the bike responds to your input and interacts with the trail. For most off-road riding, the improvements in pedaling efficiency, control, and comfort from a well-designed carbon frame far outweigh the marginal gains from ultra-lightweight wheels. Right now, this performance-optimized combination is incredibly accessible. The Trifox MFM200 carbon hardtail frame paired with a durable WM823 alloy wheelset is available as a complete bundle for just $342 USD with free shipping. Available in multiple colors, this offer makes entering the world of carbon performance more attainable than ever. Alloy wheels bring their own set of proven advantages that perfectly complement a carbon frame's performance: Durability and Strength: Aluminum rims are exceptionally resilient against impacts from rocks, roots, and trail debris. They can take the punishment of aggressive trail riding without the anxiety of damaging expensive carbon rims. This durability lets you ride harder and focus on the trail, not on protecting your equipment. Maintenance Simplicity: Alloy wheels are easier to maintain and repair. Truing, replacing spokes, and addressing dings are straightforward processes for any bike shop. For disc brake setups, alloy rims also eliminate concerns about heat-related brake performance issues that can affect some carbon rims on long descents. Budget Allocation Wisdom: By choosing a carbon frame with alloy wheels, you allocate your budget where it makes the most difference. The savings can be invested in other critical components like a better suspension fork, upgraded drivetrain, or personalized cockpit setup—creating a more balanced, capable bike overall. This combination creates a powerful synergy. The carbon frame provides the efficient, responsive platform, while the alloy wheels deliver reliable, durable performance. The frame's advanced engineering isn't wasted; it's fully expressed through wheels that can handle whatever the trail throws at them. For riders seeking a 29er mountain bike small frame, this approach ensures proportional handling and fit without sacrificing performance or durability. Ultimately, this pairing is ideal for the practical performance rider: someone who logs serious miles, tackles technical terrain, and values reliability alongside performance. It's not about chasing the lightest possible build; it's about creating a bike that performs consistently, handles confidently, and withstands real-world use. The carbon frame and alloy wheels combination represents intelligent engineering meeting practical wisdom—delivering exceptional ride quality without unnecessary fragility or expense. With the Trifox MFM200 frame and WM823 wheelset bundle, you're not just buying components; you're investing in a balanced approach to mountain bike performance. Experience how the right foundation transforms every ride, and discover why sometimes the smartest upgrade path is also the most practical one.
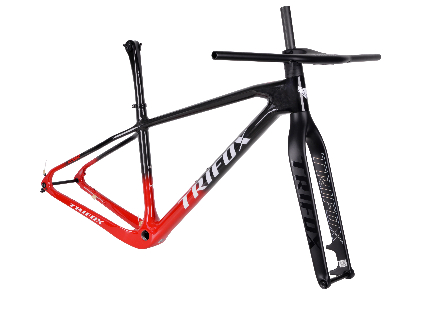
In mountain biking, individual component quality matters—but true performance emerges from how these parts work together. When you pair a premium carbon frame with a purpose-matched carbon fork, you unlock a level of synergy that transforms your entire ride. The combination of Trifox's SDY21 carbon hardtail frame and TMK200 rigid mtb fork 29 creates a unified system where stiffness, weight savings, and responsiveness multiply rather than simply add. The foundation of this partnership is material harmony. Both the SDY21 frame and TMK200 fork are constructed from high-modulus unidirectional carbon fiber, using compatible resin systems and layup techniques. This shared material DNA ensures consistent flex characteristics and vibration damping throughout the front triangle. When frame and fork speak the same structural language, energy transfer becomes incredibly efficient. Every pedal stroke propels you forward with minimal loss, while trail vibrations are absorbed uniformly, reducing fatigue. Geometry alignment is equally critical. The SDY21 frame is designed around modern trail metrics—a slack head angle, short chainstays, and optimized front-center measurement. The TMK200 fork complements this with precisely calculated offset and axle-to-crown length. Together, they create handling that's both stable at speed and nimble in corners. This isn't a generic fork bolted to any frame; it's a calibrated pairing where steering precision feels intuitive and predictable. Weight optimization reaches its peak in this combo. The SDY21 frame utilizes strategic carbon layering to reinforce high-stress zones while trimming material elsewhere. Similarly, the TMK200 is engineered as one of the lightest mountain bike fork options in its category. When combined, the total weight savings at the front end significantly improves maneuverability. The bike feels more willing to change direction, easier to loft over obstacles, and generally more lively on the trail. This synergy makes the whole bike feel lighter than the sum of its parts. Stiffness synchronization creates another performance multiplier. A stiff frame paired with a flexible fork (or vice versa) creates handling inconsistencies. With the SDY21 and TMK200, both components share similar torsional and lateral rigidity. This means when you lean into a corner or power through a rock garden, the front and rear of the bike respond as one cohesive unit. There's no lag or disconnection—just immediate, faithful tracking that builds rider confidence. The practical benefits extend to assembly and maintenance. Designed as a matched system, the fork's tapered steerer integrates seamlessly with the frame's head tube. The Boost spacing aligns perfectly, and brake routing follows complementary paths. This compatibility eliminates installation headaches and ensures optimal performance from day one. Additionally, the shared aesthetic—clean carbon textures and minimalist branding—creates a visually unified machine that looks as fast as it rides. Choosing a frame and fork as an integrated system, like the Trifox SDY21 and TMK200 bundle, represents a smarter approach than mixing and matching components. You're not just buying two separate parts; you're investing in a harmonious relationship engineered from the ground up. The result is a mountain bike that handles with a rare balance of efficiency, control, and pure fun. In the equation of performance, synergy is the ultimate multiplier, transforming capable components into an extraordinary complete bike.


