


As modern bicycles become more aerodynamic and visually refined, integrated handlebars and cockpits have become increasingly popular among road, gravel, and mountain bike riders. These sleek systems improve cable management, reduce wind resistance, and create a cleaner appearance. However, they also present a challenge: where should you securely mount your cycling computer?
That's where a high-quality carbon computer mount comes in. Designed specifically for integrated handlebars, these mounts provide a lightweight, secure, and professional solution for displaying ride data exactly where you need it.
Why Integrated Handlebars Need a Dedicated Computer Mount
Traditional handlebar-mounted computer brackets often create clutter and may not fit well on modern integrated cockpits. Riders need a mounting solution that complements the design of their bike while maintaining easy access to important ride information.
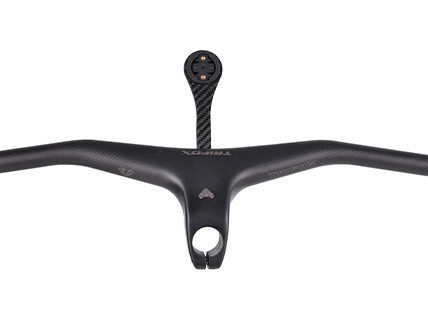
A dedicated bike computer stem mount positions your cycling computer directly in front of the stem, creating a more natural viewing angle while keeping your handlebars clean and organized. This setup not only looks better but also improves safety by allowing riders to check speed, navigation, and performance metrics without taking their eyes too far off the road or trail.

The Advantages of Carbon Fiber Construction
Material choice matters when selecting a computer mount. Carbon fiber has become a preferred option because it combines exceptional strength with extremely low weight.
The TRIFOX SBH100 is constructed from premium 3K carbon fiber, providing an outstanding stiffness-to-weight ratio. Unlike heavier aluminum alternatives, carbon fiber adds minimal weight to your cockpit while maintaining excellent durability. It also helps reduce vibration, keeping your cycling computer stable even on rough roads and technical trails.
For performance-focused cyclists, every gram matters. A lightweight cockpit contributes to a more responsive bike while preserving the sleek appearance of an integrated handlebar setup.
More Than Just a Computer Mount
Today's riders often use multiple devices during a ride. In addition to a cycling computer, many cyclists rely on action cameras, bike lights, and GPS accessories.
The TRIFOX SBH100 goes beyond being a simple computer holder. Its versatile design supports major cycling computer brands such as Garmin, Bryton, CatEye, and iGPSPORT while also accommodating GoPro-compatible accessories and compatible bike lights. This makes it an excellent choice for riders looking to build a complete and organized cockpit system.
Whether you're training on the road, exploring gravel routes, or hitting technical trails, having all your devices mounted in one centralized location improves convenience and overall ride experience.
Ideal for Road and Mountain Bike Riders
While many cyclists associate computer mounts with road bikes, they are equally valuable for off-road riding. A secure mountain bike computer mount allows riders to monitor navigation, elevation, heart rate, and ride statistics without compromising control.
Mountain biking often involves rough terrain and constant vibration, making mount stability especially important. The rigid carbon construction of the SBH100 helps ensure that your cycling computer remains secure even during aggressive trail riding. Its centered position also improves visibility while maintaining a balanced cockpit setup.
What to Look for When Choosing a Computer Mount
When shopping for a computer mount for integrated handlebars, consider the following factors:
• Lightweight but durable construction
• Compatibility with major cycling computer brands
• Support for accessories such as cameras and lights
• Aerodynamic design
• Secure attachment system
• Vibration resistance
• Clean integration with modern cockpits
The SBH100 checks all of these boxes while offering the premium appearance expected from a carbon fiber component.
Benefits of an Aerodynamic Cockpit Setup
Modern cyclists increasingly focus on aerodynamic efficiency. By integrating your cycling computer neatly into the cockpit, a carbon computer mount reduces clutter and helps create a cleaner airflow around the handlebars. While the gains may seem small, every advantage matters during long rides, races, and endurance events.
Additionally, a well-organized cockpit improves the overall appearance of the bike, giving it a professional look often seen on high-end race machines.
Final Thoughts
As integrated handlebars become the standard on many modern bikes, choosing the right computer mount is more important than ever. A quality carbon mount enhances both functionality and aesthetics while keeping your cockpit organized and aerodynamic.
The TRIFOX SBH100 combines lightweight carbon construction, broad device compatibility, and clean integrated styling, making it an excellent upgrade for cyclists who want a more professional and efficient setup. Whether you're a competitive road rider, gravel adventurer, or trail enthusiast, investing in a premium carbon computer mount can significantly improve your riding experience.
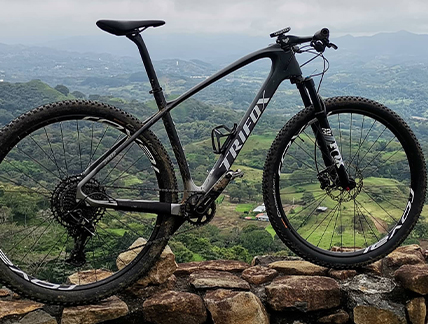
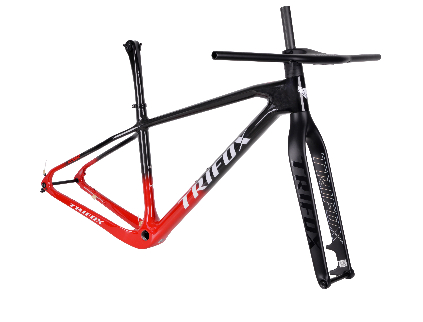
The mountain bike world is full of strong opinions, but few debates run as deep as hardtail vs. full-suspension. Walk into any bike shop or scroll through online forums, and you‘ll hear passionate arguments for both sides. Full-suspension bikes dominate showroom floors and trailheads, while hardtails are often dismissed as “entry‑level” or “budget” machines. But that perception misses the real story. The truth is simpler: there is no universally “better” bike. There is only the bike that matches your terrain, your budget, and your riding style. Whether you're a beginner learning to pick lines, an XC racer chasing efficiency, or a weekend warrior exploring local trails, a well‑chosen hardtail like the Trifox MFM200 bike frame 29er for sale can be the perfect foundation — lightweight, responsive, and surprisingly capable. Let‘s break down the real trade‑offs so you can decide which platform truly suits your ride.
The Hardtail: Lightweight Efficiency and Raw Feedback
A hardtail has suspension only in the front fork, with a rigid rear triangle. This design isn‘t a compromise — it‘s a deliberate choice for riders who value direct power transfer, climbing efficiency, and a pure connection to the trail. Because there‘s no rear shock or linkage to absorb pedaling energy, almost every watt you put into the cranks goes straight to the rear wheel. There‘s no “pedal bob” — that subtle energy loss that can make a full‑suspension bike feel sluggish on smooth climbs. For cross‑country racing, marathon events, or long days on forest paths, that efficiency advantage is real and measurable.
Hardtails are also inherently lighter and simpler. Without a rear shock, pivot bearings, and linkage hardware, a hardtail frame sheds significant weight — often 1‑2 kg less than a comparable full‑suspension bike at the same price point. This weight savings translates directly to easier climbing, quicker acceleration, and a bike that feels lively and eager under power. The MFM200, for example, weighs as little as 1,219 grams (size S), rivaling carbon frames that cost twice as much.

When a Hardtail Shines
Hardtails excel on smoother singletrack, flow trails, gravel paths, and mixed terrain where the surface is predictable. On climbs, the rigid rear end delivers unmatched efficiency, and the lack of rear suspension encourages active riding — you learn to shift your weight, unweight the rear wheel over obstacles, and pick smoother lines rather than relying on the bike to absorb mistakes. Many experienced riders argue that starting on a hardtail builds better technique than jumping straight to a full‑suspension bike.
For taller riders seeking a stable, confidence‑inspiring platform, the MFM200 is available in sizes up to 19”, making it an excellent option for a mens mountain bike xl frame. The frame‘s geometry — a 68° head angle and longer reach — provides stability on descents while keeping the front wheel planted for precise steering. Riders up to 195cm can find a proper fit without compromising the balanced handling that makes this frame so versatile.
The Trifox MFM200 bike frame 29er for sale at an astonishingly affordable price, proving that you don‘t need a four‑figure budget to experience real carbon performance. Its T800 carbon construction delivers the classic hardtail advantages: featherlight weight (starting at 1,200g), excellent vibration damping that takes the edge off trail chatter, and a stiff bottom bracket that transfers every pedal stroke into forward momentum. The frame also includes modern standards — 142x12mm rear spacing for stiffness, internal cable routing for a clean look, and a threaded BSA bottom bracket for creak‑free reliability and easy maintenance.
The Full-Suspension Case: Comfort, Traction, and Forgiveness
Full‑suspension bikes add a rear shock and linkage, which transforms how the bike handles rough terrain. On rocky, rooty trails or chunky descents, the rear wheel tracks the ground more faithfully, maintaining traction where a hardtail might bounce and lose grip. This also reduces fatigue dramatically — the bike absorbs the trail‘s impacts, so your body doesn‘t have to. Riders with back or joint pain often find full‑suspension bikes significantly more comfortable over long days in the saddle.
Full‑suspension also offers a larger margin for error. If you take a bad line or misjudge a drop, the rear suspension helps save you from a harsh impact. This makes full‑suspension bikes popular for aggressive trail riding, enduro, and bike park use, where speed and forgiveness are prioritized over pure pedaling efficiency.
However, that capability comes with trade‑offs. Full‑suspension bikes are heavier (often 2‑4 lbs more than a comparable hardtail), more expensive to purchase, and require significantly more maintenance — pivot bearings need regular cleaning and greasing, rear shocks require annual servicing, and the added complexity means more parts that can creak, wear out, or fail.
Making Your Choice: Terrain, Budget, and Goals
So, which is right for you? Start with an honest assessment of where you ride most often. If your local trails are smooth singletrack, flowy climbs, and forest paths, a hardtail will feel fast, efficient, and fun. If your terrain is relentlessly chunky, rocky, and steep, full‑suspension will keep you fresher and more in control.
Budget is another critical factor. At the same price point, a hardtail will almost always have better components — a lighter frame, a superior fork, and a higher‑end drivetrain. A $2,500 hardtail often comes with a pro‑level groupset and carbon frame, while a $2,500 full‑suspension bike may use entry‑level components and a heavier alloy frame. The MFM200 mens mountain bike xl frame option, for example, delivers a full T800 carbon chassis at a price that often buys only an entry‑level alloy full‑suspension frame from bigger brands.
Finally, consider your goals. If you‘re new to mountain biking, a hardtail forces you to learn proper technique — line choice, weight transfer, and body positioning — that will make you a better rider when you eventually switch to full‑suspension. If you‘re an experienced rider looking for a second bike for winter training or smoother trails, a hardtail offers a refreshing change of pace. And if you‘re building a bikepacking rig, the simplicity and reliability of a hardtail are hard to beat.
The Verdict: Hardtails Aren‘t Dead — They‘ve Evolved
Hardtails never disappeared from mountain biking. They simply shifted into specialised territory where their simplicity, efficiency, and honesty still make perfect sense. Modern carbon hardtails like the Trifox MFM200 combine featherlight weight, responsive handling, and modern geometry that rivals full‑suspension bikes of just a few years ago. With 29” wheels, and clearance for up to 2.1” tires, the MFM200 is ready for aggressive XC, marathon racing, and all‑day trail adventures. Available in multiple colors and sizes up to 19”, it‘s a versatile platform that delivers the core benefits of carbon — weight savings, power transfer, and trail compliance — at a price that won‘t break the bank.
Ultimately, the right frame is the one that spends the most time on the trails you actually ride. Buy for your home trails, not for a hypothetical mountain you visit once a year. And if you‘re still unsure, the 80/20 rule applies: choose a bike that excels on the terrain you ride 80% of the time. For many riders, that bike is still a hardtail — efficient, engaging, and ready to roll.
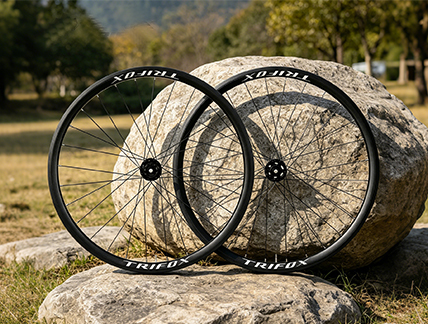
For years, road cyclists believed that narrow tires at sky‑high pressure were the only path to speed. That era is over. Today, riders understand that a wider rim — even by a few millimeters — fundamentally changes how a tire behaves. It reshapes the contact patch, lowers optimal pressure, and transforms ride quality. The Trifox AWT7 alloy disc brake wheelset is a perfect example of this modern philosophy. With its 14mm internal width, it’s engineered to do something simple but powerful: make your tires work better, so you ride faster, safer, and more comfortably. At an affordable price, it’s one of the best cheap bike wheelset options available for riders who want real performance without breaking the bank.
Rim Width Shapes the Tire, Not Just the Wheel
The rim isn’t just a hoop that holds the tire. Its internal width dictates the tire’s profile once inflated. On a narrow rim, a tire bulges into a light‑bulb shape — tall and narrow, with a small contact patch. This shape forces high pressure to keep the sidewalls stable, which translates into a harsh, unforgiving ride. A wider rim supports the tire’s sidewalls more effectively, creating a flatter, wider profile. This shape stabilizes the tread, reduces squirm, and dramatically increases the contact patch. As one industry analysis notes, “when the internal width of a rim reaches 21mm or more,” the contact surface rises considerably, enhancing redistribution of contact pressure and increasing lateral grip during cornering. The result is more predictable handling and better traction, especially on wet or loose surfaces.
The AWT7’s 14mm internal width is purpose‑selected for modern 25‑28mm tires. Rather than forcing a tire to bulge unnaturally, it creates a smooth, continuous surface from the rim to the tread. This profile improves stability when cornering and reduces the vague, wandering sensation that plagues narrow‑rim setups. Riders using the AWT7 on classic road routes have noted the wheels feel “planted” and “predictable” — a direct result of matching rim width to tire shape.
How Width Unlocks Lower Pressure and Higher Comfort
The most direct benefit of a wider rim is what it allows you to do with air pressure. A properly supported tire can be run at significantly lower pressures without risking pinch flats or rim strikes. According to wider rim research, using a 21mm internal width rim allows tires to be run at lower pressures, absorbing road vibrations more effectively and reducing the impact transmitted to the rider’s body and the frame. The AWT7’s 14mm width, while not as extreme as gravel‑oriented rims, hits the sweet spot for road use. It lets you drop pressure from the traditional 100‑120 psi range down to 80‑95 psi, depending on rider weight and tire choice. At these lower pressures, the tire flexes over road imperfections rather than bouncing off them. The result is dramatically reduced hand and saddle fatigue on rough pavement, longer chip seal, and worn asphalt.
This pressure flexibility also helps the tire maintain traction. A tire at lower pressure deforms around irregularities, increasing the effective contact patch. As one manufacturer explains, a wider internal rim maximizes tire support and grip, enhancing stability and comfort, and the lower pressure setup “absorbs road vibrations more effectively, therefore lowering the impact sent to the rider’s body.” That’s the difference between a bike that feels fragile on rough roads and one that inspires confidence mile after mile.
Alloy Efficiency Meets Budget‑Friendly Performance
Carbon wheels get the headlines, but alloy wheels like the AWT7 deliver 95% of the performance at a fraction of the cost. The AWT7’s 30mm rim depth offers a balance of aerodynamics and crosswind stability, while the 28 Pillar stainless steel spokes and welded aluminum construction provide the stiffness needed for efficient power transfer. Weighing approximately 1,956g per pair, the wheels are light enough for climbing yet durable enough for daily training. The 6‑pawl, 120‑point engagement hubs deliver crisp acceleration, and the disc brake compatibility ensures consistent stopping power in all weather. For riders seeking an affordable but capable bicycle disc wheel, the AWT7 represents exceptional value — a wheelset that doesn’t compromise on the fundamentals of ride quality.
The Bottom Line
Rim width isn’t a secondary spec. It’s a primary determinant of how your bike feels on the road. A 14mm internal width strikes a balance: wide enough to support the tire’s sidewalls and enable comfortable lower pressures, yet narrow enough to remain aerodynamically efficient for road use. The Trifox AWT7 alloy disc wheelset capitalizes on this design principle, delivering a ride that is stable, grippy, and noticeably more comfortable than traditional narrow‑rim wheelsets. For cyclists on a budget who refuse to sacrifice ride quality, the AWT7 is a smart upgrade that proves modern alloy engineering can rival carbon’s best traits — without the premium price tag.
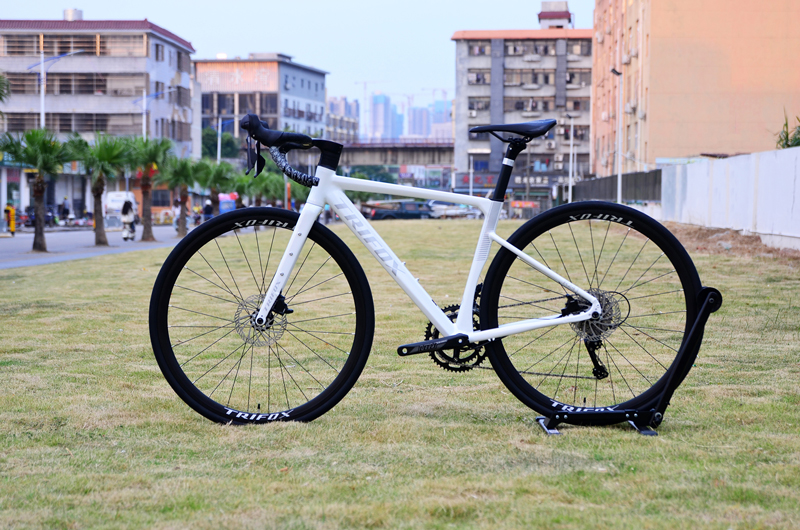
The most persistent question in road cycling hasn't changed in decades: is a carbon frame worth the premium? For riders eyeing the Trifox X16QR, this calculation involves a 979-gram 56cm frameset, T800 carbon construction, and the enduring simplicity of rim brakes. The price gap between this carbon frame and a comparable alloy alternative is real. But so are the performance returns. Let's weigh them.
The Weight Equation: How Much Does 200 Grams Actually Matter?
Spec sheets tell one part of the story. The X16QR 56cm frameset weighs 979g ±30g. A high-quality aluminum frame in the same size typically lands between 1,200g and 1,500g. That's a 200-500g difference—the equivalent of carrying a full water bottle or leaving it at home.
But raw grams don't capture the riding experience. The X16QR's T800 carbon fiber construction offers a stiffness-to-weight ratio that aluminum can't match. Every pedal stroke feels immediate, with less energy lost to frame flex. On a climb or out of a corner, that responsiveness translates into tangible performance.
For competitive cyclists, a 500g lighter frame can improve climbing speed by 1-2%, potentially saving 20-30 seconds per hour on steep ascents. For the rest of us, the benefit is less about seconds and more about sensation—a bike that feels eager, lively, and responsive to every input.
Beyond Weight: The Ride Quality Argument
Weight savings are only part of carbon's value proposition. The X16QR's natural vibration-damping properties fundamentally change how a road bike feels over long distances.
Carbon fiber excels at absorbing high-frequency road vibrations—the relentless chatter of chipseal, worn pavement, and expansion joints. Studies have shown that carbon frames can reduce high-frequency vibration transmission to the rider by 23–37% compared to aluminum. Riders report up to 30% less forearm fatigue after two hours on carbon-equipped bikes.
This means you arrive at the end of a long ride less beaten down, with fresher hands, arms, and focus. For endurance riders and century enthusiasts, this comfort advantage alone justifies the upgrade.
Additionally, carbon frames can be "tuned" through different layup schedules to achieve specific ride characteristics—stiff where you need power transfer, compliant where you want relief from road imperfections. This level of engineering refinement is difficult to achieve with aluminum.
The Rim Brake Advantage: Simplicity and Savings
The X16QR is a road frameset rim brake design at a time when the industry has largely shifted toward discs. For many riders, this is a feature, not a drawback.
Rim brakes offer lighter overall system weight, simpler maintenance, and easier wheel changes compared to disc systems. There are no rotors to align, no calipers to bleed, and no risk of contaminated pads. For riders who don't regularly descend mountains in the rain, rim brakes remain more than adequate.
The pragmatic advantage is cost. Disc brake frames and wheels command premiums at every price point. By choosing a rim brake frameset like the X16QR, you're investing more of your budget into the frame itself—the foundation of the bike—rather than into a braking system you may not fully utilize. The quick-release dropouts (front 9×100mm, rear 10×130mm) further simplify wheel compatibility and maintenance.
Building Your Dream: The Complete Frameset Package
The X16QR isn't just a bare frame. The complete 56cm frameset includes a full carbon fork (325g) and a carbon seatpost (182g), ensuring weight savings are carried throughout the entire build.
Internal cable routing keeps the cockpit clean and the frame looking modern, while compatibility with both DI2 electronic and mechanical groupsets ensures flexibility regardless of your drivetrain preference.
Tire clearance up to 700×28C provides a moderate increase in comfort and grip over the standard 25C limit, allowing for slightly wider rubber without compromising the frame's race-oriented geometry.
Who Is the X16QR For?
The X16QR's weight savings and ride quality are most valuable for:
- Climbing specialists who spend significant time on steep grades.
- Endurance riders who prioritize comfort over long hours in the saddle.
- Enthusiast builders who want a high-quality carbon foundation without paying the premium for disc brakes.
- Riders who value simplicity—quick-release wheels, easy maintenance, and decades of rim brake compatibility.
For a pure budget build, an aluminum frame will save money upfront. But for the rider who understands that a frame is the heart of the bike and that weight and ride quality matter on every ride, the X16QR offers a compelling value proposition. The question isn't whether carbon is "worth it." It's whether your riding deserves the upgrade.
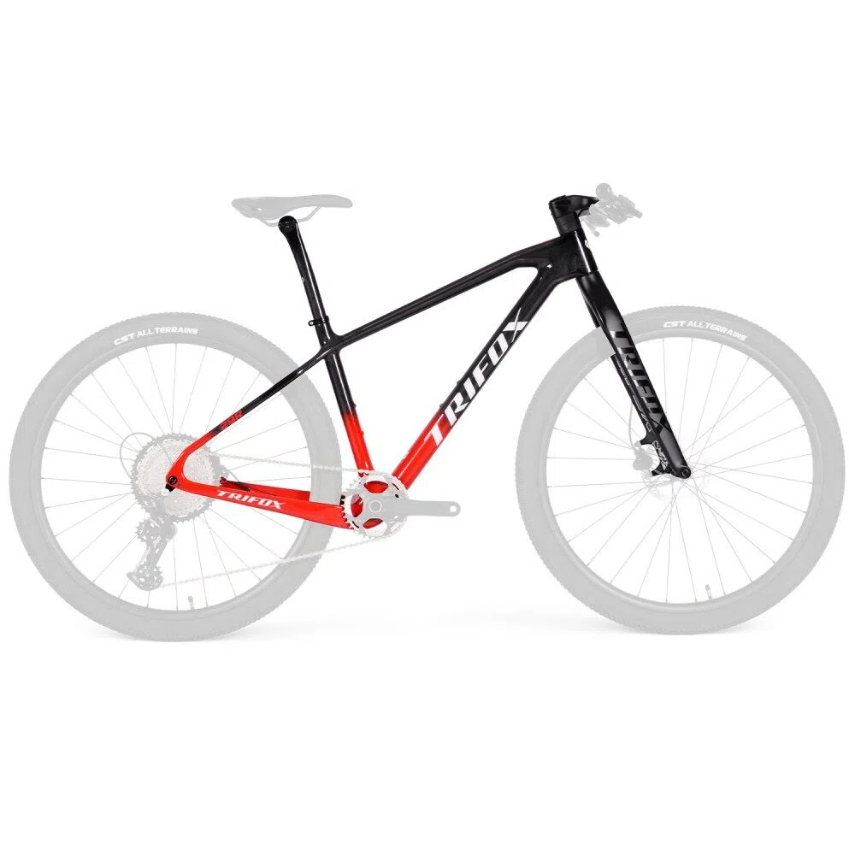
For years, mountain bikers faced a frustrating trade-off: a bike that felt stable at speed and on descents often felt sluggish and unresponsive on tight, twisty climbs. Conversely, a nimble, agile bike could feel twitchy and nervous when the trail pointed down. The 29-inch wheel format was supposed to solve this, but not all 29er frames are created equal. The Trifox MFM200 carbon hardtail frame is engineered to deliver precisely that elusive balance—combining the rollover stability of large wheels with the playful agility that makes a bike fun to ride. Here’s how it works.
The 29er Advantage: Why Big Wheels Excel
Before diving into the MFM200’s specific geometry, it’s worth understanding why 29-inch wheels are the standard for modern trail and cross-country bikes. A larger wheel has a longer contact patch, which improves traction and rolls over obstacles more easily than a 26 or 27.5-inch wheel. This “monster truck” effect provides greater stability at speed, especially in rough, chunky terrain. However, the trade-off can be a feeling of sluggishness in tight corners and slower acceleration. The MFM200’s design addresses these potential downsides head-on.
Geometry That Bridges the Gap
The MFM200 is a mtb frame 29 inch with carefully calibrated geometry numbers. Let’s look at the key figures for the size large (19”):
* Head Tube Angle: 70° – This is the sweet spot for a versatile hardtail. A slacker angle (67-68°) would prioritize descending stability but make climbing and tight switchbacks more difficult. A steeper angle (71-72°) would feel quicker steering but could be nervous at speed. At 70°, the MFM200 offers confident high-speed stability while remaining responsive enough for technical climbs and quick direction changes.
* Seat Tube Angle: 73° – A relatively steep seat tube angle places the rider’s hips directly over the bottom bracket, optimizing pedaling efficiency and keeping the front wheel planted on steep climbs. This is critical for a 29er, which can sometimes feel like the front wheel wants to wander on ascents.
* Chainstay Length: 440mm – Moderately short chainstays (by 29er standards) make the bike feel more playful and easier to manual or pop off roots. Shorter stays also improve cornering agility by making the rear end feel more connected to the rider’s inputs.
* Reach: 412mm (size large) – A modern, roomy reach allows the rider to stretch out for better weight distribution, improving stability without sacrificing the ability to move around the bike.
The Carbon Factor: Stiffness Where It Matters
The MFM200 is constructed from T800 carbon fiber, a high-modulus material that allows engineers to tune the frame’s stiffness. The bottom bracket area and head tube are reinforced for maximum rigidity, ensuring that when you stomp on the pedals or hammer through a rock garden, the frame doesn’t flex wastefully. Yet the rear triangle and seat stays can be designed with a degree of vertical compliance, absorbing trail chatter and reducing fatigue. This selective stiffness enhances both stability (through precise tracking) and agility (through responsive power transfer).
Why Size and Fit Matter for Agility
A bike that’s too large will feel like a barge; a bike that’s too small will feel twitchy. The MFM200 comes in three sizes: 15.5”, 17”, and 19”. Each size has proportional geometry, so a smaller rider on the 15.5” frame gets the same balanced handling characteristics as a taller rider on the 19” frame. This includes a appropriately scaled reach and stack. For riders who want a personal touch, the MFM200 is available in multiple colors, including a striking purple mtb frame option that stands out on the trail without compromising performance.
Real-World Ride Feel
On the trail, the MFM200’s balanced geometry translates to a bike that climbs eagerly, holds a line through loose corners, and doesn’t punish you when the trail gets steep. The 70° head angle provides enough front-wheel traction for confidence on descents, while the 73° seat angle keeps you positioned for efficient power on the way up. The 440mm chainstays make the bike feel lively—you can pop the front wheel over a log or snap through a series of switchbacks without feeling like you’re wrestling a bus.
The Verdict: A True All-Rounder
The Trifox MFM200 proves that a 29er hardtail can be both stable and agile. Its carefully chosen geometry—70° head angle, 73° seat angle, 440mm chainstays—strikes a balance that works for XC racing, trail riding, and everything in between. The T800 carbon construction provides the stiffness for efficient power transfer and the compliance for comfort. And with sizes ranging from 15.5” to 19” and color options including a vibrant purple mtb frame, there’s a fit and finish for almost every rider. If you’re looking for a mtb frame 29 inch that doesn’t force you to choose between stability and agility, the MFM200 is a compelling choice.
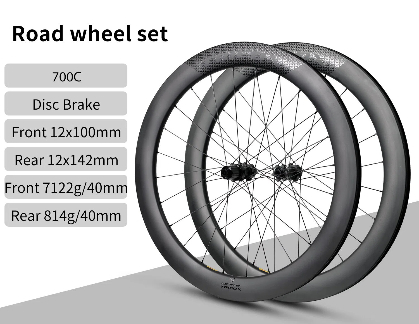
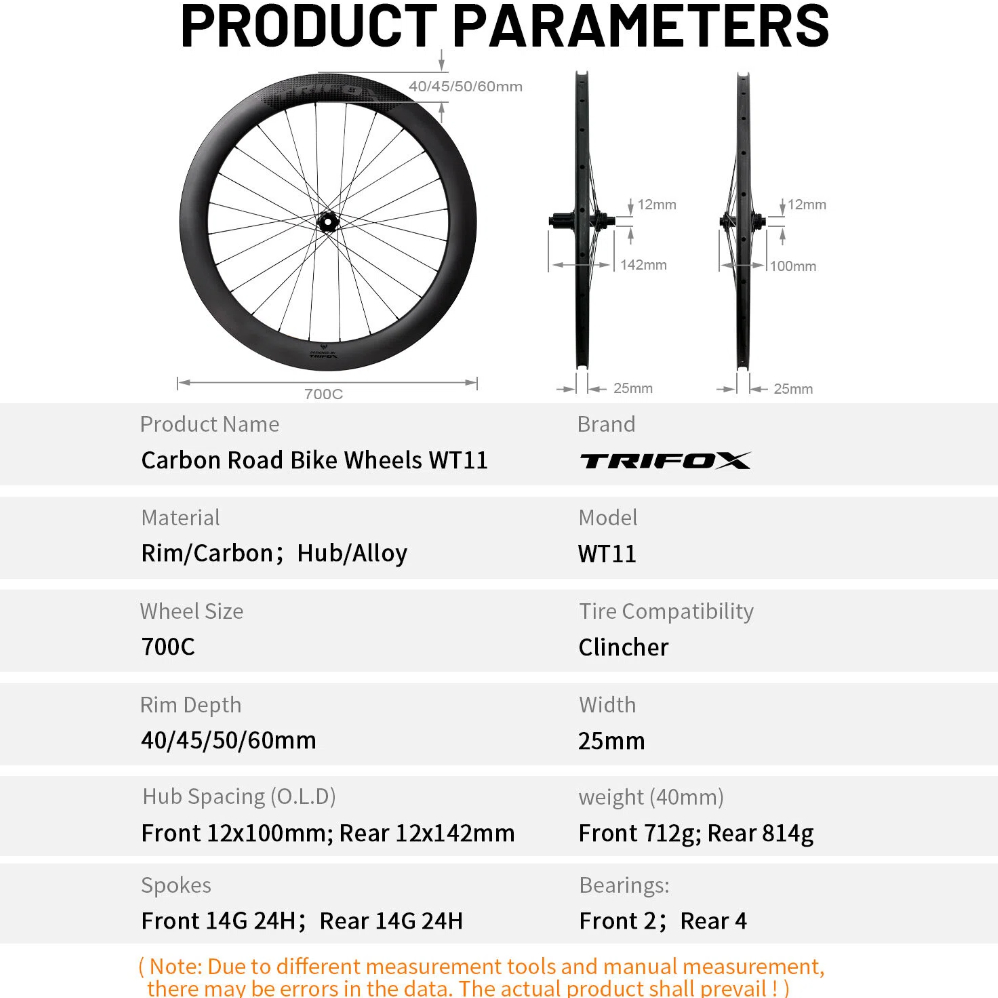
Your wheels are the engine of your bike, and the tire system you choose is the critical interface between that power and the road. For riders investing in performance carbon racing bike wheels, the decision between Clincher, Tubeless, and Tubular tire systems is fundamental. Each has distinct advantages, trade-offs, and philosophies. This guide cuts through the confusion to help you select the perfect system for your riding style, goals, and willingness to tinker.
1. Clincher: The Proven, Accessible Standard
The clincher system is the most common and familiar. It uses a separate inner tube inside a tire that "clinches" onto a hooked rim bead, like the WT11 wheelset is designed for.
* Pros: Unmatched accessibility and convenience. Tires and tubes are widely available and inexpensive. Repairs are straightforward: find the puncture, patch or replace the tube, and you're rolling again. Installation is generally the easiest of the three systems, requiring only tire levers and a pump. It's the perfect, low-fuss choice for most recreational riders, commuters, and those new to high-performance road bicycle wheels.
* Cons: Requires an inner tube, which adds weight and rolling resistance. The tube is also the most vulnerable point for pinch flats (snake bites) if you hit a pothole at low pressure. At very high pressures, there's a slight risk of the tire blowing off the rim (though modern rims and tires make this extremely rare).
* Best For: Riders who prioritize ease of use, easy roadside repairs, and maximum compatibility. It's the reliable workhorse system.
2. Tubeless: The Modern Performance Benchmark
Tubeless technology, borrowed from mountain biking, has revolutionized road performance. It uses a special tire and sealed rim to create an airtight system without an inner tube. Sealant liquid inside the tire instantly plugs most small punctures.
* Pros: Superior puncture protection and ride quality. The absence of a tube eliminates pinch flats and allows you to safely run lower tire pressures (e.g., 60-80 psi vs. 90+ psi on clinchers). This dramatically increases comfort, grip, and rolling efficiency over rough surfaces. The sealant handles most small flats automatically, a huge advantage mid-ride.
* Cons: More complex setup and maintenance. Initial installation can be messy and often requires an air compressor or a high-volume pump to "seat" the tire bead onto the rim. Sealant dries out and needs replenishing every few months. Compatible tires and rims are required. Repairs for larger cuts can be more involved than simply swapping a tube.
* Best For: Performance-oriented riders seeking the best combination of comfort, grip, and flat protection for everyday training and racing. It's the ideal modern upgrade for carbon racing bike wheels.
3. Tubular: The Legendary Race-Day Specialist
Tubulars (or "sew-ups") are the oldest and most specialized system. The tire is a closed tube, stitched around an inner tube, and glued directly onto a smooth, hookless rim.
* Pros: Unbeatable ride feel and security at the limit. When properly glued, tubulars offer legendary ride quality—a supple, "connected" feel that many pros swear by. In a crash, they are less likely to roll off the rim than a clincher. They can also be ridden flat to a safe stopping point in a race.
* Cons: High cost, high complexity, and high commitment. Tires are expensive, and the gluing process is a meticulous, multi-day ritual requiring skill and patience. Repairs are difficult and time-consuming; most riders simply replace the entire tire. Swapping wheelsets is not a quick task.
* Best For: Almost exclusively competitive racers at the highest levels who have team support, prioritize the absolute pinnacle of ride quality and cornering confidence, and accept the significant hassle and cost. For the vast majority of riders, the performance gap to modern tubeless has narrowed considerably.
The Verdict: Making Your Choice
* Choose Clincher for simplicity, reliability, and hassle-free use.
* Choose Tubeless for the best all-around performance, combining flat protection, comfort, and speed for most serious riders.
* Choose Tubular only if you are a dedicated racer chasing every last percent of performance and have the support system to manage it.
For a wheelset like the disc-brake ready, carbon racing bike wheels WT11, starting with reliable clincher tires is a fantastic choice. As your confidence and demands grow, the same rims are often tubeless-ready, allowing you to easily upgrade to a tubeless system to unlock the next level of performance, making your road bicycle wheels faster and more comfortable than ever.
In mountain biking, individual component quality matters—but true performance emerges from how these parts work together. When you pair a premium carbon frame with a purpose-matched carbon fork, you unlock a level of synergy that transforms your entire ride. The combination of Trifox's SDY21 carbon hardtail frame and TMK200 rigid mtb fork 29 creates a unified system where stiffness, weight savings, and responsiveness multiply rather than simply add.
The foundation of this partnership is material harmony. Both the SDY21 frame and TMK200 fork are constructed from high-modulus unidirectional carbon fiber, using compatible resin systems and layup techniques. This shared material DNA ensures consistent flex characteristics and vibration damping throughout the front triangle. When frame and fork speak the same structural language, energy transfer becomes incredibly efficient. Every pedal stroke propels you forward with minimal loss, while trail vibrations are absorbed uniformly, reducing fatigue.
Geometry alignment is equally critical. The SDY21 frame is designed around modern trail metrics—a slack head angle, short chainstays, and optimized front-center measurement. The TMK200 fork complements this with precisely calculated offset and axle-to-crown length. Together, they create handling that's both stable at speed and nimble in corners. This isn't a generic fork bolted to any frame; it's a calibrated pairing where steering precision feels intuitive and predictable.
Weight optimization reaches its peak in this combo. The SDY21 frame utilizes strategic carbon layering to reinforce high-stress zones while trimming material elsewhere. Similarly, the TMK200 is engineered as one of the lightest mountain bike fork options in its category. When combined, the total weight savings at the front end significantly improves maneuverability. The bike feels more willing to change direction, easier to loft over obstacles, and generally more lively on the trail. This synergy makes the whole bike feel lighter than the sum of its parts.
Stiffness synchronization creates another performance multiplier. A stiff frame paired with a flexible fork (or vice versa) creates handling inconsistencies. With the SDY21 and TMK200, both components share similar torsional and lateral rigidity. This means when you lean into a corner or power through a rock garden, the front and rear of the bike respond as one cohesive unit. There's no lag or disconnection—just immediate, faithful tracking that builds rider confidence.
The practical benefits extend to assembly and maintenance. Designed as a matched system, the fork's tapered steerer integrates seamlessly with the frame's head tube. The Boost spacing aligns perfectly, and brake routing follows complementary paths. This compatibility eliminates installation headaches and ensures optimal performance from day one. Additionally, the shared aesthetic—clean carbon textures and minimalist branding—creates a visually unified machine that looks as fast as it rides.
Choosing a frame and fork as an integrated system, like the Trifox SDY21 and TMK200 bundle, represents a smarter approach than mixing and matching components. You're not just buying two separate parts; you're investing in a harmonious relationship engineered from the ground up. The result is a mountain bike that handles with a rare balance of efficiency, control, and pure fun. In the equation of performance, synergy is the ultimate multiplier, transforming capable components into an extraordinary complete bike.

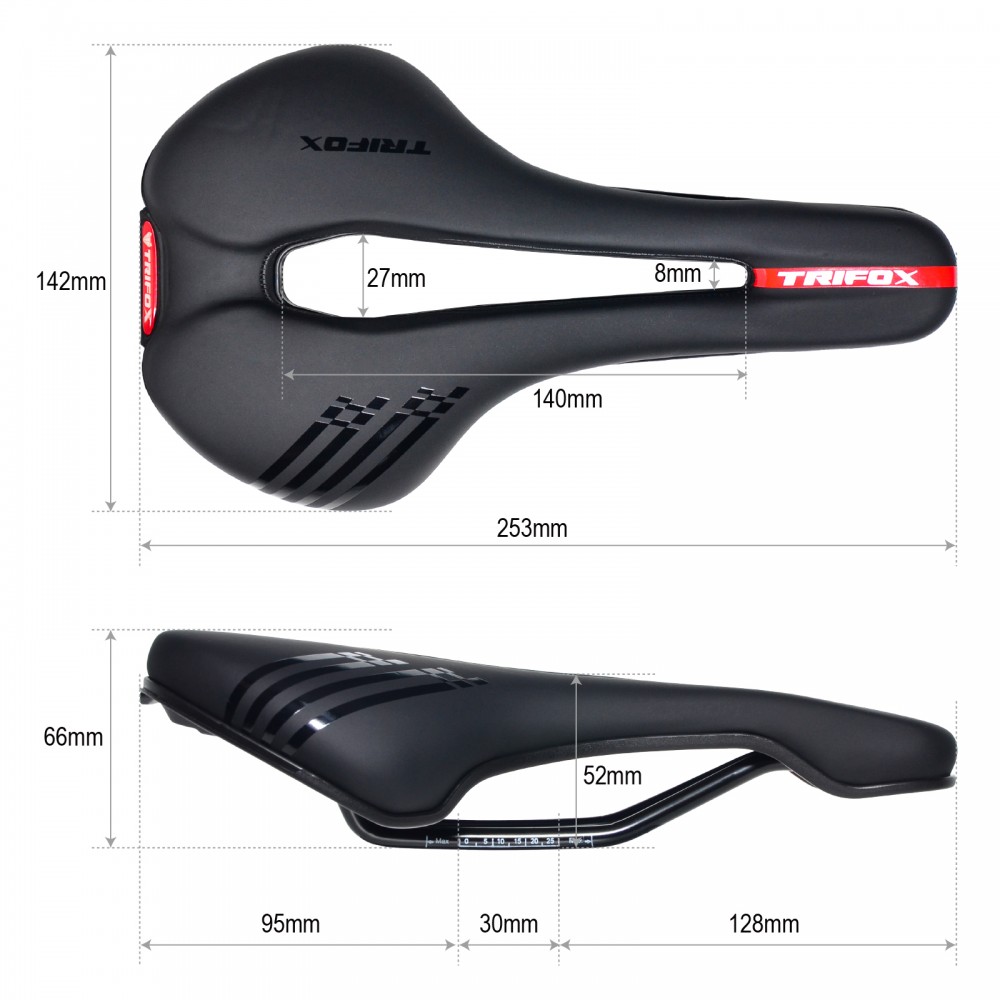
For many riders, the quest for comfort leads to a simple conclusion: a softer saddle must be better. This instinct often backfires. A saddle that feels like a plush couch in the showroom can transform into an instrument of discomfort on a long ride. Why? Because true comfort isn't about maximum softness; it's about intelligent pressure distribution. The materials inside your saddle—foam, gel, and advanced composites—are engineered not just to cushion, but to create a stable, supportive platform that places pressure precisely where your body is designed to handle it.
The Problem with "Soft": The Hammock Effect
Imagine sinking into a soft sofa or a loose hammock. Initially, it feels great. But soon, your body sinks until it meets resistance, often concentrating force on your soft tissue and pelvic bones. A saddle with overly soft, uniform padding does the same. Your sit bones (ischial tuberosities) push through the soft material, bottoming out and creating intense pressure points. This lack of support can also lead to instability, chafing, and numbness. A comfortable bicycle seat doesn't invite you to sink in; it provides a firm, supportive platform to sit on.
Material Science: The Tools for Intelligent Support
Modern saddles use advanced materials to solve this problem, moving beyond a one-thickness-fits-all approach.
High-Density & Multi-Density Foam: The Precision Tool
This is the cornerstone of performance saddle design. Instead of a single soft layer, engineers use varying densities:
Firm, High-Density Zones: Located directly under your sit bones. This dense foam resists compression, providing a stable platform that prevents sinking and effectively supports your skeletal structure.
Softer, Lower-Density Zones: Placed in the surrounding areas and along the center channel. This foam absorbs vibrations and provides gentle cushioning without compromising the critical structural support of the firmer zones.
This "multi-density" approach is like having a custom-molded base layer: firm where you need support, forgiving where you need relief.
Gel Inserts: Targeted Damping
Gel is excellent at dissipating sharp impacts and high-pressure points in a static setting. However, its drawbacks are weight, poor breathability, and a tendency to create a "quicksand" feel if overused, absorbing energy and causing slight instability during pedaling. Therefore, in well-designed saddles like the Trifox Comfortable Saddle, gel is used strategically as an insert, often in the nose or specific high-pressure areas, to add a layer of dampening on top of a supportive foam base. It's a supplement, not the main structure.
Shaped & Variable-Thickness Padding: The Holistic Approach
The most advanced designs combine material density with physical shape. Through pressure mapping and biomechanical research, saddle padding is carved to be thicker in supportive areas and thinner or absent in zones that require relief (like the critical perineal area). This 3D shaping ensures the right amount of material is in the right place, working in concert with the saddle's shell to create a unified support system.
The Trifox Design Philosophy: Engineered Comfort
The Trifox PU Leather Comfortable Saddle exemplifies this intelligent approach to pressure management. It moves beyond the old "soft vs. hard" debate by focusing on structured support.
PU Leather & Resilient Padding: The high-quality PU leather cover provides durability and a slight give, while the underlying cushioning system is designed for resilience and support over many miles.
Ergonomic Shape is Key: The saddle's shape features a central relief channel, a fundamental design element that alleviates soft-tissue pressure by ensuring no contact or minimal pressure in the midline. This works in tandem with the padding to direct support to the sit bones.
Focused on Lasting Support: The goal isn't initial plushness that fades, but consistent, dependable support that reduces fatigue and hotspots, allowing you to focus on your ride, not your discomfort.
Support Over Softness
Choosing a bicycle saddle based on padding thickness alone is a common mistake. The science of comfort is about differential support—using materials like multi-density foam and strategic shaping to create a stable platform that distributes your weight efficiently. It’s the difference between sinking into a problem and sitting on a solution. When your sit bones are properly supported, pressure is healthily distributed, and soft tissues are relieved, you unlock the true potential for a comfortable bicycle seat that enhances, rather than hinders, every ride. Look for design intelligence, not just squishiness.
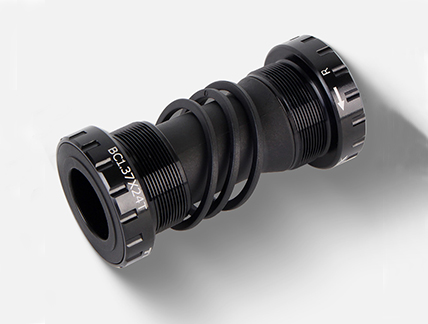
The bottom bracket bearing is the heart of your bike's drivetrain. When it's time for an upgrade, the debate between high-end ceramic and reliable aluminum models is inevitable. Is the premium for ceramic worth it, or is a well-made aluminum bicycle bottom bracket like the Trifox TRBB68 the smarter choice? Let's examine the facts.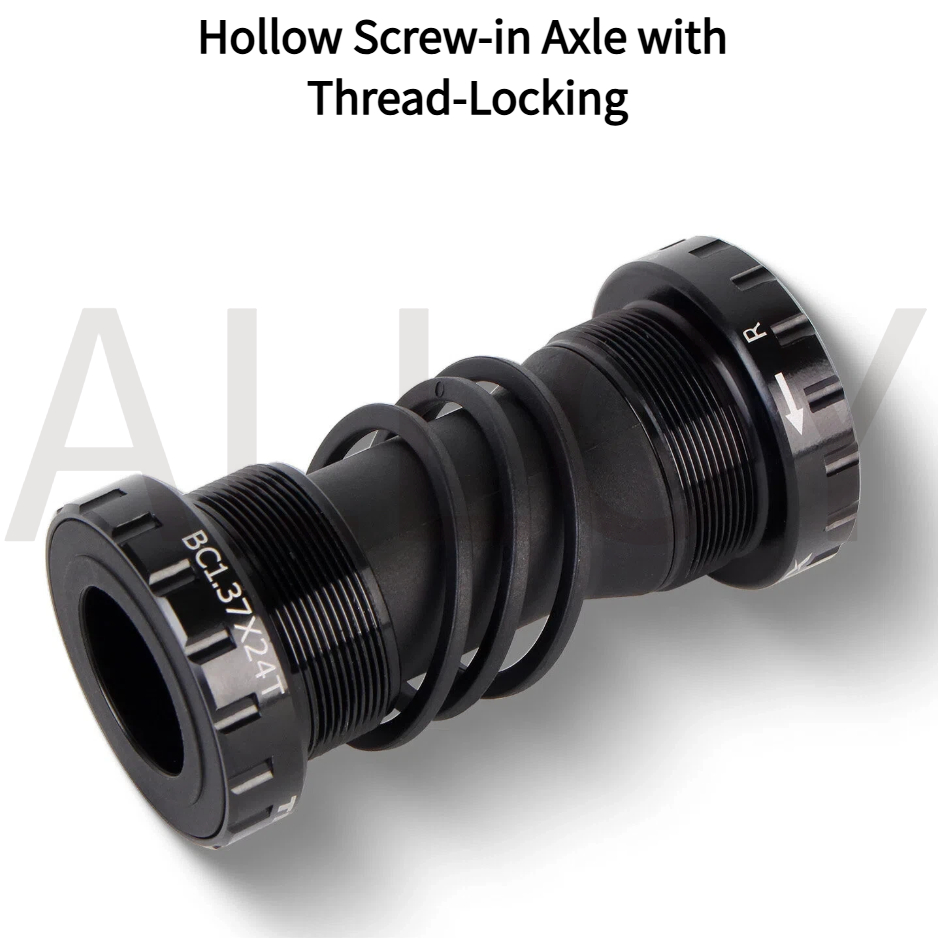
1. Friction & Efficiency: The Core of the Claim
Ceramic bearings boast a lower coefficient of friction—lab tests show up to 25-30% less than steel. However, real-world power savings are subtle, often just 1-3 watts. For most riders, this is imperceptible. A precision-made aluminum bracket with smooth bearings, like the Trifox TRBB68, provides exceptionally efficient performance for nearly all applications, making the ceramic advantage most relevant for elite racers.
2. Durability & Longevity: A Trade-Off
* Corrosion Resistance: Ceramic Wins. Ceramic balls cannot rust, a plus for all-weather riders.
* Impact Resistance: Aluminum/Steel Wins. Under high load or shock (common in MTB), ceramic's hardness can lead to brittleness and cracking. A quality aluminum-shell bracket with steel bearings is generally more robust for real-world riding.
3. Weight: A Negligible Difference
Weight should not be a factor. A standard aluminum 68mm bottom bracket like the Trifox TRBB68 weighs 94-98g. A comparable ceramic model often weighs nearly the same, as the tiny weight saving from the ceramic balls is offset by other components.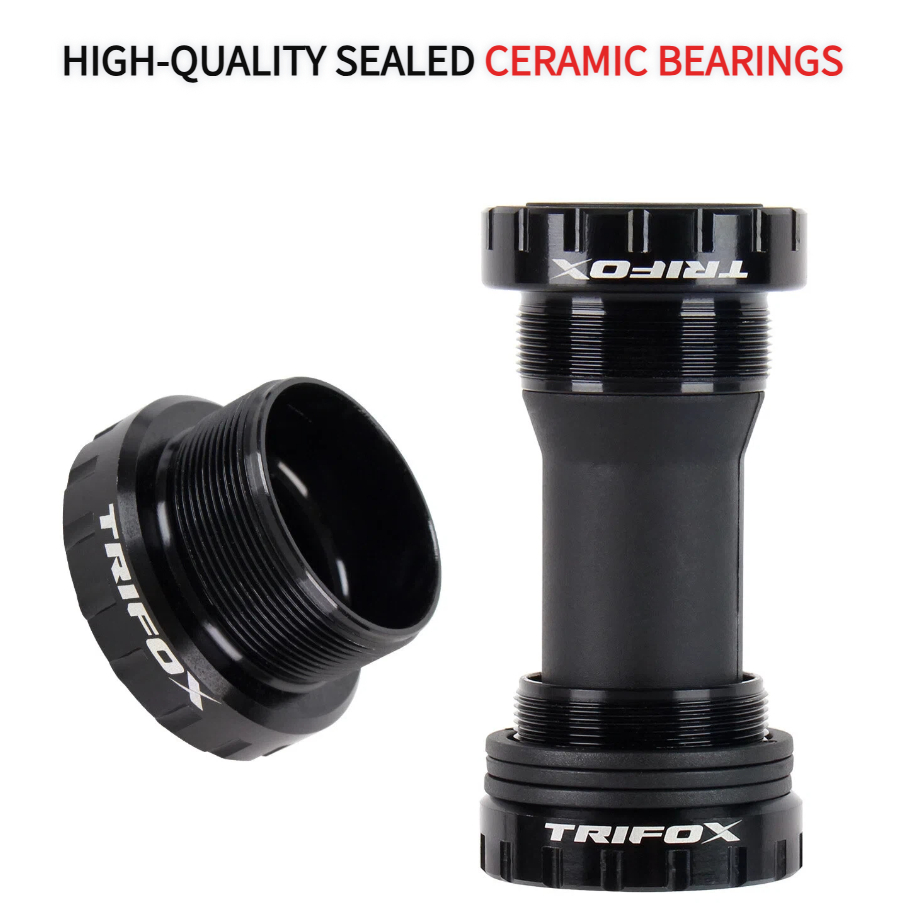
4. Maintenance & Sensitivity: The Hidden Cost
To achieve their potential, ceramic bearings require near-perfect installation alignment and a clean environment. They are less tolerant of misaligned bearing seats. Aluminum brackets with standard bearings are far more forgiving of minor installation variances, making them a more practical choice for home mechanics.
5. Price & Value: The Ultimate Decider
This is the clearest difference. A ceramic bottom bracket can cost 5 to 10 times more than a premium aluminum model.
* Ceramic is for: Elite racers chasing every watt, and enthusiasts who value "marginal gains."
* Aluminum is for: The vast majority of riders. A high-quality option like the Trifox TRBB68 offers outstanding value, precision machining, and reliable sealed bearings, freeing up budget for upgrades with more noticeable returns (like better tires).
The Verdict: Data-Driven Reality
Ceramic's friction advantage is real but minimal for non-racers. When you factor in its higher cost, sensitivity, and durability trade-offs, the value proposition narrows. For a component that must withstand real-world conditions, the balanced performance and exceptional value of a modern aluminum bottom bracket are hard to beat. Products like the Trifox TRBB68 deliver superb smoothness and reliability, letting you focus on the ride, not just marginal gains.


