


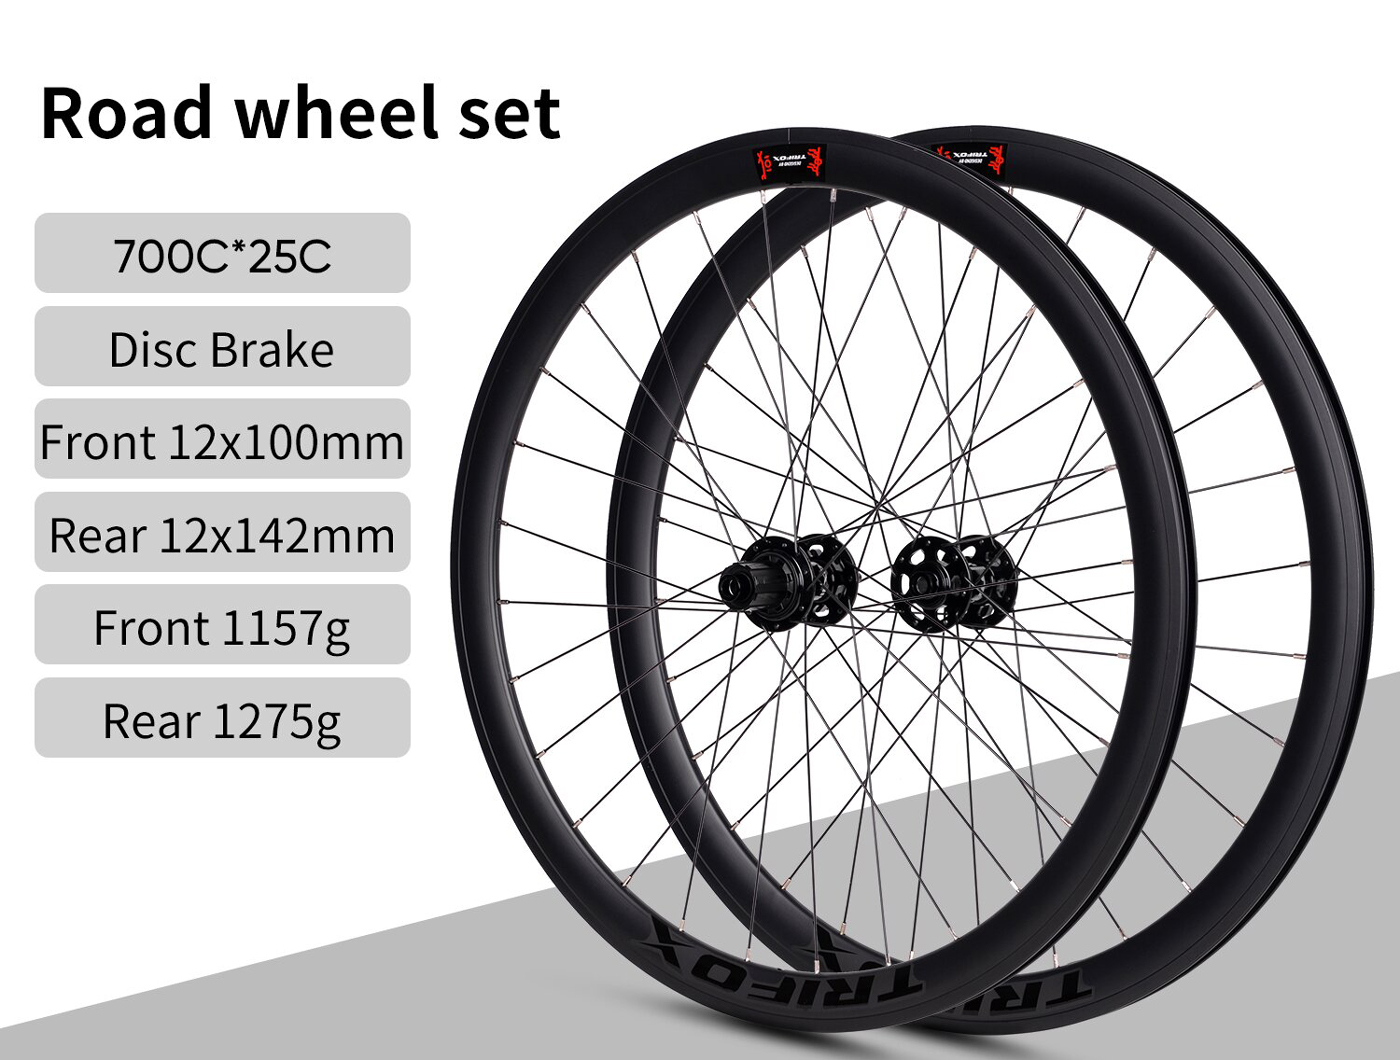
Choosing the right wheelset is crucial for enhancing your cycling experience, and Trifox's carbon road bike wheels offer options tailored to various cycling styles.
Whether you're into racing, touring, or commuting, the wheelset you choose can significantly impact your performance and comfort.
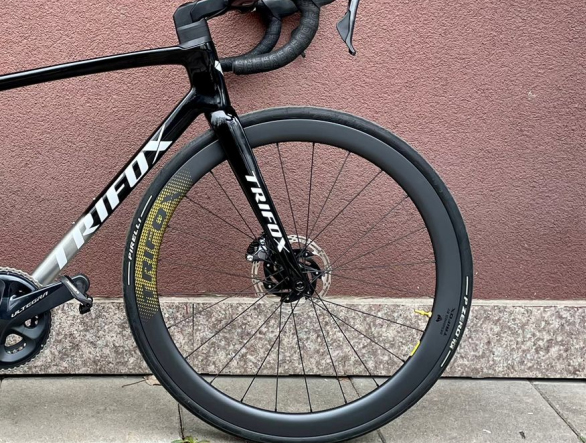
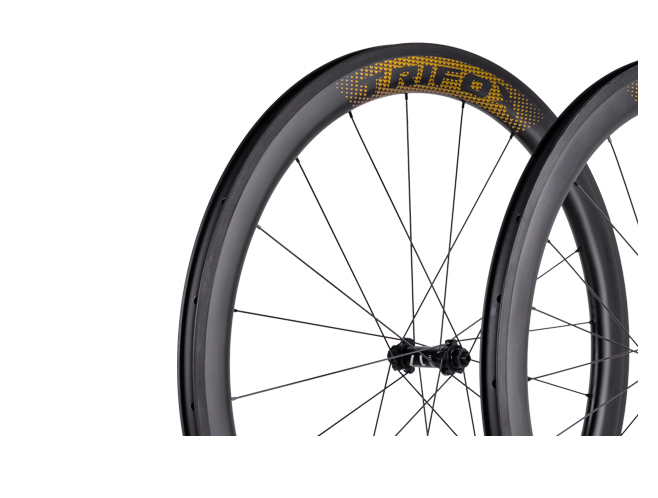
For racers, lightweight and aerodynamic wheelsets like the Trifox Carbon Road Bike Wheels WT11 are ideal. These wheels reduce drag and enhance speed, crucial for competitive cycling. The carbon construction ensures a light yet strong build, allowing for quick accelerations and efficient climbing.
Touring cyclists benefit from wheelsets that balance durability with comfort. The WT17 model, with its robust carbon fiber construction, offers the reliability needed for long distances. Its disc brake compatibility provides superior stopping power in varied conditions, essential for navigating diverse terrains safely.
Commuters, on the other hand, might prioritize durability and ease of maintenance. A wheelset like the WT18, compatible with both disc and V brakes, offers versatility and reliability for daily use. Its strength ensures it withstands the rigors of everyday commuting while providing comfortable rides.
When selecting a wheelset, consider factors like material, weight, and brake compatibility. Carbon wheels are lighter and more aerodynamic, offering performance benefits but may require more care.
Compatibility with your bike's braking system is also essential to ensure seamless integration.
Ultimately, understanding how these features align with your cycling style will help you make an informed decision that enhances your riding experience. By choosing a wheelset that complements your needs, you can enjoy better performance, increased comfort, and more enjoyable rides.


Choosing a durable alloy wheelset for your bike can significantly elevate your riding experience and ensure long-lasting performance. Here’s how to select the best alloy wheelset and maintain it to extend its lifespan.
How to Choose
1. Material: Opt for wheelsets made from high-grade aluminum alloys like AL6061 or AL7075. These materials offer an ideal balance of strength and weight, ensuring durability without compromising performance. The Trifox Alloy WM823 BOOST, made from AL6061 and AL7075, is a prime example of this balance.
2. Weight: Lightweight wheels reduce rotational mass, making acceleration and climbing easier. However, ensure the wheels are robust enough for your riding style and terrain. The WM823 BOOST offers an optimized blend of weight, strength, and durability, making it perfect for cross-country and all-mountain use.
3. Compatibility: Ensure the wheelset is compatible with your bike’s frame and braking system. Check axle dimensions and whether it supports quick-release or thru-axle setups. Compatibility with your drivetrain (Shimano or SRAM) is also crucial.
4. Rim Width and Profile: Wider rims provide better tire support and stability, especially for off-road biking. The WM823 BOOST features a 25mm inner width and a 30mm outer width, making it suitable for various tire sizes and offering enhanced stability.
Care and Maintenance
1. Regular Cleaning: After rides, especially in muddy or wet conditions, clean your wheels with a mild detergent and a soft brush. Avoid using high-pressure water jets, which can force dirt into the bearings.
2. Checking for Damage: Regularly inspect your wheels for cracks, dents, or loose spokes. Pay close attention to the rim and hub areas. Early detection of issues can prevent costly repairs.
3. Proper Storage: Store your bike in a dry, cool place to prevent moisture from causing rust or corrosion. Hang the bike by the frame, not the wheels, to avoid unnecessary strain.
4. Tire Pressure: Maintain the recommended tire pressure to reduce the risk of pinch flats and rim damage. Over-inflation or under-inflation can adversely affect wheel performance and longevity.
Benefits of a Durable Alloy Wheelset
Investing in a high-quality alloy wheelset like the Trifox Alloy WM823 BOOST provides numerous benefits. The durability of the alloy ensures your wheels withstand rough terrains and extensive use. Moreover, the lightweight design enhances your bike’s performance, making climbs and accelerations smoother. A well-maintained wheelset also saves you money in the long run by reducing the need for frequent replacements.
In conclusion, choosing the right alloy wheelset involves considering material, weight, compatibility, and rim profile. Proper care and maintenance, such as regular cleaning, damage checks, and correct storage, extend the lifespan of your wheels. Investing in a durable wheelset not only improves your riding experience but also ensures long-term reliability and performance. For an excellent option, consider the Trifox Alloy WM823 BOOST, designed for durability and compatibility with various setups.
Enhancing your cycling performance can be as simple as upgrading to the right set of wheels. The Trifox 700C Alloy Disc Brake Wheelset AWT7 is a game-changer, designed to deliver speed, stability, and ultimate performance.
These revolutionary road wheels are perfect for climbing, daily training, and all-road adventures, thanks to their ultralight alloy construction and 40mm rim depth. Here’s how you can optimize your cycling performance with these exceptional wheels.
First, take advantage of the lightweight design. The AWT7 wheels are lighter than typical wheels, reducing the effort required for climbs and allowing for quicker acceleration. This makes them ideal for both competitive racing and daily rides.
Next, focus on stability. The 40mm rim profile offers a perfect balance, providing the speed of deeper rims with the stability of shallower ones. This stability is further enhanced by the 14mm inner width, which ensures smoother rolling with less drag.
Incorporate these wheels into your routine by starting with your daily training sessions. The Ultralight hubs, featuring TRIFOX’s self-developed aluminum hubs, ensure smooth and reliable rolling, helping you maintain a consistent pace without unnecessary resistance.
Finally, don’t overlook the importance of maintenance. Regularly check the centerlock disc hubs and thru-axles to ensure they are secure. Keep the tires inflated to the recommended pressure (90-135 psi) to maximize performance and reduce wear.

For those interested in experiencing the benefits firsthand, you can purchase the Trifox 700C Alloy Disc Brake Wheelset AWT7 at Trifoxbike. Upgrade today and revolutionize your cycling performance.

Matching your bike frame with the right rim brakes is essential for achieving better control and a safer ride. Rim brakes are a popular choice for road bikes due to their lightweight design and effective braking performance. Here’s how to ensure your bike frame and rim brakes work seamlessly together for optimal control.
First, consider the compatibility of your bike frame with rim brakes. Not all frames are designed to accommodate rim brakes, especially modern models that may favor disc brakes. Check the manufacturer’s specifications to ensure your frame has the necessary mounts and clearances for rim brakes. This includes confirming the placement and type of brake bosses on the frame and fork.
Next, evaluate the brake calipers. Rim brakes typically come in two main types: caliper brakes and cantilever brakes. Caliper brakes are common on road bikes, offering direct pull and consistent braking power. Ensure the reach of the caliper brakes matches the distance from the brake mounts to the rim. Cantilever brakes, often found on cyclocross and touring bikes, provide more clearance for wider tires and are ideal for mixed terrain.
The wheel size and tire width are also crucial factors. Rim brakes need to align perfectly with the braking surface on the rim. For instance, 700c wheels are standard on road bikes, and the brake pads should make full contact with the rim for maximum braking efficiency. Wider tires might require longer-reach brakes to fit properly within the frame and fork.
Consider the material of your rims as well. Alloy rims are commonly used with rim brakes because they offer a solid braking surface and good heat dissipation. Carbon rims can also be used but often require specific brake pads to avoid overheating and ensure reliable performance. Matching the brake pads to the rim material is critical for consistent braking power and longevity.
Pay attention to the brake levers and cables. High-quality brake levers and well-maintained cables ensure smooth operation and responsive braking. Make sure the brake levers are compatible with your brake calipers. Regularly check and replace worn cables to maintain optimal performance.
Lastly, fine-tuning and regular maintenance are key. Properly adjusting the brake pads to sit parallel to the rim and ensuring even pad wear can significantly improve control. Regularly inspect and replace brake pads as needed to maintain effective braking.
In conclusion, matching your bike frame with the right rim brakes involves considering frame compatibility, brake type, wheel size, rim material, and brake components. By paying attention to these details, you can achieve better control and a safer ride. For high-quality rim brakes and bike frames, explore trusted brands and components.
Choosing the right wheel size is crucial for optimizing your cycling experience, whether you’re an avid road cyclist, a mountain biker, or a commuter. The wheel size impacts your bike's handling, comfort, and performance. Here’s how to pick the right wheel size to meet your specific cycling needs.
First, identify your riding style and terrain. Road cyclists typically use 700c wheels, which offer a good balance of speed and stability on paved surfaces. These wheels have a larger diameter, allowing for smoother rolling over long distances.
If you're into mountain biking, you might choose between 26-inch, 27.5-inch (650b), and 29-inch wheels. Each size has its benefits: 26-inch wheels are nimble and responsive, 27.5-inch wheels offer a mix of agility and rollover capability, while 29-inch wheels provide better traction and roll over obstacles more easily.
Next, consider your height and frame size. Taller riders often feel more comfortable with larger wheels like 700c or 29-inch, as they better match their proportions. Smaller riders may prefer 650c or 27.5-inch wheels for better maneuverability and control. Ensure that your bike frame is designed to accommodate the wheel size you choose, as this affects the bike’s geometry and overall ride quality.
Think about the type of riding you do most frequently. If you commute or prefer leisure rides on smooth roads, 700c wheels are usually ideal. For mixed-terrain or adventure riding, 650b wheels provide versatility with wider tire options for added grip and comfort. Mountain bikers who enjoy technical trails might favor the agility of 27.5-inch wheels, while those tackling rough, cross-country trails might opt for the stability of 29-inch wheels.
Evaluate the availability of tires and components for your chosen wheel size. Some sizes, like 700c and 29-inch, have a broader range of tire options, making it easier to find replacements or upgrade your setup. Make sure the wheel size you choose offers the flexibility you need for your riding style.
Finally, test ride bikes with different wheel sizes if possible. Personal preference plays a significant role in how comfortable and confident you feel on a bike. Trying out various sizes can help you determine which wheel size provides the best fit for your needs.
In conclusion, picking the right wheel size involves considering your riding style, terrain, height, frame compatibility, and personal preference. By taking these factors into account, you can select a wheel size that enhances your cycling experience and meets your specific needs.


Determining the perfect tire width is essential for achieving a comfortable bike ride. Tire width influences various aspects of your cycling experience, including comfort, rolling resistance, and handling. Here's how to select the ideal tire width for your needs.
First, consider your riding terrain. If you primarily ride on smooth, paved roads, narrower tires (23-28mm) are typically preferred. These tires offer less rolling resistance, allowing for faster speeds and efficient performance. However, if you frequently encounter rough or uneven surfaces, wider tires (30-35mm or more) provide better shock absorption and comfort, as they can handle bumps and imperfections more effectively.
Next, think about your riding style. Competitive road cyclists often opt for narrower tires because they prioritize speed and aerodynamics. On the other hand, recreational riders and commuters may find that wider tires are more comfortable for longer rides, as they reduce vibrations and provide a smoother experience.
Bike compatibility is another important factor. Ensure that your bike frame and fork have enough clearance to accommodate the desired tire width. Modern road bikes and gravel bikes are designed to support wider tires, but it's always best to check the manufacturer's specifications for your specific model.
Consider the impact of tire width on pressure. Wider tires can be run at lower pressures without the risk of pinch flats. Lower pressure allows the tire to conform to the surface better, improving grip and comfort. For instance, a 32mm tire can be comfortably ridden at lower pressures than a 25mm tire, providing a cushier ride.
Evaluate the trade-off between comfort and performance. While wider tires offer enhanced comfort, they can slightly increase rolling resistance compared to narrower ones. However, advancements in tire technology have minimized this gap, making wider tires a viable option even for performance-oriented cyclists.
Finally, personal preference plays a significant role. Some cyclists prefer the nimble feel of narrower tires, while others appreciate the stability and confidence that wider tires provide. It's a good idea to experiment with different widths to find what feels best for you.
In conclusion, determining the perfect tire width involves considering your riding terrain, style, bike compatibility, and personal preference. By taking these factors into account, you can select a tire width that enhances comfort and improves your overall cycling experience. Happy riding!
Selecting a good road wheelset is crucial for enhancing both speed and durability on your bike. The right wheelset can significantly impact your performance, whether you're racing or enjoying a long ride. Here’s how to choose the perfect road wheelset to meet your needs.
First, consider the material of the wheelset. Alloy wheels, like those available on [Trifox Alloy Road Wheels], are a popular choice due to their excellent balance of weight, strength, and affordability. Alloy wheels are durable and can withstand the rigors of various road conditions, making them an ideal choice for many cyclists.
Next, assess the wheel size and rim depth. The most common road bike wheel size is 700c, which offers a good blend of speed and stability. Rim depth plays a crucial role in aerodynamics: deeper rims (40mm and above) provide better aerodynamic benefits, reducing drag and helping you maintain higher speeds with less effort. However, deeper rims can be heavier and more susceptible to crosswinds. If you frequently ride in windy areas or prefer climbing, a shallower rim (20-30mm) might be more suitable.
The spoke count is another important factor. Wheels with fewer spokes (16-24) tend to be lighter and more aerodynamic, making them ideal for racing. However, they may not be as robust as wheels with more spokes (28-36). If durability and strength are your primary concerns, especially if you ride on rough roads, opt for a higher spoke count.
Hub quality also affects performance. High-quality hubs provide smoother rotation and greater reliability. Look for wheels with sealed bearings, which require less maintenance and offer better protection against dirt and moisture.
Consider the weight of the wheelset. Lighter wheels accelerate faster and make climbing easier, but they should not compromise strength and durability. Alloy wheels strike a good balance here, offering lightweight properties without sacrificing robustness.
Lastly, think about your budget. Investing in a quality wheelset can significantly enhance your riding experience. While high-end wheels can be costly, there are many excellent options available at different price points. The [Trifox Alloy Road Wheels] provide a range of choices that combine performance and value.

In conclusion, selecting a good road wheelset involves considering material, size, rim depth, spoke count, hub quality, weight, and budget. By taking these factors into account, you can find a wheelset that boosts your speed and durability, ensuring a better ride. Happy cycling!
Selecting the right performance wheelset can drastically improve your bike's speed and efficiency. Here's how to make an informed choice to elevate your cycling experience.
1. Understand Your Riding Style
Consider whether you're into road racing, mountain biking, or long-distance touring. Each discipline demands different wheel characteristics. Road cyclists often prefer lightweight, aerodynamic wheels, while mountain bikers need robust, durable options.
2. Focus on Material
Carbon fiber wheelsets are a top choice for serious cyclists due to their lightweight and strength. They provide excellent stiffness and responsiveness, crucial for both acceleration and maintaining speed. However, they are more expensive than aluminum alternatives.
3. Consider Rim Depth
Rim depth affects aerodynamics and handling. Deeper rims (50mm+) are more aerodynamic, making them ideal for flat courses and time trials. Shallow rims (30mm or less) are better for climbing due to their lighter weight and improved maneuverability.
4. Check Hub Quality
High-quality hubs reduce rolling resistance and enhance overall performance. Look for sealed bearings that offer smooth rotation and require less maintenance.
5. Evaluate Spoke Count
Wheelsets with fewer spokes are generally lighter and more aerodynamic but might sacrifice durability. Opt for higher spoke counts if you’re heavier or ride on rough terrains frequently.
6. Factor in Budget
Performance wheelsets can be a significant investment. Balance your budget with your riding goals to find the best value without compromising essential features.

Optimizing your ride with an aero bike can make a significant difference in your cycling performance, especially if you're aiming for speed and efficiency.
Understanding Aero Bikes
Aero bikes are designed to reduce aerodynamic drag, allowing you to cut through the air more efficiently. They feature streamlined frames, integrated components, and often deeper wheel rims. Here's how to optimize every aspect of your aero bike for maximum performance:
1. Perfect Your Bike Fit
A proper bike fit is crucial. Visit a professional fitter to ensure your aero bike is adjusted to your body dimensions. A good fit reduces wind resistance and increases comfort, allowing you to maintain an aerodynamic position for longer periods.
2. Choose the Right Wheels
Wheels play a vital role in aerodynamics. Deep-section wheels (50mm-80mm) are ideal for flat terrains and time trials due to their reduced drag. However, they can be susceptible to crosswinds, so consider mid-section wheels (35mm-50mm) for versatility.
3. Optimize Your Riding Position
An aero position minimizes frontal exposure. Lowering your handlebars, tucking your elbows in, and maintaining a flat back can significantly reduce drag. Practice holding this position to improve endurance and efficiency.
4. Use Aero Components
Invest in aero handlebars, stems, and seat posts. These components are designed to slice through the air more effectively than standard parts. Additionally, consider using an integrated cockpit system for seamless airflow.
5. Wear Aerodynamic Gear
Your clothing should be tight-fitting and designed for aerodynamics. Opt for aero helmets, skinsuits, and overshoes to reduce air resistance. Every small improvement can add up to noticeable gains in speed.
6. Mind the Accessories
Minimize accessories like saddle bags and bottle cages that can disrupt airflow. Use aero water bottles and mount them strategically to maintain the bike’s streamlined profile.

Conclusion
Optimizing your ride with an aero bike involves a combination of proper fit, equipment choices, and riding techniques. By paying attention to these details, you can maximize your efficiency and enjoy faster, more enjoyable rides.


