


Look at the front of most road bikes, and what do you see? A tangle of brake hoses, shift cables, and handlebar tape ends. It’s functional, but it’s not beautiful. Worse, those exposed cables create aerodynamic drag, add weight, and can rattle or collect dirt. The DHB1000 fully-integrated carbon drop bar changes all of that. By routing every cable and hose completely inside the bar and stem, it transforms your bike’s front end into a clean, aerodynamic, and professional-looking cockpit. Here’s how this one component upgrades both performance and aesthetics.
The Problem with Traditional Handlebars
Standard road handlebars have cables that run externally along the front of the bar, then down the stem and into the frame. This design has persisted for decades, but it comes with downsides:
- Drag: Exposed cables disrupt airflow, creating turbulence and slowing you down.
- Clutter: A busy cockpit distracts from the bike’s lines and can interfere with accessories.
- Maintenance: Cables can rub against the frame, wear through paint, and collect grime.
- Safety: In a crash, external cables can snag or be damaged.
The DHB1000 solves all these issues with a single, elegant design.
Full Integration: How It Works
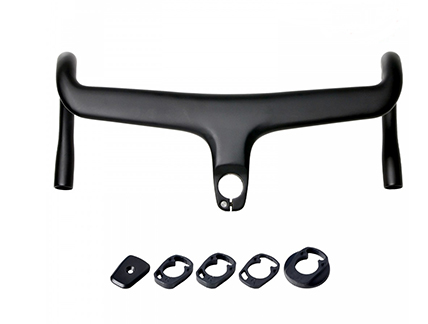
The DHB1000 is a carbon fiber bicycle handlebars system that integrates the bar, stem, and cable routing into one seamless unit. The bar features internal channels that guide brake hoses and shift cables from the shifters, through the bar, and directly into the stem. From there, they enter the frame through a dedicated port in the headset or top tube. The result: no cables visible anywhere from the shifters to the frame. The cockpit looks like a single, sculpted piece of carbon fiber.
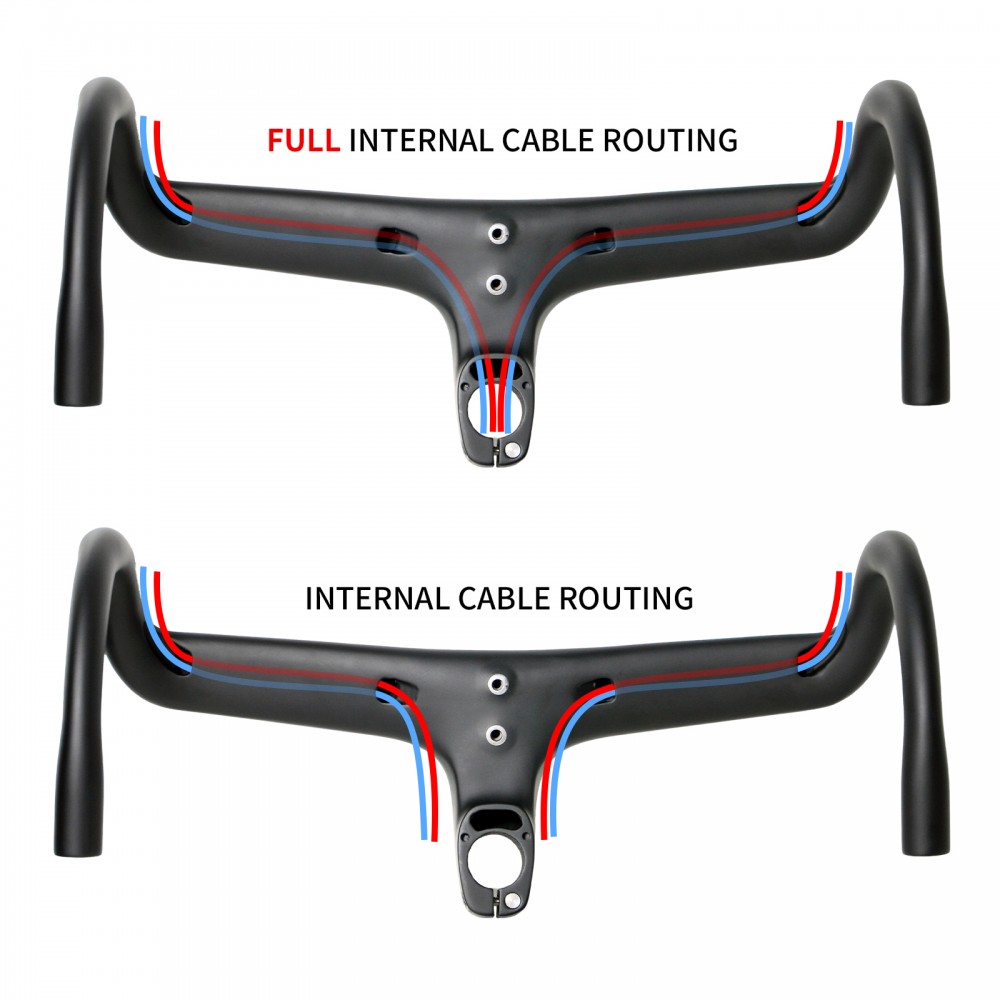
Aerodynamic Benefits
Every cyclist knows that reducing drag is the key to going faster with less effort. The DHB1000’s fully internal routing cleans up the leading edge of the bike, reducing turbulence and lowering drag. While the exact savings depend on speed and wind angle, studies have shown that a fully integrated front end can save several watts at 30-40km/h. For racers and time-conscious riders, this is a free speed upgrade. For everyone else, it means riding faster or easier for the same effort.
A Clean, Professional Aesthetic
Beyond the numbers, there’s the look. A bike with fully internal cables looks like it came from the future. The clean lines of the DHB1000 complement modern drop bar road bike frames with internal routing, creating a cohesive, high-end appearance. No more zip ties, no more cable rub patches on the head tube. Just pure carbon and smooth curves. This is the kind of detail that makes a custom build stand out.
Weight and Stiffness
The DHB1000 is constructed from high-modulus T800 carbon fiber, offering an exceptional stiffness-to-weight ratio. The one-piece design eliminates the need for a separate stem and faceplate, saving weight and improving rigidity. When you sprint or climb out of the saddle, the bar transfers power directly without flex. Yet carbon’s natural vibration damping keeps the ride comfortable over rough pavement. With a width of 380mm (center-to-center) and a compact drop shape, it’s ideal for riders who prioritize an aerodynamic, forward position.
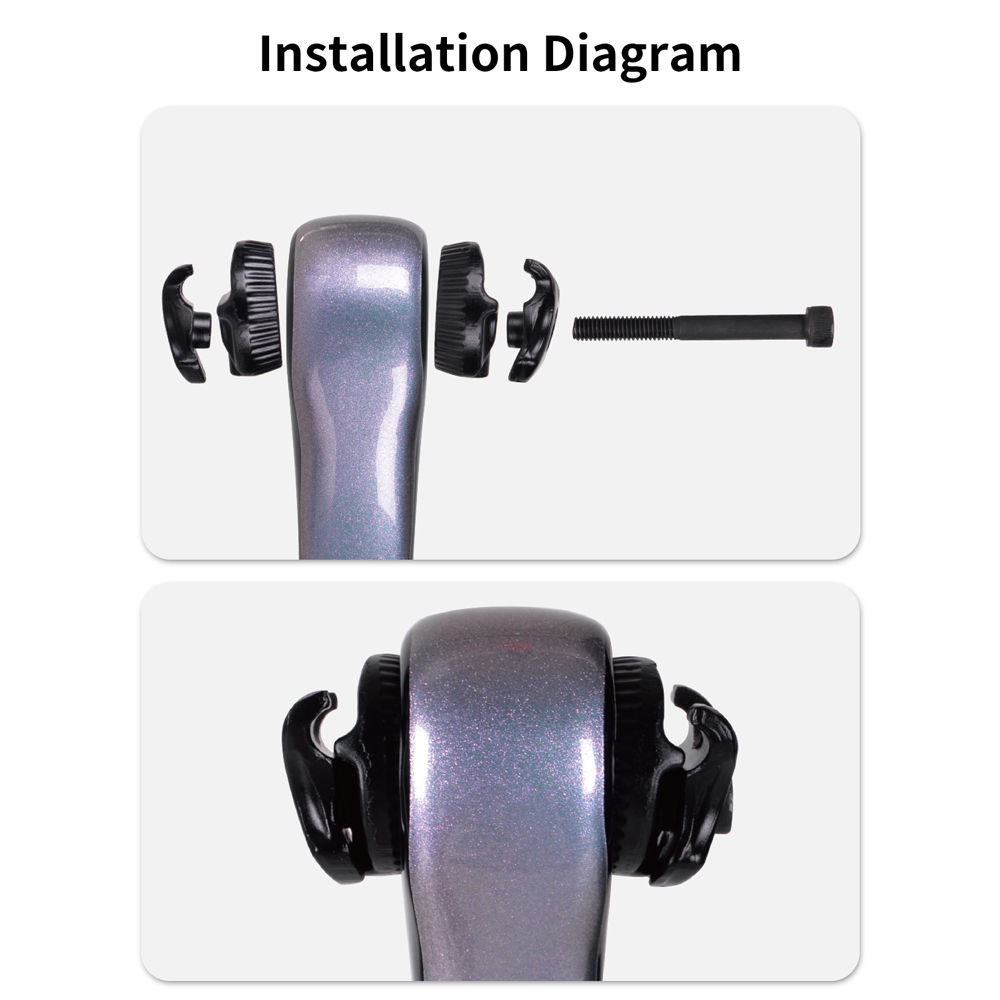
Installation Considerations
Installing a fully integrated bar like the DHB1000 requires more patience than a traditional bar, but the result is worth it. You’ll need to route the hoses and cables through the internal channels before attaching the shifters. It’s helpful to use a internal routing kit (guide wire) and take your time. Once installed, the system is maintenance-free—cables are protected from the elements and won’t shift or rattle. Trifox includes detailed instructions, and many bike shops can handle the installation if you prefer professional help.
Compatibility
The DHB1000 is designed to work with most modern road bikes that have a standard 1-1/8” steerer tube and accept internal cable routing through the stem or headset. It’s compatible with mechanical and electronic shifting systems, as well as hydraulic disc brakes. The 380mm width is measured center-to-center at the drops, providing a narrow, aero position favored by racers and performance-oriented riders.
The Transformation
Installing the DHB1000 is more than an upgrade; it’s a transformation. The front of your bike becomes a statement of intent: clean, fast, and modern. You’ll notice less cable noise, easier cleaning, and a cockpit that simply looks right. And on the road, the aerodynamic advantage and stiffness give you a tangible performance edge.
Conclusion
For riders seeking the ultimate carbon fiber bicycle handlebars for their drop bar road bike, the DHB1000 represents the pinnacle of integration. It eliminates clutter, reduces drag, saves weight, and delivers a professional, high-tech look. Whether you’re building a dream race bike or upgrading your current machine, the DHB1000 transforms your bike into something truly special.
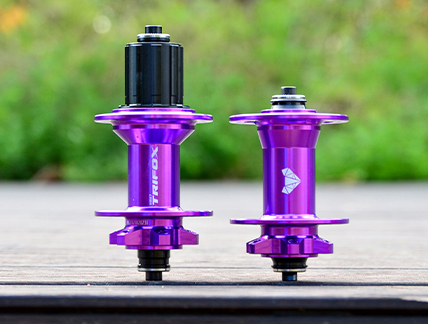
In the world of cycling, the pursuit of lightness has become an obsession. We weigh every component, chase gram savings, and celebrate the lightest frames, wheels, and parts. But when it comes to mountain biking—especially components like hubs that endure tremendous forces—the mantra “lighter is better” can lead you astray. A hub that sacrifices durability, engagement speed, or reliability for a few grams is not an upgrade; it’s a liability. Here’s why a robust, well-engineered hub like the Trifox M827 is often a smarter choice than the lightest option on the market.
The Hidden Cost of Ultra-Light Hubs
To achieve extremely low weights, some hub manufacturers use thinner flanges, smaller bearings, or less material in the freehub body. While these hubs may look impressive on a scale, they often compromise on durability. Thin flanges can crack under the stress of hard landings or repeated impacts. Undersized bearings wear out faster and are more prone to developing play. And a lightweight freehub body can suffer from cassette bite (where the cassette digs into the soft aluminum) or even strip under high torque.
The Trifox M827 durable bike hub takes a different approach. It’s constructed from machined 6061 aluminum alloy bodies and 7075 aluminum axles and freehub bodies—materials chosen for their excellent strength-to-weight ratio, not just low weight. The result is a hub that is still impressively light (front: 165g, rear: 314g) but built to withstand the rigors of trail, all-mountain, and even enduro riding.

Engagement Speed Matters More Than a Few Grams
When you’re powering over a rocky climb or sprinting out of a corner, instant power transfer is far more valuable than saving 20 grams. The M827 features a 6-pawl, 72-point engagement system with just 5 degrees of rotation between engagement points. This means the hub responds almost instantly when you put down power. An ultra-light hub with a slow-engaging mechanism (e.g., 10-15 degrees of rotation) will feel vague and unresponsive, no matter how light it is. For mountain biking, reliable and fast engagement is a performance feature that outweighs minor weight savings.
Durability Is the Ultimate Weight Saving
A hub that fails on the trail can end your ride, damage your frame, or even cause injury. A durable hub that you install and forget about is, in the long run, the lightest hub of all—because you never have to carry spare parts or walk out of the woods. The M827’s four sealed cartridge bearings in the rear (two in the front) provide smooth rolling and long service life. The robust pawl design and heat-treated freehub body resist wear and tear. This isn’t a hub that needs constant maintenance or early replacement.
The Real-World Trade-Off
Yes, you can find hubs that are 50-100 grams lighter than the M827. But those hubs often come with trade-offs: lower rider weight limits, shorter bearing life, or less reliable engagement. For most riders—from XC racers to aggressive trail riders—the M827 offers the perfect balance. It’s light enough to build a responsive wheelset, but it’s engineered to take abuse and keep rolling. The peace of mind that comes from a durable, high-engagement hub is worth far more than a few grams saved on a spec sheet.
The Verdict
When shopping for a mountain bike hub, don’t be seduced by the lowest number on a scale. Consider engagement speed, bearing quality, material strength, and overall reliability. The Trifox M827 delivers on all fronts: fast 6-pawl/72-point engagement, durable 6061/7075 aluminum construction, sealed bearings, and convertible axle options for future‑proofing. It’s a hub that proves “lighter” isn’t always “better”—what’s better is a component that performs when you need it most, season after season.
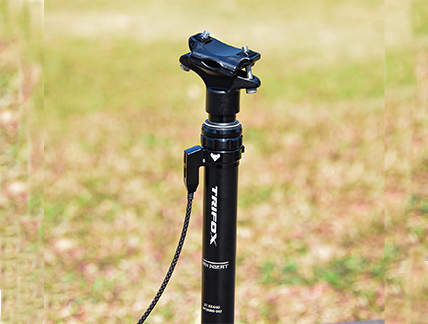
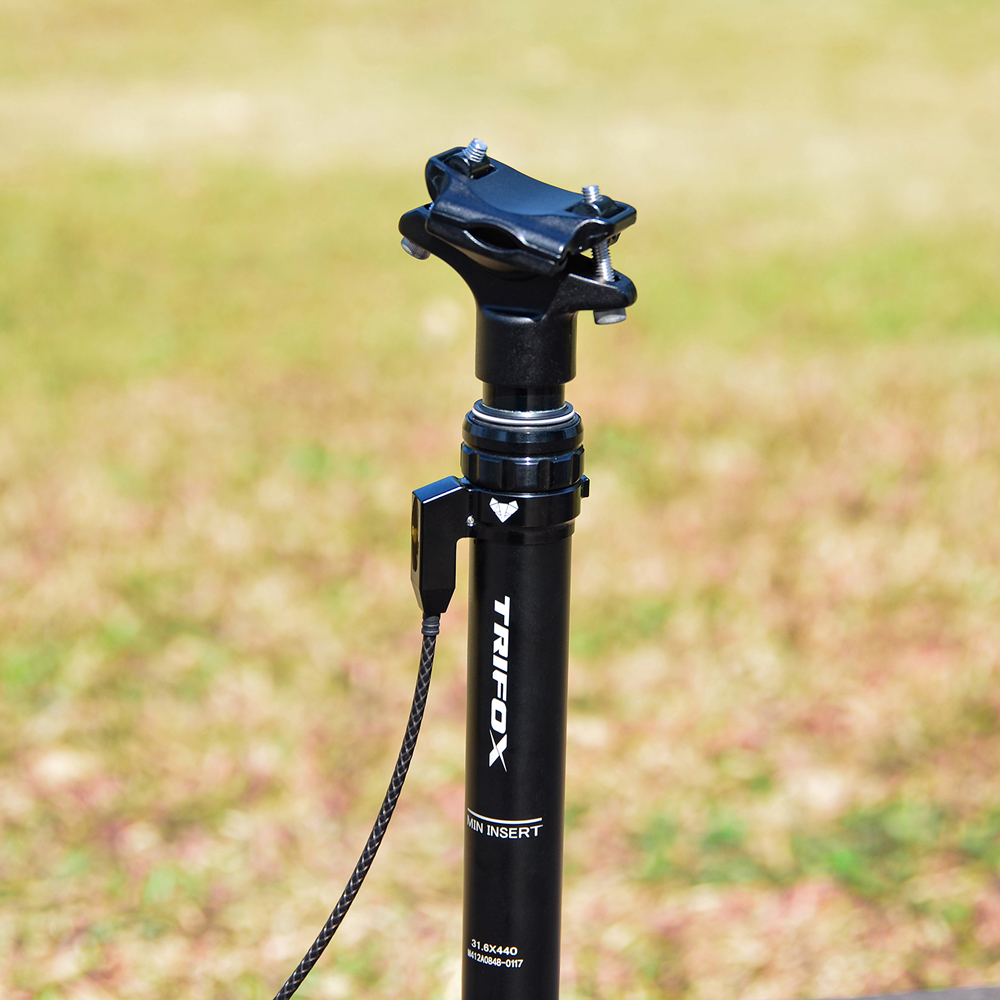
A dropper post is one of those upgrades that, once you ride with one, you’ll wonder how you ever lived without it. Being able to drop your saddle at the push of a lever—and return it to your perfect climbing height automatically—transforms trail riding. But with travel options ranging from 100mm to over 200mm, how much do you actually need? And what’s the right amount for your bike, your terrain, and your budget? Let’s break it down, and then look at why the Trifox AP316 (125mm travel) is the perfect first upgrade for many riders.
What Does Dropper Travel Mean?
Dropper post travel is the vertical distance the saddle can move from its fully extended (climbing) position to its fully dropped (descending) position. More travel means you can get the saddle completely out of the way on steep descents. Less travel might leave the saddle still bumping your thighs when you’re hanging off the back of the bike. The “right” amount balances your riding style, frame geometry, and personal height.
Travel Ranges and What They’re For
* 100mm – XC and Light Trail: This is for cross-country riders who spend most of their time climbing or on rolling terrain. A 100mm drop is enough to get the saddle low for small descents, but not so much that it compromises the efficient pedaling platform. It’s also a good fit for smaller frames where insertion depth is limited.
* 125mm – The All-Around Sweet Spot (Where the AP316 Sits): This is the most common travel for trail and all-mountain riding. A 125mm drop gets the saddle completely clear for most moderate-to-steep descents while still fitting into many frames. It’s the “do‑it‑all” travel that works for riders of average height (170‑185cm) on medium to large frames. The Trifox AP316 offers 125mm of smooth air-sprung travel, making it an ideal choice for a first dropper upgrade. It provides enough clearance for the vast majority of trail riders, without requiring a massive insertion depth or a super-long seat tube.
* 150mm – Aggressive Trail and Enduro: For riders who regularly hit steep, technical descents and want the saddle completely invisible, 150mm is the ticket. This travel is common on modern enduro bikes with longer seat tubes. However, it requires sufficient seat tube length and insertion depth, so not every frame can accommodate a 150mm post.
* 170mm – 200mm – Long-Travel (Enduro / Downcountry): These are for riders who want the saddle to drop as low as possible—often for bike park laps or very steep terrain. They’re typically found on large or XL frames with very long seat tubes. Most riders don’t need this much travel; it’s a specialty choice.
How to Determine the Right Travel for You
Three factors limit how much travel you can run:
1. Your Height and Inseam: Taller riders need more saddle height to begin with, so they can often run longer travel posts without the collar hitting the frame when fully extended.
2. Your Frame’s Seat Tube Length: Measure the exposed seatpost length from the collar to your pedaling height. Subtract the minimum insertion depth (usually 70‑100mm). That number is the maximum travel you can safely use. For example, if you have 230mm of exposed post and need 100mm inserted, you can run up to about 130mm of travel.
3. Your Riding Terrain: If your local trails are rolling with short descents, 100‑125mm is plenty. If you ride steep, long descents regularly, aim for 150mm or more.
Why the AP316 Is the Best Budget Dropper Post for Most Riders
The Trifox AP316 is a 125mm travel dropper post available in 30.9mm and 31.6mm diameters. It’s constructed from durable 7075 aluminum, uses an air-sprung cartridge, and comes with a 1.5m remote cable. But what makes it truly special for budget-conscious riders is its three routing options: upper (APS316), center (APM316), or bottom (APD316) cable entry. This means no matter your frame—external or internal routing—you can find a version that fits cleanly. For those with older frames or external cable guides, the external routed dropper post options (upper or center) provide a simple, no‑drill installation. With its 125mm travel, it covers the needs of most trail, XC, and all-mountain riders. And at a price point that’s often under $70, it’s widely considered the best budget dropper post for anyone making their first foray into dropper posts.
The AP316: Your First Upgrade
You don’t need a 200mm post to enjoy the benefits of a dropper. For most riders, 125mm is the magic number—enough to get the saddle out of the way on descents while remaining compatible with a wide range of frames. The Trifox AP316 delivers that travel with reliable air-suspension performance, durable construction, and multiple routing options. It’s the perfect gateway to a more confident, capable, and fun mountain biking experience. Measure your exposed post, check your seat tube length, and if 125mm fits, the AP316 is your best value choice.
Modern riding demands modern gear. Your handlebar is home to your GPS computer, your headlight, maybe an action camera, and sometimes a phone mount. The result? A cluttered cockpit where cables tangle, devices compete for space, and nothing feels secure. The Trifox SBH100 carbon computer mount is designed to solve this exact problem. It’s not just a mount—it’s an integrated solution that organizes your essential devices into a single, clean, and rock-solid platform.
The Problem: A Handlebar That’s Out of Space
Traditional mounting means a separate bracket for your computer, another clamp for your light, and perhaps a third for a camera. Each adds weight, consumes precious handlebar real estate, and often results in a setup that looks messy and feels unstable. Worse, these individual mounts can interfere with your controls or create distracting vibration. For riders seeking a clean stem bike computer mount that can handle more than one device, the options have been limited—until now.
The Solution: One Mount, Three Functions
The SBH100 is engineered as a multi-device hub that attaches cleanly to your stem or handlebar. Its 3K carbon fiber construction is incredibly lightweight yet exceptionally rigid, ensuring your devices stay exactly where you put them—no wobble, no sag. At the heart of the system is a universal quarter-turn interface that securely holds most major cycling computers, including Garmin Edge series, Bryton, Cat Eye, iGPSPORT, and Blackbird. This makes it an ideal gps mountain bike computer mount for riders who rely on accurate navigation and performance data.
But the real innovation is the SBH100’s modular expansion. Integrated into the mount are standard GoPro-style mounting points, allowing you to attach an action camera or a bike light (up to 25mm diameter) directly below or above your computer. Everything is aligned and centered, creating a professional, aerodynamic profile that doesn’t clutter your bars. No additional clamps, no zip ties, no compromises.
Why Carbon Fiber Matters
The SBH100 is constructed from 3K carbon fiber, a material chosen for its exceptional stiffness-to-weight ratio. Weighing just grams, it adds virtually no weight to your bike while providing the rigidity needed to keep devices steady on rough terrain. Carbon also absorbs high-frequency vibration better than aluminum, reducing the risk of your computer shaking loose or your camera footage appearing shaky. It’s a small detail that makes a big difference in real-world use.
Compatibility and Versatility
The SBH100 is designed to work with the most popular cycling electronics on the market. Whether you use a Garmin Edge 830, a Bryton Rider 750, or a CatEye Padrone, the quarter-turn interface ensures a secure fit. The GoPro-compatible accessory mounts accept lights from brands like Lezyne, NiteRider, and others, as well as action cameras from GoPro and similar. This versatility means you can build your perfect cockpit without being locked into a proprietary ecosystem.
A Cleaner, Safer, More Professional Cockpit
By consolidating your computer, light, and camera into one integrated mount, the SBH100 does more than just organize—it improves safety. Your view of the trail is unobstructed. Your light beam isn’t blocked by a computer. Your cables can be routed cleanly. And when you stop for a coffee or a rest, you can quickly remove the entire assembly with a simple twist.
For riders who value a clean, functional cockpit, the Trifox SBH100 is the solution. It transforms the handlebar from a collection of individual brackets into a unified command center, proving that the best way to solve the multi-device puzzle is to stop adding mounts—and start integrating them.
You’ve invested in a high-performance carbon saddle. It’s lighter, stiffer, and designed to provide the perfect platform for power transfer and long-distance comfort. You bolt it onto your existing seatpost, torque it to spec, and head out for a ride. Everything feels great—until it doesn’t. A few miles in, you notice a faint creak. Over time, the saddle shifts, or worse, you worry about damaging those expensive carbon rails. The culprit? Your standard saddle clamp may not be designed to properly accommodate carbon rails. This is where a simple upgrade like the Trifox saddle clamp becomes essential.
Why Carbon Rails Are Different
Traditional metal saddle rails are typically 7mm round. They’re forgiving and work with almost any standard two-bolt seatpost clamp. Carbon rails, however, are a different story. Many premium saddles use oval-shaped 7x9mm rails, which are larger and have a different profile than standard round rails. Clamping a 7x9mm oval rail into a clamp designed for 7mm round rails creates a poor fit. The clamp won’t distribute pressure evenly, leading to one of two problems: either the saddle slips under load, or you overtighten the clamp to compensate, risking crushing or damaging the carbon structure of the rails. Either outcome is frustrating and potentially expensive.
The Simple Solution: A Compatible Clamp
Upgrading to a seatpost clamp adapterspecifically designed for your rail type is a small investment that protects a much larger one. The Trifox saddle clamp is available in two versions:
* Round 7x7mm: For standard round metal rails, offering a secure, even clamp for traditional saddles.
* Oval 7x9mm: For modern carbon rails, with a precisely shaped cradle that matches the oval profile, ensuring uniform pressure distribution without stress points.
This small aluminum component is engineered to provide a secure, creak-free interface between your seatpost and your saddle, regardless of which rail type you use. It’s a critical piece of the puzzle for anyone upgrading to a carbon-railed saddle.
Who Needs This Upgrade?
Consider this clamp if any of the following apply:
* You’re upgrading to a carbon saddle with 7x9mm oval rails.
* Your current saddle slips or creaks despite being torqued correctly.
* You’ve recently changed seatposts and the original clamp hardware doesn’t fit your new saddle’s rails.
* You want the peace of mind that comes from a perfectly matched saddle-to-post interface.
Installation and Peace of Mind
Installing the correct clamp is straightforward. Remove your existing saddle clamp hardware, replace it with the Trifox unit that matches your rail type, torque the bolt to the manufacturer’s specification (typically around 12-15 Nm for seatpost clamps), and ride with confidence. The right clamp ensures that every watt you put into the pedals is transferred efficiently, with no energy lost to a slipping saddle and no anxiety about damaging your carbon investment.
Ultimately, the small cost of a compatible saddle clamp is dwarfed by the value of the components it protects. Whether you’re upgrading to a premium carbon saddle or simply ensuring your current setup is dialed, this is one of those overlooked parts that can make the difference between a ride that’s perfect and one that’s plagued by creaks, slips, and uncertainty.
Your handlebar is prime real estate. It’s where you mount your computer, your lights, your action camera, maybe even a phone. Before long, what started as a clean cockpit becomes a cluttered mess of brackets, wires, and zip ties. This clutter isn’t just unsightly—it can interfere with controls, create distracting shadows from your light, and even compromise safety in a crash. The Trifox STH200 offers an elegant solution: it moves your computer (and your light) off the handlebar entirely, mounting them securely under your saddle.
A Smarter Location for Your GPS
The STH200 is a bike computer mount for aero bars—or for any handlebar setup—that installs directly onto your saddle rails. Using a sturdy aluminum and plastic construction, it clamps securely to the two rails under your seat. From this central post, it extends downward, providing a stable platform for your devices. This repositioning is a game-changer. Your computer is now out of the wind and elements, tucked safely behind you, while your handlebar is completely free for your hands and controls. The mount weighs just 43 grams, so it adds negligible weight while solving a major cockpit organization problem.
Rock-Solid Stability for Your Devices
One of the biggest concerns with moving a computer away from the handlebar is vibration and stability. The STH200 excels here. Its dual-device design allows you to mount a bicycle garmin mount and a bike light simultaneously, using the standard quarter-turn interface for computers and a GoPro-style mount for lights. The aluminum construction is notably rigid, with reviewers praising that it holds devices “rock-solid” and “with zero wobble, even on gravel.” The angle is adjustable, allowing you to tilt the display for optimal viewing from your riding position or aim your light directly at the trail or road behind you. It’s a level of stability that belies its simple design.
Compatibility and Versatility
The STH200 is designed to work with the most popular cycling computers on the market. Its standard quarter-turn interface makes it compatible with Garmin Edge series, Bryton, iGPSPORT, Blackbird, and Cat Eye devices. The secondary GoPro-style mount can accommodate a wide range of bike lights, action cameras, or other accessories. Installation is straightforward—simply clamp the mount to your saddle rails, attach your computer and light, and adjust the angle to your preference. As one reviewer noted, “Installation took two minutes.”
The Value of a Clean Cockpit
A decluttered handlebar isn’t just an aesthetic preference. It means your controls are always unobstructed, your light beam isn’t blocked by a computer, and your bike is easier to pack into a car or travel case. For riders with aerodynamic handlebars, the STH200 offers a perfect bike computer mount for aero bars that keeps the front end clean and fast. For mountain bikers, it moves a vulnerable computer out of harm’s way in a crash. For commuters, it provides a safe, stable home for a bright rear light.
In short, the Trifox STH200 is a simple, affordable, and highly effective upgrade that transforms your cockpit. It relocates your essential electronics to a secure, stable spot under your saddle, freeing your handlebar for what matters most: your hands and your focus on the road or trail ahead.
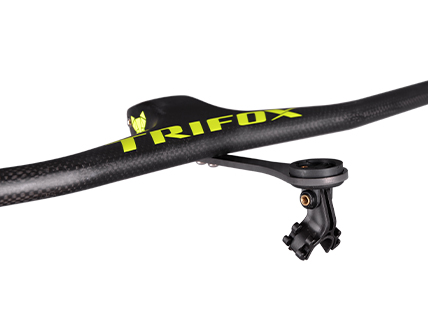
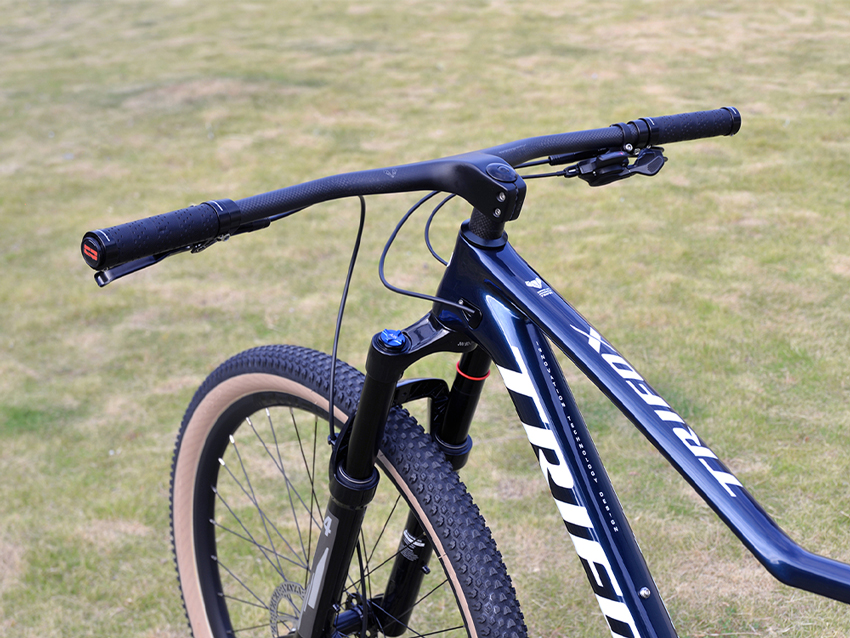
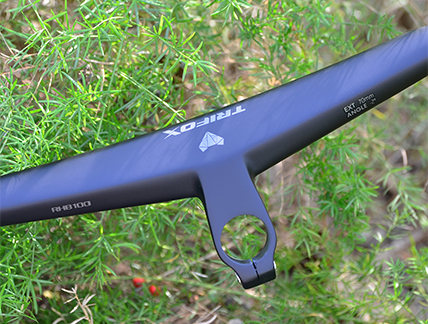
When it comes to mountain bike handling, the handlebar is your primary connection to the trail. Its geometry—the angles and dimensions—dictates how you control the bike, how efficiently you climb, and how confidently you descend. The Trifox RHB200 integrated carbon handlebar features a purposeful combination of a -17° stem angle and a 9° backsweep, a pairing meticulously chosen to deliver a balanced, powerful, and comfortable riding position for aggressive trail riding. Understanding these numbers reveals why the RHB200 is engineered for control.
The -17° Stem: Aggressive and Stable
The stem angle is critical for setting your front-end height and reach. A -17° stem is on the lower end of the angle spectrum, meaning it positions the handlebar lower and further forward relative to the steerer tube. This creates a more aggressive, aerodynamic riding position that lowers your center of gravity. On steep descents, this lower stance inspires confidence, allowing you to weight the front wheel effectively for traction and control. During high-speed sections, it promotes stability by placing your body in a balanced, centered position over the bike. This angle is favored by riders who prioritize precise, aggressive handling and want to maintain a low, powerful profile on the trail.
The 9° Backsweep: Natural Wrist Position
The backsweep angle dictates how far the grips are angled back toward the rider. A 9° backsweep is a carefully calibrated figure for mountain biking. It places your hands and wrists in a more natural, neutral alignment, which is crucial for two reasons. First, it significantly reduces strain and fatigue in your wrists, forearms, and shoulders during long climbs and extended rides. By allowing your hands to sit in a position that follows your arm's natural angle, you can maintain a relaxed, powerful grip with less muscular tension. Second, it optimizes leverage and control when descending. This natural wrist angle allows you to pull up on the bars for manuals or absorb impacts with greater strength and less effort, giving you more precise command over the front wheel through rough sections.
The Integrated Advantage: Stiffness and Feedback
Beyond the angles, the RHB200's integrated, one-piece T800 carbon fiber construction is key to translating this geometry into performance. By eliminating the separate stem and bar interface, this design creates an incredibly stiff and direct connection. When you lean the bike into a corner or make a sudden line correction, the response is immediate and precise, with zero detectable flex or delay. This stiffness provides exceptional feedback, allowing you to feel exactly what the front wheel is doing. Despite its rigidity, carbon's natural vibration-damping properties filter out high-frequency trail chatter, reducing arm pump without sacrificing the valuable feedback you need to stay in control.
A Customizable Fit for Every Rider
The RHB200 is available in stem lengths of 80mm, 90mm, 100mm, and 110mm, and the 800mm width can be cut down, allowing you to fine-tune your reach and leverage to match your body and riding style perfectly. Weighing in at approximately 280g, it's a significant weight saving over most alloy combinations, contributing to a livelier, more responsive front end.
In conclusion, the Trifox RHB200's geometry isn't an accident; it's an engineered system designed to enhance trail control. The -17° stem provides an aggressive, stable platform for descents, while the 9° backsweep ensures ergonomic comfort and powerful leverage. For riders seeking a set of high-performance bars for mountain bike that offer this precise blend of control and comfort, the RHB200 represents a compelling choice. It transforms the cockpit into a cohesive, responsive tool that instills confidence on every climb and descent, solidifying its place as a contender for the best mtb handlebars available.
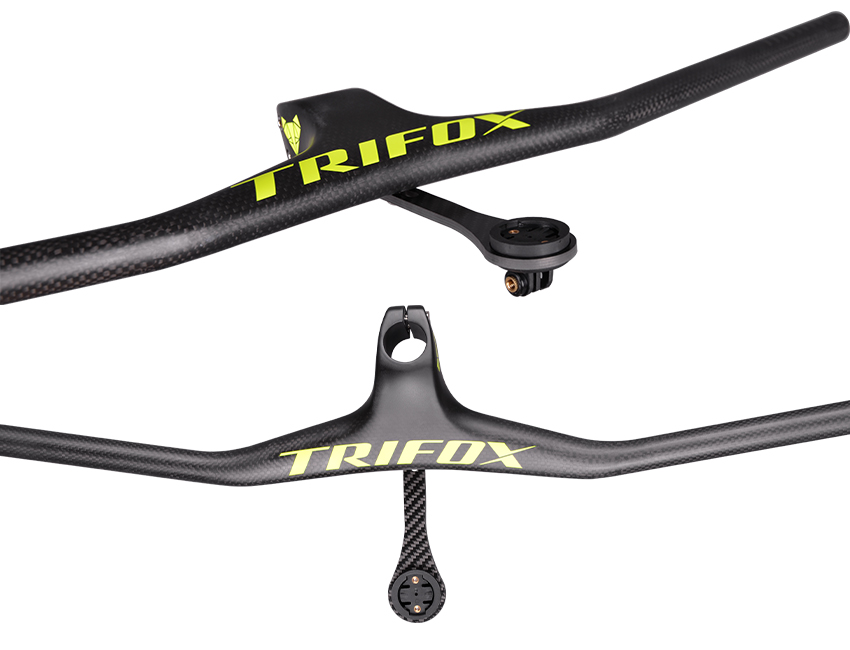
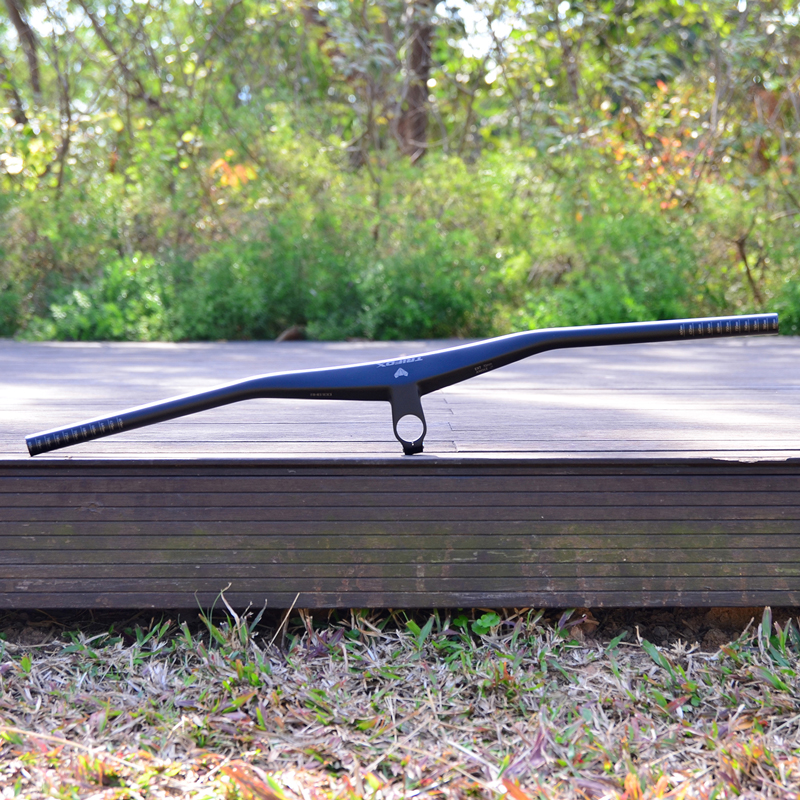
Upgrading your handlebar is one of the most direct ways to change how your bike feels. But with options ranging from basic alloy to high-end integrated carbon, it's fair to ask: is an integrated carbon bar truly worth the investment? We spent time riding and evaluating the Trifox RHB100—an aero integrated carbon handlebar designed for mountain bikes—to see if its promises of reduced weight, increased stiffness, and improved ergonomics translate into a better riding experience.
First Impressions: Weight and Build Quality
Lifting the RHB100 out of the box, the first thing you notice is its remarkable lightness. At a claimed weight of just 244 grams (for the complete bar and stem assembly), it represents a significant weight saving over almost any alloy combination. This reduction is immediately noticeable when you pick up the bike, and on the trail, it translates to a front end that feels lively and easier to maneuver. The T800 carbon fiber construction feels dense and high-quality, with a clean matte finish and precise molding around the stem clamp area. The integrated design eliminates the separate stem and faceplate, contributing to both the low weight and a sleek, uncluttered aesthetic.
On the Trail: Stiffness and Control
Mounting the RHB100 is straightforward, thanks to printed alignment marks for shifters and brakes. Once installed, the difference in stiffness is palpable. The one-piece construction creates an incredibly direct connection between your hands and the fork. When you pull up on the bars for a manual or lean the bike into a high-speed corner, there's zero detectable flex. This rigidity inspires confidence, especially on technical descents where precise steering input is critical. The 6° rise and 6° backsweep geometry places your hands in a natural, comfortable position that reduces wrist fatigue without feeling overly upright. For riders seeking responsive mtb bars, this setup delivers.
The Aero Advantage and Clean Cockpit
While aerodynamics are less critical on a mountain bike than on the road, the RHB100's clean, integrated profile does offer benefits. The lack of a protruding stem and faceplate creates a smoother surface that slices through the air marginally better. More importantly, the clean lines provide a perfect foundation for a tidy cockpit. The bar's shape allows for neat cable routing, and its flat top section offers a stable platform for mounting a computer or light. This contributes to an overall professional, finished look that many riders appreciate.
The Trade-Offs: Fit and Adjustability
The primary consideration with any integrated bar is that you're committing to a specific stem length and bar width. The RHB100 is available in stem lengths of 40, 50, 60, and 70mm, and the 800mm width can be cut down. You must be confident in your fit before purchasing, as you cannot swap stems independently. For riders who know their preferred position, this is a minor trade-off for the gains in weight, stiffness, and aesthetics. For those still experimenting with fit, a standard bar and stem might be a more flexible starting point.
The Verdict: A Worthwhile Upgrade
For the rider who has dialed in their fit and is looking to shed weight, increase front-end stiffness, and elevate the look of their bike, the Trifox RHB100 is a compelling upgrade. It delivers on its promises of lightweight performance and precise control, all at a fraction of the cost of many comparable carbon offerings. The build quality is excellent, and the on-trail feel is noticeably more direct and responsive. If you're considering moving to high-performance mtb bike bars, the RHB100 represents a significant and worthwhile step up. It transforms the cockpit from a collection of parts into a cohesive, high-performance system that enhances every ride.
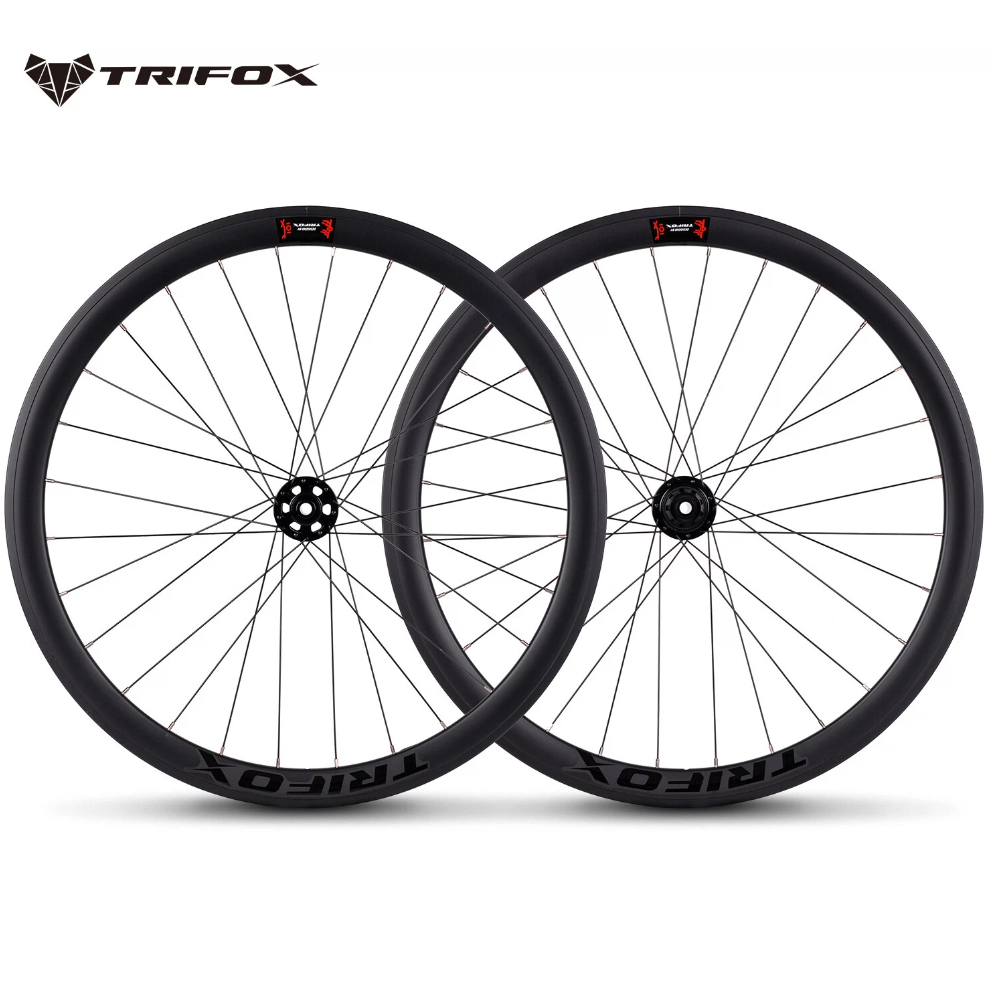
Finding a single wheelset that can tackle steep mountain passes, withstand the rigors of daily commuting, and deliver a lively feel on a classic weekend club run is a tall order. Many wheels are specialized for one task but compromise on others. The Trifox AWT7 alloy disc brake wheelset defies this trend. With its thoughtfully chosen 30mm rim depth, durable alloy construction, and smooth-rolling hubs, it proves to be a versatile performer, equally at home on climbs, commutes, and classic road adventures.
On Climbs: Lightweight and Responsive
When the road tilts upward, every gram counts. The AWT7 wheelset strikes an excellent balance, with a pair weight of approximately 1956g (front: 920g, rear: 1036g). This is notably light for a durable alloy wheelset with disc brake compatibility. The low rotational mass means less effort is required to accelerate the wheels out of a corner or up a steep pitch. The stiffness of the alloy rims, laced with 28 Pillar stainless steel spokes front and rear, ensures that when you stand on the pedals, your power translates directly into forward momentum with minimal flex. The 6-pawl, 120-point engagement hubs deliver that immediate, crisp pickup when you need to power over a crest or accelerate out of a hairpin.
For Commutes: Durable and Reliable
Daily riding puts a unique strain on equipment. Potholes, curb hops, and unpredictable weather demand durability and reliability. The AWT7's welded aluminum rim construction and robust 28-spoke count provide the strength needed to withstand the daily grind without sacrificing weight. The 14mm inner rim width is optimized for the popular 25-28mm tire sizes, offering a stable tire profile that enhances comfort and grip on less-than-perfect pavement. The sealed cartridge bearings (with ceramic options on the rear) resist the elements, ensuring smooth rolling in rain or shine. The 12mm thru-axle compatibility guarantees a secure, rattle-free connection to modern frames and forks, essential for safe braking and handling in traffic.
In the Classics: Agile and Stable
Classic road riding—whether a spirited fondo or a fast group ride—demands wheels that feel lively yet predictable. The AWT7's 30mm rim depth hits a sweet spot. It's deep enough to offer an aerodynamic benefit and improve crosswind stability compared to deeper sections, yet shallow enough to keep the wheel light and responsive. The wheels accelerate eagerly and hold speed well on rolling terrain. The disc brake interface provides consistent, powerful stopping power in all conditions, giving you confidence on long, fast descents. Whether you're attacking a short, steep climb or cruising in the peloton, the AWT7 feels connected and engaging.
Versatility Without Compromise
The Trifox AWT7 doesn't try to be the lightest pure climbing wheel or the deepest aero section. Instead, it masterfully combines the best attributes of an alloy wheelset into a single, versatile package. Its strength makes it a perfect choice for year-round training and commuting. Its weight and responsiveness make it a joy on climbs and spirited rides. And its reliability makes it a trusted companion for any road adventure. For riders seeking one set of road bicycle wheels that can truly do it all, the Trifox 700c road bike wheels AWT7 represents an outstanding blend of performance, durability, and value.


