


Let's be honest: the sight of a modern internal cable handlebar can be intimidating. The sleek, unbroken lines promise aerodynamic gains and a clean look, but they also whisper of complicated installations and future maintenance headaches. These concerns are valid, but they're also largely based on outdated experiences. Today's integrated cockpits, like the Trifox RHB600, are designed with the user in mind, transforming installation from a daunting task into a straightforward, confidence-building process.
The key to success lies in understanding the systematic approach to installation. First and foremost: Torque and Tools Matter. This cannot be overstated. Carbon components require precise installation. For the RHB600 carbon mtb bar, we specify exact torque values for the stem faceplate bolts (typically 4-6 Nm) and the top cap pre-load bolt (typically 2-4 Nm). Using a quality torque wrench is not optional; it's essential to prevent slipping, overtightening, and potential damage. Always apply a thin layer of carbon assembly paste to the handlebar clamp area and the steerer tube to ensure a secure, non-slip interface. This simple step ensures your position stays put without damaging the carbon fibers.
The Bolt Layout Design of the stem section is engineered for ease and security. The RHB600 features a 4-bolt front-loading faceplate. This design allows you to easily place the handlebar, set your desired angle, and then evenly tighten the bolts in a cross pattern. This method ensures uniform pressure distribution, eliminating gaps or uneven clamping force that could lead to stress points or slippage. The included top cap and spacers provide the necessary flexibility to fine-tune your stack height before finalizing the headset preload, making initial setup intuitive.
Now, let's tackle the elephant in the room: Integrated Routing Simplified. The RHB600 is designed to make cable and hose installation as painless as possible. Key features facilitate this:
* Large, Accessible Ports: The entry and exit ports are generously sized, making initial threading much easier.
* Smooth Internal Channels: The interior of the carbon bar is molded with smooth guides to prevent hoses from snagging.
* Removable Port Covers: The sleek rubber grommets or port covers can be easily removed for routing and just as easily popped back in for a clean finish.
Think of it this way: We've done the hard part. The complex internal channels are precision-molded into the carbon structure during manufacturing. Your task is simply to guide the cables and hoses through a pre-designed, optimized path. Start by feeding a mechanic's cable or a dedicated guide wire through from the stem end, attach your housing, and pull it through. A little patience and the right technique make the process manageable for any home mechanic.
This focus on user-friendly design extends from installation to long-term Serviceability. The fully integrated design isn't a maintenance trap. Once set up, the system is incredibly reliable. Should you ever need to replace a cable or hose, the process is simply the initial installation in reverse. The design ensures that routine maintenance remains accessible.
Ultimately, the RHB600's installation process is a direct reflection of a user-centric design philosophy. By providing clear guidelines, thoughtful engineering in the bolt layout, and simplifying the internal routing path, we've turned a potential barrier into an opportunity. Following these steps doesn't just secure your components; it builds your confidence in the product. A proper installation is the first step in building trust with your new carbon mtb bar, transforming initial apprehension into the satisfying certainty of a secure, professional-grade setup that's ready for the trail.

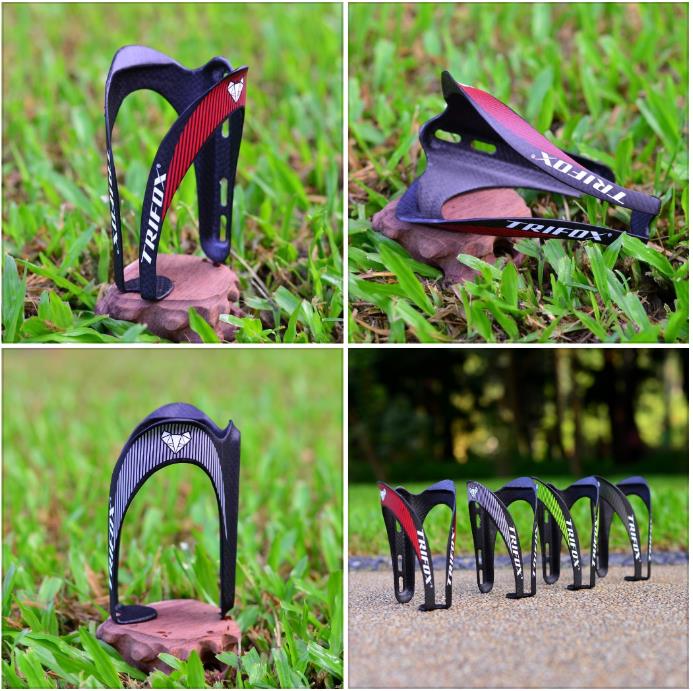
Every cyclist knows the frustration: hitting a rough patch of trail or a pothole on the road, only to hear the dreaded *clatter* of a water bottle bouncing onto the asphalt. A lost bottle means lost hydration and a frustrating stop. This common failure point is why designing a carbon fiber bottle cage is a precise exercise in balancing two opposing forces: maximum grip and minimum weight.
The quest for the lightest bottle cage often leads to minimalist designs that sacrifice security. Conversely, an overly tight, heavy cage can make retrieving and replacing a bottle a wrestling match mid-ride. The engineering challenge is to create a structure that uses material intelligently to lock a bottle in place without excess bulk.
At Trifox, we approach this through advanced carbon fiber layup and strategic geometry. Our bike bottle holder designs, like the CBC200, start with high-modulus carbon fiber. This material offers an exceptional strength-to-weight ratio, allowing us to create a cage that is incredibly light yet structurally rigid. The rigidity is crucial—it prevents the cage from flexing and loosening its hold over time or on rough terrain.
The true magic, however, lies in the shape. Grip isn't achieved by simply squeezing the bottle tighter. It's about intelligent contact points. We mold the cage arms with a specific concave curvature and textured inner surface. This shape cradles standard-sized bottles securely, creating even pressure distribution. The result is a firm hold that resists vertical bounce and lateral ejection, even when the bottle is half-full and at its most unstable.
Furthermore, the entrance and exit of the cage are carefully flared. This design consideration is critical for usability. A smooth, wide mouth allows for easy, one-handed bottle insertion and removal—a must during a hard effort—while the narrower mid-section provides the actual retention grip. This ergonomic detail ensures the cage is not just a static holder but a functional component of your ride.
The Trifox CBC200 exemplifies this philosophy. By optimizing the carbon weave and employing a unidirectional layup in high-stress areas, we shave every unnecessary gram without compromising the cage's integrity. It’s a testament to the fact that the lightest bottle cage doesn’t have to be the most fragile. Every contour, every fiber orientation, is calculated to contribute to both retention and overall bike weight savings.
Ultimately, a great carbon fiber bottle cage is an exercise in harmony. It must be light enough to be worth the upgrade, grippy enough to be utterly reliable, and smartly shaped for seamless use. It's not just about holding a bottle; it's about ensuring your hydration is always there when you need it, without a second thought. In the balance between Grip and weight, the winning formula is precision engineering, not compromise.
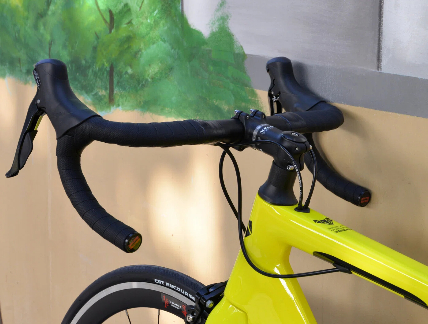
Upgrading your cockpit shouldn't feel like solving a complex puzzle. A stem that doesn't fit your handlebar can turn an exciting upgrade into a frustrating ordeal. This guide will demystify the key standards and explain how a versatile component like the Trifox Alloy Light Stem ABS300 is designed for broad, hassle-free compatibility.
The Core Standard: Handlebar Clamp Diameters
The most critical check is the stem-to-handlebar fit. The industry uses two main diameters:
• 31.8mm (The Universal Standard): The default for most modern mountain bike stems and road bike stems. It offers a great balance of stiffness and weight.
• 35mm (The Oversized Standard): Used on some high-end bikes for maximum stiffness.
The Trifox ABS300 features a 31.8mm handlebar clamp, making it instantly compatible with the widest range of handlebars.
Compatibility Checklist: What Works with the ABS300
Here’s a quick guide to what fits:
• Handlebars: Any standard 31.8 mm stem diameter bar (most MTB and road bars).
• Fork Steerer: Standard 1-1/8" (28.6mm) threadless forks.
• Shift/Brake Levers: All major brands (Shimano, SRAM). Levers mount to the bar, independent of the stem.
• Use: Designed for both mountain and road bikes.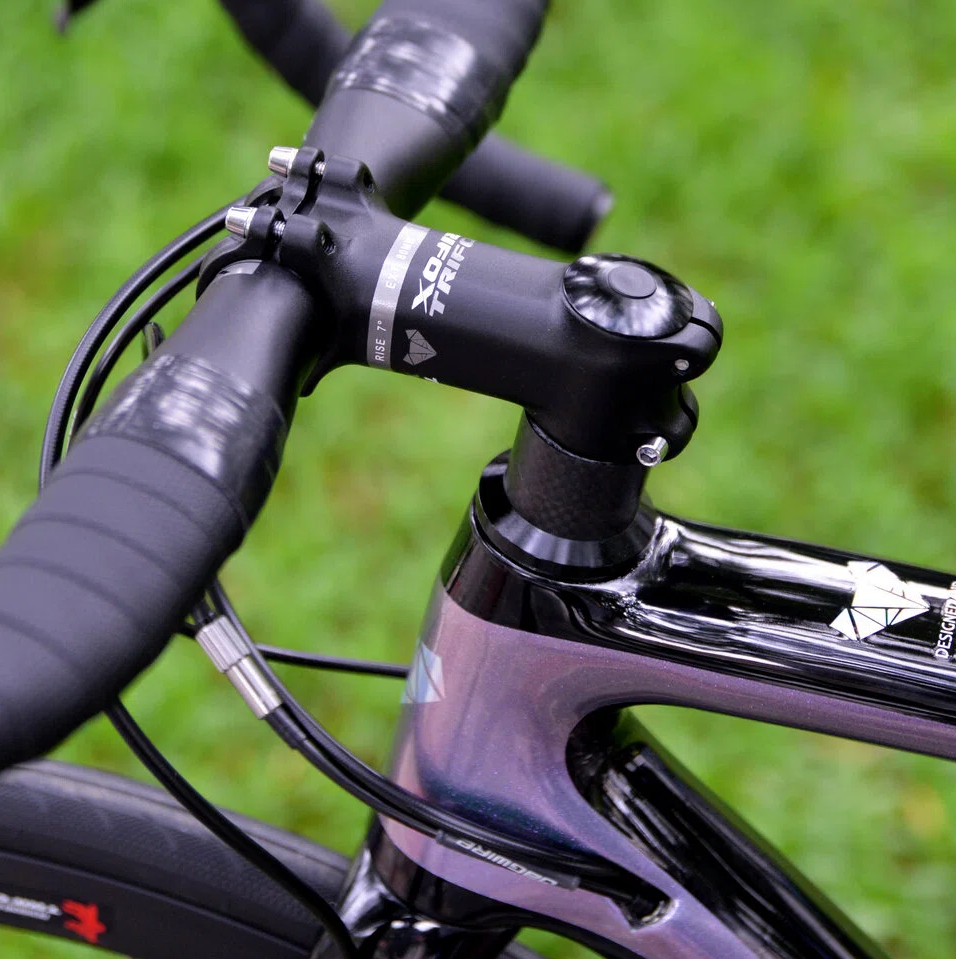
Precision Matters: The Role of Tolerances
Two parts listed as 31.8mm might not fit perfectly due to manufacturing tolerances (allowed margin of error). Low-quality stems with poor tolerances can lead to unsafe, uneven clamping. The Trifox ABS300 is precision CNC-machined with extremely tight tolerances. This guarantees a perfect, secure fit with standard bars—no shims, no guesswork, just safe and reliable performance.
Pro Installation Tips for a Safe Fit
1. Clean Surfaces: Wipe the bar and stem clamp with isopropyl alcohol.
2. Check Alignment: Center the handlebar in the stem.
3. Torque to Spec (CRUCIAL): Always use a torque wrench. Tighten bolts gradually in a cross pattern.
- For Aluminum Bars: Typically 5-6 Nm.
- For Carbon Bars: Use carbon assembly paste and torque to spec (check bar manual).
Conclusion: Compatibility Equals Confidence
Choosing a stem like the Trifox ABS300 eliminates compatibility guesswork. Its universal 31.8mm standard, precise manufacturing, and versatile design let you build with confidence, ensuring a safe and reliable connection between you and your bike for every ride.
Your bike computer is your command center, delivering vital data on speed, distance, and navigation. But if it’s angled poorly, you’ll be squinting, straining your neck, or taking your eyes off the trail for too long. Achieving the perfect angle is a simple yet transformative adjustment that enhances comfort, safety, and your connection to the ride. Here’s how to dial it in for any discipline.
Start with a Proper Mount
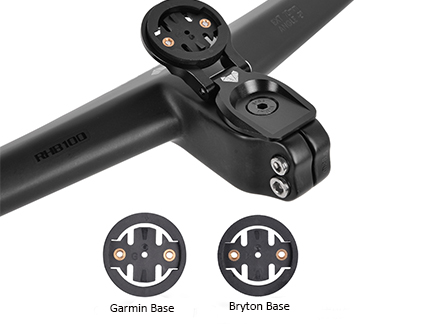
Before fine-tuning the angle, you need a solid and adaptable foundation. A high-quality mount, like the Trifox STH300, is essential. This isn't just alloy; it's the interface between your handlebar and your valuable device. Look for features that promise stability and versatility:
Secure Attachment: A robust clamp system that locks onto your handlebar without slippage, even on rough trails.
Adjustable Angle Mechanism: The core feature that allows you to fine-tune the tilt. A simple, tool-free lever or dial is ideal for on-the-fly adjustments.
Universal Compatibility: Ensure it fits your specific handlebar diameter and your computer’s mounting standard (e.g., Garmin, Wahoo).
A mount like the Trifox STH300 provides this reliable base, allowing you to focus on finding your optimal view. 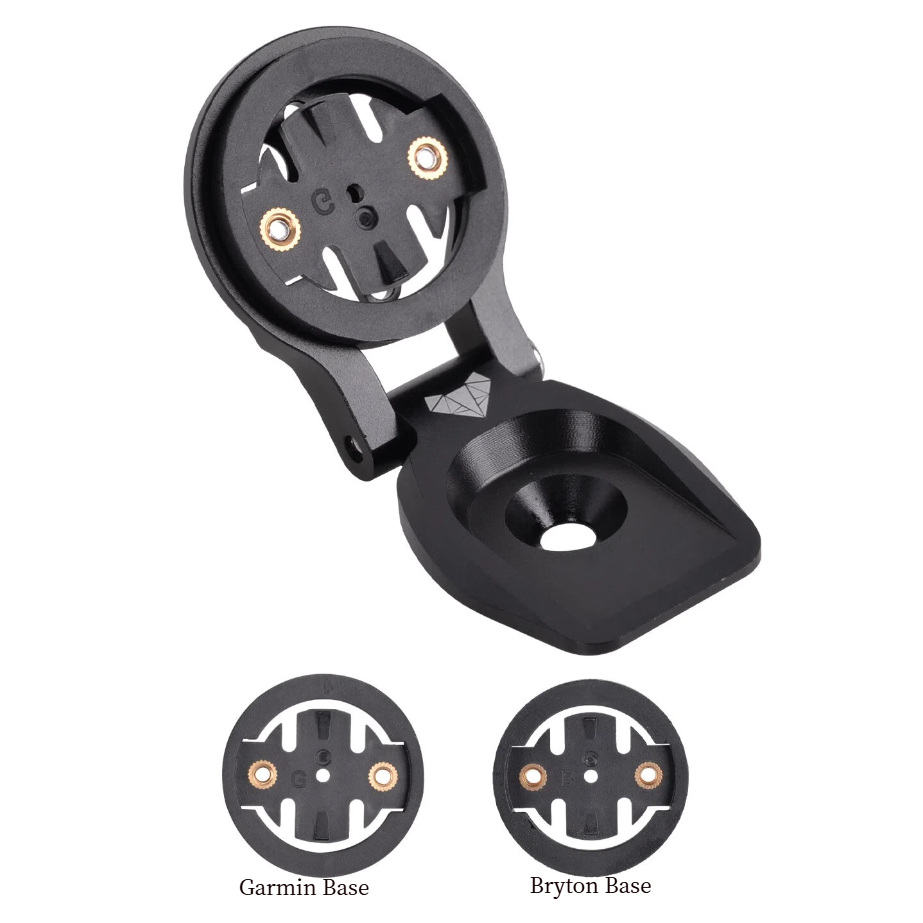
Finding Your Angle: Road vs. Mountain Bike Principles
The “correct” angle isn’t a single number; it’s dictated by your riding posture.
For Road & Gravel Riding (Aggressive Posture): When you’re in the drops or an aero tuck, your line of sight is lowered. Tilt the computer face slightly upward. This brings the screen perpendicular to your natural sightline, minimizing glare and making data easy to read without lifting your head. A good starting point is having the screen face roughly toward your chin when in your primary riding position.
For Mountain Biking & Upright Positions: On a trail bike or hybrid, your posture is more upright. The screen should be closer to level with the ground or tilted only very slightly upward. This prevents the display from being obscured by the handlebar or your hands and ensures quick glances for navigation or timer data. The key is to maximize the visible screen area from your higher vantage point.
The Simple Setup Method: The On-Bike Test
Forget protractors. Use this practical method:
1. Clip into your bike on a stationary trainer or have a friend hold you upright.
2. Assume your primary riding position—whether that’s in the hoods, drops, or a ready mountain bike stance.
3. Close your eyes, then naturally open them and look where your gaze falls.
4. Adjust the computer angle so the screen is facing directly into this natural line of sight. Your neck should feel neutral, not craned up or down. 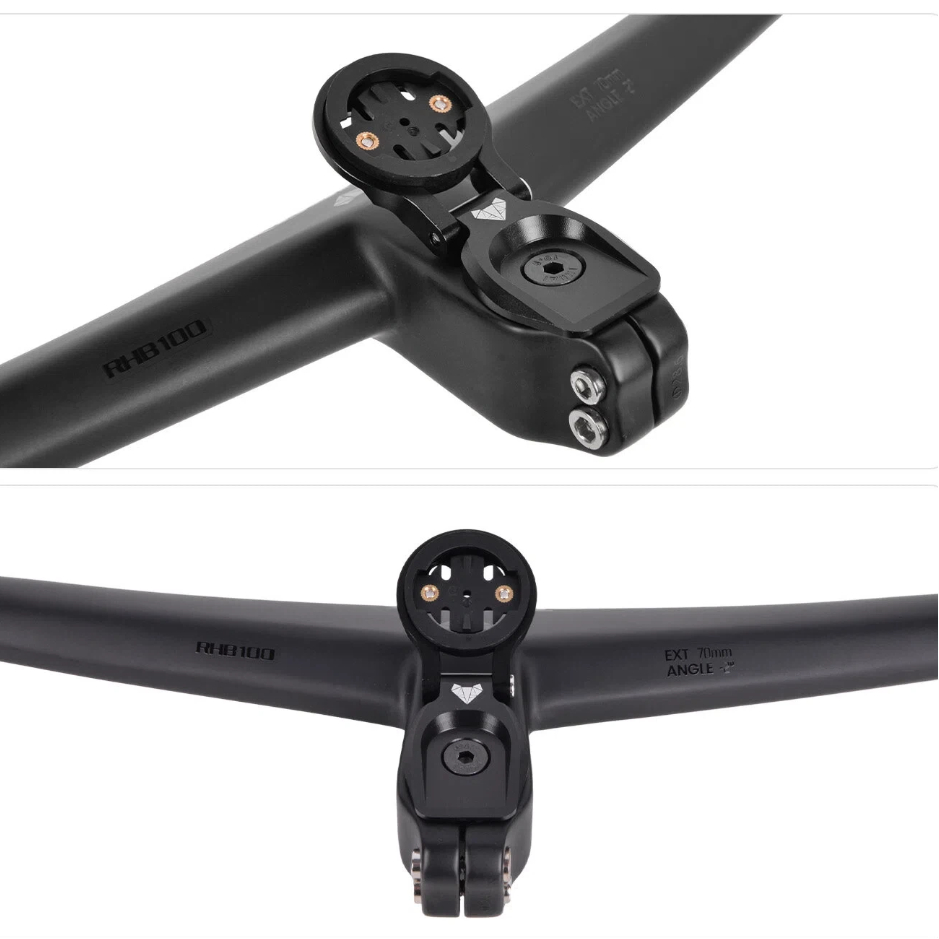
Pro Tips for Precision & Safety
Prioritize a Clear View: The screen should be completely visible, not blocked by cables, a bicycle light mount, or your hands. If you use a combined mountain bike computer mount and light bracket, position them so both devices have an unobstructed field of view.
Minimize Glare: Tilt the screen to avoid direct reflections from the sun or bright sky. A slight adjustment can make the difference between an illegible glare and a crisp display.
Ensure Stability: After setting the angle, check all fasteners. The computer should not wobble or vibrate, as this distracts and can lead to damage on rough terrain.
Safety Check: Before every ride, give the computer a gentle tug to confirm it’s locked securely into its mount. The last thing you need is for it to detach on a fast descent.
Why the Perfect Angle Matters
Spending a few minutes on this adjustment pays dividends:
Enhanced Safety: Quick, effortless glances keep your focus on the path or traffic ahead.
Reduced Fatigue: A neutral neck and eye position prevent strain on long rides.
Better Data Utility: When you can see your metrics clearly, you can use them effectively to pace your effort or follow a route.
Your bike computer should feel like a natural extension of your cockpit, not an awkward addition. By investing in a versatile, adjustable mount and taking the time to set the angle for your unique riding style, you unlock a smoother, safer, and more connected cycling experience. Look down with ease, and look ahead with confidence.
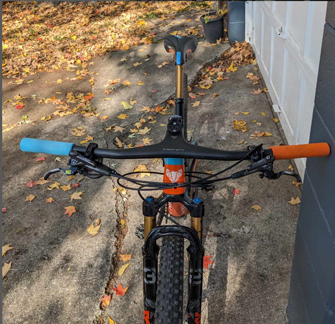
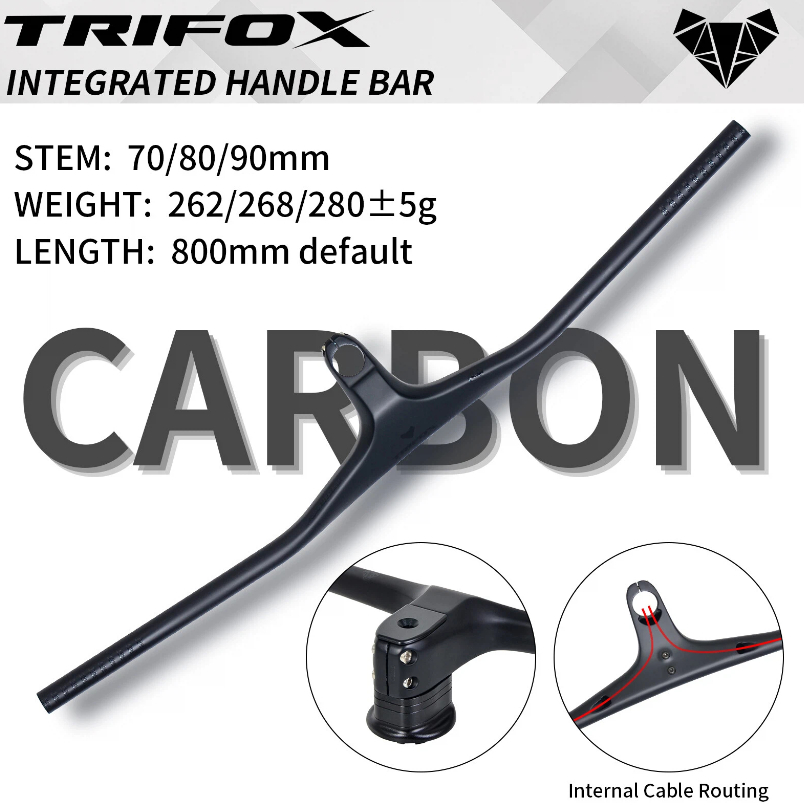
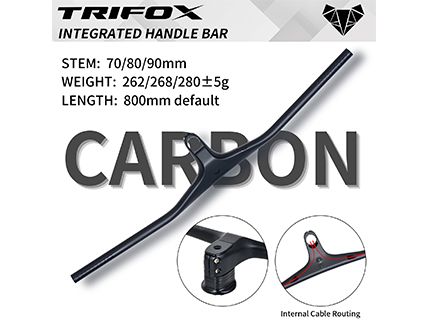
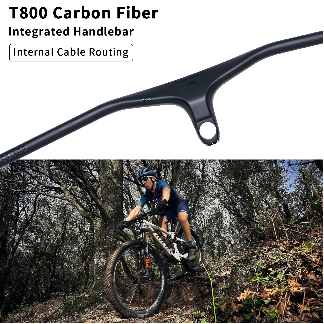
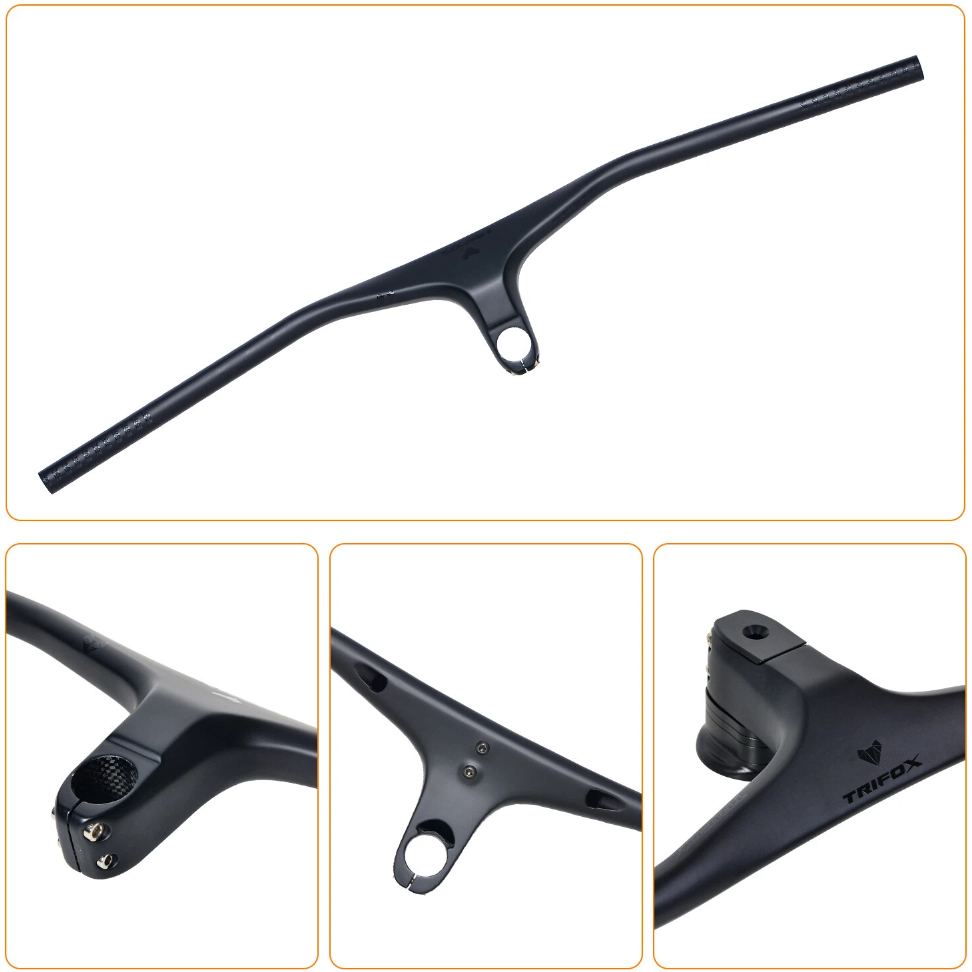
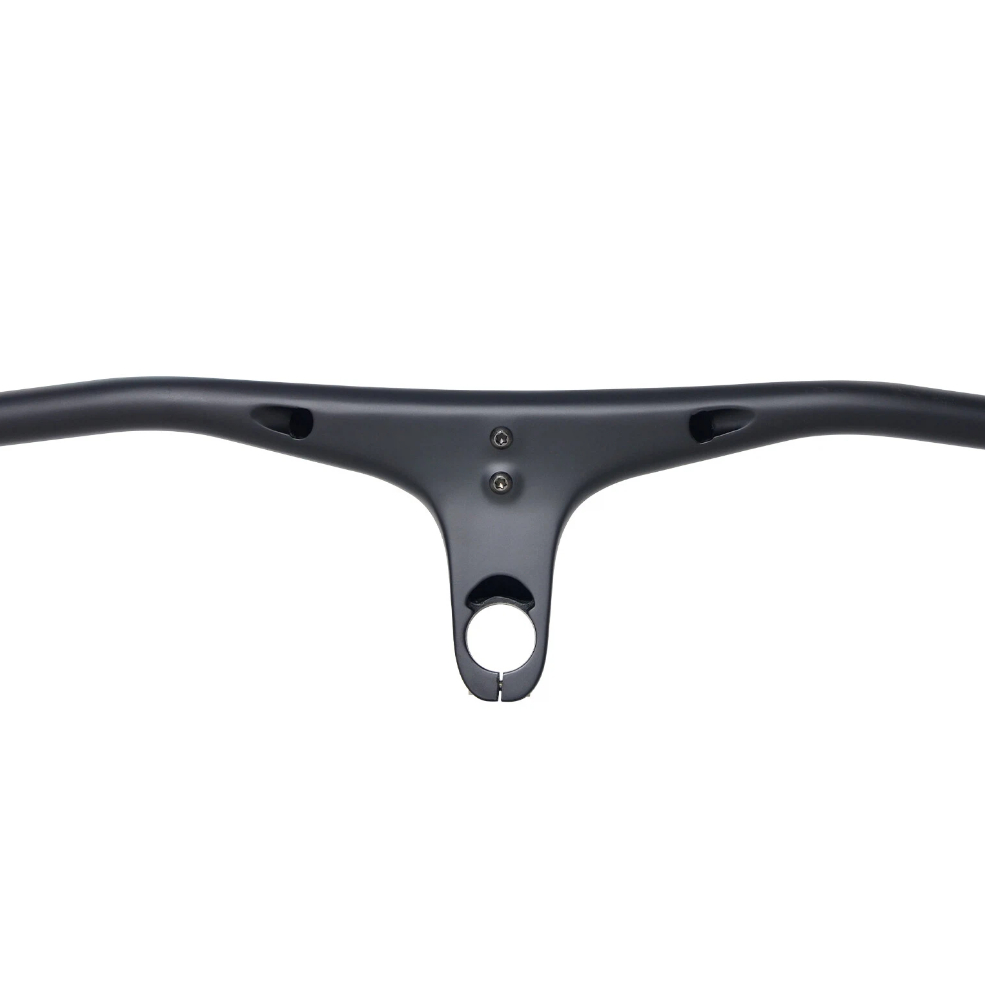
In the quest for a cleaner cockpit and enhanced performance, integrated handlebars have become the upgrade of choice for discerning mountain bikers. Trifox offers two excellent options in this category: the RHB200 and RHB600. Both are carbon fiber integrated MTB handlebars designed to improve your bike's front end, but they feature key differences that cater to varying preferences and needs. Understanding these distinctions will help you select the perfect cockpit upgrade for your trail adventures.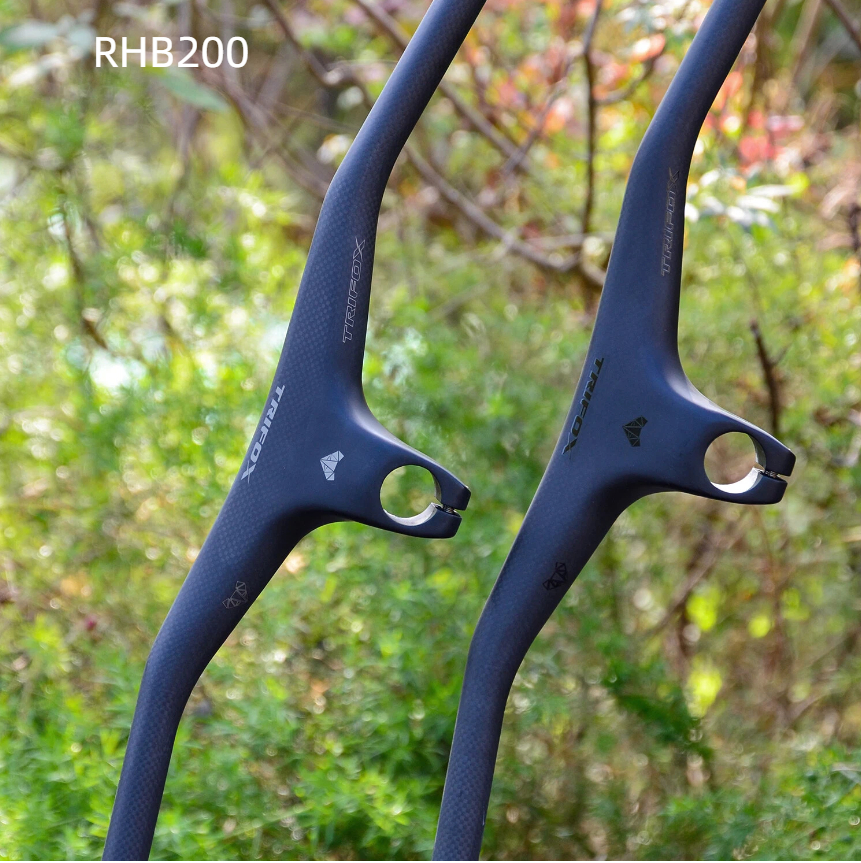
Design & Construction: Carbon Excellence for Mountain Biking
Both the Trifox RHB200 and RHB600 utilize high-quality carbon fiber construction, offering the ideal balance of lightweight performance and trail-ready durability. As carbon mtb handlebars, they provide superior vibration damping compared to aluminum alternatives, reducing hand fatigue on long rides while maintaining the stiffness needed for precise control in technical sections.
Geometry & Fit: Tailored for Trail Performance
Both handlebars are designed specifically as mountain bike riser handlebars with ergonomic geometries optimized for off-road riding. They feature moderate rise (typically 20-35mm) and backsweep (8-9 degrees) that position your hands naturally for control and comfort during long trail sessions. Both models represent excellent choices for riders seeking responsive mtb bicycle handlebars.
Cable Management: The Defining Difference
This is where the two models diverge most significantly, representing different approaches to cockpit cleanliness and maintenance accessibility.
The RHB200 Carbon Integrated MTB Handlebar utilizes a semi-integrated routing approach. While it features clean entry and exit points for cables, some cable housing may remain partially visible along the bar and stem interface. This design offers easier installation and maintenance while still providing a cleaner look than traditional separate components.
The RHB600 Carbon Integrated Full Internal MTB Handlebar represents the pinnacle of cockpit integration. All brake lines, derailleur cables, and dropper post housings route completely internally through the bar and stem structure. This full internal routing creates an exceptionally clean appearance while protecting cables from trail debris and weather elements. This makes the RHB600 a superior choice for those seeking the ultimate in internal cable routing solutions.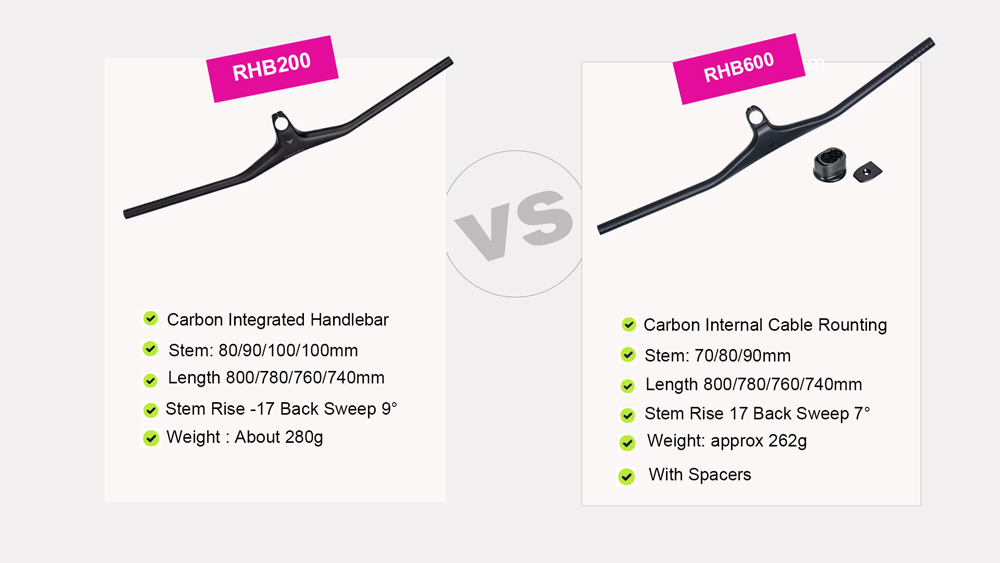
Weight & Performance Considerations
As lightweight mtb cockpit solutions, both bars offer significant weight savings over traditional setups. The RHB200 typically weighs between 260-300g (depending on width), making it a noticeable upgrade for riders seeking to reduce front-end weight without compromising strength.
The RHB600, with its additional material for internal routing channels, still very light (approximately 240-290g) and represents a significant improvement over non-integrated alternatives. Both models provide the responsive handling characteristics that serious mountain bikers demand from their mtb bars.
Compatibility & Installation
Both Trifox handlebars are designed for modern mountain bikes with tapered steerer tubes. The integrated stem lengths vary between models and within each product line to accommodate different bike geometries and rider preferences.
The RHB200 offers relatively straightforward installation similar to traditional handlebars, making it accessible for most home mechanics. The RHB600 requires more careful installation due to its internal routing system but rewards users with the cleanest possible cockpit aesthetic.
Value Proposition: Which Bar Is Right for You?
The choice between these two excellent carbon mtb handlebars comes down to your priorities for aesthetics, maintenance preferences, and budget.
Choose the Trifox RHB200 if you want a significant cockpit upgrade at a more accessible price point, value easier installation and maintenance, appreciate cleaner aesthetics but don't require complete cable concealment, or are building or upgrading a trail bike where value and performance balance matters.
Choose the Trifox RHB600 if you demand the cleanest possible cockpit appearance with full cable integration, prioritize modern, sleek aesthetics, don't mind the additional complexity of internal routing installation, or are creating a high-end build where every detail contributes to the overall premium appearance.
Both the RHB200 and RHB600 deliver exceptional value in their respective categories, offering the performance benefits of carbon fiber construction with improved integration over traditional setups. Whether you choose the accessibility of the RHB200 or the ultimate integration of the RHB600, you'll be upgrading to a cockpit that enhances both the performance and appearance of your mountain bike.

When it comes to optimizing your mountain bike for performance and aesthetics, every component matters. While many riders focus on upgrading suspension or wheels, the mtb bicycle handlebar often remains an overlooked opportunity for transformation. Integrated carbon mountain bike bars, like the Trifox Ultra Light Integrated Full Inner Mountain Bike Handlebar RHB600, offer a revolutionary approach to achieving a cleaner, lighter, and more efficient setup.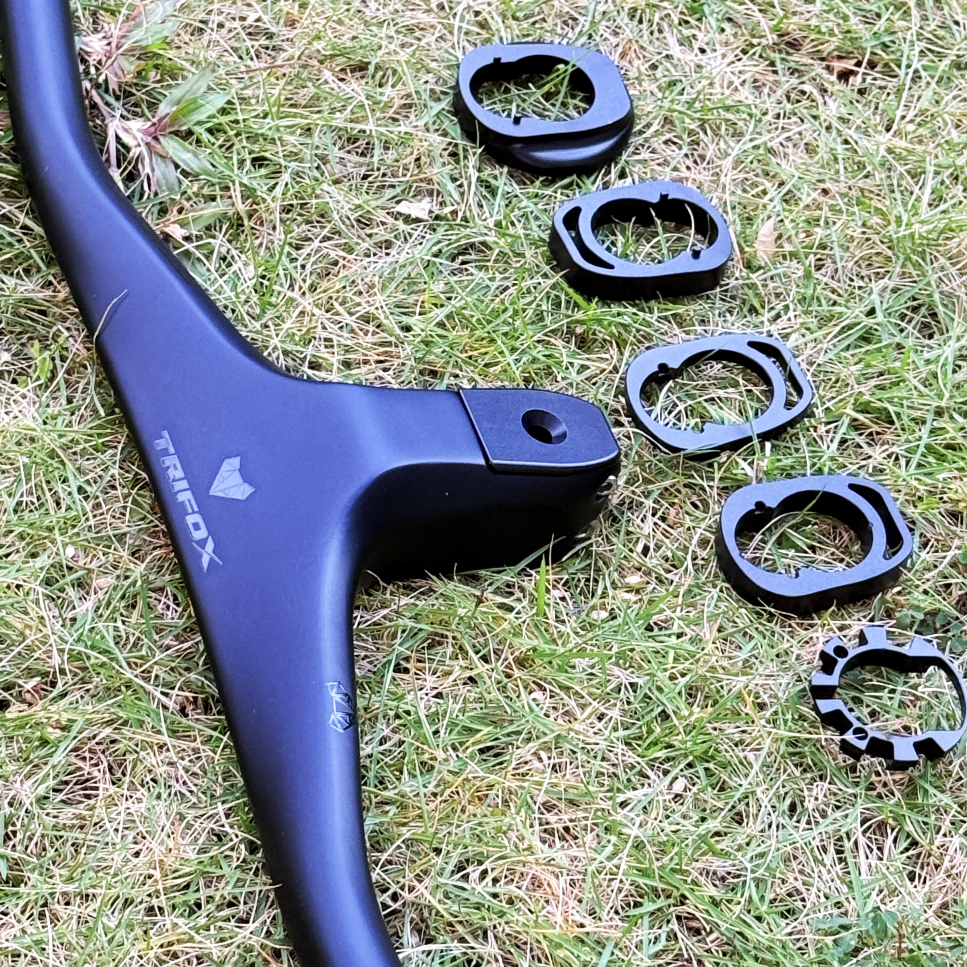
The Problem with Traditional Handlebars
Traditional mtb bike handle setups often involve multiple parts: the bar itself, a separate stem, and external cable routing. This not only adds weight but also creates a cluttered appearance vulnerable to cable snags and dirt accumulation. For riders seeking a sleek and functional solution, integrated bars present a compelling alternative.
Benefits of Integrated Carbon Design
1. Cleaner Aesthetics and Functionality
The Trifox RHB600 features full internal cable routing, eliminating exposed cables and housing. This streamlined design reduces the risk of snagging on trails and simplifies cleaning. Whether you're navigating dense forests or rocky descents, an integrated mtb cycle handlebar ensures your cockpit remains tidy and functional.
2. Significant Weight Reduction
Crafted from high-modulus carbon fiber, the RHB600 is exceptionally lightweight without sacrificing strength. By merging the stem and bar into a single unit, it removes redundant materials, making it an ideal upgrade for cross-country and trail riders focused on reducing overall bike weight.
3. Optimized Rise for Comfort and Control
As riser handlebars, the Trifox RHB600 provides a comfortable rise that improves body positioning for technical climbs and descents. This design reduces strain on your wrists and back, allowing for longer, more enjoyable rides.
4. Enhanced Stiffness and Responsiveness
Integrated bars like the RHB600 deliver superior stiffness compared to traditional two-piece setups. This translates to precise steering input and better power transfer, giving you confidence when tackling sharp corners or rough terrain.
Why Choose the Trifox RHB600?
The Trifox RHB600 isn't just another mountain bike handlebar—it's a meticulously engineered component designed for modern trail demands. Its ergonomic shape, combined with a lightweight carbon construction, ensures durability and performance. The internal routing channels are compatible with dropper posts, shifters, and brake lines, making installation straightforward.
Riders who prioritize a minimalist yet high-performance cockpit will appreciate how this bar simplifies their bike's look while elevating its capabilities. Whether you're building a new bike or upgrading an existing one, the RHB600 offers a tangible improvement in both form and function.
Conclusion
Integrated carbon mountain bike bars represent the future of cockpit design, and the Trifox RHB600 stands out as a top contender in this category. By eliminating clutter, reducing weight, and improving handling, it addresses the core needs of today's riders. If you're ready to elevate your MTB's performance and aesthetics, it's time to consider making the switch to this innovative integrated carbon handlebar.
Upgrade to the Trifox RHB600 and experience the difference a well-designed integrated carbon handlebar can make on the trails.
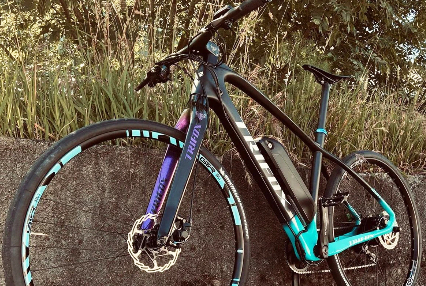
When it comes to mountain biking, control and comfort are non-negotiable. Every trail, every descent, and every technical section demands a fork that can handle the rigors of off-road riding while keeping you in command. Enter the Trifox 29er Disc Brake Tapered Carbon MTB Rigid Fork (Model TA-TMK100)—a game-changer for riders seeking to elevate their MTB experience. In this blog, we'll explore how this fork enhances control and comfort, making it a must-have upgrade for your mountain bike.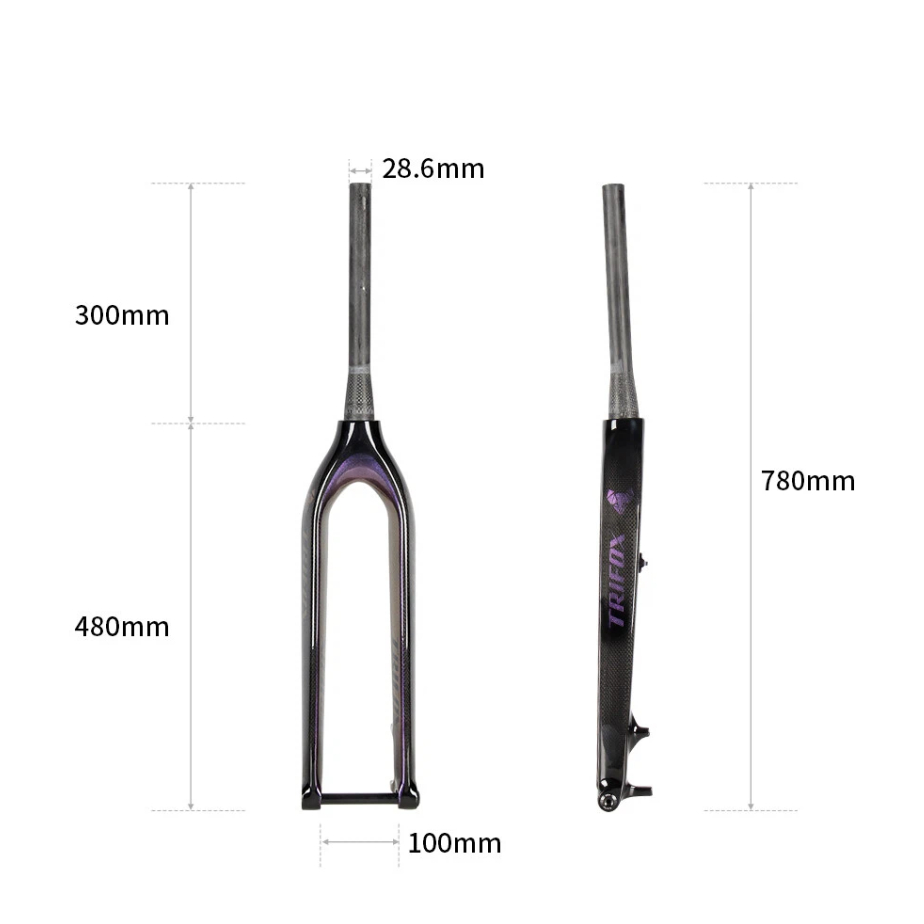
Lightweight Carbon Construction for Agile Handling
One of the standout features of this 29er carbon MTB fork is its full carbon fiber construction. Weighing just 600g, this fork significantly reduces bike weight for quicker steering response, easier maneuverability, and less fatigue on long rides. Whether navigating tight singletrack or climbing steep gradients, the reduced weight allows for more agile handling and better control—perfect for cross-country and trail riders who value speed and precision.
Tapered Design for Superior Stiffness and Stability
The tapered carbon fork features an engineered steerer tube that widens at the base to enhance steering precision and reduce flex. This design provides optimal stiffness during high-speed descents and aggressive cornering, giving riders confidence to tackle technical sections with predictable handling and improved stability.
29er Compatibility for Smooth Rollover and Traction
The 29-inch wheel compatibility of this 29er rigid fork ensures superior obstacle rollover, maintaining momentum and reducing bump impact. This results in a smoother ride with improved traction, directly translating to better control and comfort on rocky trails or loose gravel surfaces.
Disc Brake Compatibility for Reliable Stopping Power
Equipped with disc brake mounts, this ensures consistent, powerful braking in all conditions. The compatibility with modern hydraulic or mechanical disc brakes provides superior modulation and stopping power, crucial for maintaining control on steep descents and wet trails while ensuring rider safety.
Vibration Damping for a Comfortable Ride
Carbon fiber's natural vibration-damping properties make this carbon mountain bike fork exceptionally comfortable. By absorbing high-frequency trail vibrations, it reduces hand fatigue and discomfort, allowing for longer, more enjoyable rides—particularly beneficial on rough terrain where constant vibrations can cause numbness.

Sleek Design and Easy Installation
Beyond performance, the Trifox 29er Fork boasts a sleek, minimalist design that complements modern mountain bikes. Its gloss finish and clean lines add a touch of style to any build. Additionally, the fork is designed for easy installation, with compatibility for tapered head tubes and standard 100 * 15mm thru axles. Whether you’re upgrading an existing bike or building a new one, this fork is a straightforward and rewarding addition.
The Trifox 29er Disc Brake Tapered Carbon MTB Rigid Fork -TMK100 is a premium upgrade that delivers on both control and comfort. Its lightweight carbon construction, tapered design, and 29er compatibility work together to enhance your riding experience, while its vibration-damping properties ensure a smooth and comfortable ride. Whether you’re a competitive racer or a weekend warrior, this fork will help you tackle trails with confidence and style.
Ready to transform your mountain bike? Check out the Trifox 29er Carbon MTB Fork today and experience the difference for yourself!
Let's be honest. Are you tired of looking down at your mountain bike bars only to see a tangled nest of shift and brake cables? Not only does it look messy, but those exposed cables can snag on branches, collect grime, and create annoying cable rub on your precious head tube.
What if there was a solution? What if you could achieve a sleek, minimalist front end that looks like it belongs on a concept bike? Enter the Trifox RHB600 Ultra-Light Integrated Full Inner Mountain Bike Handlebar. This one-piece carbon fiber handlebar promises the clean look we crave. But is it the real deal? Let's dive in.
What Are Integrated Carbon Handlebars?
Traditional mountain bike handlebars are a two-piece system: a bar and a separate stem. Cables are typically routed externally, or at best, enter the frame but still loop around the head tube.
An integrated handlebar, like the Trifox RHB600, changes everything. It's a single, unified component crafted from carbon fiber, where the bar and stem are one. Its defining feature is full internal routing—channels are molded directly into the structure, allowing brake hoses and shift cables to run completely through the bar and stem, disappearing from view entirely.
Are These the Cleanest Mountain Bike Bars? Analyzing the Trifox RHB600
So, does the Trifox RHB600 live up to its promise of a pristine cockpit? The evidence points to a resounding yes.
1. The "Wow" Factor of a Clean Cockpit: The most immediate benefit is the stunning visual upgrade. With all cables seamlessly routed inside the integrated carbon bar, the front of your bike looks fast, modern, and professional. It’s a level of clean that is simply impossible to achieve with traditional components.
2. Aerodynamics (Yes, on a MTB!): While not the primary goal on the trail, reducing cable clutter marginally improves airflow. Every little bit counts when you're chasing speed.
3. Protected Cables: By tucking them away inside the bar, you shield your crucial brake and shift lines from the elements—mud, dust, and moisture—which can contribute to longer component life and more consistent performance.
4. Ultra-Lightweight: Made from high-modulus carbon fiber, the RHB600 is engineered to be exceptionally light. Reducing weight at the cockpit, the most manipulated part of the bike, enhances handling agility and makes the bike feel more responsive.
5.The Installation Consideration: It's important to be upfront. Installing a full inner routing handlebar is more complex than a traditional bar. It requires patience and the right tools, like a hydraulic hose kit for brakes. For many, the unparalleled clean look is well worth the extra effort during the initial build or professional installation.
Who Is This Ultimate Clean Cockpit For?
The Trifox RHB600 is the perfect upgrade for:
The Weight-Weenie: Seeking every gram savings without sacrificing strength.
The Aesthetic Perfectionist: Who believes a clean bike is a fast bike and takes pride in a flawless build.
The Tech-Savvy Trail Rider: Who appreciates modern engineering and the functional benefits of protected cables.
The Upgrader: Looking for a single component that will dramatically transform the look and feel of their modern mountain bike.
The Verdict on Cleanliness
So, back to our original question: Are These the Cleanest Mountain Bike Bars?
If your definition of "clean" is a cockpit completely free of visual cable clutter, then the answer is a definitive yes. The Trifox RHB600 achieves a level of minimalist perfection that sets a new standard. It combines the weight savings and stiffness of carbon fiber with the sleek, professional finish of full internal routing.
While it demands a more meticulous installation, the payoff is a breathtakingly clean front end that enhances aesthetics, offers subtle performance benefits, and gives you the pride of owning a bike that looks as high-performance as it rides.
Forget "just" improved stopping power – switching to a dedicated disc brake wheelset unlocks a cascade of performance benefits that fundamentally elevate your road riding. It's not an incremental upgrade; it's a transformation in control, confidence, and capability.
Why Disc Wheelsets Rule the Road:
1. Unshakeable Confidence, Anywhere, Anytime: Rim brakes falter in wet grit or on long, steep descents. Discs deliver consistent, powerful, and modulated braking performance regardless of weather, road grime, or gradient. This translates directly to riding faster with more control when it matters most.
2. Aerodynamic & Structural Advantages: Free from the need for a braking surface, disc wheelsets allow for wider, deeper, and more aerodynamically optimized rim profiles. This reduces drag for free speed. The rim itself is also stronger without the wear surface, enabling lighter constructions and improved impact resistance.
3. Tubeless Paradise: Disc wheelsets are the perfect partners for tubeless tires. Wider rims create a better tire profile for lower rolling resistance, enhanced grip, and the holy grail: fewer flats at lower pressures. No more worrying about brake track wear from heat during hard descents either.
4. Future-Proof Performance: The industry standard is clear. Disc brakes dominate new road bikes. Investing in a quality disc wheelset ensures compatibility with the latest frames and groupsets, protecting your upgrade path.
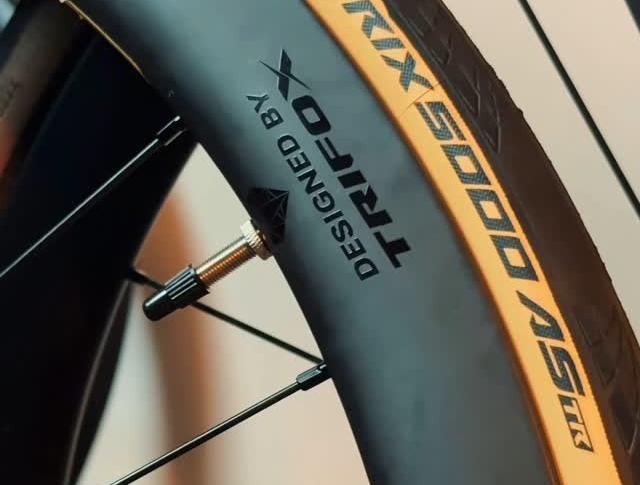
The Trifox WT11: Performance Engineered for Disc:
The WT11 Disc Brake Centerlock Clincher Carbon Wheelset embodies these advantages:
- Lightweight Carbon Construction: Prioritizes acceleration and climbing response.
- Optimized Aero Depth: Balances speed and crosswind stability.
- Wider Rim Profile: Enhances tire performance and supports tubeless setups seamlessly (valves included!).
- Reliable Centerlock Interface: Ensures secure rotor mounting and easier maintenance.
- Stiffness & Durability: Engineered for powerful sprints and demanding riding.
Who Wins with Disc Wheels?
- All-Weather Warriors: Ride confidently rain or shine.
- Descenders & Climbers: Brake later, descend faster, climb without rim heat worries.
- Speed Seekers: Leverage superior aero and tubeless efficiency.
- Tech Adopters: Invest in the modern standard.
Ready for Uncompromised Control & Speed?
Upgrade your stopping power, unlock aerodynamic gains, embrace tubeless simplicity, and future-proof your ride. Disc wheelsets aren't just better brakes; they're the foundation for a faster, safer, and more enjoyable road experience.


