


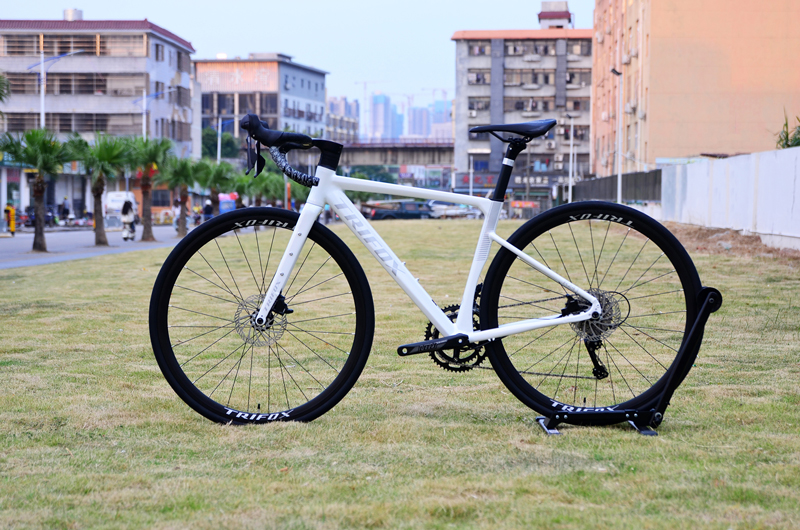
For years, road cyclists believed that narrow tires at sky‑high pressure were the only path to speed. That era is over. Today, riders understand that a wider rim — even by a few millimeters — fundamentally changes how a tire behaves. It reshapes the contact patch, lowers optimal pressure, and transforms ride quality. The Trifox AWT7 alloy disc brake wheelset is a perfect example of this modern philosophy. With its 14mm internal width, it’s engineered to do something simple but powerful: make your tires work better, so you ride faster, safer, and more comfortably. At an affordable price, it’s one of the best cheap bike wheelset options available for riders who want real performance without breaking the bank.
Rim Width Shapes the Tire, Not Just the Wheel
The rim isn’t just a hoop that holds the tire. Its internal width dictates the tire’s profile once inflated. On a narrow rim, a tire bulges into a light‑bulb shape — tall and narrow, with a small contact patch. This shape forces high pressure to keep the sidewalls stable, which translates into a harsh, unforgiving ride. A wider rim supports the tire’s sidewalls more effectively, creating a flatter, wider profile. This shape stabilizes the tread, reduces squirm, and dramatically increases the contact patch. As one industry analysis notes, “when the internal width of a rim reaches 21mm or more,” the contact surface rises considerably, enhancing redistribution of contact pressure and increasing lateral grip during cornering. The result is more predictable handling and better traction, especially on wet or loose surfaces.
The AWT7’s 14mm internal width is purpose‑selected for modern 25‑28mm tires. Rather than forcing a tire to bulge unnaturally, it creates a smooth, continuous surface from the rim to the tread. This profile improves stability when cornering and reduces the vague, wandering sensation that plagues narrow‑rim setups. Riders using the AWT7 on classic road routes have noted the wheels feel “planted” and “predictable” — a direct result of matching rim width to tire shape.
How Width Unlocks Lower Pressure and Higher Comfort
The most direct benefit of a wider rim is what it allows you to do with air pressure. A properly supported tire can be run at significantly lower pressures without risking pinch flats or rim strikes. According to wider rim research, using a 21mm internal width rim allows tires to be run at lower pressures, absorbing road vibrations more effectively and reducing the impact transmitted to the rider’s body and the frame. The AWT7’s 14mm width, while not as extreme as gravel‑oriented rims, hits the sweet spot for road use. It lets you drop pressure from the traditional 100‑120 psi range down to 80‑95 psi, depending on rider weight and tire choice. At these lower pressures, the tire flexes over road imperfections rather than bouncing off them. The result is dramatically reduced hand and saddle fatigue on rough pavement, longer chip seal, and worn asphalt.
This pressure flexibility also helps the tire maintain traction. A tire at lower pressure deforms around irregularities, increasing the effective contact patch. As one manufacturer explains, a wider internal rim maximizes tire support and grip, enhancing stability and comfort, and the lower pressure setup “absorbs road vibrations more effectively, therefore lowering the impact sent to the rider’s body.” That’s the difference between a bike that feels fragile on rough roads and one that inspires confidence mile after mile.
Alloy Efficiency Meets Budget‑Friendly Performance
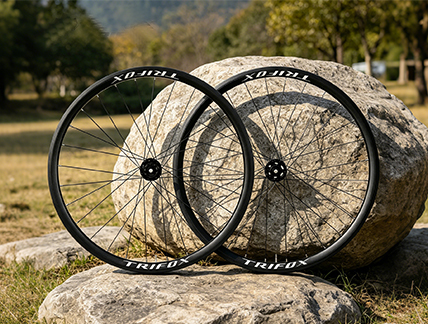
Carbon wheels get the headlines, but alloy wheels like the AWT7 deliver 95% of the performance at a fraction of the cost. The AWT7’s 30mm rim depth offers a balance of aerodynamics and crosswind stability, while the 28 Pillar stainless steel spokes and welded aluminum construction provide the stiffness needed for efficient power transfer. Weighing approximately 1,956g per pair, the wheels are light enough for climbing yet durable enough for daily training. The 6‑pawl, 120‑point engagement hubs deliver crisp acceleration, and the disc brake compatibility ensures consistent stopping power in all weather. For riders seeking an affordable but capable bicycle disc wheel, the AWT7 represents exceptional value — a wheelset that doesn’t compromise on the fundamentals of ride quality.
The Bottom Line
Rim width isn’t a secondary spec. It’s a primary determinant of how your bike feels on the road. A 14mm internal width strikes a balance: wide enough to support the tire’s sidewalls and enable comfortable lower pressures, yet narrow enough to remain aerodynamically efficient for road use. The Trifox AWT7 alloy disc wheelset capitalizes on this design principle, delivering a ride that is stable, grippy, and noticeably more comfortable than traditional narrow‑rim wheelsets. For cyclists on a budget who refuse to sacrifice ride quality, the AWT7 is a smart upgrade that proves modern alloy engineering can rival carbon’s best traits — without the premium price tag.

Unlocking the full potential of a modern cross country full suspension bike is an art. A frame like the Trifox Trail II Pro offers a lightweight, stiff carbon platform designed for efficiency, but its rear shock needs precise tuning to match. A poorly tuned shock can make even the best double suspension mtb feel harsh or wallowy. This guide will help you sync your shock with your frame's personality for a ride that’s both fast and forgiving. 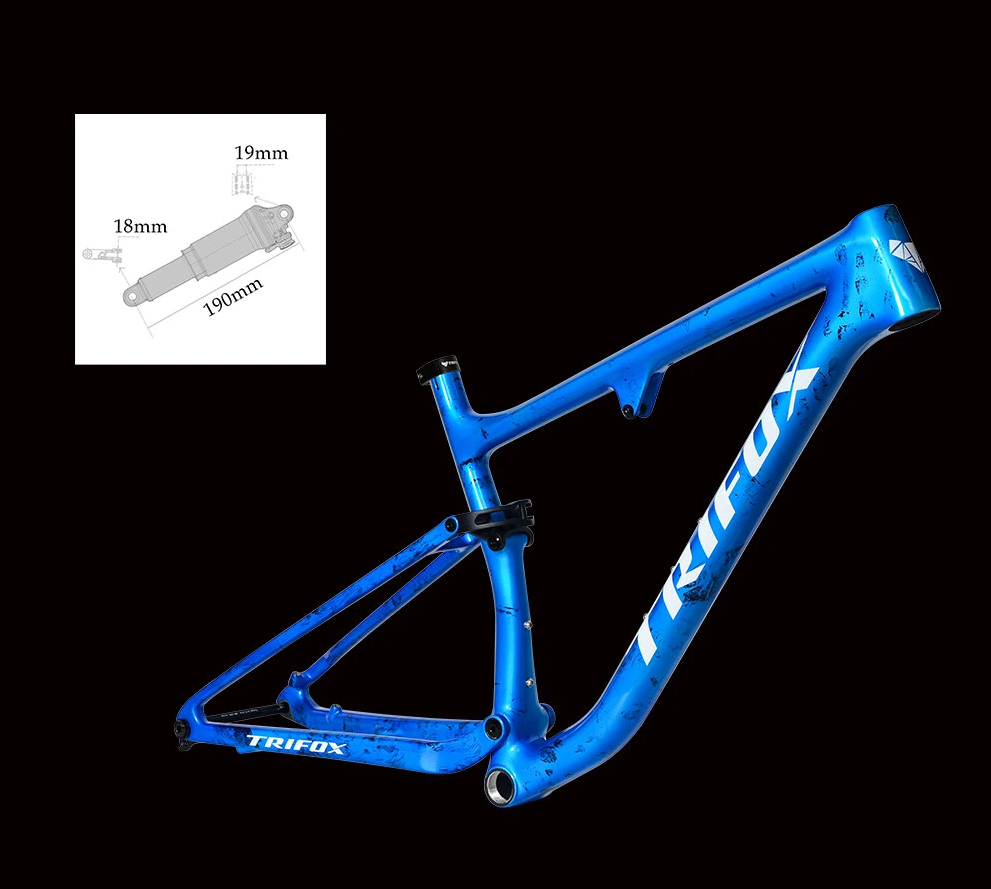
Step 1: Foundation – Setting Sag and Leverage Rate
Every setup begins with sag—the amount your shock compresses under your weight in a neutral riding position. For an XC-focused frame, aim for 20-25% sag. This balances pedaling efficiency with bump absorption.
Why it matters for carbon frames: Carbon’s high stiffness translates pedal input directly. Correct sag ensures the suspension is in its optimal part of the stroke to react to trails without wasting energy.
Pro Tip: Know your frame's leverage ratio. The Trail II Pro is designed with a specific progressive or linear curve. Check the manufacturer's guide; this tells you how the shock feels through its travel. A progressive frame (common in modern designs) helps prevent bottoming out on big hits.
Step 2: Controlling the Motion – Rebound Damping
Rebound damping controls how quickly the shock returns after compression. This is crucial for maintaining traction.
Too Fast: The bike feels springy and can "kick back," losing tire contact.
Too Slow: The shock "packs down" over successive bumps, feeling harsh and reducing travel.
Setting Rebound:
1. Set sag correctly first.
2. Find a bumpy trail or series of curb drops.
3. Start with rebound fully open (fast). Ride and gradually add clicks (slow it down).
The Goal: The rear wheel should recover quickly enough to handle the next bump but not so fast it causes the bike to bounce. The rear should feel "calm" and controlled.
Step 3: Refining the Feel – Compression Damping
Compression damping controls how the shock compresses under force. Most XC shocks have low-speed compression (LSC) for pedaling/platform support.
LSC Tuning: Start with LSC fully open. On a smooth climb or while pedaling hard on flat ground, add clicks until you feel a noticeable reduction in unwanted bob without making the ride feel harsh over small bumps. The goal is a firm, efficient platform that still remains active.
The Critical Link: Frame Bushing & Bearing Care
Your tuning is only as good as the mechanical connection between the shock and frame. Friction from dry or worn pivots destroys sensitivity.
The Trifox Advantage: The Trail II Pro includes a set of premium 190x18mm and 190x19mm replacement bushings, compatible with major shocks from Fox and RockShox. This ensures you always have a perfect-fit, low-friction interface on hand.
Maintenance: Regularly check pivot bolts for proper torque (use a torque wrench!). Annually, or if play develops, inspect bushings and bearings for wear. A well-lubricated, slop-free pivot system allows your finely tuned shock to perform exactly as intended, translating every damping click into a tangible trail feel.
Final Tune: Match Shock to Frame Intent
Understand your frame's design goal. The Trail II Pro is a lightweight XC race machine. Prioritize a setup that favors:
Efficient climbing (firmer LSC, proper sag).
Traction and control on technical, rocky ascents (balanced rebound).
Confidence on descents (enough progression and damping to handle drops).
Don't be afraid to make small adjustments and test. Terrain changes, and so should your setup. Start with manufacturer base recommendations, then use this guide to personalize. When your shock’s dynamics are in harmony with your carbon frame's stiffness and geometry, you’ll experience the true synergy of a modern cross country full suspension bike—where every watt of effort propels you forward, and every trail feature is an opportunity, not an obstacle.
Your bike computer is your command center, delivering vital data on speed, distance, and navigation. But if it’s angled poorly, you’ll be squinting, straining your neck, or taking your eyes off the trail for too long. Achieving the perfect angle is a simple yet transformative adjustment that enhances comfort, safety, and your connection to the ride. Here’s how to dial it in for any discipline.
Start with a Proper Mount
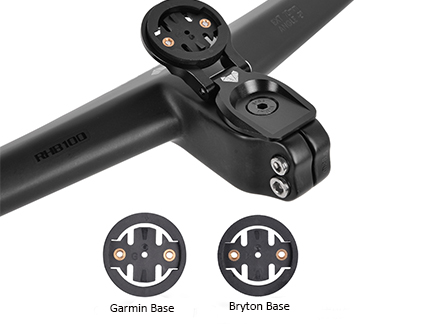
Before fine-tuning the angle, you need a solid and adaptable foundation. A high-quality mount, like the Trifox STH300, is essential. This isn't just alloy; it's the interface between your handlebar and your valuable device. Look for features that promise stability and versatility:
Secure Attachment: A robust clamp system that locks onto your handlebar without slippage, even on rough trails.
Adjustable Angle Mechanism: The core feature that allows you to fine-tune the tilt. A simple, tool-free lever or dial is ideal for on-the-fly adjustments.
Universal Compatibility: Ensure it fits your specific handlebar diameter and your computer’s mounting standard (e.g., Garmin, Wahoo).
A mount like the Trifox STH300 provides this reliable base, allowing you to focus on finding your optimal view. 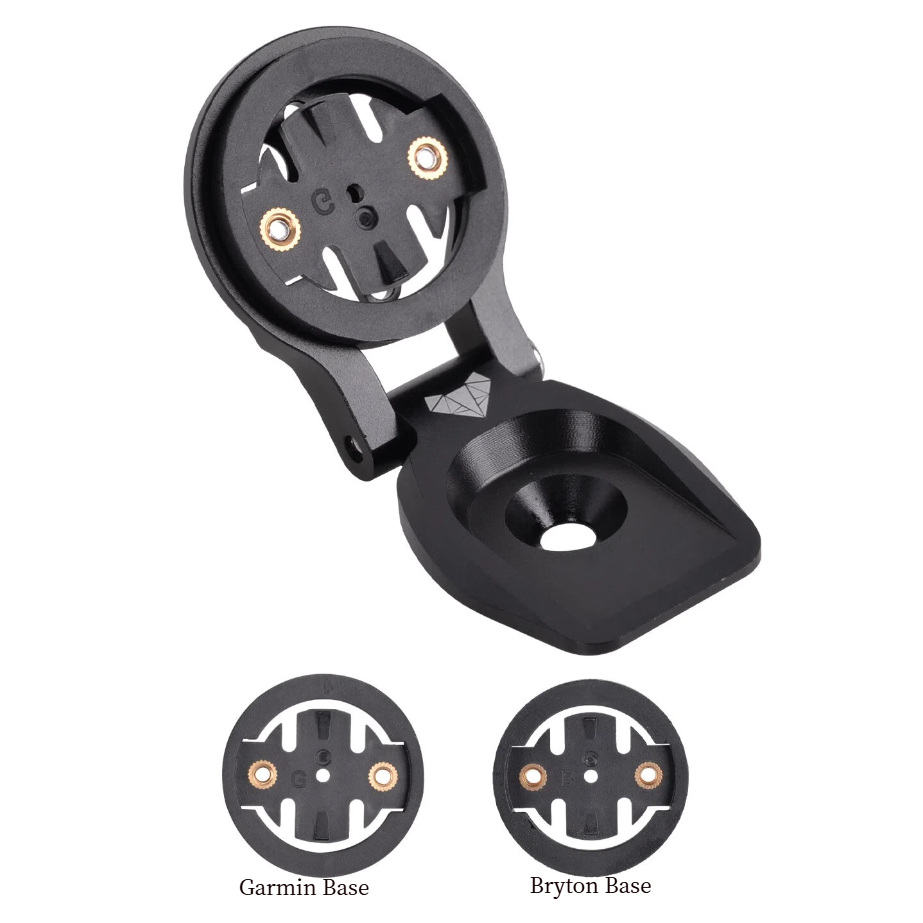
Finding Your Angle: Road vs. Mountain Bike Principles
The “correct” angle isn’t a single number; it’s dictated by your riding posture.
For Road & Gravel Riding (Aggressive Posture): When you’re in the drops or an aero tuck, your line of sight is lowered. Tilt the computer face slightly upward. This brings the screen perpendicular to your natural sightline, minimizing glare and making data easy to read without lifting your head. A good starting point is having the screen face roughly toward your chin when in your primary riding position.
For Mountain Biking & Upright Positions: On a trail bike or hybrid, your posture is more upright. The screen should be closer to level with the ground or tilted only very slightly upward. This prevents the display from being obscured by the handlebar or your hands and ensures quick glances for navigation or timer data. The key is to maximize the visible screen area from your higher vantage point.
The Simple Setup Method: The On-Bike Test
Forget protractors. Use this practical method:
1. Clip into your bike on a stationary trainer or have a friend hold you upright.
2. Assume your primary riding position—whether that’s in the hoods, drops, or a ready mountain bike stance.
3. Close your eyes, then naturally open them and look where your gaze falls.
4. Adjust the computer angle so the screen is facing directly into this natural line of sight. Your neck should feel neutral, not craned up or down. 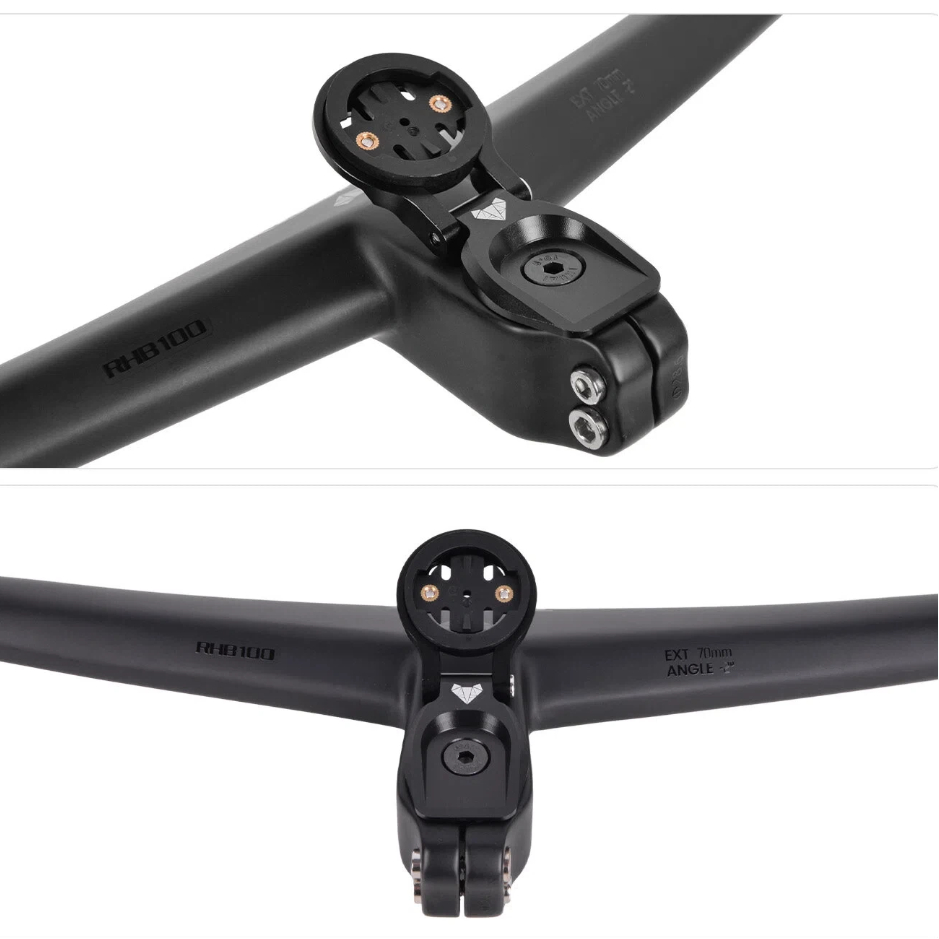
Pro Tips for Precision & Safety
Prioritize a Clear View: The screen should be completely visible, not blocked by cables, a bicycle light mount, or your hands. If you use a combined mountain bike computer mount and light bracket, position them so both devices have an unobstructed field of view.
Minimize Glare: Tilt the screen to avoid direct reflections from the sun or bright sky. A slight adjustment can make the difference between an illegible glare and a crisp display.
Ensure Stability: After setting the angle, check all fasteners. The computer should not wobble or vibrate, as this distracts and can lead to damage on rough terrain.
Safety Check: Before every ride, give the computer a gentle tug to confirm it’s locked securely into its mount. The last thing you need is for it to detach on a fast descent.
Why the Perfect Angle Matters
Spending a few minutes on this adjustment pays dividends:
Enhanced Safety: Quick, effortless glances keep your focus on the path or traffic ahead.
Reduced Fatigue: A neutral neck and eye position prevent strain on long rides.
Better Data Utility: When you can see your metrics clearly, you can use them effectively to pace your effort or follow a route.
Your bike computer should feel like a natural extension of your cockpit, not an awkward addition. By investing in a versatile, adjustable mount and taking the time to set the angle for your unique riding style, you unlock a smoother, safer, and more connected cycling experience. Look down with ease, and look ahead with confidence.

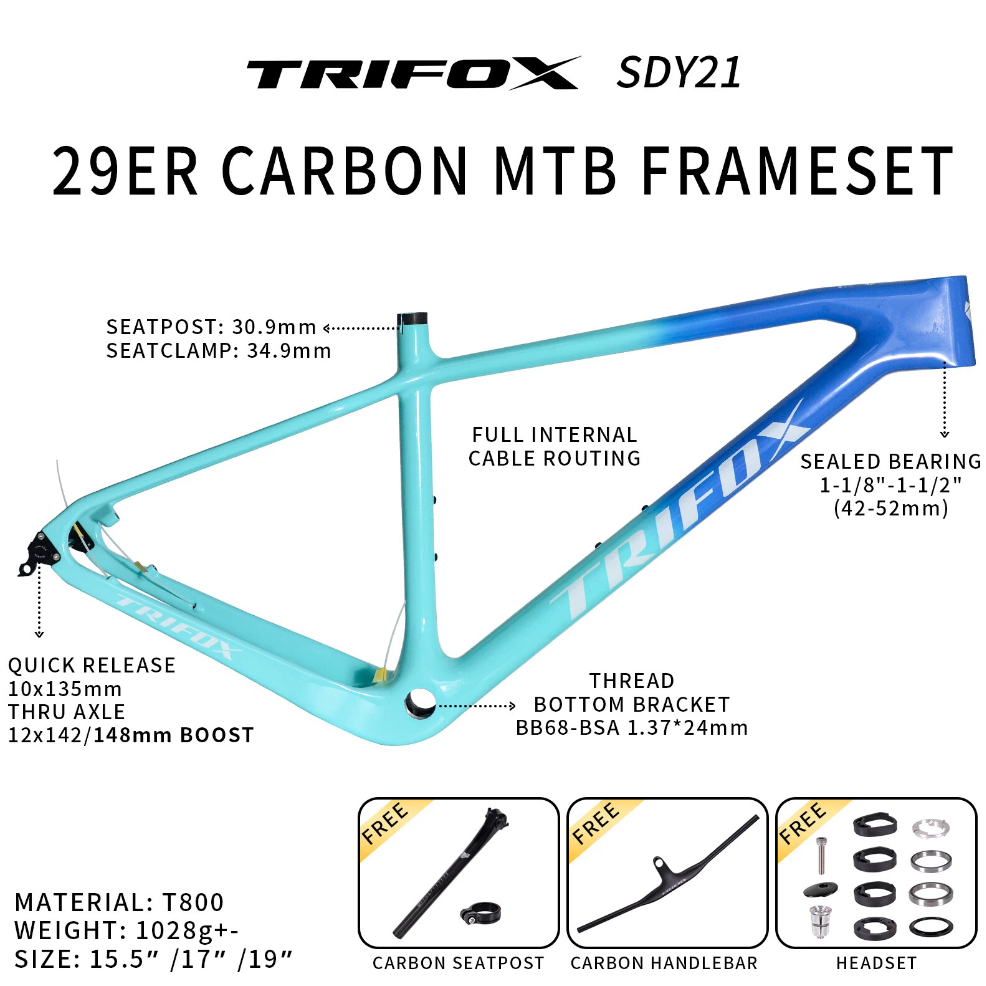
Building your dream mountain bike from the ground up is one of the most rewarding experiences for any cyclist. It allows for complete customization, ensuring every component is perfectly tailored to your riding style and local trails. If you're aiming for a modern, capable, and efficient 29er, starting with a high-quality carbon hardtail frame like the Trifox Carbon Hardtail Frame (SDY21) is the perfect foundation.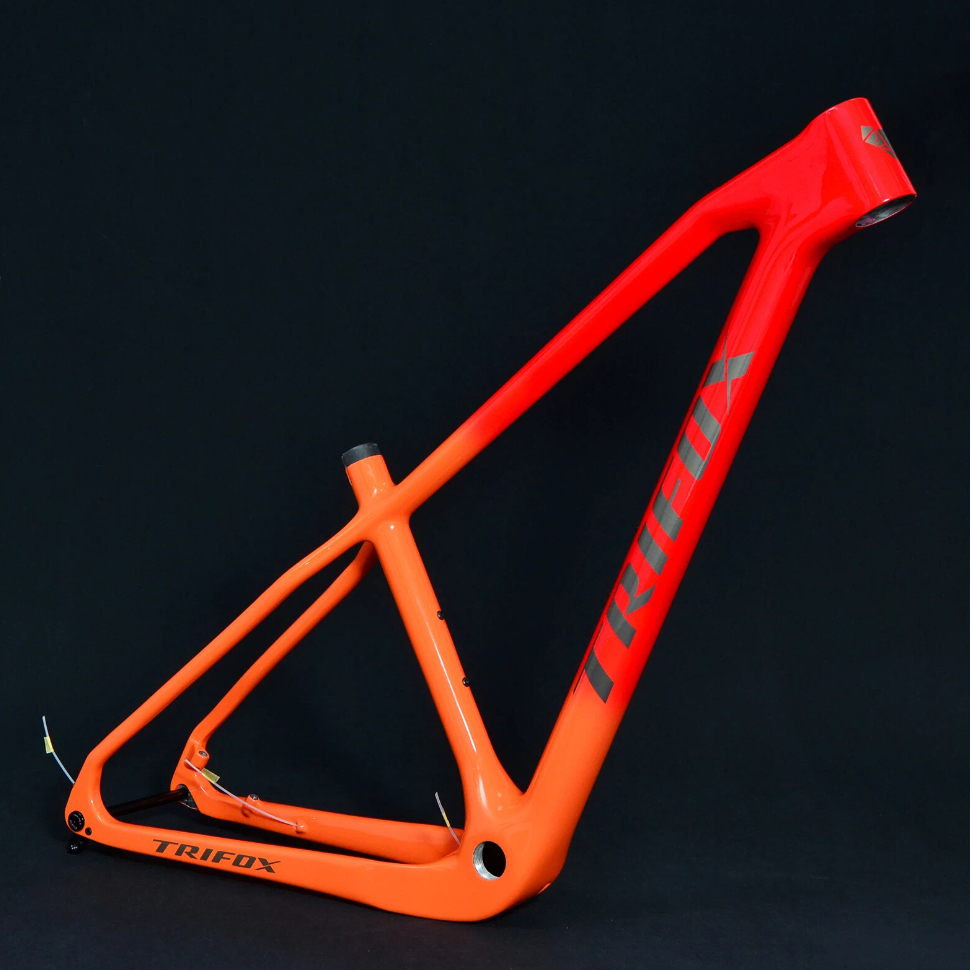
Step 1: The Heart of the Build - Choosing the Right Frame
The frame is the soul of your bike, dictating its geometry, ride quality, and component compatibility. For a dream 29er mountain bike, a carbon hardtail frame is an excellent choice. It offers an ideal blend of lightweight performance, stiffness for efficient power transfer, and inherent vibration damping for better comfort on rough trails. A frame like the Trifox SDY21 features modern standards like Boost spacing for stiffer wheels, a tapered head tube for enhanced steering precision, and internal cable routing for a clean appearance.
Step 2: Selecting the Wheelset and Drivetrain
The wheels are your bike's connection to the trail. For a 29er build, you benefit from superior rollover capability over obstacles, helping to maintain momentum. Pair your frame with a sturdy, yet lightweight, wheelset that matches the Boost hub spacing. For the drivetrain, the modern standard is a 1x (single front chainring) setup. It's simpler, lighter, and eliminates the risk of chain drops. Combine a narrow-wide chainring with a wide-range 12-speed cassette to give you all the gear range you need for any terrain.
Step 3: Dialing in Control with Suspension and Cockpit
Since you're building a hardtail mountain bike, your suspension comes entirely from the fork. A quality air-sprung fork with 120mm-130mm of travel is a versatile choice for most trail riding. Ensure it has a tapered steerer to match your frame's head tube for optimal stiffness. Your cockpit—the handlebar, stem, and seatpost—is your control center. A 35mm diameter handlebar and stem combo offers robust stiffness, while a dropper post is a game-changing upgrade for confident descending on your custom 29er build.
Step 4: Ensuring Stopping Power and Finishing Touches
Modern trails demand powerful brakes. Hydraulic disc brakes are essential, and the frame provides post-mount compatibility for a clean installation. Choose rotor sizes that match your aggression and trail demands. Finally, select the finishing kit: a comfortable saddle, reliable pedals (flat or clipless), and durable tires that suit your typical terrain. These components personalize the bike and complete your MTB project build.
Why the Trifox SDY21 Frame is the Ideal Foundation
Building around a carbon 29er frame like the Trifox SDY21 sets your dream build up for success. Its full carbon fiber construction provides the perfect blend of low weight, vibration damping, and pedaling efficiency. The internal cable routing creates a clean, snag-free appearance and protects the cables from the elements. This frame is designed for the rider who appreciates a direct, engaging trail feel and wants a bike that is both a capable climber and a fun, agile descender.
Your Dream 29er Awaits
Building a bike around a carbon hardtail frame is a deeply personal and satisfying process. You gain an intimate understanding of your machine and create a ride that is uniquely yours. By carefully selecting each component to match this high-quality frame, you will craft a lightweight hardtail mountain bike that is ready to conquer trails and provide endless smiles for years to come. Start your build journey today and experience the ultimate in customization and performance.

Imagine slicing through headwinds, floating up climbs, and feeling every pedal stroke ignite instant acceleration. This isn’t fantasy—it’s the reality of riding an ultra-light road bike. When your entire machine weighs less than a weekend grocery haul, every aspect of cycling transforms from effort to exhilaration.
Why Ultra-Light Matters:
1. Climbs Become Conquests: Shedding weight is the ultimate climbing hack. A lighter frame demands less energy to defy gravity, turning grueling ascents into rhythmic, rewarding efforts. You’ll crest hills faster—and smile wider.
2. Explosive Acceleration: Stop-and-go traffic? Sprint segments? Ultra-light bikes leap forward with minimal input. The reduced mass means near-instant response to power, making surges feel effortless and races decisive.
3. Agile Handling: Cornering tight descents or navigating technical routes becomes intuitive. A featherweight frame dances beneath you, offering surgical precision and confidence at high speeds.
4. Endurance Boost: Less weight = less fatigue. Ride longer, push harder, and finish strong without the dead-legged feeling of hauling excess mass.
The Trifox Difference:
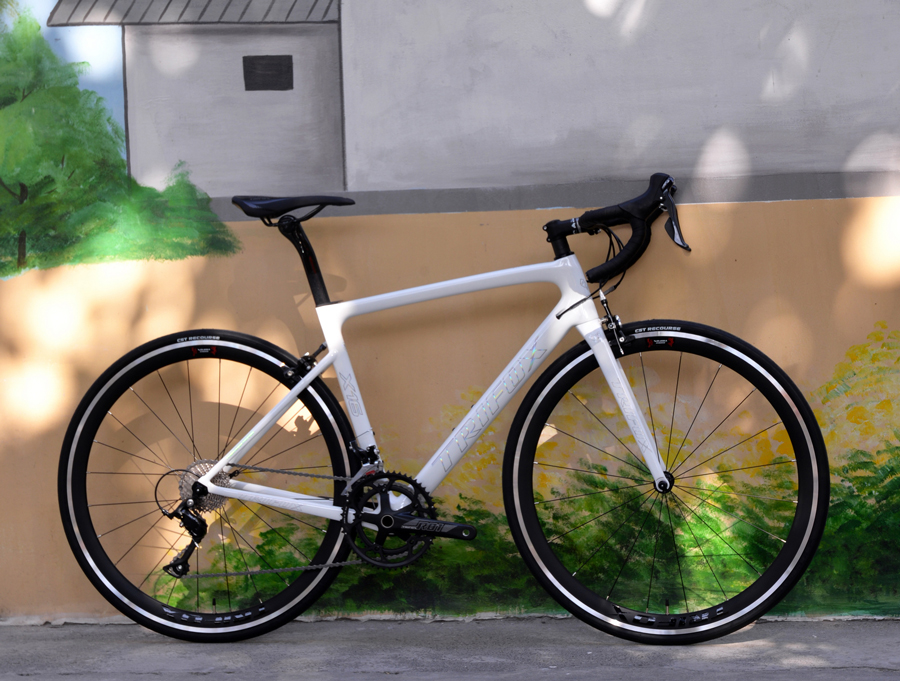
The 700c Carbon Fiber Ultra-Light Road Bicycle isn't just light—it's intelligently engineered. Its monocoque carbon frame blends minimal weight with optimized stiffness, ensuring zero power loss on sprints or climbs. Paired with aerodynamic tube shaping and compatibility with high-end components, it delivers pro-level performance without the pro-level price.
Who It's For:
Climbers: Conquer grades you once walked.
Racers: Gain seconds where they matter most.
Endurance Riders: Cover miles with leftover energy.
Upgraders: Feel your first true "race bike" epiphany.
Ready to Redefine Your Limits?
An ultra-light bike isn't an upgrade—it's a revelation. The Trifox 700C rewrites your relationship with the road, turning struggle into flow and effort into euphoria.

Forget marginal gains – shedding significant weight from your bike's core fundamentally revolutionizes your experience. A super light frame isn't just a number; it's the key to unlocking a new dimension of riding.
The most dramatic transformation? Climbing. Less mass means defying gravity requires drastically less effort. Every pedal stroke feels more efficient, translating directly to faster ascents and reduced fatigue. Hills become challenges to relish, not dread. You accelerate quicker, maintaining momentum with newfound ease.
But the magic extends beyond going up. A lightweight frame enhances handling profoundly. It's more responsive to steering inputs, making cornering sharper and more intuitive. The bike feels like an extension of your body, dancing beneath you with agility. This flickability boosts confidence on descents and technical sections.
Acceleration is where a super light frame truly shines. Whether launching from a stop sign or surging out of a corner, the reduced inertia means the bike leaps forward with minimal effort. It feels eager, alive, translating your power into speed instantaneously. You spend less energy overcoming inertia and more maintaining exhilarating velocity.
The overall ride feel becomes exhilaratingly direct. Road buzz and minor imperfections are communicated, but the frame's stiffness (often inherent in lightweight designs like carbon) ensures power transfer is immediate and precise. You feel connected, efficient, and incredibly fast.

Experience this transformation: Ready to feel the climb vanish and the road come alive? The Trifox X16TA Disc Brake Lightweight Carbon Road Bike Frame embodies this revolution. Engineered for minimal weight and maximum performance, it's the foundation for your fastest, most responsive ride yet. Discover how a super light frame changes everything: Less weight, more ride.

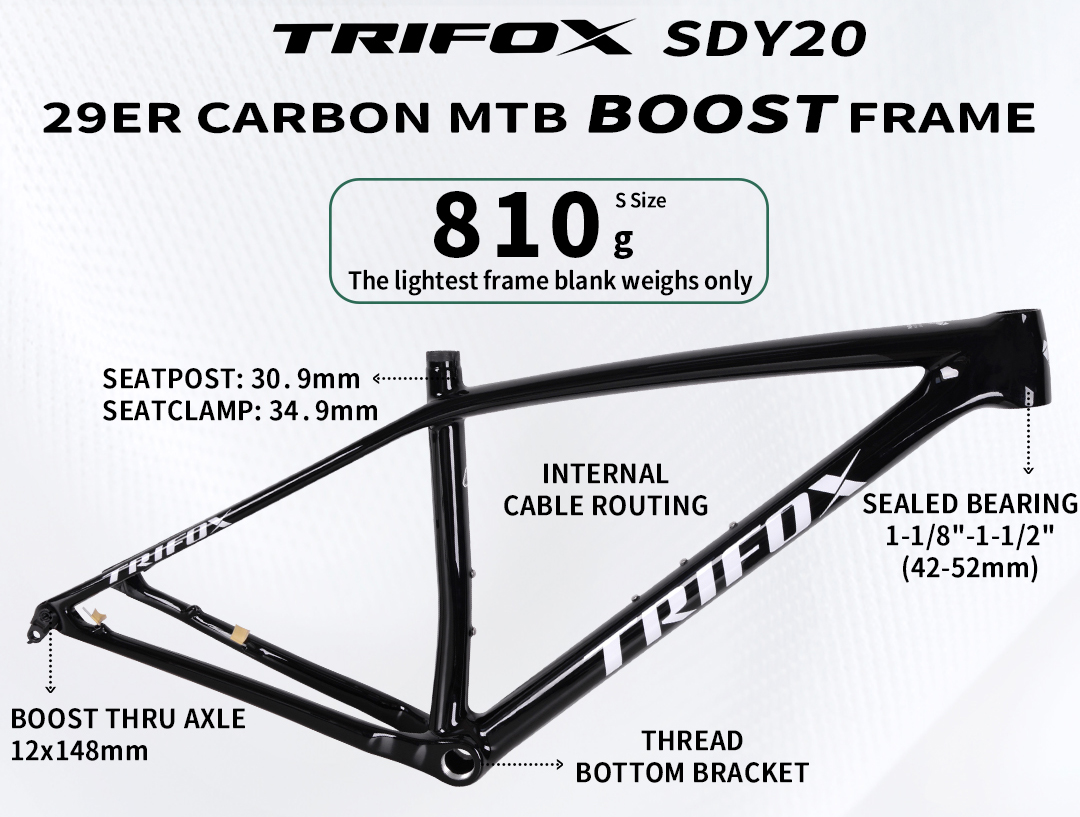
In mountain biking, weight is gravity’s currency. For racers and climb-obsessed riders, every gram shaved unlocks speed, agility, and that precious edge over rivals. At Trifox, this obsession birthed the SDY20 hardtail frame – their lightest 29er carbon chassis ever, engineered to turn ascents into triumphs.
The Magic Number: 930g
Weighing just 930 grams (size S, unpainted), the SDY20 isn’t just light – it’s a feat of carbon optimization. Using T1000 carbon with refined layering, Trifox achieves staggering stiffness-to-weight while maintaining trail-taming compliance. This frame isn’t delicate; it’s intelligently minimal.
Why Lighter = Faster?
- Acceleration: Less mass to propel uphill = instant response when you stamp the pedals.
- Agility: Flickable on switchbacks and effortless to loft over roots.
- Endurance: Reduced fatigue = more watts left for the final kick.
Race-Ready DNA Beyond Weight:
- XC Geometry: A 68.5° head angle and 445mm reach balance stability and razor-sharp precision.
- Boost Spacing: 148x12mm rear / 110x15mm front maximize stiffness and wheel compatibility.
- Stealth Integration: Full internal routing (brakes + dropper) for clean looks and snag-free rock gardens.
Modern Trail Specs: 1x-only, tapered head tube, and room for 2.4" tires.
Who Is the SDY20 For?
- XC Racers: Chase podiums with a frame born for efficiency.
- Climb Conquerors: Transform suffering into flow.
- Weight Weenies: The ultimate gram-shavers'canvas.
The Verdict:
The SDY20 isn't just a frame – it's Trifox's love letter to climbing. By ruthlessly cutting grams without sacrificing stiffness or control, it delivers a ride experience where the bike disappears beneath you, leaving only you, the trail, and the summit ahead.

Does your front end feel vague or flex excessively when you really push it? That "noodle fork" sensation – steering wandering under hard cornering, brake shudder, or a general lack of precision – can be unnerving and slow you down. While some flex is inherent and even desirable for small bump compliance, excessive flex hurts control. Here's how to dial in more stiffness:
1. Increase Air Pressure (Air Forks Only): The simplest and most direct adjustment. Adding air pressure compresses the air spring more, requiring more force to initiate movement. This significantly increases the overall stiffness of the fork, especially resisting large impacts and big compressions that cause flex. Crucially: Stay within the manufacturer's recommended maximum pressure (usually printed on the fork leg). Exceeding it risks seal failure or even catastrophic damage. Start with 5-10 PSI increases, test ride, and repeat cautiously.
2. Add Volume Spacers (Air Forks Only): These small plastic tokens fit inside the air spring chamber. They reduce the air volume. Why does this help stiffness? With less volume, the air pressure ramps up much more aggressively deeper into the fork's travel. This primarily increases mid-to-end stroke support. While not directly stiffening the initial feel like pure pressure, it combats the deep dive that often feels like flex under heavy braking or big G-outs, making the fork feel more supportive and planted overall.
3. Adjust Compression Damping:
- Low-Speed Compression (LSC): Found on most mid-to-high-end forks. This controls the fork's resistance to slow, deliberate movements like braking, cornering, and pedaling forces. Increasing LSC adds significant resistance to these forces, directly combating brake dive and the flex/wander feeling during hard cornering. Turn the dial clockwise (usually) a click or two at a time and test.
- High-Speed Compression (HSC): Less common, controls resistance to sharp, fast impacts (rocks, roots). While primarily for tuning big-hit harshness, a slight increase might offer a subtle perception of firmness, but focus on LSC first for stiffness related to steering inputs.
4. Increase Oil Viscosity (Advanced): Fork oil lubricates and dampens. Thicker oil (higher viscosity, e.g., going from 5wt to 7.5wt or 10wt) creates more resistance inside the damper. This makes the damper cartridge stiffer, particularly the compression circuit, requiring more force to move the fork quickly. This is an advanced modification. Research your specific fork model thoroughly – using oil that's too thick can damage internals, make the fork harsh, and void warranties. Best done during a full service.
5. Service Your Fork: Worn bushings, contaminated oil, or degraded seals introduce slop and reduce the fork's ability to move smoothly in its intended path. This often manifests as play or a vague, "sticky" flex feeling. A full lower leg service (replacing oil, seals, and bushings if needed) restores the fork's tightness and responsiveness, eliminating unwanted movement that feels like flex.
Important Considerations:
- Trial & Error: Stiffness preferences are personal. Make one change at a time and test thoroughly on familiar terrain.
- Trade-offs: Increasing stiffness almost always reduces small-bump sensitivity and plushness. Find the right balance for your riding style and terrain.
- Fork Limits: Every fork has a design stiffness. Aggressive riders on lightweight XC forks will hit limits faster than someone on a burly enduro fork. If you've maxed out adjustments and servicing, a stiffer chassis might be the ultimate solution.
- Headset Check: Ensure your headset is properly preloaded. A loose headset feels like fork flex!
By methodically working through these adjustments – starting with air pressure/volume and compression damping – you can significantly reduce unwanted flex and gain the precise, confident front end your aggressive riding demands.
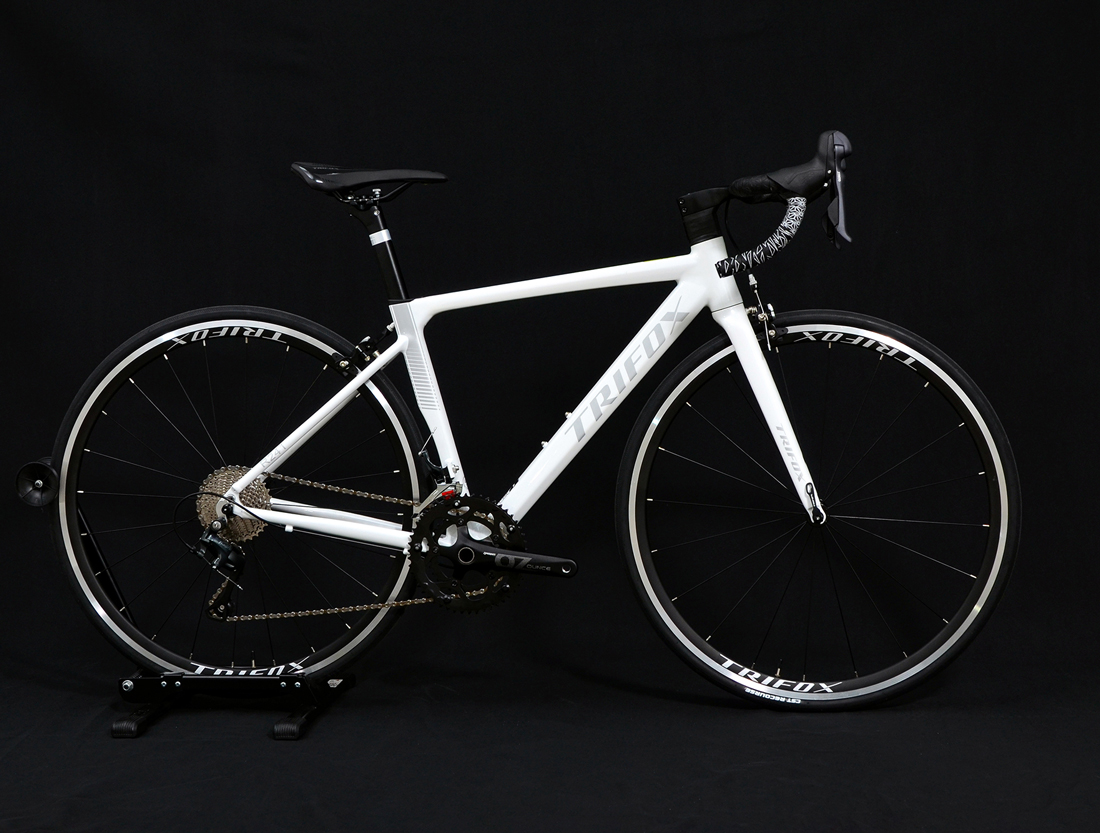
Forget squeezing rubber blocks onto your wheel rims! Modern bikes like the Trifox R241 Road Bike increasingly rely on disc brakes for superior stopping power. But how do these compact, rotor-equipped systems actually work? It's simpler physics than you might think.
The Core Components:
1. The Rotor (Disc): This is the metal (usually steel) disc bolted firmly to your wheel hub. It spins with the wheel.
2. The Caliper: Mounted near the hub on your frame (front) or fork/seatstay (rear), this housing contains the brake pads.
3. The Brake Pads: These friction material blocks sit inside the caliper, positioned on either side of the rotor.
4. The Actuator: This is your brake lever and the system it pulls – either a cable (mechanical disc) or hydraulic fluid (hydraulic disc). The Trifox R241 features mechanical disc brakes.
The Magic Happens When You Squeeze:
1. Lever Action: Pulling the brake lever initiates the stopping force.
2. Force Transmission:
- Mechanical (Cable): The lever pulls a cable. This cable runs to the caliper and directly moves a mechanism (like a piston or lever arm) inside it.
- Hydraulic: The lever pushes a piston in a master cylinder, forcing hydraulic fluid through a sealed hose to the caliper.
3. Caliper Activation: Inside the caliper, the transmitted force (cable pull or hydraulic pressure) pushes one or more pistons.
4. Pad Squeeze: These pistons press the brake pads inward from both sides, clamping them firmly onto the spinning rotor.
5. Friction = Stopping Power: The immense friction generated between the pads and the rotor creates drag. This drag acts directly on the wheel hub, rapidly slowing down the rotation of the wheel and, therefore, the bike.
Key Advantages Over Rim Brakes:
- Consistent Performance in All Conditions: Water, mud, or grime on the rim? Irrelevant! Discs shed contaminants easily, offering reliable braking in rain or on dusty trails. The Trifox R241's discs ensure confidence no matter the weather.
- Better Modulation & Power: Discs allow finer control over braking force ("modulation") and typically provide stronger overall stopping power than rim brakes, especially when wet or under heavy load.
- Reduced Rim Wear: Braking force is applied to a dedicated rotor, not your expensive wheel rims. This eliminates rim wear from braking, prolonging wheel life.
- Compatibility with Carbon Rims/Aero Wheels: Discs are essential for carbon rims (which can't handle rim brake heat) and work perfectly with deep-section aero wheels. The Trifox R241's carbon fork benefits hugely here.
- True Wheels: Since braking force isn't applied to the rim sidewalls, minor wheel wobbles (true issues) affect braking performance far less.
Mechanical vs. Hydraulic (Like the Trifox R241's S-Ride):
- Mechanical: Uses cables. Generally simpler, easier to maintain trailside, and more affordable. Can require slightly more lever effort and periodic cable tension adjustment. A solid, reliable choice like the S-Ride system on the R241.
- Hydraulic: Uses fluid. Offers self-adjusting pads, typically requires less finger effort, and provides exceptional modulation and feel. Needs less frequent maintenance but bleeding the system is more complex.

Disc brakes transform lever pull into powerful clamping friction directly at the wheel hub via a rotor. This system delivers consistent, powerful, and controllable stopping in diverse conditions, protects your rims, and unlocks modern frame and wheel designs – precisely why performance-oriented bikes like the Trifox R241 Road Bike rely on them. It's a fundamental upgrade for safety and ride quality.


