


For cyclists preparing to upgrade their mountain bike, a frequently debated question is: is a lightweight carbon XC frame really worth the extra cost over an otherwise identical aluminum frame?
As carbon fiber manufacturing technology becomes more mature, the price gap between the two has gradually narrowed, leading more riders to consider upgrading to a carbon frame. So, is it really worth it? Let's break it down from several angles.
The weight advantage remains significant
Weight is one of the biggest advantages of a carbon frame.
In XC (Cross Country) riding, frequent acceleration, climbing, and long-distance rides are all affected by bike weight. A lightweight carbon frame helps riders reduce energy expenditure and improve pedaling efficiency.
Compared to an equivalent aluminum frame, carbon typically saves several hundred grams. While that number may not seem huge, over long rides or in races, the difference becomes noticeable.
For riders chasing speed and efficiency, lightweight construction remains a compelling reason to upgrade.
A more comfortable ride experience
Beyond weight, carbon has another clear advantage – vibration damping.
Carbon fiber effectively filters out vibrations from gravel roads, trails, and rough terrain, making the ride smoother.
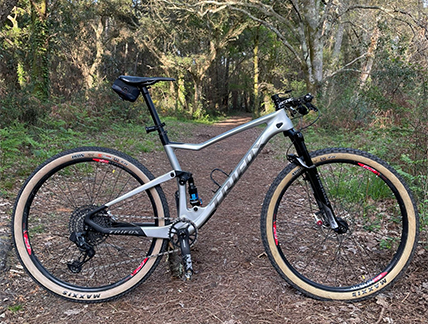
For a Carbon MTB frame full Suspension, the suspension system handles large impacts while the carbon frame further reduces small vibrations. Together, they significantly enhance overall ride comfort.
On long rides, this advantage is especially noticeable, reducing arm and leg fatigue and improving overall riding efficiency.
Superior stiffness and handling
Modern carbon frames are not only light but also offer excellent stiffness.
Well-engineered carbon layups allow pedaling power to transfer more directly to the rear wheel, delivering sharper handling during acceleration, climbing, and high-speed cornering.
For XC racing and fast trail riding, precise steering and stable frame feedback often matter more than simply shedding weight.
Does aluminum still have advantages?
Absolutely.
Aluminum frames are more affordable and cheaper to maintain.
If your riding is mainly recreational, commuting, or occasional off-road, aluminum remains a very practical choice.
But for riders looking to improve efficiency, tackle more challenging routes, or compete, the overall performance gains from a carbon frame are usually worth the investment.
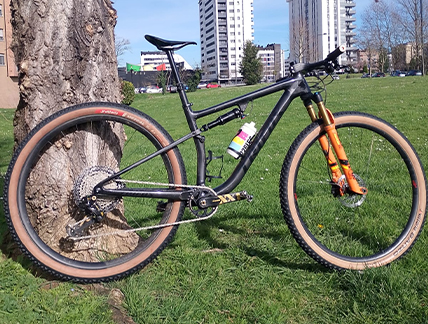
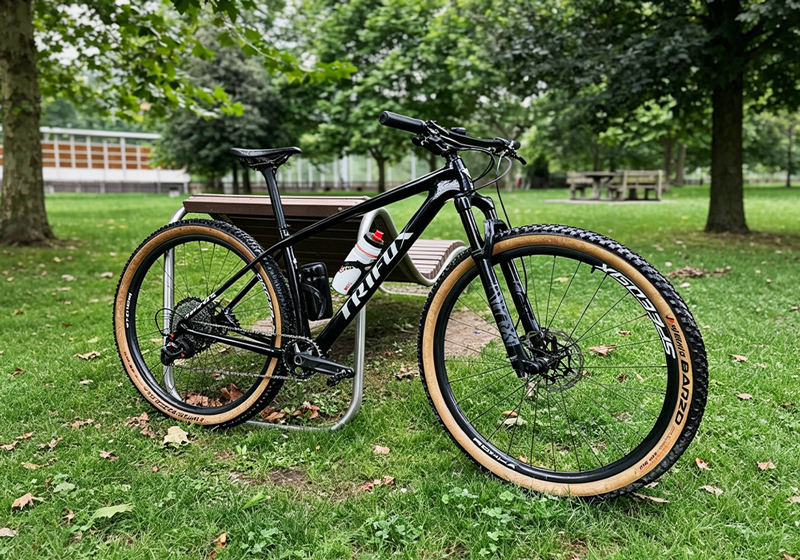
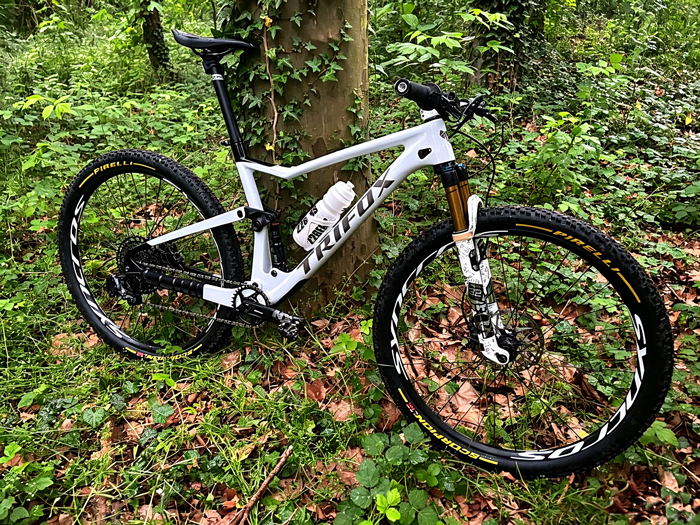
TRIFOX Trail II Pro: A lightweight XC full suspension frame
If you're looking for a Carbon MTB frame full Suspension that balances weight, stiffness, and comfort, the TRIFOX Trail II Pro is worth a closer look.
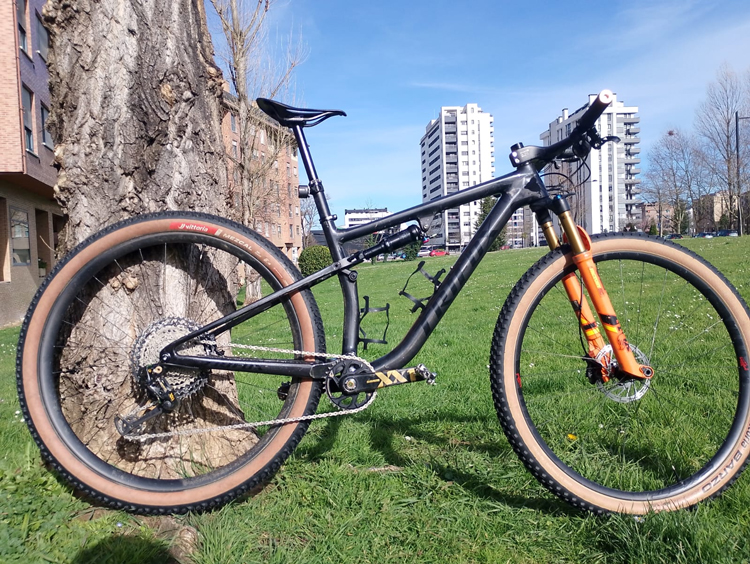
The Trail II Pro is purpose-built for XC and trail riding, featuring a lightweight carbon fiber construction and a modern full-suspension platform that delivers an efficient riding experience.
Key features include:
- Lightweight carbon fiber frame design
- 29-inch wheel compatibility
- Full suspension for improved terrain handling
- Excellent frame stiffness and pedaling efficiency
- Stable handling at high speeds
- Suitable for XC training, trail challenges, and long-distance rides
With its balanced performance and quality craftsmanship, the Trail II Pro has also gained attention as one of the best chinese carbon xc frame options among overseas riders, striking a solid balance between performance and value.
Who is a carbon frame best for?
Upgrading to a carbon frame offers greater value if you fall into any of these categories:
- You want to build a lighter XC mountain bike.
- You frequently race or ride long distances.
- You enjoy climbing and technical routes.
- You demand higher pedaling efficiency and handling precision.
- You plan to further upgrade wheels, forks, and other high-performance components.
By contrast, if you ride only occasionally, an aluminum frame will still meet most everyday needs.
Conclusion
Is a lightweight carbon XC frame worth it? For performance-oriented riders, the answer is usually yes.
While aluminum frames still offer good durability and value, carbon's combined advantages in weight, comfort, stiffness, and handling make it the preferred choice for a growing number of XC riders and trail enthusiasts.
If you're looking for a Carbon MTB frame full Suspension that delivers light weight, capable suspension, and strong value, the TRIFOX Trail II Pro is certainly worth adding to your upgrade list. It handles daily training with ease and helps you perform better in races and on challenging terrain.
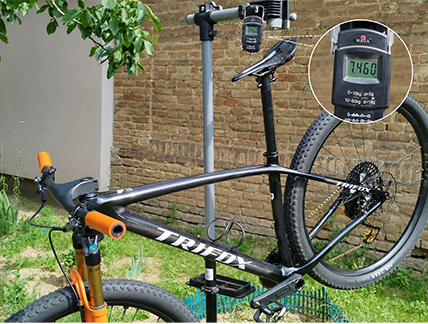
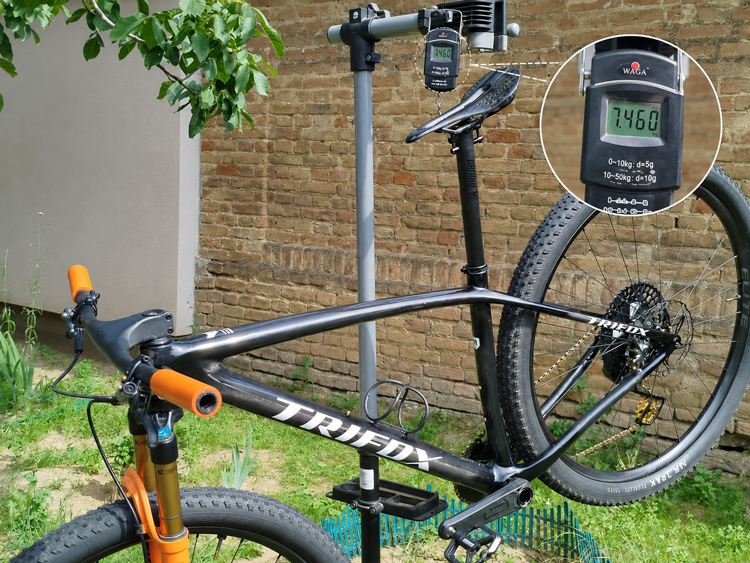
For many mountain bikers, there's one number that always sparks debate: bike weight. When a complete trail mountain bike tips the scales at just 7.46kg, the first reaction is usually, "Is that even possible?"
The answer is yes—but only with the right combination of an ultra-light frame and carefully selected premium components. Recently, one rider shared an incredible custom build based on the Trifox SDY20 Raw Carbon Frame, achieving a complete bike weight of just 7.46kg. The build features the TRIFOX SDY20 Raw Carbon Frame (867g) finished with premium parts from Darimo, Gemini Rigel, Fox Front Fork and a custom SRAM GX AXS + Garbaruk setup. Even more impressive, the Size S raw frame weighs only 867g, making it one of the lightest options available for serious trail enthusiasts.
Why 7.46kg Is Exceptionally Light
To put this into perspective, most modern carbon hardtail mountain bikes weigh between 9kg and 11kg, while many trail-focused hardtails are even heavier. A bike weighing under 8kg enters a category typically reserved for high-end race builds with premium carbon components and lightweight drivetrains.
Of course, achieving this number isn't just about spending more money. It starts with choosing the right frame.
That's exactly where the carbon fiber mtb bike frame SDY20 stands out.
The Foundation of an Ultra-Light Build
Every gram saved on the frame allows riders to invest weight elsewhere without sacrificing performance.
The Trifox SDY20 Raw Carbon Frame was designed specifically for trail riders who demand maximum efficiency.
Key highlights include:
- Ultra-light 867g raw frame (Size S) based on a customer build
- Premium carbon fiber construction
- Boost 148×12mm rear spacing
- Internal cable routing for a clean appearance
- Compatible with modern trail components
- Optimized geometry for climbing, acceleration, and technical handling
Boost 148 isn't simply a compatibility standard—it also increases rear wheel stiffness, improving power transfer and cornering precision when riding aggressively on technical trails.
Why Frame Weight Matters More Than You Think
Many riders focus only on the final bike weight.
However, the frame is the foundation of every lightweight build.
A lighter frame provides several advantages:
- Faster acceleration
- Easier climbing
- Better responsiveness
- More freedom when choosing components
- Lower overall system weight
An 867g frame gives builders extra flexibility. They can choose more durable wheels, a stronger fork, or reliable components while still achieving an incredibly light overall bike.
The Balance Between Weight and Stiffness
One common misconception is that lighter always means weaker.
Modern high-quality carbon engineering proves otherwise.
The SDY20 combines lightweight construction with excellent torsional stiffness, allowing riders to transfer more pedaling power directly to the rear wheel instead of losing energy through frame flex. At the same time, carbon naturally absorbs trail vibration better than aluminum, reducing rider fatigue on longer rides.
Why Boost 148 Makes a Difference
The SDY20 uses the now widely adopted Boost 148 rear spacing.
Compared with older hub standards, Boost provides:
- Wider spoke bracing angles
- Increased wheel stiffness
- Better tire clearance
- Improved handling during hard cornering
- Greater compatibility with modern wheelsets
For trail racers chasing every second, these small improvements quickly add up over long rides.
Is a Carbon Hardtail Still Worth It?
Absolutely.
While full-suspension bikes dominate rough terrain, many riders still prefer hardtails for trail riding and marathon events.
For riders who value speed, simplicity, and efficiency, a hardtail remains one of the smartest investments.
The Real Secret Behind a 7.46kg MTB
A 7.46kg mountain bike doesn't happen by accident.
It requires careful component selection, premium lightweight parts, and—most importantly—a frame capable of supporting such an ambitious build. The customer-built SDY20 proves exactly what's possible.
Final Thoughts
So, is 7.46kg light for a carbon MTB bike?
Without question.
It's a weight that places a bike among elite-level trail builds, demonstrating what can be achieved with thoughtful component choices and an exceptionally lightweight frame.
If you're planning your own dream trail project, the carbon fiber mtb bike frame SDY20 offers an outstanding starting point. With its Boost 148 platform, race-ready geometry, and customer-proven 867g raw frame, it's designed for riders who want every possible advantage on the trail.
Whether your goal is breaking personal climbing records or building your first sub-8kg mountain bike, the carbon hardtail frame mtb SDY20 delivers the lightweight performance modern trail riders are looking for.
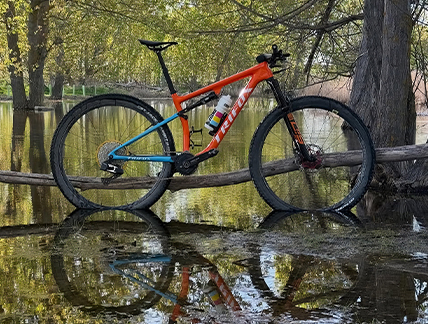
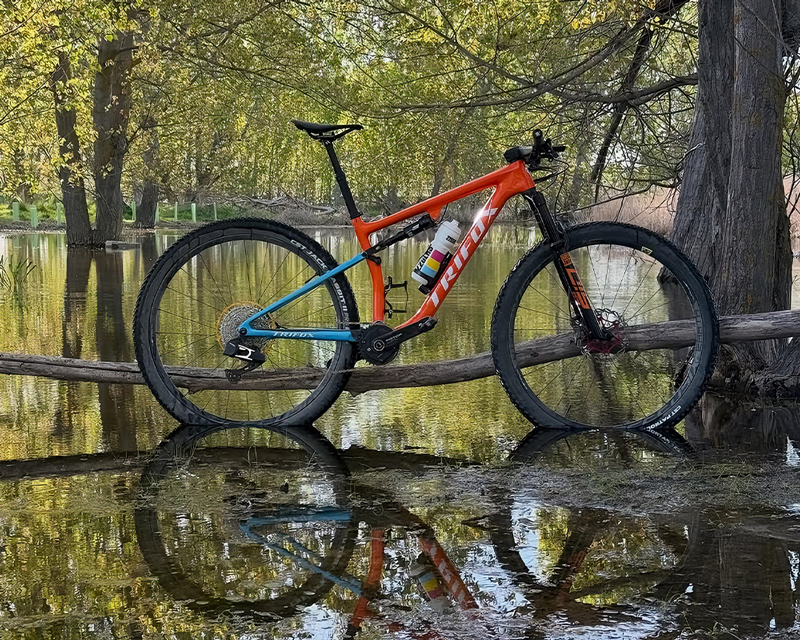
The wait is finally over. Two of the most iconic colorways from Trifox—the sophisticated Titane and the vibrant Orange & Blue—have returned to the MFM100 lineup. These frames were previously some of the most sought-after configurations, and they are now back in stock for a limited time. If you've been waiting to build a carbon boost mtb frame that turns heads and conquers trails, this is your moment.

A Frame That Demands Attention
The MFM100 has always been more than just a full-suspension frame. It's a statement of intent. Built from high-quality T800 carbon fiber, it delivers the perfect blend of strength, rigidity, and lightweight performance. The Titane finish offers a sleek, understated elegance that looks fast even when standing still. Meanwhile, the Orange & Blue paint scheme is a bold, race-inspired design that announces your arrival on the trail. Both finishes are applied with the same attention to detail that defines every aspect of this frame.
Performance That Matches the Look
Underneath the stunning paint, the MFM100 is a serious carbon xc mountain bike frame designed for off-road enthusiasts who demand exceptional performance and durability. The frame features a Boost 148 x 12mm rear axle spacing, which provides a stronger and stiffer rear wheel for enhanced tracking and control. The 68.5° head tube angle and 74.7° seat tube angle deliver confident, capable handling that climbs efficiently and descends with composure. Whether you're racing XC or exploring rugged backcountry trails, this frame is built to perform.
The frame also features a Trunnion rear shock mount for efficient pedaling and an asymmetric design that ensures a smooth structure and unobstructed cable movement. Internal cable routing keeps the bike looking clean and protects cables from the elements. With clearance for tires up to 29 x 2.35″, the MFM100 is ready for a wide range of trail conditions. Available in four sizes—15.5″, 17.5″, 19″, and 20.5″—this frame fits riders from 150cm to 195cm.
Limited Stock – Act Fast
These colorways have a history of selling out quickly, and this restock is no exception. Riders who have built up the MFM100 consistently praise its "excellent quality" and "superior comfort". One reviewer described it as "very reactive when you hit it with acceleration … the force you apply to the pedals goes directly to the wheels." On descents, users report that the bike "tracks straight on steep, rocky runs" and stays composed under hard hits. If you want to experience the balance of climbing efficiency and descending confidence that this carbon xc mountain bike frame offers, don't wait.
Head to the product page now to secure your Titane or Orange & Blue MFM100 before they disappear again.
Links
Trifox MFM100 Carbon Full-Suspension Frame
For mountain bikers seeking the ideal balance of speed, efficiency, and trail feel, the hardtail remains a compelling choice. And when that hardtail is crafted from high-quality carbon fiber, the benefits multiply. The Trifox MFM200 is a carbon hardtail mtb frame that embodies everything modern riders look for: lightweight construction, responsive geometry, and the durability to handle aggressive trail riding. Here’s why this 29er carbon hardtail deserves a spot in your garage.
The Carbon Advantage: Lightweight and Stiff
The MFM200 is constructed from T800 full carbon fiber, a material prized for its exceptional strength-to-weight ratio. Weighing in at just 1,239g for the 15.5″ frame, it is impressively light for a hardtail chassis. This low weight translates directly to the trail: quicker acceleration, easier climbing, and a bike that feels lively and responsive under power. But carbon isn’t just about saving grams. The T800 construction provides the stiffness needed for precise handling and efficient power transfer, ensuring every watt of effort is converted into forward momentum. Whether you're sprinting out of a corner or powering up a steep climb, the MFM200 responds with immediacy.

Modern Geometry for Confident Handling
The MFM200’s geometry is tuned for the demands of modern trail and XC riding. A 70° head tube angle provides a stable, confident feel on descents, while the 74.7° seat tube angle places the rider in an efficient pedaling position for climbing. The 440mm chainstays strike a balance between agility and stability, allowing for quick direction changes without sacrificing high-speed composure. The frame accommodates 29er wheels with tires up to 2.1″, offering the rollover capability and traction that 29-inch wheels are known for.
For riders seeking a 29er carbon hardtail frame that excels on diverse terrain, the MFM200's geometry delivers a balanced, predictable ride. It climbs with efficiency, descends with confidence, and handles technical sections with poise — a true all-rounder for the modern trail rider.
Internal Cable Routing and Modern Standards
The MFM200 features full internal cable routing, keeping cables protected from the elements and giving the bike a clean, sleek appearance. This design choice also simplifies maintenance and reduces drag, contributing to a more aerodynamic profile. The frame accepts a 31.6mm seatpost and uses a threaded BSA bottom bracket — a reliable standard that is creak-free and easy to service. The tapered head tube (1-1/8″ to 1-1/2″) provides a stiff interface for modern forks, enhancing steering precision. And with the ability to choose between Quick Release and Thru-Axle dropout options, the MFM200 offers compatibility with a wide range of wheelsets.
Versatility for Every Rider
Available in three sizes — 15.5″, 17″, and 19″ — the MFM200 fits riders from 150cm to 190cm. Whether you're a cross-country racer seeking a lightweight weapon for race day, a trail rider looking for a responsive and durable hardtail, or a rider upgrading from an entry-level bike, the MFM200 offers exceptional versatility. The frame is compatible with both single and double chainring drivetrains, and it can accommodate a dropper post for added descending control.
Value That Stands Out
At just $329 (regularly $639.99), the MFM200 is priced to compete with aluminum frames, offering the performance benefits of carbon at an accessible price point. It's an affordable entry into the world of carbon mountain biking, providing a high-quality foundation for a build that can grow with your skills. The 2-year warranty further underscores Trifox's confidence in the frame's durability.
Conclusion
The Trifox MFM200 is more than just a lightweight carbon hardtail frame. It's a thoughtfully engineered platform that combines modern geometry, quality materials, and thoughtful features to deliver a ride that is both efficient and engaging. Whether you're chasing podiums or simply exploring new trails, this carbon hardtail mtb frame provides the foundation for a bike that will inspire confidence and enjoyment for years to come. With its blend of performance, value, and versatility, the MFM200 stands as a compelling choice for any rider ready to experience the benefits of carbon.

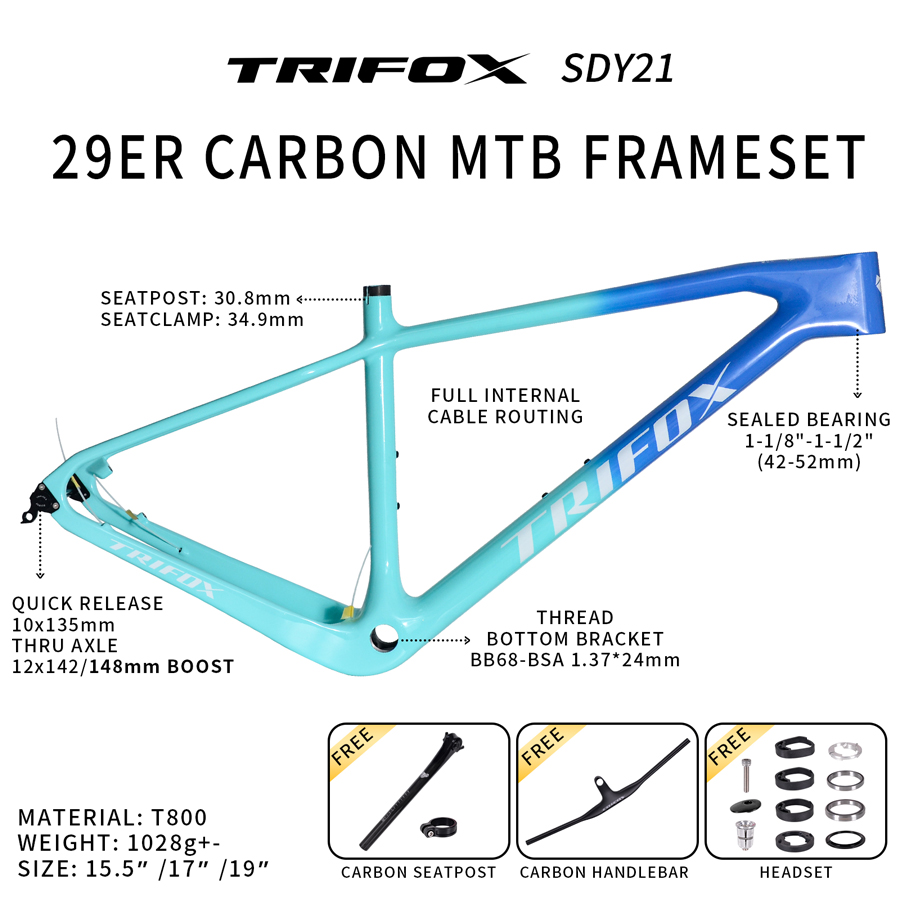
Walk into any mountain bike forum or scroll through group ride photos, and one truth becomes clear: component standards change faster than most of us care to admit. A frame that feels cutting‑edge today can feel hopelessly dated in three seasons — not because the carbon stops working, but because your wheels don’t fit, your hanger is discontinued, and the industry has moved on without you.
Relevance isn’t about fashion. It’s about compatibility. A truly relevant frame is one that gives you choices: modern stiffness when you want it, classic simplicity when you need it, and the flexibility to swap components without throwing your whole build away. The Trifox SDY21 carbon hardtail frame is built around exactly that philosophy. Its secret isn‘t a single “best” standard — it’s the ability to choose the right standard from the start. The frame is available in three distinct O.L.D (Over Locknut Distance) versions: 135mm Quick Release, 142x12mm Thru‑Axle, and 148x12mm Boost Thru‑Axle. Each is a purpose‑built frame, not a one‑size‑fits‑all hack. That clarity is the first step to keeping your bike relevant for years.
Choose Your Axle, Choose Your Future
Many brands claim versatility by offering adapters or interchangeable dropouts — solutions that often introduce play, creaks, or alignment headaches. The SDY21 takes a cleaner path. When you buy, you select the exact axle version that matches your wheelset and your ambitions.
Boost 148x12mm TA — The current gold standard. Boost spacing widens the hub flanges, which improves spoke bracing angles and creates a stiffer, stronger rear wheel. On the trail, that translates to sharper cornering, less wheel flex under hard pedaling, and better tracking through rock gardens. If you‘re building a modern XC or trail bike with 29” wheels and want maximum stiffness, this is the version to choose. Boost also gives you the widest compatibility with current wheels, forks, and drivetrains — the path of least future resistance.
142x12mm Thru‑Axle — The immediate predecessor to Boost. It offers much of the security and precision of a thru‑axle without the wider flange spacing. For riders who already own a quality 142mm wheelset or prefer a slightly narrower rear end for certain riding styles, this version provides a stiff, rattle‑free interface that improves handling and braking precision over QR. It‘s not the newest standard, but it’s far from obsolete — and it‘s the right answer if your parts bin already points that way.
135mm Quick Release — The traditionalist’s choice. Simple, lightweight, and compatible with a vast range of entry‑level and classic wheelsets. If you‘re building a budget‑conscious hardtail for smooth singletrack, bikepacking, or a singlespeed conversion, QR keeps things affordable and straightforward. Not every ride needs Boost-level stiffness — and that’s fine.
The Frame That Unites Them All
Whichever axle version you select, the core SDY21 DNA remains the same. The frame is constructed from T800 full carbon fiber, offering an exceptional stiffness‑to‑weight ratio. Weighing as little as 1028g in the 15.5” size, it‘s a true lightweight contender — a frame that doesn’t punish you on climbs. The geometry is modern and balanced: a 70° head tube angle and 73° seat tube angle provide confident, capable handling that climbs efficiently and descends with stability.
The SDY21 also features full internal cable routing through the headset, resulting in a sleek, uncluttered appearance while protecting cables from moisture, mud, and abrasion. The frame clears tires up to 29x2.4”, accommodating modern high‑volume rubber for traction and comfort. And it includes a replaceable derailleur hanger, making it compatible with both geared drivetrains and singlespeed setups — a rare touch of versatility at this price point.
The Standards That Matter Beyond the Axle
A relevant frame needs more than just axle choices. It needs to speak the industry‘s evolving language. The SDY21’s Boost 148 versions also embrace the Universal Derailleur Hanger (UDH) standard — the same interface that unlocks SRAM‘s Transmission drivetrains and makes hanger replacement universally easy. The frame uses a threaded BSA 73mm bottom bracket — famously creak‑free, easy to service with simple tools, and a deliberate departure from problematic press‑fit shells that can develop annoying noises over time.
For riders who want a frame that is both visually striking and technically sound, the SDY21 is available in multiple colors, including a vibrant orange mountain bike frame option that stands out without compromising the carbon‘s structural integrity. It’s a frame that performs as well as it looks.
Why This Matters for Your Build
The worst feeling in mountain biking is discovering that your dream build is incompatible with the wheels you already own — or with the wheels you hope to buy next season. By offering three distinct axle versions, the SDY21 puts control back in your hands. You don’t have to force adapters or compromise on your vision. You simply choose the version that aligns with your parts, your budget, and your riding style.
For riders seeking a no‑compromise rigid frame mtb that balances modern performance with practical compatibility, the SDY21 delivers. It‘s a frame that respects where mountain biking has been — and anticipates where it’s going. Build it with Boost and a 12‑speed drivetrain for a race‑ready XC machine. Build it with QR and a singlespeed tensioner for a minimalist trail weapon. Or build it with TA and a reliable 1x11 groupset for an all‑around hardtail that just works.
The right carbon hardtail doesn‘t lock you into a single path. It gives you choices — and the SDY21 gives you three. That’s how you stay relevant.
The day has finally arrived. You're ready to move on from that heavy, entry‑level alloy bike and invest in your first true carbon mountain bike. The ride quality, the weight savings, the prestige—it all beckons. But a fundamental fork in the trail awaits you: carbon hardtail or carbon full‑suspension?
Both offer massive performance leaps over an entry‑level bike, but they serve very different riders and terrains. This guide will help you navigate the pros, cons, and hidden costs of each, with a special focus on the versatile Trifox SDY20 15 inch bike frame —a featherweight carbon hardtail that proves you don't always need rear suspension to conquer the trail.
The Case for the Carbon Hardtail: Efficiency and Simplicity
At the heart of the hardtail debate is power transfer. Without a rear shock absorbing your pedaling forces, a carbon hardtail is an efficiency machine. The Trifox SDY20 trial bike frame exemplifies this. Its ultra‑light T1000 carbon layup – the 15” frame weighs just 930g – and exceptional torsional stiffness mean that every watt of power you generate goes straight into propelling you forward, not into compressing a shock. On long, smooth climbs and flowy singletrack, the direct feedback and instant acceleration of a hardtail are unmatched.
Furthermore, modern carbon hardtails like the SDY20 are no longer the crude, unforgiving bikes of the past. With clearance for 2.4” tires, you can run high‑volume rubber at lower pressures, effectively turning the tires into a form of suspension. The Boost 148mm rear thru‑axle massively increases rear wheel stiffness, improving tracking and control. And the inclusion of a UDH (Universal Derailleur Hanger) future‑proofs the frame for the latest SRAM Transmission drivetrains. The SDY20 is also a more affordable entry point to carbon, allowing you to invest more in a top‑tier fork or groupset.
Choosing the Right Hardtail Fit
Fit is crucial for any bike, but especially for a hardtail where your body is the suspension. The SDY20 offers multiple sizes to fit a wide range of riders, from the compact 15 inch bike frame to medium and large sizes. This 15″ model is a perfect option for smaller riders or those seeking a playful, agile feel, ensuring they get the performance benefits of a carbon hardtail without feeling stretched out and out of control.
The Full‑Suspension Philosophy: Traction and Forgiveness
Full‑suspension is all about traction and control. The rear wheel is better able to maintain contact with the ground over roots and rocks, improving climbing grip on technical ascents and boosting descending confidence dramatically. A full‑suspension bike allows you to ride harder, longer, by reducing the physical battering your body takes. For heavy, aggressive riders or those whose local trails are perpetually chunky, a full‑suspension bike is a significant advantage.
However, this comes with a cost. A good full‑suspension frame is significantly heavier, uses a more complex linkage system requiring maintenance, and is considerably more expensive. You also must budget for a rear shock, adding another $200–500 to your build. The complexity of riding a full‑suspension bike is also higher. To get the most out of it, you need to learn to pedal smoothly and manage the bike’s weight.
Hidden Costs: The Budget Behind the Build
This is where the decision gets real. For your first carbon MTB, the hardtail’s lower cost allows you to invest in premium components that dramatically improve the ride experience. The SDY20 frame, often available for under $600, leaves the bulk of your budget for a top‑of‑the‑line fork (e.g., Fox 34 Step‑Cast or Rockshox SID SL), a lightweight carbon wheelset, and a high‑end groupset.
With a full‑suspension frame, you will spend significantly more on the frame alone, forcing you to cut corners elsewhere. This leads to a poorly balanced build with a heavy suspension fork, budget wheels, or a cheap groupset, undermining the full‑suspension experience.
Which Should You Choose?
Choosing the right first carbon MTB is about aligning the bike with your trails and your ambitions.
Choose a carbon hardtail if:
- You ride mostly smoother, flowy singletrack, gravel roads, and XC-style trails.
- Efficiency, climbing speed, and pedal response are your top priorities.
- You are on a strict budget but still want a premium, lightweight frame.
- You are a lighter rider or prefer a lively, “playful” bike that rewards active riding.
Choose a carbon full‑suspension if:
- Your local trails are relentlessly chunky, rocky, and rooty.
- You prioritize descending confidence and comfort over flat‑out speed and weight.
- You are a heavier rider or have the budget to spend $2,500+ on a quality frameset alone.
The Final Verdict
Your first carbon mountain bike should match your terrain, budget, and skill level. While a full‑suspension bike is the ultimate tool for extreme terrain, a modern carbon hardtail like the Trifox SDY20 is arguably the smarter, more versatile first purchase for most riders. It offers a massive performance upgrade over an aluminum frame, teaches you to read the trail and pick good lines, and provides a lightweight, efficient, and incredibly fun platform for years to come.
The mountain bike industry has a habit of changing standards just when you think you’ve settled on a dream build. Rear axle spacing, derailleur hangers, tire widths—all have shifted over the past decade, often leaving older frames incompatible with newer, better components. If you’re investing in a disc brake bike frame today, you want to be sure it can accept tomorrow’s drivetrains, wheels, and tires. The Trifox TRAIL II PRO is engineered with three key modern standards: Boost 148mm spacing, a Universal Derailleur Hanger (UDH), and generous tire clearance. Here’s why those specs matter for the future.
Boost 148: The Foundation of Future Wheel Stiffness
Boost 148x12mm rear spacing has rapidly become the industry benchmark for mountain bikes. By widening the hub flanges compared to older 142mm or 135mm standards, Boost creates a significantly stiffer rear wheel through improved spoke bracing angles. This isn‘t just a performance upgrade—it’s a compatibility necessity. Nearly every modern frame, fork, and wheelset uses Boost spacing today, and the standard is likely to remain dominant for years. Choosing a non-Boost frame means limiting your wheel and hub options. The TRAIL II PRO’s Boost 148mm thru-axle dropout ensures you’ll have access to the best wheels on the market now and in the foreseeable future, from lightweight XC race hoops to rugged trail builds.
UDH: Your Gateway to Next-Generation Drivetrains
The Universal Derailleur Hanger (UDH) is arguably the most important future-proofing feature on any modern frame. Originally developed by SRAM, the UDH standardizes the derailleur mounting interface across all bikes. This has two profound benefits. First, it eliminates the hunt for frame-specific hangers—replacements are now universal. Second, and more critically, the UDH is the mandatory interface for SRAM’s revolutionary Transmission and Full Mount drivetrains. These next-generation systems mount the derailleur directly to the frame, bypassing a traditional hanger entirely for unmatched shift precision and crash durability. A frame with a UDH is compatible with all current derailleurs and ready for whatever full‑mount systems the future holds. The TRAIL II PRO’s UDH dropout ensures you won‘t be left behind as drivetrain technology evolves.
Tire Clearance: Room to Grow as Rubber Expands
Tire widths have been steadily increasing across all mountain bike disciplines. XC race tires that were once 2.1” are now routinely 2.4”, with 2.6” options appearing for more aggressive terrain. The TRAIL II PRO is designed with 29 x 2.25” as its official clearance, but real-world experience shows the frame can accommodate a 2.3” tire in dry conditions, and some owners have successfully mounted 2.4” rubber on standard rims. This generous clearance means you’re not locked into narrow tires as the industry trend toward wider, more capable rubber continues. Whether you want the grip of a 2.4” for loose races or the volume of a 2.6” for trail adventures, the TRAIL II PRO has the breathing room to adapt.
Built for Tall Riders Too: The 19‑Inch Frame Option
The TRAIL II PRO is available in 17” and 19” sizes. For taller riders, the 19 inch bike frame provides a roomy reach (470mm) and taller stack (606.1mm), accommodating riders from 175–190cm without compromising the frame’s progressive 67.5° head tube angle. Importantly, the future-proofing benefits—Boost, UDH, and tire clearance—scale across both sizes, ensuring tall riders enjoy the same long-term compatibility as their shorter counterparts.
Why These Standards Matter for Your Wallet
Buying a frame that anticipates future standards isn’t just about performance; it’s about value. A frame that can accept new drivetrains, wider wheels, and larger tires won’t become obsolete quickly. You can upgrade components piecemeal over years, breathing new life into the bike without replacing the chassis. The TRAIL II PRO’s T800 carbon construction, internal routing, and threaded BB68 bottom bracket further enhance its longevity. When you invest in this disc brake bike frame, you’re not just buying a bike for this season—you’re buying a platform that will remain competitive and compatible for seasons to come. Future-proof your build today.
You have a budget in hand and a long list of components. The classic dilemma: should you invest first in the frame, or pour your money into a top‑tier rear shock? Choose wrong, and you risk wasted budget or a bike that never feels balanced. The answer is clearer than you might think: frame first, shock second. The frame is the foundation; the shock adds the finishing touch. Frame geometry defines the bike‘s character—XC efficiency, trail composure, or enduro aggression—while the shock simply needs to match that platform. If your budget allows a quality frame to start, the disc brake bike frame MFM100 is an excellent starting point, built with the engineering priorities that align with your riding goals.
Why Frame First?
A rear shock is not a universal component. Its critical dimensions—eye‑to‑eye length and stroke—are dictated entirely by the frame. Choose a frame first, and you immediately know which shock sizes you need. Spec a shock before the frame and you risk incompatibility, wasted money, or a shock that simply won’t fit. The MFM100 simplifies this by defining clear shock parameters (165mm eye‑to‑eye, 40/45mm stroke), so you can focus on tuning rather than guesswork.
Air vs. Coil: The Decision After the Frame
Once the frame is locked in, choosing the rear shock becomes a focused decision. Air shocks are the standard for XC and light trail use. They are lightweight, tunable with a simple pump, and suit varied terrain. Coil shocks offer superior small‑bump sensitivity and traction, but add weight. With the MFM100’s efficient, climb‑oriented kinematics, an air shock is the recommended match for most riders—keeping weight low while preserving pedaling efficiency.
MFM100: A Smart Foundation
The MFM100 is a T800 carbon full‑suspension frame featuring Boost 148x12mm rear spacing, a threaded BSA bottom bracket, and a proven four‑bar linkage. For this frame, the recommended shock dimensions are 165mm eye‑to‑eye and 40mm or 45mm stroke. For XC and marathon use, consider a Rockshox SIDLuxe or Fox Float DPS. For more aggressive trail riding, the Fox Float X or Rockshox Super Deluxe provide additional support and control without overwhelming the frame‘s intended travel range.
Room for Taller Riders: The 19‑Inch Frame Option
The MFM100 is available in multiple sizes, including a 19 inch bike frame (size L). This larger geometry offers a roomy reach and taller stack, accommodating riders from 180–195cm. Choosing the correct size first ensures your future shock upgrades won’t be hindered by fitment issues—investing in the right frame size upfront saves costly adjustments later.
Smart Building Priorities: A Quick Checklist
1. Choose the frame that matches your terrain and fit (e.g., MFM100).
2. Confirm shock dimensions from the frame spec (165 x 40/45mm).
3. Select shock type (air for XC/trail, coil for heavier descending).
4. Check mounting hardware (bushings, bolts) to fit the frame.
5. Set sag and rebound based on rider weight and trail conditions.
By leading with the frame, you avoid compatibility traps and build a bike that performs as a cohesive system. The MFM100 provides a reliable, modern disc‑brake platform that makes the rest of your build straightforward. Start with the foundation—everything else will follow.
Trail chatter is the mountain biker’s silent enemy. The constant high-frequency vibration from roots, rocks, and rough ground doesn‘t just make your hands sore—it accelerates muscle fatigue, blurs your focus, and compounds over every mile. Many riders assume that only suspension can solve this. But the frame material itself plays a profound role. A carbon frame like the Trifox SDY20 17.5 bike frame (available in 15″, 17″, and 19″ sizes) transforms the ride experience not just through low weight, but through its unique ability to absorb trail vibration while maintaining pedaling efficiency. Here’s how modern carbon engineering achieves what metal simply cannot.
From Metal to Composite: A Fundamental Difference
Aluminum is a crystalline metal uniform in all directions. When vibration energy enters an aluminum frame, it transmits as a sharp, undampened shockwave directly to the rider. Steel is more compliant but heavier. Carbon fiber, however, is a composite. Thousands of individual fibers embedded in an epoxy resin matrix create a structure that can be engineered with different properties in different directions. This anisotropy is the key to carbon‘s vibration-damping advantage. The resin matrix acts as a microscopic damping agent. When high-frequency vibration enters the layup, energy is dissipated as heat within the resin and between fiber layers rather than being transmitted onward.
The Layup: Where Comfort Is Engineered
The magic of carbon isn‘t just the material—it’s how the material is arranged. A carbon frame is built from dozens of thin sheets (plies) of carbon fiber impregnated with resin, each laid at a specific orientation. By controlling the layup schedule—the number of layers, their orientation, and where they are placed—engineers can tune stiffness in one direction while allowing compliance in another. High-modulus fibers laid along the downtube and chainstays resist pedaling forces for crisp power transfer. Yet the same structure can allow controlled flex in the seatstays to absorb rear-wheel impacts, reducing shock transmitted to the rider before it reaches the spine. One study found that carbon fiber‘s damping properties enable road‑shock absorption efficiency of up to 92%, with comfort improvements of 41% on rough sections compared to less-engineered alternatives.
Carbon vs. Aluminum: The Ride Feel Difference
Aluminum offers excellent stiffness and affordability, but it doesn‘t absorb vibration as effectively, which can result in a harsher ride. Aluminum transmits “trail buzz” directly, leaving your hands and arms to absorb the punishment. This leads to faster fatigue and more difficult line-holding on loose terrain. Carbon’s natural damping filters out high-frequency vibrations, keeping you fresher and more in control. The Trifox SDY20, built with T800 carbon, exemplifies this balance. T800 occupies a sweet spot between entry-level T700 and ultra-stiff premium fibers, offering excellent stiffness for pedaling efficiency while retaining enough vertical compliance for real‑world comfort.
What T800 Brings to the Trail
T800 carbon has a higher tensile modulus (stiffer) than T700, allowing frame designers to use less material to achieve the same stiffness—or build a stiffer frame at the same weight. This translates to immediate power transfer and responsive handling when accelerating or climbing. More importantly for trail riders, T800‘s balance means you don’t sacrifice comfort for performance. The material is neither so flexy as to feel vague nor so rigid as to be harsh. Professional analysis confirms that T800 often provides a better balance of stiffness and vertical compliance than higher-modulus fibers like T1000. For riders seeking a 17.5 bike frame that climbs efficiently yet stays comfortable over long days, this precise blend of properties makes a tangible difference. Not all T800 is equal—quality control in fiber layup and resin application is critical—and Trifox‘s attention to this detail ensures the SDY20’s layup delivers consistent, predictable damping.
Making It Yours: Custom Frame Painting
A carbon frame‘s performance core is the same whether it wears subtle livery or bold colors. But personalization matters. Trifox offers custom bicycle frame painting options, allowing you to choose from multiple colors (the SDY20 is available in finishes such as Red, Green, and Glossy black). Whether finishing a stealth race build or a standout trail bike, custom paint doesn’t affect the engineering—it reflects your identity without compromising the frame‘s vibration-damping layup.
The Long‑Ride Payoff
Over hours in the saddle, vibration isn’t a minor inconvenience—it‘s a performance limiter. Carbon’s ability to reduce transmitted vibration means less muscle tension, clearer vision, and better bike control, especially in technical sections where staying loose matters. The rigid front triangle keeps steering precise, while the rear stays can be tuned to absorb just enough chatter to keep the rear wheel planted. That‘s the real magic of a well-engineered carbon frame: you stop thinking about the bike and start flowing with the trail. The Trifox SDY20 proves that carbon’s advantage isn‘t just about grams on a scale—it’s about how the material makes you feel on mile 30, mile 50, and beyond.


