


Walk into any bike shop and the advice is almost universal: “Buy complete. It’s cheaper.” And in many cases, that’s true. Manufacturers buy components in massive volumes, so they can offer a fully built bike for less than the sum of its parts — often by hundreds of dollars. A 2025 analysis found that sourcing all components individually for a mid-range mountain bike cost about $876 more than buying the complete version. So why would anyone buy just a frameset? Because the full story is more complicated, and for many riders, buying a frameset actually saves money in ways that aren’t immediately obvious.
The “Cheaper to Buy Complete” Myth Needs Context
The conventional wisdom is correct if you intend to ride the bike exactly as it comes from the factory. But how many enthusiasts actually do that? The moment you swap the saddle, change the handlebars, replace the wheels, or fit different tires, you‘re paying for parts twice — the stock components you never wanted and the upgrades you actually ride. One forum user described this reality perfectly: “Having bought a complete bike and replacing every single part except the fork, I say just buy the frame. it’s less work and you won’t save all that much because you‘ll have to sell the take off parts for less than what people can get them online for”. Sell those “new take‑off” parts on eBay, and you’ll recoup maybe 50‑70% of their retail value. That hidden loss is money you never see again.
Customization Isn’t a Luxury — It’s a Performance Upgrade
The real value of a frameset isn‘t just about cost — it’s about getting exactly the bike you want. Buying a complete bike means accepting someone else‘s choices: their saddle, their stem length, their crank arms, their handlebar width. For many riders, this is fine. But for serious cyclists, the ability to select every component transforms the riding experience. As one builder noted, “I’m small and I like weird things like 38cm bars and 165mm cranks. Those are hard to find stock on a bike. I‘m also a big tubeless fan, so I’m probably switching wheels. Again, stock wheels often get replaced right away”. Building from a carbon road bike frame disc brake means you choose your favorite crank length, your preferred cassette range, the exact handlebar width, and the saddle that fits your anatomy — not the one the factory spec’d to save $15.
The Hidden Costs of “Cheap” Complete Bikes
Complete bikes often hide compromises in components you can’t easily see: heavy OEM wheels, low‑spec finishing kit, basic tires, and budget brake rotors. Upgrading these items later costs significantly more than buying quality parts upfront. Building from a carbon fiber road bike frame 54cm lets you allocate your budget exactly where it matters — premium wheels, a reliable drivetrain, and contact points that fit you. One experienced builder confirmed that for high‑end builds, “It’s cheaper to build up from a frameset than it is to buy the high end stuff like S‑Works, etc. Plus you can select which components you really want and not waste anything”. That’s the overlooked math: buying a frameset isn’t about paying less; it’s about wasting less on parts you’ll replace anyway.
Frameset Economics: Spread the Cost, Buy Better Components
Another financial advantage of starting with a frameset is the ability to spread your investment over time. A complete bike requires a single large payment. Building from a frameset allows you to buy the frame now, wheels next month, and the groupset the month after. One buyer noted this flexibility: “I can buy parts as I obtain the budget for them, rather than wait a long time to build up a budget and then spend it all at once. That allows me to get better components than I‘d otherwise be able to get”. This approach also lets you shop sales aggressively, securing premium components at discount prices — something a complete bike purchase rarely allows.
Quality Control and Frame First — Everything Else Follows
Starting with a frameset also ensures your most critical component — the frame itself — is exactly what you want. The frame determines geometry, weight, stiffness, and ride feel. Everything else is replaceable. By investing in a quality carbon road bike frame disc brake up front, you build on a foundation that won’t become obsolete. When components wear out or technology advances, you upgrade individual parts, not the entire bike. This long‑term thinking is how experienced riders build bikes that last for years.
When Does Buying a Frameset Make the Most Sense?
A frameset purchase is ideal for riders who:
- Already own quality components (wheels, groupset, saddle) from a previous bike.
- Have strong opinions about fit and component selection.
- Plan to ride the bike for years and want a platform that grows with them.
- Are building a mid‑to‑high‑end bike where OEM parts would likely be replaced anyway.
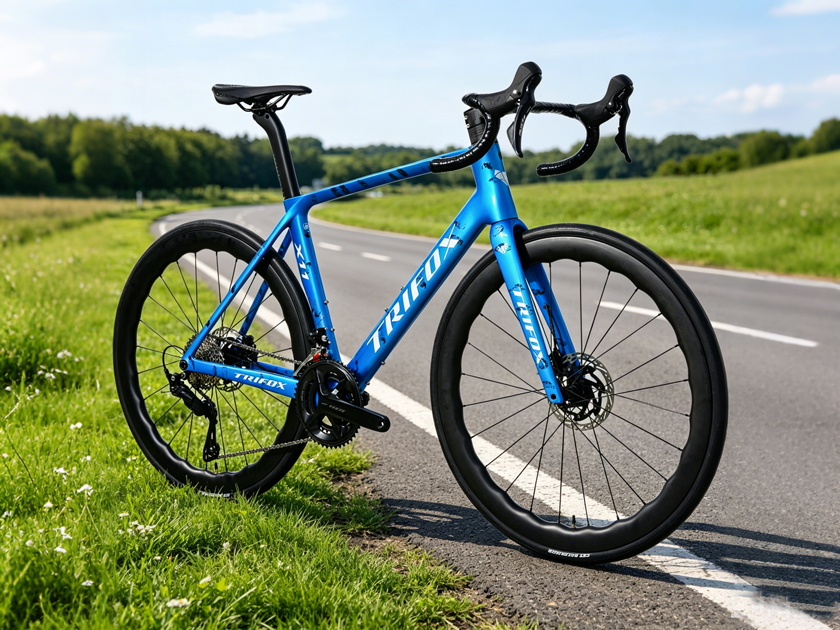
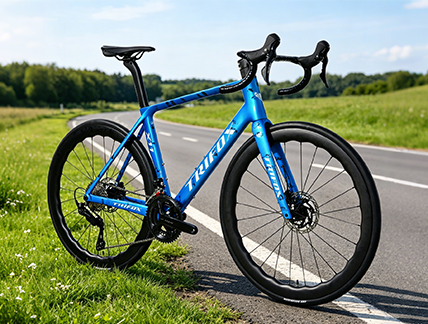
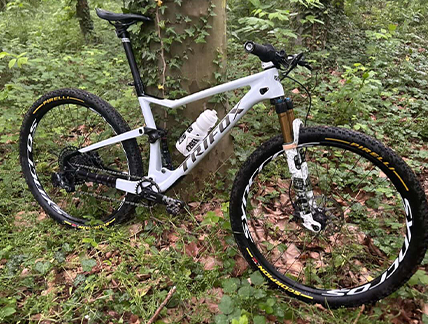
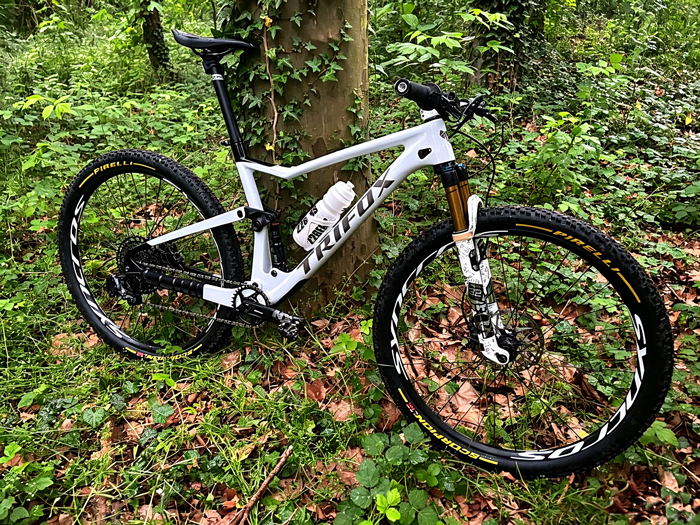
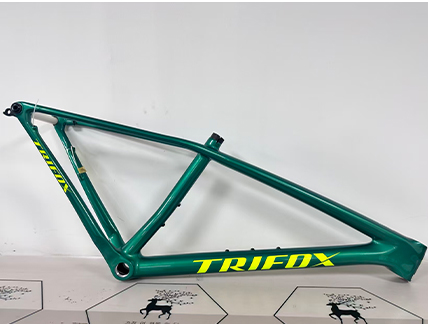
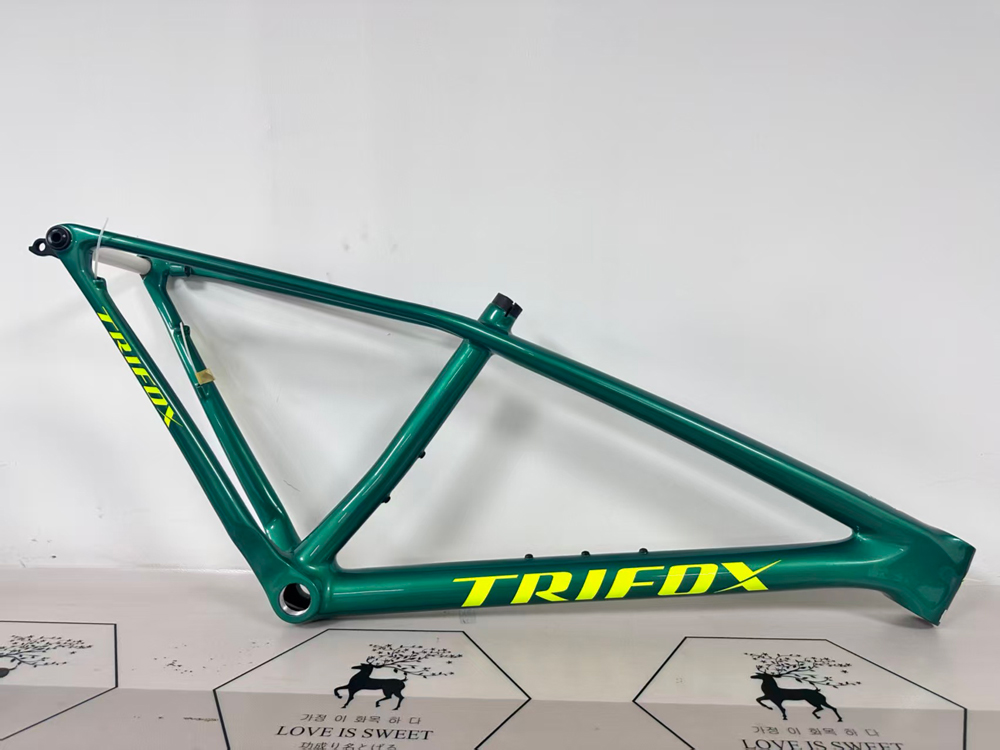
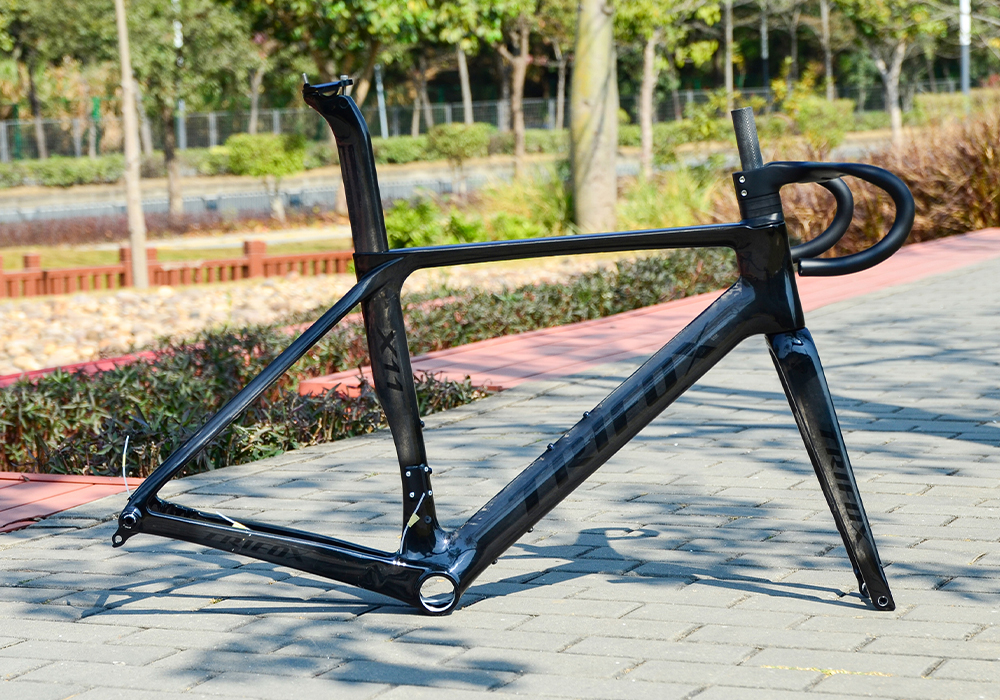
The Trifox X11: A Frameset Worth Building Around
The Trifox X11 exemplifies everything a modern frameset should offer. Its T800 carbon fiber construction delivers exceptional stiffness‑to‑weight, while the full internal cable routing creates a clean, aerodynamic profile. The UDH derailleur hanger future‑proofs the frame for next‑generation drivetrains, and the T47 threaded bottom bracket ensures creak‑free reliability. Sizes from XS to L accommodate a wide range of riders, including the popular 54cm option for heights 175‑188cm. And the included full‑carbon fork, integrated handlebar, and seatpost eliminate the need to source these components separately — a meaningful value addition that further reduces the hidden costs of a custom build.
The bottom line: buying a complete bike is often cheaper upfront, but building from a frameset is often the smarter long‑term investment. You get exactly the bike you want, you don‘t pay for parts you’ll replace, and you build on a foundation designed to last. Sometimes the best way to save money is to spend it on what actually matters — starting with the frame.
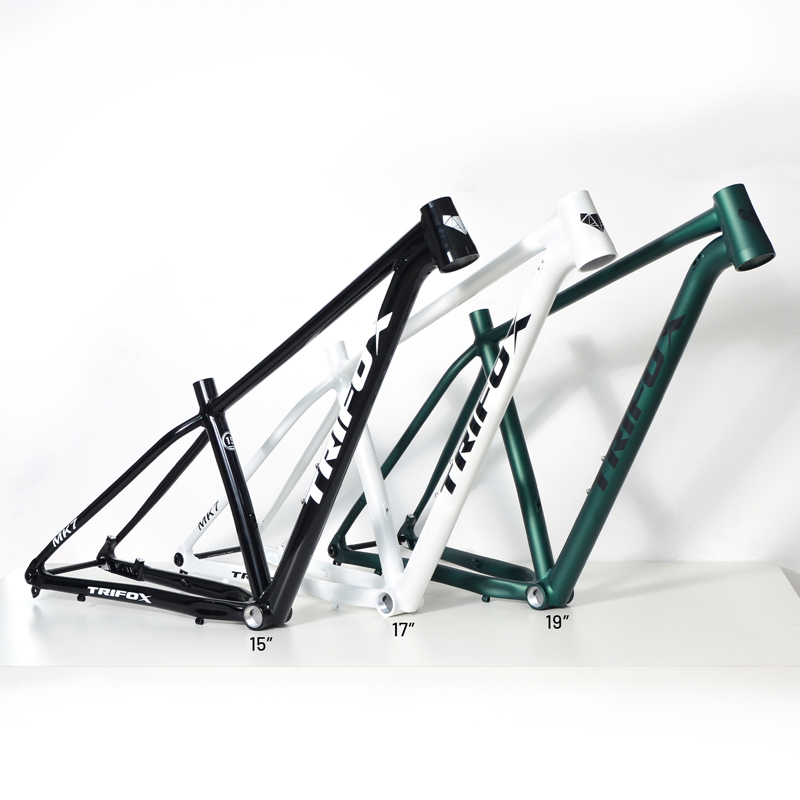
When mountain bikers think of a single frame, one discipline usually comes to mind: cross-country racing. But modern aluminum hardtails have quietly become the most versatile platforms in cycling. A well-designed 29er alloy hardtail can wear multiple hats—XC race rig, backcountry bikepacking mule, city commuter, and even a stripped-down singlespeed. The Trifox MK7 Pro is a perfect example of this new breed. Its combination of Boost 148mm spacing, modern geometry, and ultralight 6061 aluminum construction makes it a bike frame 17 inch that isn‘t locked into a single identity.
Boost Spacing: The Foundation of Versatility
The MK7 Pro features Boost 148x12mm rear spacing and Boost 110x15mm fork compatibility. This wider hub spacing moves the spokes further apart laterally, dramatically increasing wheel stiffness—especially critical for hardtails that lack rear suspension to absorb chassis flex. On rocky climbs or when powering out of corners, the rear wheel tracks precisely without the vagueness that plagues narrower frames. Boost also enables shorter chainstays (440mm), which enhances agility and makes the bike feel playful on singletrack.For bikepackers, the stiffer rear end handles loaded panniers with less wobble. For commuters, the thru-axle interface provides a rattle-free, secure wheel mount that shrugs off daily abuse.
Tire Clearance and Modern Geometry
The wider Boost rear triangle gives designers room for generous tire clearance. The MK7 Pro readily accommodates up to 29x2.4" tires—enough volume for aggressive XC tread, plus-size rubber for bikepacking comfort, or durable touring tires for urban commuting. The geometry itself is tuned for balance: a 68.5° head tube angle provides stability at speed without sacrificing climbing precision, while the 74° seat tube angle puts the rider in a powerful, centered pedaling position.This means you can swap between a 100mm race fork for fast summer loops and a 120mm trail fork for rowdier adventures without ruining the bike‘s handling.
From XC Race Rig to Bikepacking Machine
For XC racing, the MK7 Pro’s hydroformed 6061 aluminum frame keeps weight low—the claimed 1.55kg for the 17” size is competitive with many alloy race frames. The stiff Boost rear end ensures every watt goes into forward motion, not frame flex. Owners report that the frame feels “stiff and lively,” with direct power transfer that rewards hard pedaling.
For bikepacking, the frame includes multiple bottle cage mounts and internal routing options for a dropper post or rear light. The robust alloy construction shrugs off the rock strikes, luggage scrapes, and crashes that would punish a fragile carbon frame. Hardtail simplicity also means fewer pivot bearings to fail in remote backcountry.
For commuting, the MK7 Pro accepts rack and fender mounts (check compatibility), and the 29” wheels roll efficiently over potholes and curbs. The internal cable routing keeps the bike looking clean and protects cables from winter grime and theft attempts.
Singlespeed and Custom Builds
The MK7 Pro’s replaceable derailleur hanger and BSA threaded bottom bracket make it an ideal candidate for a singlespeed conversion. BSA 68/73mm bottom brackets are the most widely available standard, offering countless crankset options for custom builds. The frame’s aggressive geometry also shines when stripped down—no clutter, just a direct, analog connection to the trail. Owners call it “perfect for those who want a modern aluminum frame, ready to receive good components and ride without worries.”
Classic Appeal Meets Modern Standards
There‘s a reason aluminum hardtails have endured through decades of cycling trends. They belong to the tradition of **classic bicycle frames**: honest, durable, and endlessly adaptable. The MK7 Pro honors that legacy while embracing modern necessities like a UDH derailleur hanger (ready for SRAM’s newest Transmission drivetrains), internal cable routing, and tapered head tube. It’s a frame that respects where mountain biking came from while looking squarely toward the future.
Who Is This Frame For?
The MK7 Pro 17” frame (recommended for riders 5‘4″ to 5’9″) is the ideal platform for the rider who wants one bike to rule multiple disciplines. It’s for the XC racer on a budget, the bikepacker who values repairability over ultimate light weight, the commuter who wants a fun ride to work, and the tinkerer who wants a solid base for a singlespeed build. With its Boost 148mm spacing, modern geometry, and hydroformed 6061 aluminum construction, the MK7 Pro doesn‘t force you to choose. It’s one frame, ready for many rides.
You have a budget in hand and a long list of components. The classic dilemma: should you invest first in the frame, or pour your money into a top‑tier rear shock? Choose wrong, and you risk wasted budget or a bike that never feels balanced. The answer is clearer than you might think: frame first, shock second. The frame is the foundation; the shock adds the finishing touch. Frame geometry defines the bike‘s character—XC efficiency, trail composure, or enduro aggression—while the shock simply needs to match that platform. If your budget allows a quality frame to start, the disc brake bike frame MFM100 is an excellent starting point, built with the engineering priorities that align with your riding goals.
Why Frame First?
A rear shock is not a universal component. Its critical dimensions—eye‑to‑eye length and stroke—are dictated entirely by the frame. Choose a frame first, and you immediately know which shock sizes you need. Spec a shock before the frame and you risk incompatibility, wasted money, or a shock that simply won’t fit. The MFM100 simplifies this by defining clear shock parameters (165mm eye‑to‑eye, 40/45mm stroke), so you can focus on tuning rather than guesswork.
Air vs. Coil: The Decision After the Frame
Once the frame is locked in, choosing the rear shock becomes a focused decision. Air shocks are the standard for XC and light trail use. They are lightweight, tunable with a simple pump, and suit varied terrain. Coil shocks offer superior small‑bump sensitivity and traction, but add weight. With the MFM100’s efficient, climb‑oriented kinematics, an air shock is the recommended match for most riders—keeping weight low while preserving pedaling efficiency.
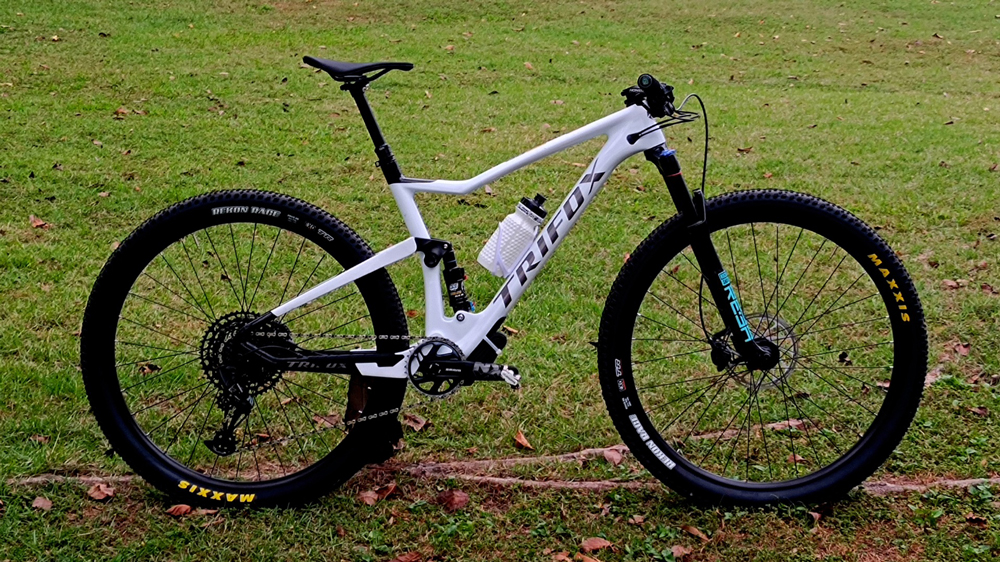
MFM100: A Smart Foundation
The MFM100 is a T800 carbon full‑suspension frame featuring Boost 148x12mm rear spacing, a threaded BSA bottom bracket, and a proven four‑bar linkage. For this frame, the recommended shock dimensions are 165mm eye‑to‑eye and 40mm or 45mm stroke. For XC and marathon use, consider a Rockshox SIDLuxe or Fox Float DPS. For more aggressive trail riding, the Fox Float X or Rockshox Super Deluxe provide additional support and control without overwhelming the frame‘s intended travel range.
Room for Taller Riders: The 19‑Inch Frame Option
The MFM100 is available in multiple sizes, including a 19 inch bike frame (size L). This larger geometry offers a roomy reach and taller stack, accommodating riders from 180–195cm. Choosing the correct size first ensures your future shock upgrades won’t be hindered by fitment issues—investing in the right frame size upfront saves costly adjustments later.
Smart Building Priorities: A Quick Checklist
1. Choose the frame that matches your terrain and fit (e.g., MFM100).
2. Confirm shock dimensions from the frame spec (165 x 40/45mm).
3. Select shock type (air for XC/trail, coil for heavier descending).
4. Check mounting hardware (bushings, bolts) to fit the frame.
5. Set sag and rebound based on rider weight and trail conditions.
By leading with the frame, you avoid compatibility traps and build a bike that performs as a cohesive system. The MFM100 provides a reliable, modern disc‑brake platform that makes the rest of your build straightforward. Start with the foundation—everything else will follow.
Carbon fiber frames have evolved dramatically over the past decade. Today, a truly modern carbon road bike is defined by three key standards: disc brakes, thru-axles, and tapered steerer tubes. The Trifox X10 carbon road bike frame embraces all three, delivering the performance, safety, and handling that today‘s riders expect. Here’s why each standard matters and how they work together on the X10.
Disc Brakes: All-Weather Stopping Power
The Trifox X10 is a dedicated disc brake frame, designed specifically for flat-mount calipers. Unlike rim brakes, disc brakes provide consistent stopping power regardless of weather conditions—wet roads, steep descents, or sudden obstacles. The flat-mount standard ensures a clean, integrated look with the frame’s aerodynamics. Disc brakes also allow wider tire clearance (the X10 accepts 700x25C tires, with compatibility for 28C), offering more comfort and grip without sacrificing the frame’s race-ready pedigree.
Thru-Axles: Stiffness and Precision
The X10 features 12x100mm front and 12x142mm rear thru-axles. Compared to traditional quick-releases, thru-axles thread directly into the frame, creating a much stiffer and more secure wheel-to-frame interface. This stiffness translates into sharper cornering, better tracking under hard braking, and zero disc rotor rub—a common nuisance on QR disc setups. The result is a bike that goes exactly where you point it, with no flex or hesitation. Thru-axles also make wheel installation consistent and repeatable, eliminating guesswork.
Tapered Steerer: Steering Confidence
The X10 employs a tapered 1-1/8” to 1-1/2” steerer tube. This wider lower diameter creates a dramatically stiffer interface between the fork and head tube compared to straight 1-1/8” steerers. The increased stiffness translates to more precise steering, less flex under hard cornering, and greater confidence on fast descents. For a carbon road bike frame disc brake, this is non‑negotiable for confident handling in all conditions.
Complete Integration: A Frame Built for Today
The X10 doesn’t stop at these three core features. It also includes full internal cable routing for a clean, aerodynamic profile, a threaded BSA BB68 bottom bracket for creak‑free reliability and easy maintenance, and progressive geometry across sizes from XS to XL. Crafted from T800 carbon fiber, it balances lightweight performance with the durability needed for all‑round use, making it a genuine contender for the best chinese aero frame value in its class. When combined with disc brakes, thru-axles, and a tapered steerer, the X10 delivers a complete platform that’s ready for fast group rides, gran fondos, and everything in between.
For years, mountain bikers believed you had to choose: an efficient climbing bike or a confident descending bike. A short-travel XC race machine would dance up climbs but leave you white-knuckled on steeps, while a long-travel bruiser could plow through anything but felt like pedaling a couch uphill. The compromise seemed inevitable — until modern carbon full‑suspension engineering changed the rules.
The Trifox MFM100 frameset is designed to deliver the best of both worlds. Whether you‘re chasing a podium in an XC race or enjoying an all‑day trail adventure, this T800 carbon platform proves you can have climbing efficiency and descending confidence in one bike.
Geometry: The Foundation of Versatility
A frame’s geometry determines how it responds to rider input. The MFM100 uses a carefully balanced 68.5° head tube angle and 74.7° seat tube angle — numbers that sit right in the sweet spot between XC urgency and trail stability.
The slightly slacker head angle (compared to traditional XC bikes) provides confidence on descents, keeping the front wheel planted and stable at speed. Meanwhile, the steeper effective seat tube angle places the rider directly over the bottom bracket for efficient power transfer on climbs. This combination creates a bike that climbs with authority and descends with composure — no compromises needed.
For riders in the market for a medium bike frame, the MFM100’s M size (17.5“) offers a 440mm seat tube and a generous 470.2mm reach, providing a spacious yet planted cockpit for riders from 170‑185cm. The proportional geometry across all four sizes (XS, S, M, L) ensures every rider gets the same balanced handling characteristics.
Suspension Kinematics: The Science of Simultaneous Efficiency
The real magic happens in the rear suspension. The MFM100 employs a Horst‑link four‑bar linkage, a proven design that separates pedaling forces from bump forces. The key is the anti-squat curve — a measure of how the suspension resists compressing under pedaling loads.
At the sag point (where the bike sits with a rider on board), the anti-squat is tuned high enough to resist pedal bob, keeping the bike stable and efficient during seated climbing. But deeper in the travel, the anti-squat tapers off, allowing the suspension to absorb impacts without harshness. Meanwhile, the anti-rise curve (which affects suspension behavior under braking) is tuned to keep the rear wheel active and glued to the trail even when you‘re grabbing anchors on a steep chute.
This sophisticated kinematics tuning is paired with a Trunnion‑mounted rear shock — a design that reduces friction and allows for a more linear, predictable suspension feel. The Trunnion mount eliminates long eyelets, saving weight and enabling cleaner frame lines, while improving small‑bump sensitivity for better traction on loose or choppy terrain.
Together, these design elements create a bike that climbs with the urgency of a hardtail (no wasted energy from pedal-induced bob) yet descends with the plushness and control of a bike with much more travel.
Carbon Construction: Where Stiffness Meets Compliance
Carbon fiber’s anisotropic nature is the final piece of the puzzle. Unlike aluminum, which has uniform stiffness in all directions, carbon allows engineers to orient fibers to be stiff exactly where needed and compliant exactly where desired.
In the MFM100’s T800 carbon layup, high‑modulus fibers are oriented along the downtube and chainstays to resist pedaling forces and prevent wasteful flex. Yet the same structure allows controlled flex in the seatstays, absorbing rear‑wheel impacts and reducing vibration transmitted to the rider. This selective stiffness is the reason a carbon full-suspension frame can feel both rigid under power and forgiving over rough ground.
The result is a frame that weighs just 2,235g (size M, including hardware) — impressively light for a full‑suspension chassis — yet provides the lateral rigidity needed for precise cornering and the vertical compliance that keeps you fresh hour after hour.
Boost Spacing and Modern Standards
The MFM100 fully embraces modern mountain bike standards. Boost 148x12mm rear spacing (with a 15x110mm fork interface) widens the hub flanges, creating a stiffer, stronger rear wheel that tracks more accurately through corners and resists flex under hard pedaling. Internal cable routing keeps the frame clean and protects hoses from trail debris.
Real‑World Rider Feedback
Riders who have built up the MFM100 consistently praise its balanced character. One owner noted the bike is “very fast and rigid … the suspension behaves very well, absorbing small irregularities in the terrain and it does not rock anything at all.” Another described it as “very reactive when you hit it with acceleration … the force you apply to the pedals goes directly to the wheels.” On descents, users report that the bike “tracks straight on steep, rocky runs” and stays composed under hard hits. This is the combination that makes a frame truly versatile: efficient power transfer for climbs and predictable, planted stability for descents.
Value: Premium Performance Without the Premium Price
Historically, a full‑carbon, full‑suspension frame with this level of engineering cost $2,000‑$3,000. The MFM100 disrupts that paradigm entirely. At just $899 (frequently on sale at $699‑$789 for certain sizes), it is a genuine best carbon frameset under 1000 — a full modern‑geometry, T800 carbon, Boost‑spaced chassis at a price normally reserved for high‑end aluminum frames.
To achieve this value, Trifox uses a direct‑to‑consumer model, eliminating retail markups. The result is a frame that punches well above its price class, offering the kind of balance between climbing and descending that typically requires spending two or three times as much.
Who Is This Frame For?
The MFM100 is the ideal platform for:
- Cross‑country racers who want efficient pedaling on climbs without sacrificing control on technical descents.
- Trail riders who cover varied terrain — climbs, descents, flow trails, and chunky sections — all in a single ride.
- Riders upgrading from an entry‑level hardtail, seeking the comfort and control of full suspension without a five‑figure investment.
- Value‑conscious builders who want a modern, capable, lightweight full‑suspension platform that won’t break the bank.
You no longer have to choose between a climbing bike and a descending bike. The Trifox MFM100 carbon full‑suspension frame proves that careful geometry, sophisticated suspension kinematics, and intelligent carbon layup can deliver the best of both worlds. It climbs with efficiency, descends with confidence, and offers exceptional value for riders who want a true one‑bike solution. Whether you‘re racing XC or exploring new trails, this frame is ready.
A great ride doesn’t happen by accident. It starts long before you hit the trailhead—with honest self-assessment, smart route planning, and a bike you trust. Whether you’re a first-timer or a seasoned rider, a little planning transforms a good day out into an unforgettable one. Here’s how to plan the perfect mountain bike ride, step by step.
Know Yourself: Fitness and Skills Come First
The most important part of planning any ride is being realistic about your current fitness and technical ability. If you’re new to the sport, start small. Choose well-marked trails with gentle slopes and avoid overly technical terrain that could lead to frustration or injury. There’s no shame in being a beginner—every experienced rider started exactly where you are now. For group rides, plan for the least experienced rider in the group. A ride is only as enjoyable as its most tired or struggling participant.
Choose Your Route with Intention
Once you’ve assessed your fitness, match your route to your goals. Are you training for endurance? Look for longer distances and significant elevation gain. Riding for fun with friends? Choose flowy singletrack that keeps everyone smiling. Digital tools make route discovery easier than ever. Apps like Komoot, Trailforks, Strava, and MTB Project offer trail maps, difficulty ratings, and user reviews that reveal trail conditions before you arrive. GPS devices are great for navigation, but always carry a backup—a physical map, a power bank, or both. Batteries die, but a paper map never runs out.
Check the Weather—Then Check It Again
Mountain weather can shift without warning. Before you head out, check wind speed, precipitation forecasts, and “feels like” temperature. Pay attention to daylight hours and always leave yourself slack. If conditions look questionable, remember: the trails will still be there tomorrow. And let someone know where you’re going and when you expect to be back. That simple act could save your life if something goes wrong. After your ride, text them to confirm you’re safe.
Your Bike: The Most Important Piece of Equipment
A well-maintained bike is your ticket to a trouble-free day. Before every ride, run through a quick pre-ride checklist: squeeze the brakes to feel lever travel, check tire pressure for both traction and puncture resistance, inspect your chain and derailleur for smooth shifting, and test your dropper post and suspension. For riders seeking a reliable, go-anywhere hardtail, the mens mountain bike SDY21 offers a full T800 carbon frame that soaks up trail chatter while remaining light and stiff for climbs. Its 12-speed range covers everything from steep ascents to fast flats, and internal cable routing keeps cables tidy and rattle-free on descents. Reviewers consistently note that the SDY21 “soaks up trail chatter and climbs like a dream,” making it an ideal companion for everything from short after-work loops to all-day backcountry explorations].
Pack Smart, Ride Lighter
The gear on your back matters as much as the bike under you. Essentials include: hydration (more than you think you’ll need), snacks for energy, a multi-tool with chain breaker, spare tube or plug kit, mini-pump, first-aid kit, and an emergency shelter or space blanket for remote rides. A helmet-mounted crash sensor (like those from Specialized or Tocsen) can alert emergency contacts if you crash while riding alone. And always carry a method of communication—fully charged phone and, in remote areas, a personal locator beacon.
On the Trail: Have a Plan B and Ride Smart
Even the best plans can unravel. Weather changes, a section of trail is blocked, or a rider tires unexpectedly. Professional guides always have a plan B—or even a plan C—in mind. Be willing to adapt. Turn around if conditions worsen. Walk a section you’re not confident riding. The goal is to finish the day safely, smiling. And always respect trail signage, yield to other users, and pack out everything you pack in.
The perfect ride isn’t about distance or speed. It’s about preparation, presence, and a little bit of adventure. Plan well, ride smart, and enjoy every moment on the trail.
Trail chatter is the mountain biker’s silent enemy. The constant high-frequency vibration from roots, rocks, and rough ground doesn‘t just make your hands sore—it accelerates muscle fatigue, blurs your focus, and compounds over every mile. Many riders assume that only suspension can solve this. But the frame material itself plays a profound role. A carbon frame like the Trifox SDY20 17.5 bike frame (available in 15″, 17″, and 19″ sizes) transforms the ride experience not just through low weight, but through its unique ability to absorb trail vibration while maintaining pedaling efficiency. Here’s how modern carbon engineering achieves what metal simply cannot.
From Metal to Composite: A Fundamental Difference
Aluminum is a crystalline metal uniform in all directions. When vibration energy enters an aluminum frame, it transmits as a sharp, undampened shockwave directly to the rider. Steel is more compliant but heavier. Carbon fiber, however, is a composite. Thousands of individual fibers embedded in an epoxy resin matrix create a structure that can be engineered with different properties in different directions. This anisotropy is the key to carbon‘s vibration-damping advantage. The resin matrix acts as a microscopic damping agent. When high-frequency vibration enters the layup, energy is dissipated as heat within the resin and between fiber layers rather than being transmitted onward.
The Layup: Where Comfort Is Engineered
The magic of carbon isn‘t just the material—it’s how the material is arranged. A carbon frame is built from dozens of thin sheets (plies) of carbon fiber impregnated with resin, each laid at a specific orientation. By controlling the layup schedule—the number of layers, their orientation, and where they are placed—engineers can tune stiffness in one direction while allowing compliance in another. High-modulus fibers laid along the downtube and chainstays resist pedaling forces for crisp power transfer. Yet the same structure can allow controlled flex in the seatstays to absorb rear-wheel impacts, reducing shock transmitted to the rider before it reaches the spine. One study found that carbon fiber‘s damping properties enable road‑shock absorption efficiency of up to 92%, with comfort improvements of 41% on rough sections compared to less-engineered alternatives.
Carbon vs. Aluminum: The Ride Feel Difference
Aluminum offers excellent stiffness and affordability, but it doesn‘t absorb vibration as effectively, which can result in a harsher ride. Aluminum transmits “trail buzz” directly, leaving your hands and arms to absorb the punishment. This leads to faster fatigue and more difficult line-holding on loose terrain. Carbon’s natural damping filters out high-frequency vibrations, keeping you fresher and more in control. The Trifox SDY20, built with T800 carbon, exemplifies this balance. T800 occupies a sweet spot between entry-level T700 and ultra-stiff premium fibers, offering excellent stiffness for pedaling efficiency while retaining enough vertical compliance for real‑world comfort.
What T800 Brings to the Trail
T800 carbon has a higher tensile modulus (stiffer) than T700, allowing frame designers to use less material to achieve the same stiffness—or build a stiffer frame at the same weight. This translates to immediate power transfer and responsive handling when accelerating or climbing. More importantly for trail riders, T800‘s balance means you don’t sacrifice comfort for performance. The material is neither so flexy as to feel vague nor so rigid as to be harsh. Professional analysis confirms that T800 often provides a better balance of stiffness and vertical compliance than higher-modulus fibers like T1000. For riders seeking a 17.5 bike frame that climbs efficiently yet stays comfortable over long days, this precise blend of properties makes a tangible difference. Not all T800 is equal—quality control in fiber layup and resin application is critical—and Trifox‘s attention to this detail ensures the SDY20’s layup delivers consistent, predictable damping.
Making It Yours: Custom Frame Painting
A carbon frame‘s performance core is the same whether it wears subtle livery or bold colors. But personalization matters. Trifox offers custom bicycle frame painting options, allowing you to choose from multiple colors (the SDY20 is available in finishes such as Red, Green, and Glossy black). Whether finishing a stealth race build or a standout trail bike, custom paint doesn’t affect the engineering—it reflects your identity without compromising the frame‘s vibration-damping layup.
The Long‑Ride Payoff
Over hours in the saddle, vibration isn’t a minor inconvenience—it‘s a performance limiter. Carbon’s ability to reduce transmitted vibration means less muscle tension, clearer vision, and better bike control, especially in technical sections where staying loose matters. The rigid front triangle keeps steering precise, while the rear stays can be tuned to absorb just enough chatter to keep the rear wheel planted. That‘s the real magic of a well-engineered carbon frame: you stop thinking about the bike and start flowing with the trail. The Trifox SDY20 proves that carbon’s advantage isn‘t just about grams on a scale—it’s about how the material makes you feel on mile 30, mile 50, and beyond.

Tire clearance is one of those numbers every frame manufacturer lists in their spec sheet — and one of those numbers that very few riders bother to actually test before the first muddy race day. The Trifox TRAIL II PRO carbon frameset lists a clean, confident 29 x 2.25″ as its official maximum tire size. But spec sheets don‘t account for real-world mud, clay, sticky loam, or the subtle way a tire’s profile expands at lower pressures. So we took this frame out of the catalog and put it into the conditions that matter: wet, cloggy mess.
The Official Number vs The Muddy Reality
On paper, 2.25 inches is respectable. That width sits right in the modern XC and light trail sweet spot, offering enough volume for traction and comfort while still rolling fast enough to hang with the race crowd. The TRAIL II PRO’s T800 carbon construction and sculpted chainstays provide a claimed maximum of 29 x 2.25″ clearance — no ambiguity, just a clean number on a spec sheet.
But the trails don‘t read spec sheets. Wet clay and decaying leaves don’t measure themselves against manufacturer tolerances before accumulating. When we pushed this frame into actual mud, a more nuanced picture emerged.
The Dry Condition Overachiever
Several owners have reported that in clean, dry conditions, the TRAIL II PRO can accommodate a 2.3″ tire without rubbing. The extra 0.05 inches (about 1.3 mm) of width is possible thanks to the frame’s generous chainstay and seatstay shaping. One reviewer even noted 74 mm of clearance between the chainstays — enough space that they planned to try a 2.4″ tire for dry, fast summer racing. That’s not just clearance; that’s versatility for riders who change tires by season.
Where Mud Changes the Equation
The key word, however, is clean.
When mud, clay, or sticky loam accumulates, the same 2.3″ tire that clears perfectly in dry conditions can start contacting the frame, especially near the seat tube bridge or the chainstay yoke. Mud doesn‘t compress. It builds. And with heavy, claggy conditions, even the official 2.25″ tire will demand caution. The TRAIL II PRO’s mud clearance is adequate for race‑day slop, but it’s not designed for deep, sticky clay expeditions.
This isn‘t a design flaw — it’s a design philosophy. The TRAIL II PRO is an XC full-suspension frame first. Its geometry prioritizes efficient pedaling, short chainstays (437–438mm), and a 67.5° head angle for planted but responsive handling. Mud clearance is a real consideration; the relatively wide chainstay bridge and sculpted seat tube help, and the UDH dropout with thru-axle keeps the wheel precisely aligned even under load. But if your local trails turn into peanut butter for half the year, you‘ll want to stick to the official 2.25″ maximum and run channel‑clearing tread patterns that self‑eject mud rather than packing it tight.
Why Real-World Testing Matters
For riders considering a best carbon frameset under 1000, the numbers on the spec sheet only tell part of the story. Yes, the TRAIL II PRO is built from T800 carbon, weighs 1660–1700g depending on size, and features Boost 148x12mm spacing, internal cable routing, and a threaded BB68. All of that is impressive on paper.
But the real value reveals itself when you’re three hours into a wet race, lapping through a mud bog, and your wheels keep spinning without the dreaded drag of tires rubbing against the frame. That’s when well-engineered clearance matters.
If you’re a taller rider running a bike frame 17 inch (the 17″ option fits riders 160–175 cm with a 430 mm seat tube), you’ll appreciate that the clearance scales with the frame size — the geometry is proportional, and the chainstay length remains consistent across sizes, so smaller frames don’t lose clearance to accommodate taller riders.
The Balanced Verdict
The Trifox TRAIL II PRO clears 2.25″ tires in all conditions without drama. In dry, dusty conditions or summer race days, you may be able to sneak a 2.3″ tire for extra grip and comfort. But for truly wet, cloggy trails — especially those that feature deep clay or sticky organic loam — the official 2.25″ maximum remains the safe and smart bet.
The spec sheet gives you a number. Wet trail testing gives you confidence. The TRAIL II PRO delivers honest clearance that matches its listed spec, with a little extra breathing room for dry days. That’s the kind of transparency that turns a best carbon frameset under 1000 into a frame you actually trust when the sky opens up and the mud starts flying.
There is a point in every builder’s journey when a box arrives. Inside, wrapped in foam and bubble wrap, is a carbon frame—a thing of sculpted beauty, ready to become someone’s pride. The question that lingers in that moment is: is this one built right? For the Trifox X11, the answer is shaped long before the box is sealed. Behind every one of these road bike frameset clearance creations stands a quality control process that runs from raw carbon fibre to final inspection. Here is how the X11 is built—consistently, reliably, and with the precision that defines a modern chinese carbon fiber frame at its best.
From Prepreg to Autoclave: The Layup Foundation
Every X11 begins as prepreg—carbon fibre fabric pre-impregnated with epoxy resin. The layup process is where the frame’s character starts. Sheets of T800 carbon are cut as plies and layered by hand in orientations that govern stiffness, compliance, and impact resistance. Some layers are placed at 0° to resist pedaling forces; others at 45° or 90° to manage torsional loads through corners. Each frame uses a specific sequence of plies, a recipe refined through finite element analysis to ensure the right balance of rigidity and vibration damping. This is not guesswork. The layup crew trains for weeks before touching a production frame, and each ply is positioned with a margin of error measured in millimeters, verified against laser-cut templates to ensure consistency part to part. After the plies are placed into the mold, the frame enters an autoclave—a pressurized oven where heat (typically 120–130°C) and pressure cure the resin, eliminating voids and bonding the layers into a homogeneous structure. This step is arguably the most critical in carbon frame manufacturing. Incomplete curing or trapped air can compromise strength, so autoclave cycles are logged and monitored for every production batch.
Finding the Invisible Flaws: Non‑Destructive Testing
Once a frame emerges from the autoclave, its true integrity must be verified without damaging it. This is where non-destructive testing enters the process. High-end carbon frame manufacturing employs **ultrasonic testing** to peer inside the carbon. High-frequency sound waves are passed through the laminate; reflections reveal delaminations, voids, or areas where plies failed to bond. This is the same inspection technology used in aerospace composite structures, and it catches flaws invisible to the naked eye. Advanced manufacturers—and those producing frames intended for international markets—also use **X‑ray computed tomography** and **thermography** to detect subsurface anomalies. For a frame like the X11, intended to withstand years of road vibration and occasional road hazards, this level of scrutiny is non‑negotiable.
Visual Inspection and Dimensional Precision
Before any frame leaves the production floor, it receives a thorough visual examination. Inspectors check for surface irregularities—pinholes, dry spots, or uneven clear coat—and also look inside bottom bracket shells and head tubes for signs of cured resin pooling or misaligned plies. The frame is then mounted on a geometry fixture to verify its alignment against the X11’s published specifications: head tube angle, bottom bracket drop, chainstay length, and rear dropout alignment. A frame that is misaligned by even a few millimeters can cause tracking problems and accelerated component wear. The X11 is also designed to carry a 2‑year warranty, a commitment that requires each frame to meet consistent standards across every batch.
Raw Materials and Supply Chain Accountability
Quality control begins long before the layup table. The X11 is built from **T800 carbon fibre**, a high‑modulus material known for its stiffness‑to‑weight ratio. But raw fibre is only as good as its source. Reputable manufacturers require certificates of analysis for each roll of carbon, verifying fibre density, resin content, and tensile strength. Incoming rolls are staged in climate‑controlled storage to prevent moisture absorption, which can compromise the resin during curing. The bottom bracket shell is machined to accept a **T47 threaded bottom bracket**—a standard chosen for its reliability, but one that requires precise machining to ensure proper bearing alignment. Every machined interface, from the headset cups to the brake mounts, is checked with calibrated gauges.
Real‑World Verification
Specifications alone do not build trust; real‑world performance does. Owners of Trifox carbon frames have noted that components fit precisely—bottom brackets thread cleanly, headset bearings seat without creaking, and wheels slot into dropouts without binding. They also point to the importance of the company’s responsiveness, with one reviewing the overall experience as efficient and reliable. While no manufacturing process is perfect, a systematic quality control protocol directly reduces the likelihood of defects and uneven bond lines. The X11’s **full internal cable routing** and integrated carbon handlebar are additional examples of complex features that rely on precise molding to ensure smooth housing paths. These details are not afterthoughts—they are designed and validated through the same quality framework that governs the frame’s structural elements.
Why Consistency Matters to You
Every time you climb out of the saddle, carve a descent, or ride through a rainstorm, you are testing your frame. What you hope not to discover is a variance from one frame to the next—a bottom bracket that creaks, a rear triangle that flexes more on one side, or a dropout that twists under load. Consistency is the quiet virtue of a mature supply chain. A frame that is built the same way, inspected with the same tools, and tested to the same standards, batch after batch, earns the right to be called reliable. The X11 represents that kind of engineering discipline: not flashy, not overstated, but built with the precision that lets a rider stop thinking about the frame and start enjoying the road.
For more details or to explore the X11 further, visit the product page linked below.
Road Bike Frameset Clearance Options
The Trifox X11 is available in multiple sizes to fit a wide range of riders: XS (49cm) for heights 155-168cm, S (52cm) for 165-178cm, M (54cm) for 175-188cm, and L (56cm) for 185-196cm. With a bare frame weight starting at just 965g and a full internal cable routing design, the X11 represents an uncompromising road bike frameset clearance choice for those seeking a high-performance carbon chassis without the premium price tag attached to bigger brand names. Its T47 bottom bracket and disc brake compatibility further ensure this frame remains current as component standards continue to evolve. For riders who have hesitated to invest in a chinese carbon fiber frame, the X11’s documented quality control provides the reassurance that this is a frame built to last.
Choose the X11, and you choose consistency—ride after ride, mile after mile.


